


Taron Foxworth: Hello, hello. It is now 1:02 PM. And welcome to the Losant Deeper Dive Webinar Series. Just to check in on things, Dylan, can you hear me okay?
Dylan Schuster: I hear you right. Can you hear me?
Taron: Yep. Awesome. Sweet. Yeah, I'm able to hear you. The Deeper Dive Series was designed to provide an in-depth overview of some of Losant's functionality. The goal is to give you all the tools and support you need while building in Losant. In this case, if you're looking to learn more about experiences and how to utilize them, this webinar is for you. If you're new and looking for an overview or a demo of Losant, feel free to reach out and we'll be happy to help you get that started. Speaking today, my name is Taron Foxworth. I also go by Fox. I'm the education leader at Losant. I work on things like our educational material and Losant University. And I will be functioning as your emcee for today's webinar. Speaking is Dylan. Dylan is our lead UX engineer. And he is the main presenter today to take us to the world of experiences. And last but not least, one of the benefits of the Deeper Dive Series is that you get access to our in-house experts. Brandon, he's really focused on the vision of our platform as our chief product officer. And he will be joining us for some Q&A at the end. And speaking of questions, Zoom has a really awesome Q&A feature at the bottom of the webinar window. Throughout the webinar, I'll be gathering your questions to get them to Brandon and Dylan so we can answer at the end. So, feel free to start throwing them whenever you have them. One thing to also keep in mind is that we will be recording this webinar for you. The benefit is that if someone on your team or colleague couldn't make it, you will be able to share that with them. And we'll have that replay available for you after the webinar. If you're new to Losant or just as a refresher, Losant is an application enablement platform designed for IoT. I really love those words, application enablement platform, because we give you the tools to create your own IoT products that you can then go and add value or sell to your customers. We divide our platform into components. We like to call these your building blocks. The building blocks support you all the way from the edge to bringing in additional data sources or tracking your devices within Losant, putting that information on the dashboard, reacting to it as it's coming in using our visual workflow engine. And last, but certainly not least, to help you build that custom-branded application for your customers. And that's where end-user experiences come in and the main focus of today's webinar. Losant is a leader in the smart environment and industrial spaces. Our tools are... We offer a wide variety of tools for our customers. And we have a wide variety of customers, all the way from startups to the Fortune 100 customers. And I think what's nice is that we get to take all of those learnings and expertise we have in the industry and put that in the platform and deliver that to you to add value to your applications. Now, Losant is just software. And what that means is that there are other parts of IoT stack in the IoT ecosystem in general. But IoT requires sensors, gateways, connectivities. Our technology partners are there to help fill that gap. Our solution partners are there to help you develop your own applications using Losant. And lastly, we have our strategic partners where we have a close relationship with these companies and share go-to-market and sell strategies. I highly recommend checking out our partner page to see if our partners can help you fill some of the gaps you need within your application. Now, on to the main event. Today, we're going to be talking about building an application within experiences. Now, I'm going to hand it over to Dylan Schuster. And he's going to take you through the main part of the content. I'm sure you're going to love it.
Dylan: Thank you very much, Fox. If you just want to throw the screen over to me and I'll pick it up from there. Once again, I'm Dylan Schuster, the lead UX engineer here at Losant. Let me just get my screen share going on here. We're going to talk about today that Fox touched on is building application experiences. Let's see. Here we go. Now, this is a topic... Fox, do you see my screen okay? Just want to check-in.
Taron: Yes.
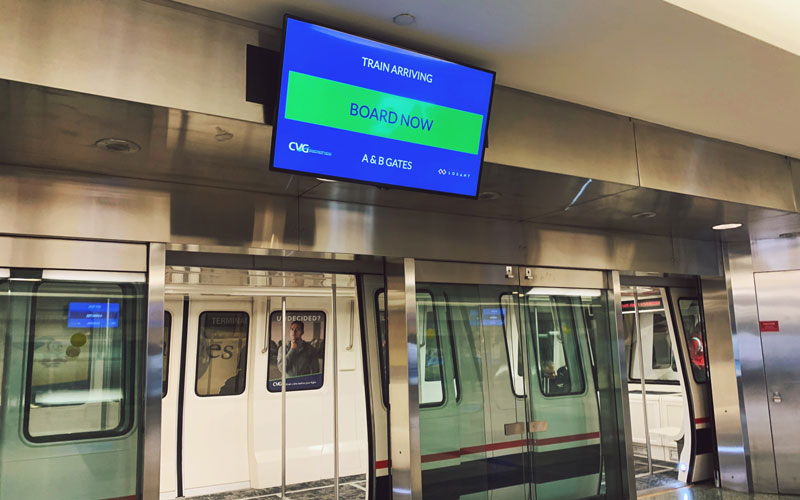
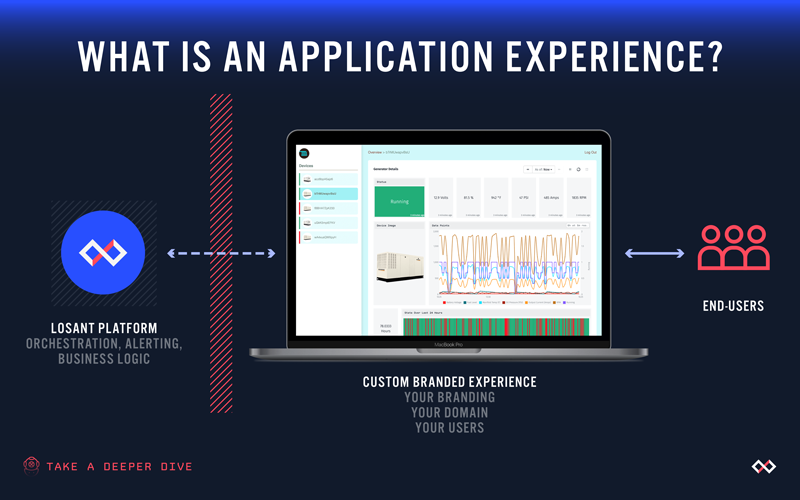
Dylan: Got it. Cool. Okay. This is a topic that comes up a lot in our forums, in our support requests, in pre-sales calls is what is an application experience? And how can I use these to my benefit inside of a Losant application? So, that's what we're going to cover today. First of all, as I just said, what exactly is an experience? I'll touch on that very briefly here at the beginning. The majority of where we're going to spend our time is actually building out an application experience, a very simple version of one just to kind of touch on a lot of the core concepts. And then at the end, we'll touch on some other resources that are available when you're building out your experience. And really, before we get started, Fox, you're the host of the webinar, I think you have the power to do this. I just wanted to put a quick poll out to those who are watching the webinar today just to get an idea of who we have here. You should be seeing a pop up on your screen right now. The answers to these questions... This is optional. But the answer to these questions may influence where we spend some of the more the nitty-gritty, the details on what we actually cover today. So, just the first question which describes you. And if you do, if you would identify yourself as an engineer, what sort of engineer would you call yourself? A web developer, hardware engineer, etc. Give you a couple minutes to go over that. And while you're looking over that poll, let's go ahead and move on to what is an application experience. So, taking a look at what you see on my screen right here, the application experience is an interface between your end-users over here on the right and the Losant platform here on the left. The experience living here in the middle. This is important to really drive home. This is your branding. It's your design, your logo, your domain. And then your end-users, these users over here belong to you and your application. They are not Losant users in the sense that if you're a current Losant user where you can access the platform. All they can access is what you build inside of your application experience. So, not only do you get your own custom branding to display to these end-users, but you have sort of a gate right here between a Losant platform, which is really your application, and the experience here in the middle. And you get to decide what information from your application you want to expose to these end-users, primarily through the workflow engine. You can only allow certain users to access certain devices as an example. You can build an entire multi-tenancy application where certain users have access to absolutely everything, but other ones only have access to devices specific to them, etc. And then, as far as like you can even let these end-users manipulate your application in certain ways via the power of the workflow engine, which we'll get into that a little bit further here in the presentation. So, this part in the middle here can take a number of different forms. The most common that we see is a traditional request response web application. So, one of your end-users fires up their web browser and they type in your domain, mygreatexperience.com, let's say. That request makes its way over to the Losant platform. And there, it is resolving down to your application and returning to your user a webpage that you've created for them to interact with. And again, that's the majority of the application experiences that our users are building today. This can actually take a couple of different forms, also. We can also build a full data API. So, instead of returning an actual webpage to a user, you can actually return just straight data, usually in JSON format, JavaScript Object Notation. You can use this to build a whole API. Like I said, we actually do this internally at Losant. We use a internal chat service called Slack. Many of you probably use it. And we actually use application experiences to build some apps and applications in Slack that allow us to interact with, for example, our conference room booking and office plans and things like that. If you're going to also build a mobile application, you're not going to host that interface inside of Losant, inside experience. But you do want to build the API calls that the application is going to make inside of application experiences. It's just going to be, again, simple data return instead of a full webpage. And then a third form would be a combination of the two where you actually do serve up web pages from application experiences inside of here just like you see, but you can also have asynchronous portions of your application that can, for example, load a list of devices over here after the entire page has loaded that would then call an API endpoint that you build that only returns data. And then the rendering gets put onto the web browser to actually turn that into a list. Most of our enterprise solutions are built in that style that I just described right there. Just a couple of examples of application experiences. If you've flown into the Greater Cincinnati Airport in the last couple of years, you may see these two screens that you see right here atop the train. There's a train that runs between the concourses at the airport. Losant actually put some sensors in the tunnels, kind of a retrofit to tell where the trains were and when they'd be arriving next. So, that information is conveyed up on these screens as well as some other helpful information about where these trains go, when to expect the next one to arrive, etc. And over on the right, Verizon's critical asset tracker. Just to reiterate what I mentioned before, this is a Verizon product branded for Verizon sold by Verizon to Verizon users. However, behind the scenes, all of the data that is powering this application is pointed to a Losant application that they maintain. Actually, this demo here was built by our internal solutions team. I know few of them are actually listening in on the call today. Just a shout out to you all, you did an outstanding job building this out. It's a really excellent use of application experiences. And if you're looking for something really... This enterprise is really high quality level like they've done here. I would recommend reaching out to your account rep and see how we can help you out with something like that. Okay. So, the primary building blocks of an application experience are what you see right here, an endpoint, a workflow, and a view. So, the way that these all interact together to return a custom brand of experience here to end-users, let's look at that very quickly. So, you have a user over here, and that user is making some request to your application experience that starts with an endpoint. This is going to be yourdomain.com slash some parameters on the rest of the URL. When that endpoint is hit, that is then going to trigger a workflow. And that workflow then can do a number of different things. It can query your application to find some additional data to return specific to that user. It can redirect unauthenticated users to other parts of your application. It kind of serves as like... For my web developers maybe on the call, this would be like the middleware, the application layer right here. Whereas the endpoints up here would be more of like the web server. There's a little bit of basic auth middleware built into endpoints also. But you can also handle a lot of that inside of your workflows down here. And then if you're going to build a traditional request response app, like I talked about before, that workflow is then going to return an HTML page down here as a view, which is then sent back to the user who made the request. Inside of this, this is going to be HTML handlebars to render out templates. That's actually rendered on the server, so that is not... So, we're only exposing the information in the view that you want to expose to the user who made the request. So, what are we going to build today? So, what you see right here is an out-of-the-box version of our asset tracker template. I did a webinar on this template, specifically a few weeks ago. You can create your own version of this template very easily inside of your Losant account. Just going to application...or Losant.com and create a new application. You'll find it inside of there. So, what you see here is the experience side of that application. And this is pretty typical for what we see most users building inside of an application experience. We've got here... But before we head to this... Before we got to this point, we had a login screen. I've since logged in. But once you log in, you have an overview dashboard in the main panel right here. That's what we have. This is five different devices traveling across the Midwest, logging additional telemetry data. And then over on the left right here is a list of all the devices I have access to inside of this application. And if I click on one of these devices, this then takes me into a detailed dashboard that is specific to the device I have selected. Choosing a different device, of course, then gives me different... Well, the same dashboard really but with different information populating all of the widgets that you see inside here. So, what we're going to do is what I have here is that same asset tracker template. I cloned this application a couple weeks ago at this point, but what I've done is I've removed all of the experience portions of the application. Now, this mirrors a little more closely to where you could expect to begin building an experience. We have in our hands a mature application that's been running for some time. We already have some dashboards built. They've got our workflows chugging along. We've got our devices configured. And now we're ready to expose all of this information to our end users. Now, what we ultimately end up with building is not going to look exactly like this template you see right here. There's a lot of custom branding and custom CSS, Cascading Style Sheets, the language that is responsible for making the web look the way it looks. We're going to forgo a little bit of that today in favor of using an out-of-the-box CSS framework, which if you are not an experienced web developer, I would highly recommend you continue going down that route. The benefits there, I'll show you in a couple minutes. But in order to get started here... Again, this is a just a regular old Losant application, where I remove the experience portions of it. I'm going to come down here and click on the link down to my experience section of the navigation. And the first time I come here, I'm going to get this modal that you see right here, this is going to give me the option of building out my experience with some starter resources. Now, you may ultimately not end up using any of these resources in your application. I do still recommend you actually go through this path and build your application with these sort of layouts and routes. You're going to get a login route out of it immediately as well as some other examples of other resources that we'll get to over here in a second. I'm just going to copy this to a safe place. We also do create one experience user as part of the bootstrapping process, so that you can actually test signed in versus signed out users. I am going to recommend, of course, that you, at the very least, change this user's password because the password is the same as what you see in the email address here, which is what we do to make it easier to test with. At the very least, change that password or most likely you're going to want to delete this user before you actually take this application live. Okay. So, what did that create for us? Down the left column right here, you see we've got series endpoints, some workflows, and then some... These are the views here, pages, layouts, and components. And I'll do a little bit of a deeper dive on these over the course of this conversation today. Just want to touch on very quickly here, we'll start with the login endpoint. Now, everything in an application experience starts with an endpoint. This is the beginning of every interaction that your user is going to have with your Losant application by making a request to an endpoint. In this particular case, this one I've opened here is a GET request to the /login endpoint. Now, this is typical for just about any web application. You have a route where a user can enter their email address and password to sign in and authenticate against your application, which they can then use that authentication to make additional requests against your app. So, as I mentioned before, there's a little bit of access control middleware built automatically into the endpoints, which is what you see right here. This route, I want to be available to all public users. And then, how do I actually want to reply to that route? If you're just going to return a page, like an about page, a terms and conditions page, something like that, very easy to bypass the workflow engine and just choose a page to return here. Or we can also redirect to a different path if you want to. This case, we're going to use a workflow to reply. And we're going to do a dive into that really quickly here. So, after I have created all of these resources, you see up here in the top right corner, I've got a URL where I can view my work. Let's open that up. And this is what we get out of the box. It's custom, this branding for this fictional company we created called kanarra. We've got a login page that I get redirected to because I'm not signed in. Again, though my Losant user is signed in, what we're talking about here is an experience application... Excuse me, an application experience user, not the same thing. And I'm just going to open the workflow before we go any further here. So, this workflow here is responsible for replying to any requests made to either my GET /login endpoint, which is the one we touched on before, or my POST /login endpoint, which is the same route but a different HTTP method. Just a quick note on what GET and POST actually mean. The vast, vast, vast majority of the requests you make as you are browsing the web, if you're typing a URL and clicking a link, anything like that is what's called a GET request. I just want you to retrieve this resource for me. GET requests should be repeatable without changing the state of the application. And like I said, most requests you make around the web are going to be a GET request. POST is more used for submitting information to your application, especially sensitive information such as a username and password in our case. So, just to follow along with this here, I'm just going to refresh this page. And let's see what happens in our workflow. Here's a debug log. This maps to the requests I just made. This was a GET request to /login. You see right here. First check it makes is, "Am I currently signed in? If I am currently signed in..." And you'll see this behavior across most applications on the web. If somebody tries to go to the sign in page or the create account page as they're signed in, we don't want to let them do that. We're just going to redirect them to our home route. What you see down here, all four of these nodes are called endpoint reply nodes. You'll find them down here in the palette. Given a request, put some nodes in the middle, issue a reply. So, the path I just described right here, which is if a logged in user tries to come to a login page, let's just redirect them to our home page. Now, let's see what happens when I make a POST request. I have my email that I copied up here. The first thing I'm going to do is going to put in an incorrect password. I'm just going to type in some stuff here. I'm going to hit sign in. And let's follow along with our workflow. Let's just go back here and see. Of course, authentication failed. My email or password is incorrect. If I look at that request, this was a POST request to /login. Again, because the user submitted credentials, they submitted information up to the application. They're not logged in. Down here, the next check is whether or not this is a GET request or a POST request. So, when I made the original request to the webpage just to view the page, you can see it was not a POST request. And what I did instead was I rendered the login page down here. I just want to render my login page. As far as POST request goes, let's take the email and the password that the user submitted. And let's use an authenticate node to see if those match up against an experience user I have configured in my application. If login fails, which is what just happened as I demonstrated, let's take them right back to the login page. And we're also going to provide some additional data to say that the login failed. And we can go ahead and return them the email address also, which allows us to pre-populate that field that they entered right there. Now, when login succeeds, now I've been redirected to my application home. So, let's look at that request, how that happened. As you see, looking at the authenticate node here, it takes the true path meaning that the email and password that the user provided do match up to one of my experience users. And let's also take the token. So, this authenticate node is also going to generate a token that the user can then use to send up with additional requests, so they don't keep logging in with every request that goes to the application. And we're going to set that as a cookie in their browser. And then every request they make thereafter to my application is going to include that token. And now, they can navigate the app as they're a signed in user. And then, of course, what I did is I am redirecting to my home page. Okay. And I guess while I'm here, let's go ahead and demonstrate also the last path, which is if I were to type in...if I try to go to /login, it's going to redirect me right back here. That's what I touched on before. A GET request to a user who's already signed in, let's just send them right back to the home page. Okay. So, let's get started building out, just generally, this layout in our application experience. So, if we go back into our experience edit screen, let's see, first thing we want to do is create an endpoint where our devices can live. So, we built this endpoint wizard up here to really help users along with the interplay in between endpoints, workflows, and pages. I create an endpoint using this wizard. What do I want to do with this endpoint? Well, what I want to do is display a page that renders a dashboard for all my devices. So, I'm going to render and display an experience page. Next thing I'm going to do is configure the method and the route. This is going to be a GET request to /devices. I do want to create a new experience page for this. I'm going to call this one overview dashboard. And I want to also choose to render this inside of the layout that was generated when I bootstrap the experience. Since I'm just returning a patient now, I don't actually need to run a workflow. So, let's just say no workflow is required. This is a static experience page. So, when a request is made to /devices, just turn around and return me that same page. I only want to allow authenticated users to see this page. So, we're just going to leave that setting alone. We could open it up to everybody if we wanted to by clicking the all public users option. We'll just leave it in the authenticated user. And then, if somebody were to try to access this page who was not authenticated, what should we do with them? Let's just redirect them back to my login page. Take a look. Everything in here looks good. It's going to create those resources for me. And then, let's do the same thing for my detail page and display an experience page. Now, this time, my method and route... Pay attention to this part right here, deviceid. Now, if you'll notice, I put deviceid inside of these brackets, opening curly brace, closing curly brace. This here represents a variable in my path. So, given a request to /devices/ something that goes inside of here. Whatever we put inside of this spot here in the URL is going to trigger this endpoint. Same as before, we're going to create a new page. We'll call this one our detail dashboard. And same, we want to lay out. We do not need a workflow. This is going to be a static page. Again, any authenticated user then, again, redirect my users who have not signed into login. There we go. Okay, let's go check and see where we are. /devices, which is the endpoint I created. And then this is what you see down here is just the standard output when generating a page using the endpoint wizard. It just spit out the payload that is available to it, so that you can use this on building things out. So, that's working. And then /device/, as I said, something, anything, I get the same thing. Okay, that's obviously not what we want. So, how do we get dashboards to display inside of these ones? So, I created these two pages, the overview dashboard that you see down here under pages. Again, when a request is made, a GET request, to /devices, we configured it to return the overview dashboard page that you see right here. And this is the markup that's currently inside of that page that we just saw. Instead of that, I want to render one of my Losant dashboards. Now, this is pretty cool. We can actually take a dashboard we've configured in our application and now expose it to our experience users. In this case, I want to do the overview dashboard. And then for the detail dashboard, let's do the same thing except in that case, we, of course, want to render the detail dashboard. And now, let's check in. All right. Here's our overview dashboard rendered inside of this domain /devices. And now, if I come back into here very quickly, and let's go grab one of my device IDs and put that on the end. Here's my detail dashboard. Let's try a different device ID. Well, almost, that's the same dashboard. While it is paying attention to whether or not there is a value in this slot in the URL, it's not actually doing anything useful with that data. So, what we need to do now is take this input from the URL that the user has given us, in which this maps to a device ID, and display the correct dashboard data to the user. Well, the way we accomplish that in the dashboard is through dashboard context. Now, if you've gotten this far building out in that Losant application, you've probably come across dashboard context already. The way this works is that all of these blocks are configured to display information from a variable. And that variable's value is one of my applications device IDs. So, for example, if I switch this to tracker four, you see the view changes that all these are now tied to a different device. So, how do I get that information into my application experience? Let's come back into our detail dashboard page. You'll see down here, we actually have the ability to set our context variables that are passed into this dashboard. We can set them specifically manually, or we can also put variables inside of there. So, if I come back into this detail dashboard, I'm just going to refresh it really quick so that I can get an entry in my render log over here. So, this is going to put an entry in here for every single time that this page renders as I'm looking at it. If I look under request.params.deviceid, I see the value that I had put right here. So, what I want to do then is request.params.deviceid. I'm going to save. Let's come back here and let's refresh. And now, our detail dashboard is displaying the information specific to this value I have in my path parameter up here that I have designated as my device ID in the endpoint. What's nice is that when doing this as a dashboard page, there's a little bit of validation already built in there. If I just put in some garbage in the slot, it's still going to resolve to the same endpoint even though that's not a valid device ID. The dashboard will take care of blocking the user from seeing anything in that case. Okay. So, let's back up a little bit. Here I am at /devices. If we compare this to what we have here, well, one thing we're certainly missing still is this left column. So, our end users don't exactly have a list of device IDs that are available to them when they're going to come and type the 24 character alphanumeric ID into this URL. We need to give them some way of clicking around to get to the various devices that are available to them. And the way to do that is to add this left column. Well, unfortunately, the context in which these pages are being rendered right now is not available to them. What devices are available to that user, what devices should be in that column. So, we're going to have to make some edits here in order to get that experience that we want. So, how can I do that? Well, the first thing we'll do is let's come back into our endpoint for GET devices. We're not going to get away with just rendering a static experience page anymore. We're going to have to use a workflow engine to reply. And the same is also going to be true for our detail route right here. We're going to have to use a workflow engine now. And while we're here, one thing that I didn't really touch on is that we are treating /devices as our homepage. So, you see how it redirects me to /devices. Let's do the same thing in our application here. For our home route, what I really want is the main home of my application to be the devices endpoint. Instead of rendering that homepage, let's just redirect to /devices. Nothing too fancy there if I just come back here and do that. The reason it's broken at the moment is because I removed that static reply from the endpoint. We're going to add it back in. So, it's okay. We expect it to be broken at this point. Let's go ahead and build our workflow to fix that reply. We'll just call this our dashboard workflow. All right. We want to trigger this workflow. This workflow is going to be responsible for applying to two different endpoints, one of which being our devices overview, another one being our device detail endpoint. Okay. And the reason we're doing this is because we need to expose to the rendering engine a list of devices to put in that left column. So, how can we get that list of devices? Let's use here a device get node. We're going to attach both of these here. And what I want to do is find devices by a tag query. Now, in this particular application, all of the devices that I want to expose, in my experience, have a device tag with a key of simid. Now, the value is different for every device. That's okay. We're going to leave it like this. Any device that has a simid tag regardless of its value is what I want to return to my users now. Let's sort them by name ascending. I want to return multiple devices. Just an array of results is fine. Down here, let's go ahead and include a couple of additional attributes. I'll go ahead and use those in rendering. We'll do the shipment ID. And we'll also do the location. So, you can choose to return all attribute data associated with these devices in the request. You can return no attribute data. Or you can only expose certain attributes, which is what I've done right here. And now, let's put the result at pageData.devices. This pageData, this can be anything you want. But this pageData is a convention for what we actually call the payload path in the rendering engines, which is why I like to use that right here. Okay. What's next? We need a conditional node. Just like we did in our login workflow, we need to know the difference between this request and this request because, for one, we are returning the detail dashboard. The other one, we're returning the overview dashboard. The easiest way to figure that out is knowing whether or not... Well, let's do this real quick. Is whether or not this parameter exists on the URL, data.params.deviceid. I'll look at the sample payload right here, data.params. I'll have a device ID right here in my actual request. If that exists, I know I'm looking at a detail page versus an overview page. And I touched on this also in the login workflow. We've got the endpoint reply right here. What I want to return is an experience page. And I want to return the detail dashboard. This layout override, I'm going to leave alone. We want to use the default one that is set here on the detail dashboard. Just a note on that, you can do some pretty cool stuff with this if you wanted to host the same experience for multiple domains inside of your application if you wanted to, for myadomain.com have a dark header and no left nav, but mybdomain.com have a red header and a sidebar. You could accomplish some pretty cool stuff there with using this layout override property. That's going to be a discussion for a different day. So, we'll leave that alone for now. The additional data we want to expose to the rendering engine, it's going to be found that the payload path of pageData. And then everything else I can leave alone here. So, again, we're going to reply with a detail dashboard, with this additional page data when a request is made to my detail endpoint. I'm going to copy and paste that and drop it over here down the false path for my conditional. The false path means that my request came for the overview dashboard. Everything else stays the same. The only difference is I am rendering instead the overview dashboard here. And now, I'm just going to drop a debug node on the end. It's always a good idea to finish your workflow one to the debug node. Let's go ahead and save that. So, let's try this again. Okay. So, now we're right back where we started, rendering out the overview dashboard. I still don't have my left column. But if I come into the render log from my overview dashboard, and I'm going to refresh that again. PageData.devices, and here's my list of devices as promised. So, now we just have to actually do something with that list of devices. So, how are we going to do that? Let's go ahead and create a component. A component is just a special type of experience view. This is one that you would expect to reuse multiple times inside of one page, inside of a layout. You can even write them recursively to use them inside of the same component if you're careful. I'm going to call this one deviceList. And what do I actually want to render inside of here? Well, as I mentioned when we first kicked off this application experience, we're using a CSS framework that is going to take care of a lot of the basic styling inside of this application. That framework is called Bootstrap. This is built by Twitter. Yes, that Twitter. This is a CSS framework that takes care of a lot of the responsive grids and things. If I want to one third column layout next to a two third column, but I want them to collapse into one single column at mobile sizes, that's all handled inside of here. If you want to have a standard buttons style across your applications. I want green buttons for my submit forms but I want red buttons for my delete, all of that kind of stuff is handled inside of this framework. And that is what we give you out of the box when you start a new application experience. You can get rid of it if you want to. You can use a completely different version if you want to. There's a whole bunch of these CSS frameworks out there. This one is just extremely popular. And it's one we chose at the time. And it's also very easy to work with. All of that is to say... For my list of devices, let's find something that'll work. I got this list group component right here. This looks pretty good. Just copy this. So, this will be our devices in our application. I'm going to just copy this markup. And I'm going to drop it here for now. We'll come back in a minute and actually populate our device data inside of here. Let's create the component. Back to our dashboard, nothing's changed. Still haven't actually used that component we created. But let's go. Where can we actually drop this component? Let's see. Probably the easiest place to do it is inside of our layout. So, our layout... What is a layout you may be asking. A layout should be all of the... I'll call it the chrome, the header, the footer, the common stylesheets, meta tags, your HTML tag, your body tag, all that stuff, that is you want to render on pretty much every page. Every single request that comes in, all of these components should be there with every request. So, what you see down here, this helper right here, this page, this is a handlebar helper that Losant wrote for application experiences that takes whatever experience page I am rendering and this is where drops it wherever I put this helper inside of my layout. So, in the case of my overview and detail dashboards, this is where my dashboard is going to live. It's going to get dropped right here. When the server request request is made to the server, this helper is going to be replaced with the content to make that dashboard render. And how do I get that side by side layout that I'm getting right here with a list of devices and a dashboard over here that's going to expand to the width of my browser screen? Let's go back to our friend, Bootstrap, and see what they have for us. So, they have a whole grid system here for building different columns at different sizes. That also, of course, collapse down to different layouts at different sizes as your browser expands and contracts. I have it copied here in my notes. I'm just going to grab this and drop it in to my layout. So, what you see here, what I just dropped in, is compiled from the Bootstrap documentation. I have a fluid container. It takes up my entire width. It's a base 12 grid system. That small screen sizes, I want to render that new device list component that I just built inside of here in the left column. And in the main column, we need to render my page and let's save. And now, let's take a look. All right. Got a left column, doesn't have our actual links in it yet. We've got our overview column... Or excuse me, overview dashboard over here. So, let's go back into that device list component and actually put the correct data inside of there. So, if I render it... Let me just do that. Let me just render that again. There we go. Render log. Once again, pageData about devices, so that's what we're going to work on here. This is a wrap around the component that gives it that border and gives it the styles that apply to the children inside of it. What I want to do is loop over all of the devices that are available to me and spit out a link. So, how do I do that? Well, I have over here also the documentation for handlebars. This is an HTML rendering framework, a template, I guess you'd call like a template engine, minimal template on steroids. There it is right there. I'm not going to go too deep into this. I do recommend you check out this documentation. There's a lot of core concepts in here that you're going to come across as you're building out your experience. Suffice it to say that what I want to do is loop over the devices that are available to me right here. So, how do I do that in handlebars? They have a helper called an each helper, which just creates a loop. So, for each of these items in pageData.devices, I'm going to do the following that concurs inside of this helper. Let's grab this link right here. The context that is available to me as I'm rendering each of these out is under a variable called this. What I want to do is change... So, this is the URL that the user is going to be navigated to when they click on this link. It's going to be /devices/this.id. So, here's one device. And I'm going to do this for each of the devices inside of here. And there's my ID. This is what's going in, that's deviceid placeholder, a variable in my experience endpoint, /devices/this.id. And right here, let's put in this .name. So, now there's the name of my device. Let's just go a step further here. I'm not going to put the battery icon in for now. But we can at least put some additional information about each of these devices inside of that list. So, the first of these two lines right here, let's drop in the tracker's current location. Where do I find that? That's going to be this.compositestate.location.value. Following this path down here, this.compositestate.location.value. And then let's also drop the ship ID, shipment ID. Okay. Now, I'm going to put out a link for each of the devices over here. Let's also add... This will be ugly for now. But just so we have a way of getting back to our overview page, just put a link underneath it back to devices. There's one last thing we need to do. The bootstrap framework also included this active class that changes the color of the list item depending if whether or not it is selected so the user can kind of tell where they are in your application. Right now, we're just rendering that all the time. We, of course, don't want that. We only want to render that when the user is looking at, of course, this particular iteration of...this device and the iteration on the page. So, how can we know when to apply this active class? Well, looking again at our render log over here, it's pretty easy to determine if we compare using what's called an equal helper, equal. And again, this is just from the handlebars documentation. We're going to compare this.id to request.params.deviceid. So, if the ID of this iteration is equal to the device ID on the request... Let's spit out that active class and see where we're at. Okay. So, I'm on the overview dashboard right now. Names of my devices, their current locations, their shipment IDs, and then a link back to all devices, which is where I am at the moment. If I click on one of these... I did forget one thing there. In handlebars, in order to get back up to my global scope... So, right now I'm inside of a loop. I need to get all the way back up to my global scope. I need to compare this ID to root.request.params.device. Let's try that again. There we go. So, we're pretty close. We've got a detail dashboard specific to each of these devices. We've got some information about each device on the left-hand column right here. We've got a link back to all our devices. Just one last thing we need to do. And to demonstrate that very quickly, I'm going to log out. And look what's happened. My login form is now scrunched over here. And I have this empty block over here. The all devices listed there. And I probably also actually have the markup for the list, but there's nothing inside of it because I did not put any kind of condition in my layout to only render that two-column layout if my user is signed in. I don't want to render that if they're not signed in. I don't have anything to display to them yet over here or rather, I don't want to display anything to them yet over here. So, let's go back into our layout and we'll fix that. One thing that is always available to me when I render a page, and I'm not going to see it when I do it this time because I'm not signed in, is my experience.user, which is currently null. I don't have a user at the moment because I'm not signed in. But if I do have an experience user, that is when I want to render what you see right here. So, let's just put an if helper in here. If I have an experience... Excuse me, experience.user, I want to render my two-column layout. When I don't, which I'm going to call the else case, let's just keep rendering the page like we were before, just the page. Let's close the statement. There we go. Now, our column is gone. We've got our individual form left. One last thing I'll do very quickly just to demonstrate its possibilities is I'm just going to build an API endpoint that just returns straight JSON data. So, let's do that really quick. Instead of returning a page, I'm going to return data for an API. Let's just call this... I'm going to prefix this with /api/devices. This'll be a GET request. Let's configure the workflow. I want a new workflow for this. I'm going to leave the name the same. And then again, any authenticated user. In the case of building an API endpoint, you don't have a place to redirect them when the request fails. So, we skip that step. It's going to create my endpoint. It's going to create my workflow. And this will be a very quick inside of here. We're just going to do the same thing we did with the device get node. Drop it on here. Match all tags query, simid, return multiple devices. And let's just return all attribute data for now. And put the result at pageData... Let's put that at just working.devices. And then in my endpoint reply, instead of returning a page, I want to return a custom data at a payload path of working.devices. We'll leave this down here, the application, JSON. And then if I open up a new browser window, let's do this, /api/devices. This is going to fail for now because I'm not signed in. Rather than signing in again, let's just change the endpoint to expose it to all users for the moment. And here's my list of devices. Well, I added additional attributes but the same data that's exposed to the rendering engine. Okay. So, that is a flyby of how to build out a typical application experience. So, we've touched on components, layouts, endpoints being the starting point here, the workflow engine, and how it can add additional data to those endpoint requests and even change the nature of the response. I'm just going to go through the rest of these very quickly since we are pressed for time. We're about 4 minutes shy of the top of 2 o'clock Eastern Time. When you build out an application experience, I also mentioned that you do get access to your own users that you see right here. And this one was created with Bootstrap, the experience. Once again, these are your users. These are not Losant's users, they're your users tied to your application. You can also organize these users into experience groups. This one, of course, already a member. I'm not going to touch on that too much here as far as the reasons for using groups in a multi-tenancy model. Brandon in his industrial equipment webinar does a great job of touching on the subject. If this is the kind of application you're looking to build, I highly, highly recommend go check out that webinar. The replay is available online. You'll learn a whole lot about how you can build that multi-tenancy experience inside of your Losant application. Files is a place where you can store static resources that you're going to be using in your experience. These could be JavaScript files, Cascading Style Sheets, images such as logos. They can be PDFs that are available for download. These are available here. You can drop them in here and make them available inside your experience. I also mentioned that you can configure your own domain or your application experience. Now, that includes with SSL. There's some instructions in the documentation for how to do that. If you have a domain and you want to point it to your experience, I would recommend just go check out the documentation for that. If you don't have your own domain but want some custom branding, you can also do an experience slug, which gives you a partially customized URL. Now, these need to be unique across the entire Losant platform. I'm just going to put one in real quick, Dylans-webinar.onlosant.com pointing in to my developed version. And then if I were to come back here and change this to Dylans-webinar.onlosant.com, I get the same thing. And then finally, versions, I didn't touch on them much but they are extremely important. When you work on an application experience and you are ready to make it live to your end-users, you're not going to want them to continue to interact with the experience as you are making changes to it. So, you really want to snapshot it at a certain moment in time. And that's what you're going to expose to your users. So, what you want to do there is create a version and call it... You can do semantic versioning example v1.0.0. And the following domains should point to that version, we'll say, Dylans-webinar.omlosant.com. What that allows you to do is continue to develop your experience on one domain, but all of your users are interacting with this domain down here. So, that the changes you make in this version, your developer version, are not breaking or otherwise changing the experience now from under your users who are actually using your production application. Now, if you ever need to make changes to this, you can always copy this back to your develop version and make your changes there. That is about all I have. We're right at 2 o'clock. I know we have a bunch of questions. We typically stop at the top of the hour. We can stick around for a little bit, answer some of these questions here because this is a very broad topic. We got a lot of really good questions. Fox, I think I'll just turn it back over to you now. And we can go from there.
Taron: Yeah. So, before I hop in and answer some questions. Dylan, are you able to see my screen? Everything look good?
Dylan: I got it.
Taron: Sweet. So, before I hit with questions, what's next? Where can you learn more for the learning? First, the Losant documentation, so no feature in Losant gets released without documentation. There's a couple walkthroughs for experiences. And there's a lot of good documentation on experiences. And that's a really good place to get information. The forums, if you have any questions along the way, feel free to reach out in the forums. The Education team is there to support you while you're building your application. Also, Losant University. So, right now, Losant University is a learning tool for you to get up to speed of Losant quickly. There is an experience course there. So, if you want to dig in more to what Dylan was talking about, you can do that within Losant University. And there's some courses on versioning and some of the other more advanced topics that Dylan was referring to. And lastly, hands-on tutorials and our blog, there's just a ton of information there ready for you to consume about, not only Losant experiences but also IoT in general. And last but not least, we also have a new webinar coming up. It's called Learning IoT in Losant. It's hosted by yours truly if you're looking for more information on how to get your team up to speed with Losant as fast as possible or just in general how to understand the path of learning Losant and the path of learning IoT and how you could use that, not only to develop more use cases within your application but also educate your team or even customers on IoT. I think it's going to be a great conversation about learning Losant and IoT. And now, it is time for questions. I'm going to answer some questions. Like Dylan mentioned, we are a little bit over time. If you don't have time to stick around, we make sure we post the questions right after the webinar. But if you do, we'll love to answer more of your questions as you go along. So, to kick things off, Dylan, the first question that we have is, is it possible to customize individual blocks of the dashboard using CSS, HTML, and JavaScript?
Dylan: It is possible to some degree. Now, there is not an interface within Losant itself to drop in some CSS and apply it to my dashboard. However, when rendering an experience page, the dashboard is rendered into the scope of the rest of the web page. So, if you're a web developer and you know how to use your browser's inspector tool to really dive in and find the right CSS selector, and I've seen a number of including our internal solutions team do this, you can write some style rules that will, for example, change the title bar background color for each of your dashboard blocks to a different color or change its font or change the background of the page, the background of the blocks. I'm trying to be very careful here about recommending that approach because yes, it works but we don't guarantee that those selectors will not change over time. It's not like a public API that we will do our best to announce breaking changes to those things before they come. But you make those CSS changes at your own peril. Now, it hasn't been an issue yet. I don't expect it to be an issue, just to be clear. But however, it is a possibility that something would change on the Losant side that would not necessarily play nicely with the CSS changes you have made in your dashboard.
Taron: Thank you, Dylan, for answering that. The next question is a really good one. So, as you're building your experiences, you talked about the pages and building API's and dashboards. But if I had custom CSS and JavaScript, where do I put that?
Dylan: Yeah, I touched on that briefly. It depends on the nature of the CSS and JavaScript that you intend or what do you expect it to be and how it lives over time. So, if it's something that's never going to change, like for example, if you want to serve jQuery or some CSS... Or I'm sorry, some JavaScript framework or some CSS framework that you're never going to edit, you'd probably want to put that inside of your application files. It's going to be cached much more aggressively. Then you can reference those files inside of your layouts, inside of your pages. If this is something that you're going to edit frequently over time, you may be better off... We have a couple options. Number one, you can put additional versions of those CSS and JavaScript files up on application files with unique names that tie back to your versions and make sure represented correctly. Or you can put it all inline in your layout, not only your layout but also inside of your pages or components. And when you do that, then it's going to be versioned along with the rest of your application. So, when you make changes to your JavaScript inside of that page, when you snapshot that and publish a new version, the previous versions are going to remain intact. I guess that is a very good point to make is that the files inside an application experience are not versioned along with your endpoints, workflows, and views. Just to say that again, they are not versioned with the workflows, endpoints, and views. So, if you change... If you have one logo file and you change that logo file in your application files, that's going to change across all of your published versions anywhere you're referencing that logo. Unless you have, of course... The solution there would be multiple logos scoped to the multiple versions that you have.
Taron: The last question I have for you, and then I have a couple for Brandon. Is it possible to restart building experiences? So, if I already started and I want to start from where you are, what's the best way to do that? I was thinking templates may be the best thing, but I was wondering if you had any other recommendations?
Dylan: So, if I understand the question is if you have an application experience built but you want to blow it away and start from scratch, is that correct?
Taron: Yeah.
Dylan: Okay. I touched on this at the very, very end there. And maybe I already answered this question. But using experience versions would be the best way to do that. So, what I would do is you don't want to lose all that work. So, at the very least, take wherever you're leaving off, create a version. You don't have to point a domain or anything to it, but you at least have it for posterity. So, you can go back and get it later if you need to. Create a version, drop that off somewhere. And then inside of the develop version of your application experience, you can do whatever you want. You can delete all the files. You can extend the current ones. You can change the CSS, whatever it is you want to do. But experience versions are certainly the answer to that. And we are pretty aggressive when it comes to making sure that you are versioning your experience before making any kind of destructive changes, such as copying a previously published version back to develop so that you can edit that. You'll actually get a modal in between that says, "Hey, before you do this, do you want to take what's currently undeveloped and publish it to a new version?" So, I think that is certainly the way I would go, to answer that. Oh, and then one other thing I guess I could also mention. It depends on what... Starting with the bootstrap version that we had before. There's only a handful resources. I can go through and delete them very quickly. But there is under the application info section, where you would edit your application name and things like that, there's a place where you can bulk delete a number of resources included in there being application resources. You can go through that list, check all the boxes of the ones you want to delete. And then, in fact, that's how I did it for preparing for this webinar. I cloned the application. I went into the new cloned application, and I deleted all those resources in that.
Taron: Yeah, that will also work as well. The next question I have is for Brandon. So, Brandon, is it possible to log details about the experience user, details like their access level and like the timestamp of their actions within my application?
Brandon Cannaday: Yeah, yeah. That's a really good question. So, the place to do that would be in the workflows that are handling all of those user actions. So, like Dylan showed when the user is requesting the overview or the device details, endpoint, in workflow handles. In those workflows, it was just gathering a list of devices to display. However, if that workflow was handling an action, so something like maybe change the device name through post, it's not unusual to then log that activity. And I would probably recommend a data table. You have to be careful. Data tables do have limits. So, want to be careful on what you log and how often you log data tables. If you just continuously log forever, they will grow and grow and eventually hit that limit. So, you might want to combine that with some kind of daily or weekly workflow on a timer that goes back and maybe deletes those old log entries that maybe aren't relevant anymore, maybe they're 90 days old, 180 days old, or whatever. But yeah, just to kind of recap that succinctly, I would recommend adding a entry to a data table in every workflow where that login is critical for you.
Taron: I would agree. I think that's a great solution. The last question, I think this is the last one. Then, we'll wrap up after this. And this for you, Brandon. I think where do you see the future of experiences going? We have a wide variety and some really good toolsets now. But what does the future look like?
Brandon: Yeah. So, what experiences are today is really a foundation on which really any kind of web interface either an API or a web page can be built. And the reason we do webinars like this and are producing a lot of training material is because the platform is so flexible on the types of applications being built, the tools can be a little bit too powerful at times. And with that amount of flexibility comes some complexity. So, as we move forward, we've laid down this really nice groundwork, this foundation on which we can build upon. We're going to start layering on, kind of I named it or I stole the term from the internet, called syntactic sugar, so we can layer on more high productivity features on top of this foundation we've already created. And you'll likely see that materialize first with a catalog lot of pre-built components. So, as Dylan showed, he built up a device list from scratch. That's a really common visual component we see in a lot of applications. That's something we can just provide for you. So, instead of having to build it from scratch every time, you can take a pre-existing implementation and just tweak it to your needs. So, you saw that with our application templates that we released a few months ago. And now, we're going to start offering up kind of pre-existing bundles of functionality. That way, you don't have to start from scratch over and over again. So, I think that's going to really boost productivity for those areas where we find a lot of people doing very similar things like, "I need a form. I need a device list," or whatever it might be. We're collecting that information now, so we can kind of deliver those reusable things right back to you.
Taron: Thank you so much, Brandon. To all of our wonderful people who stuck around in the audience, as I mentioned, these questions we'll post them in the Losant forums here after the webinar. But I really want to appreciate you taking the time with us today. I hope it was very insightful. We would love your feedback. Let us know what you think overall in the Losant forums or reach out in our contact form to begin a discussion. Until next time, stay connected.