


Heath Blandford: Hey, everyone. I hope everyone is doing well today. Again, my name is Heath, your host for this Deeper Dive Webinar. Again, thank you all for being here. I couldn't be more excited to be talking with all of you today and sharing this new feature from Losant. Today, we're going to be taking a Deeper Dive into a new edge offering from Losant — the Losant Embedded Edge Agent. Today, we've got a couple different speakers with me. Again, my name is Heath. I’m joined today by Brandon Cannaday, our Chief Product Officer and Anthony Canterbury, our Lead Backend Engineer. Before I go any further, I do want to let you know that we are recording this webinar. That's so we can provide the replay available to you in a few different ways. After this webinar, we're going to send you an email with the link to the replay and the recording will also be made available on Losant's YouTube page as well as our Deeper Dive page on our website. Now, we love hearing your questions so I would like to point out a few key features in the Zoom conference. You can use the Q&A feature or the chat feature to post questions. I myself will be monitoring those throughout our time together. Then at the end, I’ll moderate a Q&A session with Brandon and Anthony with those posted questions. Let's do a quick review of Losant and our Enterprise IoT platform. Losant is an industry-leading IoT platform. As an application enablement platform, Losant provides enterprises with the building blocks they need to create their own IoT products. The Losant platform consists of five key components to help customers achieve that. First, End-user Experiences. End-user Experiences allow you to build a fully functional web interface that lets your users interact with your connected devices. Then we have a Visual Workflow Engine. It's the low-code brains of your connected solution. It's how you trigger email notifications, create events, send commands to connected devices and much more. Next, Data Visualization, which also allows integration with Jupyter Notebooks, which allows you and your end-users to see what your connected devices are up to. Then we have Devices and Data Sources. This allows you to create a digital twin of your devices in the field as well as integrate with other services that have the data you care about. Today, we're going to talk about Edge Compute which is a suite of functionality that enables you to execute business logic right at the Edge. Our customers and partners utilize all five of these components to create the robust IoT products that they put in front of their end-users. Losant is a leader in the industrial, telecommunications and smart environment spaces and we've offered this platform for all sorts of customers ranging from startups to companies in the Fortune 100. If you're interested in learning, more please reach out and we would be happy to set up some time for a much more in-depth conversation about how Losant can help you deliver a connected solution. Now, while Losant does provide the software foundation for IoT, we surrounded ourselves with a great ecosystem of partners that helped create this IoT solution. This includes strategic partners that we share go-to-market strategies with, solution partners who work with us and you to develop your end-to-end IoT solution and technology partners that provide the hardware connectivity and other services to round out your IoT solution. Again, I couldn't be more excited to have you all here today. I’m going to pass this virtual mic to Brandon to get us started on this Deeper Dive. Again, as you have questions, please do not hesitate to ask them using that Q&A and chat feature and I’ll be sure to jot those down so we can get to that in our Q&A session. Brandon, over to you.
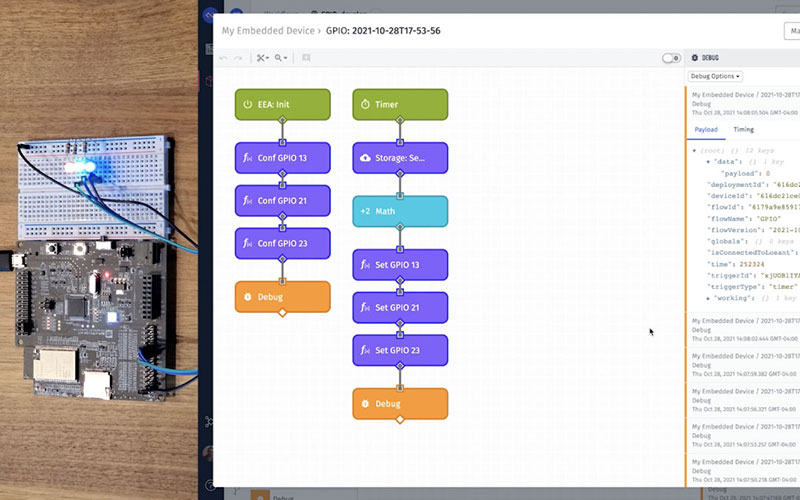
Brandon Cannaday: Thanks, Heath. Yeah, once again, my name is Brandon Cannaday. I’m the Chief Product Officer here at Losant. I’m going to be walking through one of our newest offerings called the Embedded Edge Agent. It really augments our existing Edge compute functionality in pretty exciting new ways. I’m going to cover two main areas here. I’m going to cover what it is and a lot of the use cases and then I’m going to take a fairly technical deep dive into some of the code that is required. I know it's a low-code offering but there's a little bit of code that you're still responsible for when it comes to the Embedded Edge Agent. Let's first talk about what it is. The Embedded Edge Agent brings our low-code Visual Workflow Engine, it's been there since day one, and takes it to much smaller and resource constrained devices and devices so small that they may not even have an operating system. That's I’m going to show a little bit later. This is quite a bit different than the Edge Agent you might be familiar with, the gateway Edge Agent that runs on kind of those full Linux capable gateways with the Lynx operating system, plenty of memory, plenty of hard drive space. There were a lot of examples where customers needed, they really wanted that low code environment but on much, much smaller devices. Getting into the use cases, getting past what it is and let's talk about why it exists. I bucket the use cases into two kind of primary opportunities here. The first is for new product development. If you're a manufacturer or the creator of new devices or sensors or controllers that's going to include new firmware, the EEA could be a really good fit, a good opportunity to include the runtime into the firmware, directly into the device and it adds the speed and agility of a low-code environment into something that's traditionally quite hard to update, requires code, requires OTA. The other primary bucket of use cases is for off-the-shelf or existing gateways and controllers that may offer what's called programmable application space. This is different from the gateways that run the full gateway Edge Agent in that those are just general-purpose gateways. You can run any software. There's a lot of gateways out there and controllers out there that do a specific or solve a specific problem but they do offer a little bit of programmability. Usually, you have very limited amount of memory and disk space to use and the Gateway Edge Agent won't fit there. They're programmable in a lot of different languages from Java to Python. The EEA can fit and run in a lot of those environments. Really add some low-code ability to augment and extend some of these off-the-shelf gateways. That's the two primary use cases that this fits. I want to dig a little bit deeper into kind of that new product development. This is where I think the EEA really shines and can really add a lot of value based on what you might be creating. The example I want to show here is an industrial controller. Every piece of equipment out there has a controller and it has firmware in it. If you're out there, an organization about to create a new controller, it's a really good time to think about — well, what additional technology can I add to that controller's firmware to make it more future-proof, provide the ability to extend and augment its functionality after it's delivered? The main reason to do that is when you ship a new device or controller, it's really rare that the firmware that you put on there solves all problems for the entire life of that controller. You will constantly get feedback from customers demanding, "Oh, I’d like to do this, this slight tweak." What you've determined in your lab or testing environment may not be the same when the equipment gets out into the field. You're likely to make revisions to that and the EEA makes those changes very fast and simple to do even for non-developers. I’ve got a couple examples here of common changes that we would see after the equipment's been handed to a customer and out in the field for a while. The first one is certainly the changing telemetry data that's collected. In an IoT solution, we're seeing a lot of controllers starting to be revved to think about reporting telemetry data up into the cloud environment or maybe to another gateway if it's inside a facility. You don't often know exactly what telemetry data is required. You kind of make a starting point based on the best information you have and you may want to add some telemetry data. Maybe you're collecting too much and you find — well, we don't need to send these center readings because they don't have any value to the customer and they're just consuming bandwidth. The other one is updating control algorithms. The primary purpose of a controller is certainly to control the equipment. So, it's taking sensor information, it's taking inputs, the throttle, oxygen levels, whatever it might be and it is running that through control algorithms to then feedback and control the equipment. Especially with the rise of AI, we're seeing some complicated algorithms that get pushed to these devices. You may not have these algorithms until you've got thousands of these in the field and you're collecting this data then you might find an algorithm that you want to apply back to that control. Maybe it's for safety or efficiency. Changing those in a traditional way, an OTA update can be time-consuming and difficult for your customers. And then the last is adding new capabilities. We're seeing a trend of hardware vendors shifting to what's called software-defined functionality. Inside this controller, inside this equipment is a lot of different data. There's a lot of functionality available and you might discover — oh, there's a new feature we can ship without changing the hardware. It's just using the hardware in a different way solves a unique and novel problem. Let's add that capability. Let's ship that out and then the customers get new value with the same hardware. This is just kind of one example to be thinking about. It's always been possible to do these things but what the EEA really does is make these changes much easier to do in that drag and drop visual way versus reapproaching your firmware developers or a lot of times, you've outsourced development to a firmware agency. Pulling them back in and doing firmware changes. You really want to get that power into your hands and your operator's hands to make those changes. This has been a strategy for ours for a long time. Our low-code Visual Workflow Engine is kind of the heart of Losant. It's the brains of every IoT solution built on Losant and we've been constantly pushing down the stack providing this environment for smaller and smaller devices in different use cases. With this, we've kind of completed our technology stack of low-code. We're going to constantly add new capability, new features, new nodes. One of our core values as a product team is to continually push new features and new capability to our existing customer base and certainly new customers. Really, with this release, we've got workflows starting at the embedded, down the small devices. We've got the Edge workflows for the gateway that we've had for many years. Then we switch into the cloud we've got application workflows for alerting notifications, perhaps protocol transformations and then we've got the experience workflow. That is the business logic that controls the actual customer interface. When customers are interacting with these devices and data, they can trigger these experience workflows to handle those requests. Before I get into now, how does it work, cover the what and why a little bit, let's get into how. But how I want to do this is we'll start with a demo. What I’m showing here is an ESP32. The Rover kit. This is a really nice development kit, really cost effective. The ESP32 is a really popular board. It's in a lot of production devices. It's a Wi-fi and Bluetooth module. It's also great for kind of your proof-of-concept and development work when you're experimenting with what might be required in my device and my hardware and they've got these nice kits that around it. This is a great example of a constrained device. These have no operating system. They're very small, very low power. The Rover kit has four megabytes of memory. We find that the EEA requires a couple megs of memory and less to make it safe kind of work in any kind of workflow you're working with. First, let's dive into Losant and kind of check out what this device looks like in the platform. If I go into the device itself, you'll see it looks like any other device. The device class is embedded. As part of this release, there is a new device class marking this device is the ability to run Embedded Workflows. Beyond that, attributes and tags work just the same. I’ve got a few attributes here. I’ll show the workflow in a minute but what this workflow is doing is controlling and then reporting some GPIO. Showing how an embedded workflow works with those really low-level peripherals in this case, general-purpose input/output that's available on these modules. And then the debug panel on the left over here. The right over here, you'll see some data coming in. Let me pause that. You see it's reporting some state and the value of these GPIO inputs and outputs. You'll see it's warning with an invalid time but that's just because I’m running a embedded device that has no concept of time. It really highlights the portability of these Embedded Workflows. If you've ever done kind of firmware development on something small, you'll know a lot of them don't have real-time clocks. They don't know what time it is. We've made the cloud and everything support that capability. You just parse in time since it booted and it will work. Now, the cloud here is kind of complaining about this, that zero is an invalid time. That's okay. Zero is interpreted, is ignored by the cloud and it will time stamp it by the platform for when that data point was received. Let's jump over to the workflow. I’m going to dive into this a lot deeper but for now, what's happening is I’ve got a timer and every five seconds, I’m controlling these GPIO, these three GPIOs. I’m just toggling them on and off essentially by incrementing a storage value and then modding it by two. That's just going to give me a number between zero and one over and over again. Let's open the debug window for this device. We'll see some data coming in. My timer is for every five seconds so we'll see some... There's a payload right there. And then I also have a live window of this thing going on. I can wave my hand in here. You can see I’m not cheating. But every five seconds, it's going to turn these three LEDs on by essentially, writing a one to the GPIO or writing a zero to the GPIO. The first thing I want to show is some of that agility. Every five seconds is a little bit slow. The first thing I’m going to do is speed that up. Let's go back to the workflow, make a change. I’m just going to make one quick change of the timer. Say — well, blink it every two seconds. Let's save. We'll deploy. If you are familiar with Losant Edge Compute offering, if you've used the Gateway Edge Agent, all of this looks familiar. We made it work as close as we could between the two different runtimes, two different agents so you have that familiar interface. I’m going to version it and I’m going to deploy it to my embedded device. Let's go ahead and hit deploy. Now, this will take just a few seconds to deploy. While this is deploying, let's dive back into some technicals. Figure out what is happening behind the scenes. When I click deploy there, what's happening is it's taking that workflow for all workflows targeting that device and compiling them to a WebAssembly module. This makes Losant's Embedded Edge Agent one of the world's first, might be the world's first low-code WebAssembly development environment. You might be thinking — WebAssembly and saying, "Well, that's for the web. That makes no sense for a device." But whereas WebAssembly was originally targeted for the web, what it ended up being was a really nice fast and portable assembly environment. You can compile WebAssembly and run it pretty much anywhere. What I’m highlighting here is just a subset of runtimes. Here, I’ve got four of them. I’m actually using Wasm3 in my example. It's written in C. It works on a lot of embedded devices. These runtimes support a ton of different languages. I mentioned at the very beginning, there is some code you're responsible for. Really, the majority of it is implementing the runtime. You're responsible for the code required to get a runtime working then our platform compiles the workflows into a completely normal standard WebAssembly module and then pushes that to your devices and then that's executed by these runtimes. There are runtime supported in basically every language you might be comfortable with. Because of that, it's supported on basically any operating system — Windows, Linux, FreeRTOS and Zephyr aren't necessarily what you think of as traditional operating systems but I’m using FreeRTOS in my example and then you've got none. You don't actually need an operating system at all to run several of these. If you've just got a control loop, a lot of these runtimes are completely portable C++ and you can run it right on something like an ST chip. Coming back to the workflow, this has successfully deployed. You can see a little, you got a green check mark saying, you know. We waited, it deployed. It takes maybe 15 seconds to compile and deploy. I can go ahead and click the live look again. It'll bring up the debug. You can see these are now coming in at every two seconds. If I bring up the live window again, we can see the blinking is slightly faster at every two seconds. That's a really simple way for changing on the fly. I wanted my device to blink faster but blinking LEDs aren't that useful. Let's make another change where we can control the LEDs from the cloud and in this case, from a dashboard. What I’m going to do there's a go click Make Changes. I’m going to come back here into this workflow and I’m going to replace the timer with a device command trigger. You'll see the palette, the node palette is a little bit different on Embedded Workflows. You don't get every node that's supported by Cloud and Edge but we've started with a really good set and like I said earlier, we're going to be constantly adding new nodes. Let's go ahead and remove these top three nodes. We'll add the device command. This node will trigger anytime a device command is received by the device. We're going to do a quick conditional because we want to make sure... We could be getting different devices or different commands. We want to make sure we are checking for the right command. In this case, the command's name is setvalue. Just like before, the payload of the command will just be a one or a zero. I’m sending the set value command with the payload set to one or zero. So, I can directly connect it to the rest of the logic here and it'll work just like it did before. Let's go ahead and save, deploy that. We got another couple seconds to wait and let's dive a little bit deeper into how this actually works. What I’m going to reveal next after this works and I show the GPIO being controlled by command is like how does the WebAssembly module talk to the GPIO. WebAssembly is completely portable. It doesn't really know what device it's running on. It doesn't know how to talk to the GPIO of your specific device. What we've had to do is we've created what's called the EEA API. That defines a standard for WebAssembly imports and exports. Imports and exports are the way a WebAssembly module can communicate with your native code, with the code that implements the runtime. That's the code that you're responsible for. You're responsible for implementing the runtime and then implementing all of the required imports and exports for the EEA to talk to things like GPIO or accelerometers or even the internet. If you are using MQTT, your native code is what includes the MQTT client. We do document the MQTT specification for — well, when you deploy a new workflow, this is the topic it's going to deploy to and you can accept that WebAssembly module, publish directly if you're MQTT, and then push it into the runtime. These imports and exports are what are used to communicate with the device itself. In order to send the command, we have a device input block that can send commands to devices. If I go in here... If you're not familiar with the input control block, it allows you to add any number of controls and with those controls, you can add some buttons and a button is what will take action when that control is clicked. In this case I’ve got the toggle, which lets me turn the GPIO on and off. When that is clicked or when the submit button is clicked, it sends a command to the EEA device called set value. Here's a nice little pro tip — the payload that you send does support templates. In this case, value up here, the variable value is going to be a Boolean true or false but my device is expecting a one or a zero. I can use a little template here and say — if value we send one is the payload. Else, turn zero as the payload. This is the block that's sending that command. That lets me invoke these commands to turn these LEDs on and off. Let's get into a little bit of the GPIO here itself or the ability to invoke functions defined in native code. What I’ve got here is what's called a Registered Function node. The Registered Function node allows workflows to invoke functions defined in your native code. This is the primary way, a very important way and a very important concept to understand for working with the Embedded Edge Agent. In this case, I am invoking a function named gpio_setlevel and I’m parsing it two parameters. I’m parsing it the index of the GPIO I would like to set and then I'm parsing into value. In this case from data.payload, one or a zero. Let's look a little bit at the code that's required to do that, the Registered Function GPIO. All of these are defined in the Embedded Edge Agent API. From a developer's perspective, when you are sitting down to write that firmware, this is a very important... This is a critical document it defines all of the built-in or default imports and exports, all the stuff the engine requires and then all of this stuff that custom wish. This is the registered function API. This is my specific WebAssembly runtime. I’m using wasm3. How you register functions or basically import functions into a WebAssembly module will be different based on whatever module you're using but they're all very similar. In this case, when I want to invoke gpio_setlevel, what's actually going to happen it's going to look for an import named EEA FN gpio_setlevel. We added the prefix on here just to keep things safe. If you happen to import a function that conflicts with other functions that might be imported, we added this prefix. You don't have to put the prefix on here, the EEA prefix, but when you turn around and register that function or import that function in code, you'll add that prefix to it. What this function is doing is directly wrapping underlying capability. This is a really important concept to think about when you're defining or designing your registered functions. I could have created a function that says gpio_setlevel4_input18. That function can only do one thing. You can only set the level 4 input 18. What I did instead was created a function that takes the two inputs, takes the pin to set and then takes the level of value to set that pin too. What it does, it just invokes the underlying API call. So, I switch to that. Here I am in the ESP documentation. If I want to change the GPIO for something on ESP, this is the function I call. This is the driver that they provide. Just like what I’m doing, it takes a GPIO pin number and it also takes the level. By registering one function, I am able now to completely control all GPIO from the workflow. This is a really convenient way to think about how do I design my registered functions. Really, these are providing that middleware, that kind of drive our system to expose underlying native functionality into the workflow. Very important functions to think about. If we switch here to a little bit more difficult registered function. This is a different workflow. This is reading accelerometer data. And yes, Embedded Edge devices can run multiple workflows. In this case, I’m running two. In this example, I am asking for 1024 signed integers. You can see it over here in the debug panel, I’m getting 1024 integers. The reason I’m doing this just because I’m doing vibration analysis. I could do like a loop. I could add a loop and then under each loop, I could invoke a registered function to read just one accelerometer reading but I need fairly real-time control over this because vibration analysis requires a fairly consistent time between readings. I want to send that command basically into the native code where I have real-time control over reading the high frequency data. I need these data points at roughly one millisecond apart so I can subsequently parse this into FFT and get an accurate analysis. If you want to do FFT stuff and want to learn more about that, I want to draw your attention to this how-to guide. How-to guides, you'll find them over here in their documentation. This is currently the bottom one in the list. You'll find it there. This goes through how to use Embedded Agent to do the FFT analysis. This runs on a Raspberry Pi and uses a Python WebAssembly runtime. If you're kind of new to this, you may not want to step directly into the embedded code. That can be a little much. This is a nice walk-through or a guide for doing this on a Raspberry Pi with Python. Let's talk a little bit about what's going on behind the scenes. One of the challenges with WebAssembly and that interface to communicate between WebAssembly and your native code is that it only supports a few data types. If I come back here, let's scroll up to this diagram. Sending data into WebAssembly or exporting data from WebAssembly, if you look at the WebAssembly spec, you get numerical types. That's it. Some integers, some floating point numbers, that's it. I’m asking for an array of numbers that's not any of those. What has to happen is we have to switch to pointers. The WebAssembly has to allocate a chunk of memory and give it to the native code and says —well, here's a chunk of memory big enough to hold the array of numbers that you would like to give me. Please fill this buffer of data and then give it back so. If I go in a little bit down into the again, the Embedded Edge Agent API document, scroll down to the registered functions output. Let me click on this output here. Just to remind everyone, I’ve got one output. This has no inputs. I’m not sending any information into the native code. I’m just requesting the name of code output information. What I’m asking for is a signed integer array of no bigger than 1024 items. When that comes back, I’m going to put it on the workflow at vibration so you can see all those data points here. If we go to the spec, this is really helpful kind of understanding how outputs, complex outputs map to a registered function. Come down here and click Outputs. Draw your attention to what happens if you do a string or array or JSON? JSON and string are very similar. You might think a string is a pretty simple type but a string is really just a buffer of characters. It's treated just like an array of numbers. It's a complex data type. When you want to output one of these values, what's going to happen is your code is going to be given three arguments from the EEA. It's going to be given that pre-allocated buffer. The EEA, what it's going to do, it's going to look again at your input and say — well, I need enough space to hold 1024 integers and integers are 4 bytes. So, you get 4096 bytes worth of buffer. It's going to allocate that. It's going to be empty and it's going to give you a pointer to it and say — here, please fill this buffer. And then it's going to give you the length of that buffer either in, if it's string, you'll get it in bytes. If it's an array, it'll just give you the length in elements, basically how many numbers can this hold. This is for balance checking in your native code. It's really important to do balance checking everywhere. This is pretty low-level stuff. When you're talking about raw buffers, your native code needs to check — well, how big was the buffer I just got, to make sure it doesn't do what's called buffer overflow and accidentally write too much data. Because your workflow may say — well, I expected 512 elements. It invoked the registered function but there might be a mismatch. The registered function may attempt to put 1024 elements in there and then start overriding some probably really important memory and will cause usually some really interesting and hard to debug crashes of the application. You get the pre-allocated buffer, you get how big that buffer is and then it provides you another pointer, a small pointer, just enough to hold an unsigned 32-bit number. So, again, four bytes. You need to fill that buffer with one number and that is the number of elements you wrote. Because even though you told the EEA — I want a buffer big enough to hold 1024 elements, you're not required to fill it. On arrays, it's probably likely you'll fill the whole thing but on strings, strings are often dynamic. You don't really know what the length of the string is going to be every single time. What you'll put in that field is the largest possible string. If you're invoking a registered function, it can return string between 10 characters or 10 bytes and 200 bytes. You'll put 200 bytes in there. Guarantees your buffer is always big enough to hold every type of string that you'll receive and then what you send back is how much you actually wrote to that. That allows the EEA then to parse that string appropriately, add it to the workflow appropriately. Let's check how that looks in code. This is what's happening. This 32-bit array, these are the outputs that I just showed earlier that expands into these three input arguments. I get the buffer to fill. I get the length of that buffer and then I get another pointer that I’m supposed to write how much data I write to that buffer. Here, I’m actually reading the vibration data. So, looping 1024. Vibration data is usually one axis on an accelerometer. In this case, just the x-axis and then I am copying that to the readings array. So, reading, copying it and then I’m delaying one millisecond. This is where the native code gets a little more real-time control over how far apart those readings are. And then when I’m finally done, here is where I’m copying that 1024, the number of elements I wrote to that buffer here. You'll see a lot of cases in the EEA API and registered functions where pointers are involved. I really wanted to spend a moment on that to talk about why that is. Just to reiterate that one more time, it's because this interface between the native code and the WebAssembly module is really restricted on what types of data it can directly send. As soon as we get to complex stuff like strings and arrays, the EEA inside the WebAssembly module takes care of allocating the memory and then passes a pointer to that memory out to your native code to fill and populate. A quick pro tip here, you might see this debug output looks a little different than you've seen. It's only got one property. If I click the debug node, I specified that property here. Now, when it comes to cloud and the Gateway Edge Agent, this isn't that critical. When it comes to embedded, this is very critical to think about. Embedded environments are very memory constrained and when you hit a debug node, it is creating a JSON a string representation of the workflow and it's invoking a native function through the EEA API. I actually showed that. It's called Send Message. This is another area to really emphasize how sandbox and isolated a WebAssembly module is. It doesn't know how to talk to the internet, doesn't know how to talk MQTT. It can't talk to system resources. It has no external dependencies. So, whenever the EEA when your workflow wants to send a message to Losant, it invokes this imported function called Send Message. Here, it parses some pointers, it sends a pointer to the topic, how many bytes the topic is and the whole payload. If your workflow is growing and you call Send Message, you can all of a sudden, consume a lot of information. That's 1024 integers, all serialized to JSON. In my testing, it was around 5 or 6k. When you get into these resource-constrained devices, you got to be really conscious of how much data are you trying to send to Losant. Very easy to run out of memory there. What happens is when you specify these properties down here is that's actually compiled and sent to the Edge Agent. It will only send up this property. You can control the amount of data you're trying to send up through a debug node. The other area I’ll point your attention to is the walkthrough. It's a great piece of content. I’ve talked a lot about the memory model. The walkthrough has a whole chapter on that. It really goes into a little more detail of really how that memory works, how data is passed back and forth between Losant and the WebAssembly module and your native code. Okay. Next thing I want to touch on is the differences between the GEA and the EEA. A lot of you on the call might be familiar with the Gateway Edge Agent. This is what's run as a Docker container on really any gateway but there are a number of differences between the two. The first and foremost definitely is just what it is, how it's even distributed. The Gateway Edge Agent is distributed as a standalone service. It's installed as a Docker container. Think of it like any application you install on any computer. You just install it, run it and it's good to go. The Embedded Edge Agent on the other hand, is designed to be embedded included into another application or firmware. It's not installed separately. It's not a separate service it's written right into your Edge application or your firmware. That's kind of gets back to the code you're responsible for is implementing that WebAssembly module, implementing the MQTT client. What's nice though is once the hard work is done getting that WebAssembly module implemented, then you switch over to low-code world where people from operations can kind of go in there and change behavior without that difficult firmware. In terms of dependencies, the Gateway Edge Agent, we prefer Linux but it requires an operating system. It requires something that can run Docker. Embedded Edge Agent has no external dependencies outside of a WebAssembly module or WebAssembly runtime. Then that EEA API is the interface that controls how the Embedded Edge Agent does talk to things like system resources and the internet. Kind of an interesting technical note is on the GEA, workflows are interpreted. If you've ever exported a workflow and looked at it... You can export workflows on the top right corner of the workflow editor. You'll see a JSON representation of a workflow. That's pretty much exactly what's sent to the Gateway Edge Agent. That JSON doesn't know how to interpret something like a math node. It includes the expression, whatever you typed in the math node, that will be in that JSON but it has no idea how to evaluate that. The Gateway Edge Agent, all of the code that makes that up knows how to interpret and evaluate those workflows. The Embedded Edge Agent on the other hand time, is compiled, completely self-contained. There's not a separate service running somewhere accepting the expression you typed into math in order to evaluate it separately. That's compiled directly as WebAssembly into the module. What's nice about that it keeps these workflows quite small. The workflows I’ve done with pretty full vibration analysis, they end up at 130 150 kilobytes in size and that's because we've done a lot of work optimizing those workflow sites. The Gateway Edge Agent has all these building connectors, all the nodes, all the logic to implement every possible node is always in the Edge Agent, makes it pretty big. If you don't use a node in the Embedded Edge Agent, it's not compiled into the workflow. Saves a lot of space. What I was saying on that the Gateway Edge Agent does have a lot of built-in industrial connectors. It's sitting on an operating system, it's sitting on Docker. It knows how to talk TCP IP, it can talk MQTT. So, all that stuff's built in. The Embedded Edge Agent requires you as a developer to implement those connectors as registered functions. The biggest thing is the required resources. The Gateway Edge Agent requires about a gigabyte of storage. It's the image size. We have Alpine versions that get that a lot smaller, a couple hundred meg. That's because there's an entire Linux user land compiled or in that Docker container. So, those containers are pretty big and it requires about 512 megs of memory, something like a Raspberry Pi 2 and up is kind of what we say. The Embedded Edge Agent on the other hand is much smaller. If you want to persist your workflows, it's about 256k of storage. Workflows, there's an option if you go through the MQTT specification, you can tell Losant to zip a workflow beforehand but if you don't do that, workflows won't be any bigger than 256k. So, you don't need a bunch of storage to persist it. In my example, I’m not persisting in workflow. Every time the device comes online, it sends what we call the hello message to the cloud. Says — I don't have any workflow and the cloud will turn around compile and publish the workflow. So, persisting workflows isn't required. What we've seen is I think two megabytes of memory is very comfortable. I’ve never seen anything require more than that. On my example, the ESP, I’m running about 512k. We're about a little less than a meg but 2 megs is really that comfort area. That's because your workflows are going to be 256k at most. You'll need probably two copies of that. You'll have one running. You'll need to bring another one in over MQTT. That's about half a meg already. You bring in the runtime and MQTT and you're going to be up about a meg. Before I move on to my last slide, I do want to hit a pro tip. Developing that WebAssembly runtime, I’m not going to sugarcoat it, that will be the most challenging part of creating the code, creating the firmware to get the WebAssembly module working for the very first time. We do have a really nice walk through that I would recommend. This kind of gets you acquainted with WebAssembly. We do create a WebAssembly module called the Hello World module that kind of strips out most of the API just to get it down to the core of getting WebAssembly to work. Now, when you start switching over and after you get WebAssembly working at all and you start building workflows and deploying them, what you can do instead of having to get all of MQTT working and receive these workflows over MQTT, when you have an embedded device up in the device actions menu, you'll see this option here called Request Wasm. W-A-S-M is short for WebAssembly. You click that and you can just request one of these WebAssembly modules. You can request the module that would be sent to this device you can kind of load it directly from disk or whatever. This is excellent for debugging. I can't recommend it enough. A couple options here, pretty technical. Stack size, you can mostly leave it at 32k unless you've got some really out there workflows. You can control the trace level for development. Definitely change that to verbose. There is a function, a very important function in the EEA API called Trace. It's an imported function that the EEA will invoke to send debugging information whenever it's making decisions executing workflows. It's just sending a nice little message. You'll definitely want to... Oh, man, can't find that. There we go. So, definitely want to know that this pop-up exists when you're in initial development. This is going to be really helpful for you. All right, lastly, I have talked a lot about these resources. This is a deeply technical concept so you'll really want to look through these resources right here. You'll find them all in our documentation. But you've got the walkthrough, great place to start. You've got that guide that uses the Raspberry Pi and Python to do some vibration analysis. We do have built-in Fast Fourier Transforms and RMS to handle vibration analysis use cases. For the firmware development, kind of that hard part of using the Embedded Edge Agent, the API is critical. And then when you want to receive workflows over MQTT, we do also document the MQTT specification. With that, I will hand it back to Heath for Q&A and wrap-up. Heath.
Heath Blandford: Yeah, awesome, Brandon. Thank you so much for that great overview of the new EEA and kind of a great walkthrough of how to get started with it. First thing's first, before we get to our Q&A, I just wanted to say that as always, no feature here at Losant is released without being fully documented. As Brandon showed you quite a few times, we are fully documented for our EEA. You can head over to docs.losant.com to get started there. Brandon gave you some additional resources as well. We've also got our forums, forums.losant.com. So, when you get started with this EEA, you can start to ask questions about the Losant side of things there. We also have some tutorials in our blog as well as the replays that I mentioned at the very beginning of this Deeper Dive series on our website at losant.com/deeperdivewebinarseries. Okay, I see we have a few questions. The first one that we want to get started with is actually, Brandon, probably for you. At the beginning of your demo, you started to show the frequency of those blinks with the GPIO. When you're switching from five seconds to maybe a half second blink, does that directly affect the battery life long-term?
Brandon Cannaday: It can. Obviously, keeping a light on will impact battery life. When it comes to the workflow itself or the EEA itself, there's really very little impact of a timer and executing workflows. How it works behind the scenes is you can find this in the API. There's a function called EEA loop. This goes back to kind of the embedded world. WebAssembly, they're working on it but they don't have a concept of threads. The WebAssembly module can't run itself. Has to be hosted in a thread outside or I was doing a FreeRTOS task. You have to constantly pump the EEA with loop. I’m doing it about every 100 milliseconds. Whether it's triggering timers or not triggering timers has very little impact on the overall battery life but certainly, leaving a GPIO on powering an LED for longer, although two seconds versus five seconds back and forth, I don't know to do some math on how long a light would be on over course of an hour. But so just making a timer... I guess short answer, making a timer faster won't have much impact on battery life unless that timer's doing something that does consume a bunch of battery. Well, I guess in this case, it is sending a lot more data over the debug node. So, yeah, it could. It absolutely could but it really depends on what the workflow is doing with that timer.
Heath Blandford: Perfect, thank you. Actually now, Anthony, a question for you. Brandon mentioned a couple times the workflow being compiled and WebAssembly being involved. Could you talk a little bit more about how we go from like a cloud workflow to it being compiled and then sent down to device?
Anthony Canterbury: Yeah, yeah. Hi, guys. For the compilation on this like you said, we've got the workflows in that JSON format. Each time that you go to deploy it to the Embedded Edge Agent, it takes those configurations that you put in for your nodes and the workflows and it takes all of the workflows that you're deploying presently to the device and it converts that to Rust instructions. The Rust instructions are then wrapped up in that API library that's also written in Rust. It's all optimized for the embedded environment and it's selective on what code it puts in there. It's as efficient as we could get it and we're continually tweaking it as we go. But then from that Rust instruction, then we compile it down to an optimized Wasm bundle which is then what is sent down to the device.
Heath Blandford: Awesome. Thank you so much. Brandon, a question for you. Farhang [Phonetic 00:49:44] asks — a typical microprocessor doesn't have two megabytes of memory. For example, Nordic Semi's very popular Bluetooth round 256k of RAM but the EEA requires about 2 megabytes. They're wondering if we've done a survey or maybe have worked with somebody on low-power processors that can actually run the EEA.
Brandon Cannaday: Yeah, that's a really good question. Yeah, the memory requirements does exclude quite a wide family of those pretty small ones. There are a ton of boards in that 256k area. The reality was there was no kind of assembly language in general-purpose run time we were able to create to get it that small. When you, by the time you bring in the TCP IP stack and TLS stack, that 256k turns into a very small amount of usable space. Really, it's enough to kind of fit a very domain-specific application. Those really small ones, yeah, you're probably still going to write those with code, piggybacking on kind of traditional OTA mechanisms to get those binaries updated. You have to come up the stack a little bit when it comes to getting something like more of a general-purpose runtime available in those. There are quite a few vendors that get that large. ST does have some family devices with a couple megs of memory. But yeah, you are absolutely right. This is not a fit for those very small ones, the Bluetooth modules like you said or there's a lot of popular cellular modules that have application space but again, they're pretty small, pretty limited. So, it's going to have to be a little bit bigger. It does narrow the field a little bit on which embedded devices can support. I think we've done that research internally. I think that's a great task for us is to add that to our documentation kind of advertising — here are some modules that we found out in the world that have enough space and comfortably run the EEA. We'll take that as an action-item to ourselves but yeah, you highlighted a really good point.
Heath Blandford: Thank you so much. Just one question kind of before we wrap it up here. Brandon, you mentioned Fast Fourier Transforms and RMS as released for this MVP, this first release. What other things are we working on for first-class support with the EEA? Are you able to speak a bit on the upcoming road map?
Brandon Cannaday: Yeah. So, for release, we targeted vibration analysis is a use case we see quite often. Small smart sensors, there's a lot of those being developed now to take in vibration data and FFT it right on the device and send up the analysis. The next use case we're going to tackle is geolocation. In the next release, the goal is we'll have some geofence nodes, some ability to understand and provide some value for geolocation data because that's another big use case we see. We do have a number of partners in that area where you can take a GPS or connectivity module, pair with a daughter board that has enough memory and then execute some real-time logic right in device for — did I come into a geofence or leave a geofence and do something interesting based on that. So, we'll see some geofence stuff. We'll also see Base64 encode nodes. Those are really useful for blob data. A while ago, Losant released what's called Blobs which basically allow you to report arbitrary data primarily for image data. If you do have an embedded environment that does handle images, you'll be able to run the EEA, do whatever image analysis you need, Base64, encode the image and report that directly to the cloud. So, we'll have some more powerful encoding coming very soon.
Heath Blandford: Awesome. Thank you so much. With that, everyone, we're going to go ahead and wrap this up. Again, if you have any questions or want to reach out for a more in-depth demo of the Losant platform, please reach out at hello@losant.com. Again, thank you all for being here. We will catch you in the next one. Thanks so much.