


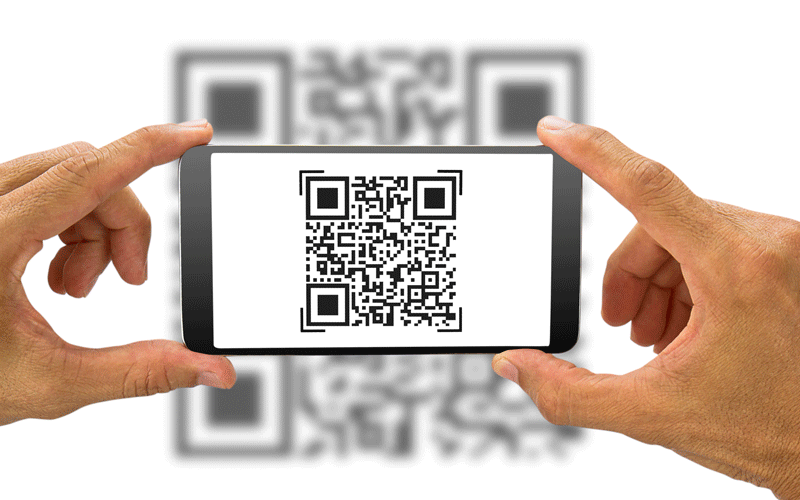
This template renders a QR code reader that can tap into a device's camera to scan a QR code. Usage examples:


Craig Baldwin: Hey, everyone. Welcome to today's Losant Deeper Dive Webinar Series where we're going to talk about implementing on-demand device registration – excuse me, provisioning – using QR codes. The person speaking right now is yours truly, Craig Baldwin, Partnerships Director. Hello to those of you I know and I think I see some names I actually spoke to earlier this morning. We also have Dylan Schuster, Director of Product, who's going to join me on today's webinar and take up the majority of the presentation. And thankfully, Brandon Cannaday is going to join us at the end for Q&A, Brandon's our Chief Product Officer. A couple of housekeeping items before we get started. So, today's webinar is recorded. We will be sending you the recording within a few days via email. You'll also be able to access the recording on our YouTube page as well as the Deeper Dive website, or page on the Losant website, rather, within a few days. If you have questions, we definitely encourage those. There are a couple mechanisms via Zoom to go ahead and submit those questions at any point throughout the webinar. We will then take care of them or try to answer them at the very end, so don't worry if we don't answer right away. We like to queue them and address each of them at the end. You can use the Q&A tool within Zoom, or you can also use the chat. We'll catch either. Please go ahead and submit those and we'll make sure to address towards the end of today's session. For those of you who are joining Losant or learning about us for the first time, we are an enterprise application enablement platform specifically for IoT applications. The Losant platform's made up of five key components – Losant End-User Experiences, visual workflow engine, data visualization, devices and data sources, and Edge Compute. We believe that by providing these five key services, or components rather, our customers, our partners, and developers are able to build end-to-end IoT applications with speed and flexibility that truly can't be found elsewhere. These are some of the customers that utilize Losant today as a part of their IoT application build. You'll see a lot of familiar names in the States as well as overseas. If you're looking for resources to help you build, we do have a fantastic partner ecosystem, whether that's technology, be it IoT devices or sensors, and gateway devices, connectivity, as well as solutions partners who are essentially professional service firms that are trained in the ways of Losant and can help you build your solution. And we also have strategic partners – we had some of those on the previous slide – like Verizon, Singtel, Optis, who are building and selling with Losant each and every day. If you'd like more information about Losant partners, I encourage you to check out losant.com/partners, or you can reach out to us via the website, or myself, craig@losant.com, since I manage the partner ecosystem in the team. So, with that, I'm actually going to go ahead and hand it off to Dylan so he can talk about implementing on-demand device provisioning using QR codes.
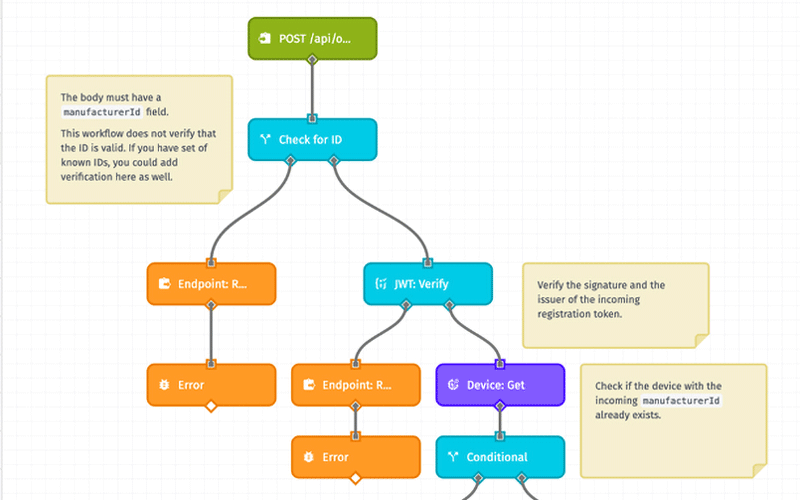
Dylan Schuster: Thanks a lot, Craig. Let me get my screen share going here. When we first put this Deeper Dive on the calendar, we did so because we're getting an awful lot of questions around the active device provisioning. Craig, you should be seeing my screen right here and hopefully, you're hearing my okay. If not, give me a shout-out.
Craig Baldwin: Sounds good. You look good, sound good, Dylan.
Dylan Schuster: Great, thanks. Based on the attendance today and for people who replied, it sounds like this is a question that a lot of our users have. If you are a Losant user, we will talk specifically about how to build an on-demand provisioning system, with or without QR codes, really, in the Losant platform. If you are not a Losant user, we're still going to talk about best practices around any provisioning process – what it means, what to guard against, and a lot of general knowledge there. So, hopefully, you still pull away from this webinar with some good tidbits. So, when starting this presentation and starting to build this out, I was looking on the Internet for a good all-encompassing definition of what we mean by "provisioning," because I want a level set with everybody to make sure that we are all talking about the same thing. And I came across this quote from IoT ONE, they're an IoT, an Internet of Things research firm. They put it as, "To evolve a device to a state in which it can be handed off to an end user or end-user team for their specific use in a functional manner." I really like this use of the verb "evolve," I think that describes it perfectly. The device may be already in a state where it can connect to a platform, it can report data, but we are taking it to the next step from there, which is to actually assign it to a specific group or user. If you think about a Nest thermostat. You go to Best Buy or Amazon; they've got shelves and shelves and shelves of Nest thermosets. And to provision it to you, you're going to take it off the shelf, bring it home, connect it to their platform, sign in, tie the two together, and now it's your Nest thermostat. Not your neighbor's, not Best Buy's, it's now yours. That's kind of what we're talking about right here also. And in the case of Losant, that specifically means to associate a device with an Experience group or user, this step down here. That's the biggest part of the provisioning process. The two steps you see up here, these can be part of the provisioning process or they can be part of – we kind of think of it as two steps – registration and provisioning. You can do both at the same time but this is the real key right here is given a device that is already connected to the platform, let's associate it with an Experience group, and allow that the users within the group to actually interact with the device. So, I kind of touched it on already, the difference between registration and provisioning. We view registration as obtaining an identity and credentials to establish a secure connection to the Cloud. So, we actually do have a library template around device registration. Now, this is not going to be something that we cover today, the registration bit. The difference here would be that in the case of registration, your Losant application, when that device is first plugged in, does not yet have a device on the Losant side associated with that hardware. This registration template, if you are interested in this, you can download it into your application, or import it into your application. Essentially, what it does is you are including an Experience URL with a signed JWT token in the firmware of your physical hardware. And when that device comes online, it phones home to the Losant platform, it checks the validity of that token, and it's going to create a device and an access key and secret, and then send it back down to the device, where it's up to the device at that point to store that information on disk. And again, use that to connect to the Cloud platform through the MQTT broker. And then provisioning is once we have the registration step complete, it's going to be what I've already touched on, associating a registered device to a specific user or a group of users. We actually do have a template in the library around provisioning also, right here. I'm actually not using this template in what I'll be demonstrating to you today but a lot of the concepts that you find in here are similar. Given a device, I want to look it up and then I want to assign it to a specific user or a specific group. This is another one that you can import into your application if you want to learn some of the techniques that go into the provisioning flow. I should also say that everything I will eventually demonstrate to you all today, if you are interested in the application itself, I'm happy to send it down or send it along to anybody who wants it. Just let us know either using the Zoom interface Q&A or reaching out to somebody at Losant through our forums or through your account representative. So, the provisioning flow that we're going to follow here, as I kind of already touched on, registration's already happened. The hardware itself is going to ship off of its manufacturing line with a Losant device ID, access key and secret already baked into the device. We're going to use the Edge Agent today, the Losant Edge Agent, to demonstrate the device side. You don't necessarily have to do that. If your device is not going to be running Linux and you don't want to use the Edge Agent, that's perfectly fine, this will still apply. Once that device powers up, its cellular modem is going to phone home at that point, because it already has the credentials, and pull down any new Edge workflows or anything, but it's not necessarily assigned to an Experience user yet. Onsite, a technician can scan a QR code that's going to be attached to the device to kick off this provisioning process. Optionally, we are going to do this today, but optionally, we can also require the technician to prove they have physical access to the device by pushing a button on the hardware itself. And then once those two steps are complete, in the field, the technician can do the rest of the configuration to insert the device details and finish provisioning the device. And at that point, it is ready to be handed off to its end user to display the telemetry data and to actually interact with it and send commands down to it. So, the story we're going to go with here is one that we've told many times before. Let's see, let's pull open our application here. We have a fictional company we called Kanarra. Kanarra creates generators that it sells to hospital groups, I don't know if "groups" or "chains" is the right word, but companies that manage a whole lot of hospitals. If you've ever been to a hospital, you've almost certainly seen a gravel out lot back that has a series of generators parked out there and the idea is in an emergency, the hospital can continue to function if power is cut because they have these generators onsite that will give you the power. Now, for today, we're assuming that Kanarra is just now getting into the smart product game. Let me shrink my window down a little bit here so that we can actually look at our UI on the right and then also our application on the left. This is our Experience UI; we'll get to that in a second. But they are just now getting into the smart product game, and what they're going to do is start retrofitting these generators out in the field with an industrial gateway that they can hook up to the generator, hook into the Modbus ports, start reading data off of them, sending commands down, and then to turn them on and turn them off, etc. So, let's just go through the demo here. I'm going to run through the entire flow first just to show everybody how it works, and then we'll kind of take it a lot slower and go through step-by-step how everything fits together. So, I'm going to log into my Experience here, okay. So, just a responsive website we have here, very similar to the hierarchical multi-tenancy model that we've demonstrated before. In fact, Brandon demonstrated it in a webinar last week. I am logged in as Sadler-Isberg which is one of Kanarra's customers, a hospital chain. And as this user, I can view devices specific to any one individual hospital or region. And more importantly, of course, for today, the ability to register a new device and assign it to one of these groups. So, some of our users have access to this link up here, this Register Device, we're controlling that using a tag on the Experience user itself. If I click on this Register Device button... And again, bear in mind, the story here is that a technician is actually out in the field, probably sitting next to a generator out in this gravel lot. So, the hardware they're going to have in hand to actually complete this provisioning flow is probably a mobile phone, it could be a tablet. I guess it could be an industrial laptop of some kind, but that's why we have our screen shrunk down here to show what this looks like to the actual technician. So, on the Register Device page, what I have here is our QR code scanner, and also optionally an input to actually type the serial ID itself. Let's see it through the magic of technology. Yeah, there we go, up there, hi. So, the tech out in the field is going to have a piece of hardware kind of like this. This is an Advantech UNO-2483G gateway. Advantech is actually one of our hardware partners that Craig touched on before. And what I've done – I'm going to cover it up so it doesn't scan yet – but we have a QR code on the back that is pasted onto here and it is a visual representation of the serial ID. Now the serial ID is going to be unique for each piece of hardware that we have in our application. So, the technician out in the field is going to have this piece of hardware, they're going to take their phone and they're going to scan it, which I will do now. And success, okay. The next step in our flow that we talked about was the pressing of that physical button to actually confirm that the user has access to the hardware itself. This is, of course, good for security, but it's also nice because you can make sure that the technician is actually interacting with the correct piece of hardware if your serial IDs are rather similar, and there's a potential for somebody making a typo if they were to type it in manually or something like that. So, we've given the technician five minutes to complete this flow. Let's go over here and let's look at, in our application, each of our devices or pieces of hardware, if it's running the Edge Agent, we can deploy down to it a workflow that can handle the register button. Now, I don't have much to show you here, unfortunately, because this is going to be extremely dependent on your hardware. It could be that you have a physical button in the generator case itself, that after it's hooked up to the Modbus ports, the pressing of the button can register to a port. It could be coming over a serial port or it could be an actual physical button that is tied to the GPIO of the device. It's going to be very dependent on your hardware if you can actually do this. But what I have here is just a virtual button that is deployed down to the device over here on the right. So, I can select that device, it is the one called "Test Device," and when I push this button, my [Inaudible 00:15:25] over here disappears. I'll get into how that works in a little bit here, but once that happens, now my technician in the field can finish this process. We're going to actually install this at Kaiser Permanente. You see this dropdown here which is all of the groups or tenants that this particular logged-in user has access to. Let's put this one at Kaiser Permanente Anaheim. Let's call something like KP002, and we'll go with this guy down here, I like the look of that one. Still three minutes left to finish, let's submit. And like that, I have provisioned my device. And what I'm doing is redirecting to a dashboard that I've set up in this application specific for each device. So, let's slow down and let's do that again and take a look at what this looks like on the Losant side. It'll redirect back to my homepage here. There it is, by the way, now that we've added it. Here we go. Okay. So, on the Losant side, here I have my application in question. You can see that I've got about 10 devices here right now. Most of them, but not all of them, are connected, are onsite given the names that we see here. And I already touched on the dashboard, that we can go to look at the telemetry data coming off on any of these. As a Losant user, I can see all of this right here. So, let's say that we have a new batch of gateways coming out of our manufacturing facility and we need to register those in our application before we can put them out in the field so that they can be provisioned by a tech. So, you probably have something in hand very similar to a spreadsheet like this. So, each of my pieces of hardware has a unique serial ID and I can also put some additional information here such as the model of the gateway itself, the firmware version that you see right here. For now, we're just doubling the name up as the serial ID. Instead of individually creating all these, we have in an application a device recipe for our generator. The most important part of this recipe is all these attributes here. This is the actual telemetry data that's going to be coming off of the generator. And then also a couple of placeholder tags inside of here. So, we can create these in a batch. Let's go to recipe actions, let's create multiple devices. And I could just type in a number and it's going to spit out however many I type in, but what I actually want to do is upload a CSV with these custom values inside of here. I can find that on my desktop. That's the file we just looked at in Excel behind there. And you can see in this preview, it's going to map these serials to an existing tag, it's going to create new tags for these I actually don't have in the recipe itself, just this version one right here. And this is important. We also want to create a unique key and secret for each of these devices. So, when I bulk create these, what I get out on the other side is a spreadsheet with Losant device IDs, access keys and secrets for each of these serial IDs. I can download this. And now I have the credentials I need per device that I can bake into the Edge Compute firmware before I send this out the door. If I go back and look at my application, there's most of the ones I created right there as well as the access keys I generated for all these. And that's how we can very quickly register devices and prep them for this provisioning flow. Just to show also – again, this is nothing new, this multi-tenancy model that you see over here – but just to show the mapping from this interface. I'm signed in currently as the Sadler-Isberg user right here who is in this group. And by being in this group, this user has access to any device associated with any group underneath of it. Not these ones that are sibling to it in Tekton Health. So, somebody logged in – this Tekton Health user as an example – is not going to be able to see any of the devices I see over here. And then the way that I'm actually associating those together, associating a device I should say, with one of these groups, is that I'm selecting devices specifically by the tag. And what I'm doing here is using the group ID itself – it's up here in the URL – as the value of the tag group. And I'll show how that comes together in the provisioning flow here in a second. Okay. So, that's the Losant side of things. Let's take a look, again, at the Experience side. And I'm going to pull up my workflows here so we can watch these in action. So, we'll just start with the homepage. What I have here, if I'm going to re-request this page, is this endpoint up here – get/devices/serial ID with a question mark on it. This is what we call an optional parameter. So, that endpoint matches on any request, the /devices or /devices/serial ID. This is really nice if you have a limit on the number of Experience endpoints or also more importantly, if you have a lot of shared logic between two endpoints here. Which I really don't in this case, but you can do a lot of your checks up front before you get further down the tree and bail early if the user does not have permission or something like that, by using only one endpoint to match on both cases. You saw what happened here as I requested the detail page over on the right. If a device is selected, which it is in this case, we're going to find the device by serial ID. You'll notice that I'm using the serial ID of each of these devices, not the ID that is assigned to it by Losant. Now, it doesn't really matter one way or the other. I just wanted to demonstrate that this is possible, that you don't have to necessarily expose the Losant device ID to your end users if you don't want to. There's no harm in doing so, it's not insecure, there's nothing you can really much from the ID itself. But some people would prefer to follow an API design like this where they would expect, given a serial ID under this devices parameter right here, to actually find the one that is associated with it. That's accomplished a pretty simple custom node given a serial ID. We sanitize the input a little bit in case this happens for a provisioning flow and somebody were to type spaces or lowercase letters. Try to find the device and if it does find it, take the true output, does not take the false output. One other thing I want to touch on while I'm here, and this is a good API design that you probably want to roll into your flow also, especially for provisioning case, is that not only am I trying to find the device by serial, I'm also making sure to verify that the user who is actually trying to access the device has access to the device. So, if I were to put in one of Tekton Health's IDs inside of here to view that device, this is going to take the false path because the user that I'm logged in as does not have access to this device. In both cases, if I were to do that, I'm going to return a 404 page that's got some garbage up there, you see right there. 404 in HTTP terms means a resource is not found. But you'll notice that I am taking that path, if I don't find the device, number one. But also number two, if I don't actually have access. You could argue that I could return a 403 in this case, HTTP 403 means access forbidden. But it is acceptable to return a 404 if you want to obscure from your end user that a resource does exist. Now, that's especially important in the case of what we're demonstrating here because if my serial IDs are sequential – which mine are not, these were generated using a password generator – but if my serial IDs are 0001, 0002, and so on, a hacker could potentially determine how many devices I have out in the field by requesting this endpoint and incrementing it over those serial IDs until it started returning a 404 instead of a 403. Which is why we want to not let the user know the difference between a device that doesn't exist versus a device that does exist but we don't want to give them access. We actually do the same thing in the Losant API. If you were to request an application ID that does exist and you do not have access to it, we return a 404. We don't let you know that that device does actually exist. So, enough on that. Let's take a look at our registration flow here. So, I'm going to click on... Actually, before I click on it, let's go pull open the workflow that powers this interface, which is this device provisioning flow right here. I'm going to click on Register Device and it's going to match our route right here, we're going to make sure that our user is in fact an admin user per that tag on the Experience user object. If so, we're going to display this page right here. Let's pull open our QR code reader again. I'm not going to spend a whole lot of time on the interface that you're seeing here, but most of it is pieced together using elements from the template library. The login form that you already saw, this is a collapsible tree component that's in there. The Bootstrap layouts which is the entire layout of the page, the 404 page is another one inside of there. And of course, the star of the show, the QR code reader. So, this library that we have here, this is in the template library, let me pull it up. One of our more popular ones actually. And behind the scenes, what we're using is an open-source library, I think it's called HTML5 QR Code. And the template that you see here exposes a handful of the options that are exposed by that underlined library, to make it easier for our users to take certain actions depending on what it is they want to do with this QR code after it is scanned. Advanced users may just want to dive into the template itself after they've imported it. And look at the documentation for the underlying library, you can do some more advanced things if that's something you're looking for. But the API we exposed right here, let me just show you the actual page. This one right here. That's how we get this functionality that you see right here. We are posting unsuccessful scan to a different URL. Posting is important, I'll get to why in a second. But back to the QR code itself, again, I'm going to cover it so it doesn't scan on me. There's nothing magic about a QR code. It's just a two-dimensional encoding of data. So, when you scan a poster you see on the street for an upcoming concert, "Scan here to get tickets," it doesn't include instructions for what to do, it doesn't include a web page. It includes the characters "https://" and so on and so on, ".com." And it's your device, your phone, that is providing the magic and saying, "Well, that looks like a URL, let's open your web browser." Or if somebody hands you a business card with the little QR code down in the corner, and you scan that with your phone. It's your phone that's saying, "Well, that kind of looks like a new contact, let's try to add this person to our address book." If you take that same QR code and scan it on what you see down here, it's not going to open that URL or open your contact book. It's going to look in the Losant application for a device with a serial id "https://" because that's what we told it to do. And of course, it's not going to return anything. So, these are very easy to generate. This one, I found an online site that you could just put in some content and it will automatically spit out the QR code for you. Of course, if you were doing that at scale, that's not a good option. There are multiple libraries in different programming languages that will do this for you. We actually use one in the Losant front end. If you try to enable your two-factor authentication, we're using one to generate a QR code right there. So, let's see. We also have down here the serial ID to allow the user to... That's the wrong keystroke, there we go. If they want to input the serial ID manually – which is valid, they may not want to give access to the camera to this particular website, or the QR code can be scratched up and illegible and they want to type it in. I mentioned that we do sanitize the user input, so just to zoom in a little bit here, the actual serial ID does not contain the spaces that you see and we are stripping those out in the workflow engine, just in case the user actually does input them if they use this flow. So, let's go ahead and scan this again. And there we go. Now, we're back to our ticking clock. So, as far as the proving of physical access goes, that's where we're at at this point right here. We want to make sure that the user pushes a button on the device, the actual physical device, to ensure that they are actually there with the device in-hand, and not sitting in a coffee shop somewhere trying to provision devices against this application. So, let's take a look at what that flow looks like. Actually, let's go back to our provisioning flow here. Let's start over and I'll show you all what happens when I scan this. Let me scan this one more time. And there we go. There's the path that it took, right here. There was a post request. Yes, we were able to find the device. And what we're going to do in that case is we're going to update the device and we're actually going to add a couple of tags to it. Register start time, which is the current time in seconds since the [Inaudible 00:30:10], and also the registry user ID, which is the ID of my Experience user right here. And so we're updating the device, adding those tags, and then we're redirecting over to this end point, which is just the serial ID tacked on the end. I mentioned that post is important because by scanning that code, we are actually changing the state of our application, we are actually updating that device. And a get request, which would be if we were to just redirect to here, should never change the state of your applications. Just a tip on API design. And if you see, if I refresh, the clock remains the same. So, what we're doing here is... Bear in mind, we're also validating again that the user has access because it's a new request. So, even though we just came over here from here, we still want to verify that this is an admin user and that we are able to find the device. And then we are sending the current time down the five-minute window. This is configurable at an application level. And then also when the last time that the button was pressed. I don't know about you all, but that ticking clock drives me bonkers, so I'm going to cover up for a minute while we go over some of the other parts of this flow here. So, how do we power the timer? Let's take a look at that. When this page loads and the device is in a state where it can be provisioned, meaning that the current time is within five minutes of that register start time tag that we just added to the device, it's going to kick off a request, a streaming endpoint request, to get the button stream, as we're calling it, for this device here. So, again, we're trying to expose as little information as possible. We want to make sure that only admins have access to this, and we want to make sure that before we even start replying, that the device does actually exist in our application. And what we're going to reply with is an SSE, server-sent event stream. There is the template also around how to build these out. I'm actually not using it here, but if you do need help building out an SSE stream on the workflow side, you can find that in the template library. And what I'm replying to in this stream is a custom topic. Now, you could argue why don't you just use the device state topic? It'd be a lot easier, honestly, and then send down all device state data that's coming off of this device as it's being reported. Well, sure, that's easier, but we have a potential security issue there because this device may already be generating telemetry data, and the user in question, whoever's requesting this endpoint, may not yet actually have access to the device as we stated in our application. So, they could be sitting there looking at the manifold temperature and the RPMs and the current being generated by this generator that they don't actually have access to. In fact, it could even belong to somebody else, if we are allowing reprovisioning in this application, which we are. So, that's why we go through the extra trouble of only subscribing to a custom topic. And in that custom topic that's being published to in a Cloud workflow...excuse me, an application workflow that runs in the Cloud platform, which is this right here, which is to say that anytime one of my generator gateways report state, of the registered button state, if the button was pressed and we are inside that five-minute window, publish the message to our MQTT topic. And that's what this interface over here is looking for. Let me start over, because I'm going to run out of time. Let's go back to a provisioning flow right here. Shrink this down again. Let's scan this one more time. Here we go. And yep, that happens every once in a while, it looks like it transposed a couple characters. I've scanned this probably 50 times and that's the second time that's happened, it figures. It does happen every once in a while. The more data you put into one of these codes, the more likely it is to encounter an error like that. They can store a heck of a lot more data than you see right here, but the more information you put into a code, the higher possibility of errors. The code cannot be generated with as much error correction in it. This is actually a pretty reasonable amount right here. Let me try it again. Please don't happen twice. Yeah, there we go, cool. So, there we are. Now, the code that we have in the interface right here is listening to that stream that we just showed. And when it receives a message on that topic, let me pull that workflow open, which is this one right here, that opens up a stream. So, I'll go through right there and then back to our handle register press. I can actually also do this by forcing state on the device. Let me do that in a separate window, which is this one actually. We're doing this through the state attribute called Register Button for state. And there it went almost instantaneously, and there's our message actually getting published. Okay, back to the registration flow...provisioning flow, I keep saying that, provisioning flow. So, at this point, we've got about three-and-a-half minutes left before this turns over. What we're also sending down to this interface using this group summary node is the groups that this user has access to, which is how we are populating this dropdown right here. You'll see that we're actually treating each of this as what's called an html option group or opt group. We don't want to allow a generator to be assigned to Los Angeles. We have to actually pick one of the...so-called one of the leafs on our tree here. We'll go ahead and stick with Kaiser Permanente, change the name a little bit here. I do want to show you very quickly, we do also have client-side validation baked into this form. You see how it's telling me that I need to put in a name. This one's okay. And I haven't selected a generator model yet. This, what I'm showing you right here, is not security. Let me say that again – that's not security, this is convenience. The security comes on the back end in our workflow right here. If you take nothing away from this webinar other than this topic or this point – validate, validate, validate your user input. Never, ever trust that what they're submitting is valid. And if I submit this, we're checking to make sure that we are still inside of the registration window, we're checking to make sure we've set a name. The group ID we've passed up is one that the user actually has access to. The generator model that they've selected is one that actually comes from a data table that we do support. And if not, it would re-render the page with an error at the top. Otherwise, we are updating device a second time. And now, we are adding in the group ID that the user just submitted, and also the model of the generator as tags on the device. Now, here we are back over here and you've successfully provisioned the device. Let's see, how are we on time? There's one other thing I want to touch on which is kind of tangential to device provisioning. And that is we get questions a lot about is it possible to build a mobile app in Losant? And the answer is sort of. You can build the back end; you can build the API using the workflow engine. In fact, it's a great tool for doing just that, for returning raw data, adjacent data usually to your interface. You wouldn't really want to build an app interface, I don't think you even could, to be honest with you, inside of Losant Experience pages. But what I'm hoping to demonstrate here is that the mobile web has come a very long way in the last few years. If you're going to build a consumer product, there's a certain bells-and-whistles aspect to having a mobile app. You're probably going to want to build a mobile app. But for a B2B application, you can get something darn close to a mobile experience inside of a mobile website. You can give it an icon and put it on your home screen. You have access to the camera, you have access to the accelerometer, you have access to the file system, whatever the file system is on a device, usually it's the camera roll. Background service workers, offline storage, a lot of stuff that can help you make a really robust application to the point where after you initially add it to your home screen, it's almost indistinguishable from a mobile app. So, at least keep that in mind. At least consider mobile web for something like this. It's a heck of a lot less work to develop. It's a heck of a lot less headache to publish changes to, you don't have to go to the app store and wait two weeks for them to approve it. You just publish the changes and they're live immediately. At least consider that. And along those same lines, I touched on that we're using the Bootstrap framework for a lot of what you see here. Admittedly, this is a little plain-looking. But this is a very widely adopted framework with a whole ecosystem around it that people have been developing themes for and tools to develop your own themes for a long time now. Just to demonstrate, and I'm not necessarily endorsing this website, but there's a lot like it that just have a catalog of themes that you can drop into a site. This one's called Bootswatch. Just to show you how far you can get with one of these themes, I'm going to comment out the default theme, this is inside of a component that I'm rendering inside of each of my Experience layouts. And I'm going to turn on... I probably shouldn't have taken that one, let's take this one. Yeah. Right here. This is called Sketchy and you'll see why. Now, please don't do this in production, but it gives you an idea of just how much you can change this interface very, very easily and still maintain the guts of it, the bones of it, and make something that's really usable very quickly. There's almost no custom styling that I wrote that went into this template other than, I think, this dot was something custom that I built. Everything else is inside of that framework. Or similarly, there's also sites where you can build your own theme. This one I'd use is called Bootstrap Build. And I built a Losant theme using that tool, putting in our colors, putting in our fonts. I spent, honestly, 15 minutes building it, starting to use the [Inaudible 00:41:52] font. To go to the register screen, that green button, you probably recognize those colors from the Losant interface. And again, that was, like, 15 minutes. I'd probably spent a little more time on something like this to go to production with, but just keep that in mind as you're developing your Experiences. You don't necessarily have to choose the Bootstrap framework, though most of our components are written with that framework in mind. But the reason we choose a framework like that is because you can get really, really far, really quickly and have something that's very easy to edit down the line and get up and running with a nice-looking website pretty quickly. So, that's all I had to demonstrate for you here. With that, I will hand this back over to Craig and I see we have some questions lined up. Craig?
Craig Baldwin: Thanks, Dylan. Give me one second to share my screen. So, before we get to questions, I just want to remind everybody we are going to have another Deeper Dive Webinar Series about making predictive maintenance a reality with Losant and Elipsa AI. Elipsa AI is a recent technology partner with Losant. That's on March 23rd. So, if you'd like to register for that one if you haven't already, please go to losant.com/deeperdive and you can do that. We would love to have you there. A couple other things in regard to resources and getting questions you may have answered that maybe you didn't come up with now, but come to you later. So, we always have Losant documentation, our developer documentation is incredibly thorough and robust, that's docs.losant.com. Losant University is primarily video-based training to get acclimated with the Losant tools, how to use them. Again, fairly robust and a great way to start learning how things may work in the world of Losant. Of course, you're joining us for our Deeper Dive Series today, and then hands-on tutorials via the blog. We have some tutorials there. And then, of course, any questions you may have as you're working on your project or your solution, check out our forums. Forums are definitely the best resource. I'm sure many of the questions you may have or be thinking of have already been answered by someone else in the community. Or if not, you can go ahead and post and the community may answer or even our internal engineering team. So, those are all fantastic resources for you as you are working with Losant, whether you're a beginner or someone who's more advanced. So, we do have a couple questions. We had a question earlier about which device was utilized or what gateway, I believe that one actually, they found the gateway themselves. There's one that I actually get a lot too, that I saw, which was, "Okay, this works great if I'm an operational person and I'm provisioning one at a time. But if I want to provision many devices at once, could I go ahead and do that via uploading a CSV?" or what would be the recommended path, Dylan, in your opinion?
Dylan Schuster: Yeah, if you wanted to do multiple at one time using the Losant interface, probably what I would do is I would update that device recipe. Well, actually, you don't even need to update the recipe because it'll add in the new tag. But if you have the IDs of your individual groups, you can add a column to that spreadsheet called "Group," which is what we are calling the tag in this particular flow. And add the ID for each of those to each line in the spreadsheet. You'd want to also add the generator model, I'm assuming you'd have that information at hand if you were trying to provision multiple at one time. But that would get it done. What controls the access after the provisioning flow is that group tag. The register start time and the ID of the user who completed the flow are only important through the actual provisioning flow itself. You could delete those afterwards if you wanted to. But that would be how you would do it. You would just simply add a new column to that spreadsheet that maps to whatever tag you're using to identify the group to which the device belongs. And you can bulk create and provision at the same time then.
Craig Baldwin: Awesome. Thanks, Dylan. So, here's another really good one, I think, from an operational perspective, and it's about, actually, utilization of the QR scanning methodology. "But could I actually use QR codes as a way to pull up dashboards in the field? So, if I had a specific device, let's say using your generator example, I come up to it with a phone or an iPad, whatever it may be, and I go ahead and scan that QR code. Could that just go directly to a dashboard of some kind that ties directly to that particular device?" Have you seen something like that in the past, Dylan?
Dylan Schuster: Yeah, most certainly. In fact, I even have another piece of hardware on my desk that I did not demonstrate for you. It's a Dell gateway that has an actual QR code on it. It actually goes to the FAQ for the device itself. So, what you'd want to do is in the code that you generate, you can include the full URL if you wanted to, or you could just put the serial ID. And then what you want to do on the successful scan is instead of posting data to an endpoint like we did here, you'd want to instead redirect your browser to the – I'm assuming it'll be a serial ID you would include in the QR code – to /devices/ the serial ID. You can certainly just route. In fact, that's a common use case that I think that we actually handle in that template, very possible, very common, not very hard to set up at all.
Craig Baldwin: Awesome, that's perfect. A couple more questions coming. So, one is, "Can you go into more details about how to restrict access to the registered device button to certain users? You said something about a user tag." We haven't heard from Brandon yet, so Brandon, I'll pull you in. Do you mind answering this question, and maybe expanding on it a little bit?
Brandon Cannaday: I certainly can. I think Dylan can bring up the actual implementation. But yeah, one of the ways that we recommend implementing kind of access control is through user tags. So, inside Losant, any user that you have can have any number of tags and Dylan's bringing that up right now. And that's a place to store really arbitrary other information. In this case, he's added a role tag and set the value to admin. And then on any page, Experience page, when an authenticated request is made, that entire Experience user is added to the context. And that will then allow the page to either render or not render that navigation item. And then what Dylan's showing here is on the back end. He made it really clear. Always validate your input. Just because the button's not visible on the screen doesn't mean someone can just post directly to the endpoint and kind of navigate around that. So, in this workflow, we're also checking the value of that role. So, you can check the value of the role on the UI to hide or display UI elements. And then on the back end, when that user attempts to perform some kind of action, you can validate the value of that role again. And in both places, ensure they're an admin.
Craig Baldwin: Awesome. So, here's a question that I've seen quite a bit that's in with IoT, of course, is that it's complex. There are many different types of devices, many different gateway options, as we know. Some people use the Edge Agent in the world of Losant and sometimes they don't. So, the question is, "Will the process look the same for non-Edge Compute devices? For example, my devices are custom boards with custom firmware. It looks like the same process will work but are there any "gotchas" that I should look out for?" Dylan, you want to try to tackle that one?
Dylan Schuster: Yeah, one of the things we always say about Losant when we're pitching the company and the product is that we are hardware-agnostic. We don't really care what your hardware is, so long as it can connect to the Cloud, usually the MQTT broker connection or you can also use a REST API. And from there, they all behave... An Arduino going to behave the same way as an Advantech when it comes to displaying data on a dashboard and everything. So, if you did not use the Edge Agent and you're using something a little more low power, like an Arduino as an example, you still need that device ID access key and secret that we touched on when it came to registering your devices. You still need to bake that into the firmware itself. We talked about using the Edge Agent here, which would be...you probably want to use a comma file, or you would just write something into the Linux code to boot the Edge Agent with some certain environment variables which would be those credentials on boot. And Arduino, we actually do have a client for that piece of hardware that you would want to flash the firmware with that access key, secret, and device ID before it goes out in the field. The only thing that would not apply would be that Edge workflow I showed briefly, where I was pressing the virtual button to demonstrate the register button being pressed. You probably, in the case of a piece of hardware like an Arduino would have it wired to the GPIO. And then pressing the button would pull it high. And on pulling high, somewhere in your firmware code, you are sending a state report that register button was just pressed.
Craig Baldwin: Awesome. Thank you, Dylan. Well, it looks like we've gone through all the questions. With that, I just want to say thank you to everyone for joining us today. As always, you can contact us at the website or hello@losant.com. My email is craig@losant.com. So, please feel free to reach out if you have any questions about partnerships or even today's webinar. Reminder to join us on March 23rd for the Elipsa AI Webinar. Until then, we look forward to seeing you and thanks for everyone [Inaudible 00:52:09] today.