


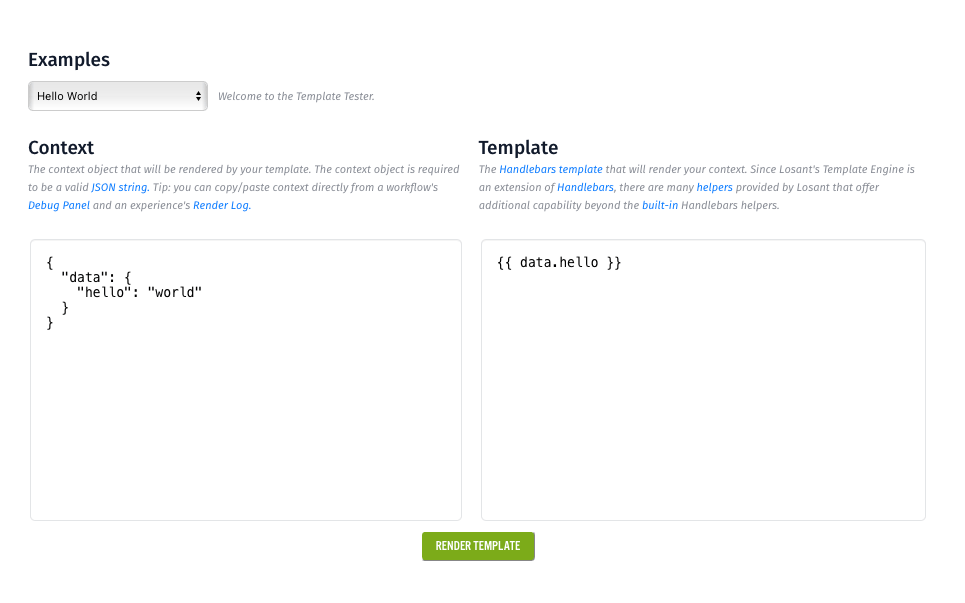


Taron Foxworth: All right. Good afternoon, everyone. It is now 1:02 PM and we are going to go ahead and get started. I hope you have your coffees, lunch, water ready. It's going to be a good time. Thank you so much for joining this Deeper Dive Webinar. If this is your first time joining us for one of our deeper dives, welcome. If you are a returning attendee, welcome back. We'd love to have you back here to spend some time with us today. My name is Taron Foxworth. I am the Education Lead here at Losant, and joining me today in this presentation is Heath Blandford. Heith Blandford is a Customer Success Engineer at Losant, where it is his job to provide all the tools that you need from a technical perspective to be successful. Heath and I are going to be presenting today. Afterwards, we will be available for a Q&A session here on the Zoom call. Just a little bit of housekeeping before we begin, for your awareness, this webinar is being recorded and the replay will be made available to you in a couple of different ways. After this webinar, we'll send you an email with a link to the replay. Additionally, the webinar will be made available on Losant's YouTube page as well as our Deeper Dive page on our website. Throughout today's webinar, you may have questions — and we encourage questions. That's really the benefit of having us here on a Deeper Dive. There's a couple key features in Zoom that allow you to do so. First, you can use the Q&A feature or second, the chat function to post questions. Heath and I will be monitoring those throughout this webinar and at the end of the presentation, we'll do a little Q&A session so we can get your questions answered. If you do have to leave early, no worries. You can always reach out to us on our contact page or in the Losant forums but we'd be happy to help. Before we hop in, I’d like to do some level setting around Losant and what our enterprise IoT platform provides especially for those of you on the call who may be new to Losant. Losant itself is what we like to call an application enablement platform. What this means is that Losant provides enterprises with the building blocks they need to create their IoT applications. The platform itself consists of five key components to help customers achieve that. First, is End-User Experiences, then our Workflow Engine, Data Visualization, Devices and Data Sources and Edge Compute. All these components come together to enable you to build really awesome scalable world-class IoT applications. Most importantly, our customers, who we love dearly, use these to create these applications. Losant is a leader in the industrial telecommunication and smart environment space and we've offered this platform to a range of customers including those in the Fortune 100. If you're interested in learning more on how to get an enterprise license with Losant, reach out and we'll be happy to have a more in-depth conversation. Also, it's important to note, Losant partners in our partner ecosystem. Losant provides really, the software that you need when creating the IoT application but there are many other components that have to come together to deliver something to market. To help you, we've surrounded ourselves with a great ecosystem of partners. This includes strategic partners, with whom we share sales and go-to-market strategies with, solutions partners who work with clients to develop end-to-end IoT applications and lastly, technology partners that can provide hardware, connectivity and other services to complete your IoT solution. And now for today's topic, we're going to talk about Advanced Templating. So, just to give you a little bit of an agenda of what's going to happen today. First, I’m going to give you a brief introduction to Templating. Kind of lay down some fundamental definitions to help guide our examples today. Next, Heath is going to come in and show us some real-world Templating use cases that you can begin to apply in your application directly. Lastly, I’m going to come back in and show some Experiences-specific Templating techniques that you can use to build better within the realm of Experiences. I’d like to kick off our conversation by looking at this chart. Templating is available in a lot of different places in Losant and it's used in the Workflow Engine, in Experiences and Dashboards but really, at its core, what is it? This visualization as you see here really describes the process of Templating. Templating involves three key variables — a context, a template and a result. We can kind of expand those to see what that could be. In general, your context is going to be data. It's going to be something coming from your device, so in this case — temperature. And then our template is going to be a representation of the data. How do we want to show it or display it or use it? In this case we can build a message. "This temperature of the device is — " and insert in the syntax, degrees. And then what that allows us to do is run that through the Losant Templating Engine and the Templating Engine takes that context, takes the template and then generates the result that you want based off of how you designed your template and what context it was pulling from. Throughout the day, I want to make sure this is first in your mind when operating with templates, the most important thing to keep in mind is — what's your context? So, as you're building templates and as you're following along in this webinar today, keep asking yourself — what's your context? And we'll be sure to remind you as we go along too. Behind the Losant Template Engine is Handlebars. Handlebars is an open-source JavaScript library that provides a super simple easy to use Templating languages and it's really at the core of Losant's Template Engine. What Handlebars really provides and what they define in the realm of Losant are really two main things. The first one is this delimiter, and close that out. Now, when this email is sent, the device name — not with the delimiter and things like that, the template engine will render the actual device name or in this case, wa4xus, here at the beginning of my email subject line. Let's move on to the email body template. I can open up here with a button and zoom in just a little bit. This is our email body template. It's HTML and it's a little bland right now. I think again, I’d like to add some more context. Similarly to my email subject line, I’d like to replace "a device," right, it's very ambiguous — with the device name. I’m going to clear that out and start again with our delimiter and just like the subject line, add device name ". And at the very end here, I’d like to also add the temperature at which...the actual temperatures that broke our spec or that was too high. I’m going to save my work here. In my current context over here on the right, I can see that all of the device data that was reported along with the temperature device with the device state trigger is here, and I can actually see the temperature here. What I’m going to do is I can actually just right click that key path and copy full key path. I can go back in to my email body template and here, at the end of my sentence, I’m going to say, "with a temperature of" And then I can start again with our delimiter and just paste that right in. You can see we have the context path. Losant gives you the ability to copy that context path and paste it right in. This is great. We've added a little bit more context to our email body, included the device name and the current temperature but my devices are actually reporting their temperature in degrees Celsius. What if I'd really like to be able to make the temperature conversion to degrees Fahrenheit. I can do that. Actually, I could come back to my workflow and add a couple math nodes to do that conversion for me. I could even head over here to the Losant Template Library and import a custom node that does the temperature conversion but with the power of templates and template helpers and using nested templates, I can actually do that on the fly. I know that the equation for converting from degrees Celsius to Fahrenheit is you take the temperature, multiply it by nine fifths or about 1.8 and then you add 32 degrees to it. So, that's C to F or Fahrenheit. Actually, I’m going to go to the Losant documentation. In our docs, we've got this great page. If you just click the search bar here, this page here at the very top accessing payload data. This document is one of our most popular. That's why it's at the top. But this document really contains all of the helpers and the ways that you can access data or your context data while working with template engines. Really, what I’m looking for here on this side is...on the right side is our Format Helpers. So, I’m going to jump down here. I’m looking for add and multiply. I can see add's here at the top, which takes two values and adds them together. And then I’m looking for multiply — yep, right here. Which, very similar to the add, takes two values and multiplies them together. Let's see how we can utilize that in our email node to convert that temperature. I’m going to go back to the debug log here. I’m actually going to utilize one of my favorite features, the Payload Template Tester. This button right here on the top right, the Payload Tester is a way for you to build and test templates with the data that's currently on the context for the workflow. What the Payload Tester does is it again, very similar to the workflow, places that current payload as the context for this tester. I know that my temperature is at data.temperature. I can start with here on the left with the string template. I can do add, and then my path to that value is data.temperature and then I can add 32. So, you can see the output is now 110. But then I’d like to do a...add the multiply in or include the multiply. To use a nested template or a nested helper, instead of again, starting with the delimiter... When we're doing nested templates, we start with the parentheses, multiply and then data.temperature. And then that's multiplied by 1.8 and I can close that. Oh, okay. I think I have my formatting right. I spelled multiply wrong. That's multiply. Now, we have again, another output. What I’d like to have this output do is actually show two significant figures instead of just one. Let's see if back in our documentation, we have like a Format Helper that will help me. Right here. The format value. When the value is number, we can use D3.js formatting to format that string. Let's take a look how that looks. I’m going to go back to my workflow here. At the very beginning right in front of add, I’m going to add format, add that parentheses again. Here at the end of that 32, I’m going to add the parentheses to close that out and then I can give it the D3 formatting string that I’d like or .2f for two significant figures. Now I have my output as 170.40, so I have my two significant figures and let's add that into my email. I can click this, copy this button and close this out. I can go back to my email node, back to my email body and select the whole temperature template here and just paste right over that. Now, we're actually making that conversion in line with templates without having to add some overhead complexity in our workflow and now we have that temperature conversion in our email. We can actually level this up just a little bit more. I’d like to include some increase or some more data that was reported alongside the temperature with this email. Things like the fuel level, the RPM, things like that. We can actually do this by using the Each Conditional...or the Each Block Helper. I’m sorry, it's not a Conditional. The Each Block Helper. I’m going to build an unordered list here and then in this unordered list, I’m going to start with our delimiter. Block Helpers start with a pound sign or an octothorpe and we go with each. And then we give it the object or array. So, the each can loop... The Each Helper is essentially a loop that loops over the object, an object or an array. So, we're going to loop over the data object. If you remember back just a minute ago, we can remember that the data object housed all of the information that was included with the stated report. For each one of these, I’m going to create a list item. I’m going to use a very special template here called @key. What key is when looping over a object, is referencing the value of the key that we have. For example, if we have a key value pair that's "hello world" @key will give us hello. I’m going to put in a colon here and then another template here. I’m going to use my Format Helper again because a lot of those numbers have multiple significant figures and I’m going to use this. What this is in this context, is a reference to the value that we're looping over. So, in an object, we have a key value. @key is referencing the value of the key. So, in our "hello world" example, it's referencing "hello." This is referencing the value of the value of that pair. So, in our "hello world" example, this is "world." I’m going to use that same string, 2f, to give me two significant figures. We'll close this out. Close our list item tag. And then we need to terminate Block Helpers... Or not terminate but end Block Helpers so that the Template Engine knows when to stop. We do that with a "/each" and I’m going to end the unordered list here. How do we know what this looks like without actually sending an email? We could use the Payload Template Tester here on the platform but I’d like to show a tool that we have in our documentation called the Documentation Template Tester. I’m going to copy our template here. I’m going to go back to our documentation. The Template Tester in our documentation is down here on the bottom. And we can select Template Tester and Template Tester. The documentation Template Tester, it's very similar to the Payload Tester that we have in the documentation but one of the primary benefits is being able to input larger inputs and see longer outputs. So, I can actually, in our template box here, close this out or remove that, paste in our template. I can go back to our workflow here. I’m going to update this. Save my work. Go to our Debug panel here and right next to the Payload Tester button, we have the "copy payload" button. I’m going to click that. What that does is it copies the payload to my clipboard and I can go back to my Template Tester and paste that whole thing in. You can see we have the entire payload as context. This is a very visual representation of what Losant is doing for you in the workflow engine. We're actually taking the current payload, making our context for our template engine and working through it. Now, we can actually click "render template" and you can see we have a result here that shows that with just a couple lines of code in our template, we can have a whole list of the information included with just the temperature. Again, I think we can level up this email just a little bit further. What I’d like to do now is at the very bottom of this, include just a little note to our engineer that says, "Hey, this device also needs to be refueled." I can do that by using a Conditional Block Helper. The "if" Conditional Block Helper. Excuse me, not the if. The less than or equal to. So, I have a global defined. We're going to start very similar to the Each Helper. We're going to use less than or equal to which is lte. I know that my fuel level is at data.fuel_level. So, we'll take data.fuel_level. And, very similar to the multiply or the add Helper, less than or equal to takes two values and compares the first one to the second one to see if it's less than or equal to. I have a global defined as well called generatorMinFuel. And so, if this is true, what I’d like to do is include a paragraph tag that says device name deviceName needs refueled. I can end that p tag there. Again, very similar to the Each, I use the forward slash and then the name of the helper to terminate it. Again, I’m going to copy this. Excuse me, I didn't mean to close that. I’m going to copy this over to our Template Tester, with just Ctrl C. Just so we can see this live in action. I’m going to replace our template here, paste that in and render our template. Hmm, okay, nothing showed up. Let's see. Where is our fuel level? Okay, fuel level. See, we have that set to 9.5. Let's see. Data.fuel_level. Oh, I actually misspelled globals. So, globals here. I forgot the first "l." If I render that template, now, we can see here that the result is a p tag with "our device name need refueled." This conditional rendering is actually a great segue into conditional rendering for Experiences. If you're unfamiliar with Experiences, we have a great Deeper Dive that was given by our Director of Product Platform, Dylan. But just a little quick overview. Experiences are pages, endpoints, and workflows all working together to deliver a completely custom user interface and API. I’m actually going to split screen my desktop here with this. I’m going to click my endpoint URL here to open that up in a new tab and I’m going to move it to the right side here. As you can see, this is my Experience on the right and I’m in Losant on the left. Two things I’d like to point out. What I’d like this Experience to do is have — for all users — have a list of devices that they have access to and if their RPM is over 4,000, I’d like to say that in that list, say, "RPMs high" and to show the RPM value. I’d also like to include an Admin Dashboard button in our navigation if that user is an admin so that they can view some statistics or a dashboard that only they have access to. We can actually see how that looks. I’m going to log out as this bravo-user here and log in as my admin. You can see we have all of the devices here. We have five devices. My application has five devices and our Admin Dashboard is here. Now, conditional rendering for that Admin Dashboard doesn't protect the route but it does, you know, I assume that if a user can't click it, then they won't go to that route. Let's first dive into the Admin Dashboard button. I’m actually going to zoom in here. That might be a little difficult to see. I apologize. Let's first take a look at how we can conditionally render the Admin Dashboard. I’m going to go back over into Losant. I’m going to click my layout here because my layout actually includes my navigation bar. I’m going to click my example layout and I’m going to open this up. Where I’d really like to focus your attention is right here. I’m using the Equals Block Helper, which is similar to the less than or equal to but this Block Helper actually checks for equality rather than if one value is greater than the other. You can see this context path experience.user.experienceGroups and then this dot notation for an array. In Losant, with our Template Engine, when you're accessing data in an array, you need to use the ".(" array note or notation rather than like in this case just... You know, if you're used to typical programming or accessing array data, this is how you would use this. In our Template Engine, you need to use the dot bracket notation. And then it checks for if that name is equal to Heath Enterprises, which is the name of the admin group in my Experience, which I think is aptly named, I think. And then we're rendering a list item here that has a nav, that is a nav link and it says dashboard. But what I’d really like to drill down on here is this context path here. Remember how I said that context is different in Experiences, it's different in workflows and it's different in dashboards. I’m going to check my render log here and, in my Experience, I’m just going to refresh my page. You can see here in my render log that we're placing this context or this page data, the information around the request as our current context for this Experience. We have information around the application, its ID, the name of the application, the workflow that helped render this. We have globals. Again, we have our minimum fuel, our generator maximum RPM. The important part here, what I’m really trying to get around or get to is Losant gives you a lot of information for free including information about the end point, the layout that was used here but specifically, around the user. When a user is logged in, we put information about that user in the current context for you to use in your Experiences. We give you email here. We have when they were created, their last login, their ID. We give you the Experience groups. You can see here that Experiences, user Experience groups and then name. Right here is what I’m checking for. Let's take a look now at that device list. My device list is actually in my home page. So, I’m going to take... Right here, I’m going to click my home page. That's fine. I’m actually doing some very interesting stuff here. Let me open this up for you and zoom in just a tad. Very similar to the email node that I was talking about, I use the Each Block Helper here to again, create an unordered list. And with each of those, I’m creating, every time we loop, I’m creating a list item but then inside this list item, I’m actually doing some more complex Templating. I’m using the greater than Conditional Block Helper here. And then I’m checking to see if the composite state for the RPM is greater than globals, the maximum generator max RPM that I have as a global. What I’d really like to focus on here is the use of the @root. Similar to the @key, it's a special variable that we get from our Template Engine, as a developer that references the root context that we received. When we're inside an Each loop, the context actually shifts to the new context that we gave it here, this pageData.devices, which I’m actually going to touch on here in a minute. When we're inside of Each, we have to go back out to the root context and grab the globals. I’m just going to close this for a sec and I’m going to open up the render log here. I’m going to refresh this page so we can see the context here. When we're looping over pageData.devices, in the Each, this page data becomes our context. To go back out and compare it to something on the root context, we have to use the @root notation to get back out to it. I mentioned this pageData.devices. Page Data on the Experiences context is the place where you place custom data. If I go to the workflow that's generating this... I’m actually going to zoom out just a little bit. It looks a little crazy. If I go to the workflow here, get home, that's powering this context or this Experience page, I can see here that I’m using a Get Devices query. And then here, my endpoint reply, you can see it asks for Page Data Source. My Page Data source for this page is a payload path and that path is working and that path on the payload "working" is what I’ve defined in this Get Devices node here down here at the bottom where my Page Data will go. I think that's a great point actually, for me to pass it back to Taron and actually get into some more Experience-specific Templating. Taron.
Taron: Thank you, Heath. Right now, I’m showing a two-paned view of what my next example is. So, if you don't see that, just let me know. However, I want to hop right back into what Heath was demonstrating. The one thing I really like about Templating within the realm of Losant, is that once you kind of learn just how to use the syntax and the helpers, they apply in the workflow engine and the Experience so you can kind of use these all over the place. The one thing I want to show here is a common change we may make to this Experience. Heath covered our Admin Dashboard link and this is only present when a user is in a specific group using this Equal Block Conditional Helper. However, in a normal application, you're not just going to have one link. We may have a link to an About page, a Contact page and as we fill out our application, this could get pretty yieldy. This is fine. However, if you think about things like maintaining consistency of styles across these elements and as the element list grows, making those kind of changes, there's a better way. I want to offer new best practices while building Experience to help you with that. Instead of just copying and pasting all of our list elements here to remove those, at the top of this layout, we have a cool new handlebar helper to talk about — the inline helper. The inline helper is essentially a way for you to create a tiny component on this page to now reuse in different places. For example, this is the inline Component's definition. If I were to look at the usage of this Component — I can copy and paste that here below for you — the usage looks like this. Let's walk through this. With the inline Component, notice this #* syntax and then we have the keyword inline. The next argument is the name of your Component. And then how we reference that name is going to be the double curlies and then the greater than and the nav item. Also, one thing to point out is that inline helpers, you're also able to parse them arguments. With this, we can now say, define a new inline helper called nav item, give it a label and an href and now use that within our inline helper block to reference those values. Now, instead of copying and pasting our navigation like we saw before, I can come here. Actually, we can fix Heath's link and go to admin. We can call that Admin Dashboard, and then we can also add in those other links. I’m not going to change the name just for typing time on the demo. However, if we were to save this. Let's do update, save. Actually, let me remove this hanging one here so it's not just in our page. Update, save. And I refresh, now we can see we can easily get that link. The nice thing is that any change we make to our link styling will now apply to everything on this page because we've defined and used this inline helper with the arguments that we parsed in. This is a really flexible way when you're in the same page, to get that clean component so you can offer some nice reusable things within this page. But that's just within this page. What about across multiple pages? Well, Experiences offer components and that's what I’m going to talk to you about. While you're on your Experience overview page, here's the overview page for my Experience, you may notice down here in the bottom left, you have access to Components. Components are reusable HTML templates that you can now, just like the inline helper, use within one page but Components allow you to take that and operate across multiple pages. To help us kind of go through Components, I want to point you to the Template Library. Losant Template Library is full of UI Components, simulators, resources to help you build all throughout Losant. The one in particular to highlight is the device list Component. Most applications in Losant that we see have a device list on the side and a dashboard. Device list is a very common component that we're going to want potentially across multiple pages. The nice thing about the Template Library is that this is a fully functional and complete Component that you can directly import into your application. The one thing to note is that every item in the template library comes with the readme. This readme provides you instructions about how to use it, so a little usage. And just so I have this, I’m going to copy this on my clipboard, and then also details about its configuration. Once you press import, what you're going to notice is in your Experiences, a new Component called tl-device-list. What I have here is my screen already set up, so we can walk through this Component a little bit easier. Here on the left, I have opened the new Component, the tl-device-list Component that we just imported into our application. Here in the middle, this is the home page context where we have our Each Helper that goes over our list of devices. This is the same Each Helper — and actually, I’m working in the same app, exactly same application that Heath was working in. Here's our result. The nice thing with this kind of three-pane view, we get to see is — the Component, the page and the output. So, let's use this component that we now import into our application. Here, if I refresh — and just to remind you again of what that context is — if we look at the context for this page, we have page data. And, within page data, we have our devices and devices is just a list of the devices for this current Experience user. So, this is available as our context within our Experience. We're able to use that here in our loop. So, because we have pagedata.devices in our context, we can actually use that in our Component. The nice thing about the “this” component that comes from the Template Library, it supports the devices syntax, so you can just parse it an array of devices and it'll just work. But let's look at this syntax here for Component. When we define a Component in that navigation in your Experiences, you have the Component keyword and then the name of the component. So, in this case, we want to reference that tl-device-list. And then this third argument is pretty special because it is... Essentially, what you're defining here is the context of this Component. So, here's our Component and here's our page. Remember, our page context is what we saw in the render log. Our Component context, we're defining it to be page data. What this means is our context for the right side within our Component, within that Component template is now page data and that's going to be an important note to keep in mind. However, let's update this new page now our home page and then I can close my render log. Let's save. If we refresh our layout, boom. Just like that, we're now able to make use of this Component out of the Template Library. However, one awesome feature of this Component is that it supports other arguments that we can parse in. I’m going to get an example here for you. So, Components aren't just the name, the keyword and the new context you're providing it. You're also able to parse in specific arguments. So, in this case, arguments like selected or the link style and the image size and the image and an image file. These arguments, if you were to save our page and refresh, immediately start enhancing and making this, not only a Component that we can reuse through our application but we can also make it flexible for different pages and in different methods that we may want to use the Component. What's really going on behind the scene to get this view and the features that we see from the Component is really, with the component that we imported into this application. If I make this a little bit bigger, since we've defined our Component and now, we parsed in arguments, so as you would imagine, there's probably in this Component, a way to use and manipulate and present those arguments. For example, we can see we have a argument image file that points to our exact image. We can see that we have our device name that points to our name of the device. And then a couple other cool arguments that come with this template is you get this nice selected view, right. But we can see the CSS class being modified also by this argument.selected. However, there's a new helper I want to show you. When you're in an Each loop... Remember, we talked about here, our Each loop. The one thing that Heath mentioned that was extremely important is that what you're doing is — you're giving this Each an object or an array to loop over. Once you do that, inside of the Each loop, the context becomes that individual key value or individual element of that array. That's why, because we're looping over, in this case, devices, we use all of our device properties — so this.name, this.id. That "this," that "this" keyword here is representing the single device. However, if you take a note at how we're referencing the arguments here, args.selected, let's look at how that's being defined. That's really being defined with this With Helper. The With Helper is a nice helper to keep in your toolbox mostly because I like to say it helps you kind of wrangle context and make it make more sense. For example, when we originally use this component within our page, we set the context to pageData.devices. Now, in our Component, this context that we have inside of our blue box here is pagedata.devices. The same way that we reference our current context in any other place in Templating, we use this keyword. However, we can now clean that up. Instead of being like, okay, this, each over this and then we get kind of looped and lost into the "this'" here. However, we can redefine this in a sense, the key word "this." So, we can now use the With helper, the value that we want to almost redefine, and add a new property to context called devices. That way, now we're looping over the array of devices but we can use the device key, the device's keyword here to make them more readable for another developer who may be working in our application. Another method and a very important thing to note is how we're redefining our arguments. Within your Component, you actually get reference to your arguments with the @args keyword. This is very similar to the @key and the @root, is another special keyword that you have available to you within Experiences to help you build. In this case, our arguments like selected, we will be able to reference in our components with @args.selected. However, here's the thing — because we, inside of this Each loop, have redefined the context to an individual device, if we were to use args.selected within our Each loop, so where we're actually using it here, this wouldn't work. Because args as it stands, is not available within this context. It's only available within our entire Component context. In order to parse the arguments into the Each loops context' we can use the with helper and this pipe syntax. Essentially what this is saying is — Hey, inside of my Each loop, make args available with this args keyword. And now, within our template, we're able to easily reference arguments properly within loops and within our application. Just like that, we've now used two very good best practices, the With helper and inline helper. The one thing I do want to show you is, in the Handlebars dock, you can actually see how and learn more about these helpers. So, "if" and "with" and the inline helper actually come from Handlebars itself. What Losant has done is we've added a whole bunch more helpers to help you build throughout Losant. But if you want to look at documentation or even more Templating-specific things, the Handlebars doc is a great, great reference. What I want to quickly do is now recap of all the cool things that we learned today. While Heath was presenting, we learned about helpers and helpers add transformation to your Templating and we can even nest those helpers that we see here and do an add and a multiply like we saw. Then we had Conditional Blocks. In this case, Conditional Blocks allow you to optionally display data. So, we talked about the less than equal to, that we also have not equal. This is a very flexible way to add, not only in your workflows but in your Experiences to kind of conditionally display information like a link. One really cool block that I want to talk about is the "includes." It's very common when you're operating over say, in a list of things like a list of numbers, to want to display something if a number that I have is in this list. You can use the includes helper and it gives you a nice way to say — include this information if this number is in the array. We also covered loops. So, within the realm of Losant, we're looping over devices. We're looping over users to just put stuff on the screen. In this case when you loop, you can loop over an object and then you get access to you know your key and your value. And then you also loop over arrays and then you get access to the index of the array and the value at that index. And then we shifted to Components. Components are a first-class property of Experiences and you can now define your own Components but the component that we use today actually came from the Template Library. But that syntax was, we used the Component keyword, we give that Component a name. We defined that Component's context. So, here, that's a very important thing, remember, we're changing the context inside this Component and we can also parse arguments to be used inside of that Component. And then we cover the with helper. The with helper helps you wrangle this context and make the page data devices be a little bit more readable within that block to be devices and even expose that into your loops as you're looping over the devices. And the inline helper. As the Component is that reusability across multiple pages, the inline helper offers you that re-usability across the same page. The example that we used there was looping over links in a nav. Before we hop into Q&A, what I wanted to do is show you how to go and learn more and really go beyond what we're doing here in this webinar. Really, it's all about our five resources here. First, is Losant Documentation. Heath brought that up. All the helpers and everything that you saw today is in Losant's documentation. Most importantly, we give no feature without documentation, so it's a great resource for you to use as you build. Losant University. Losant University is actually getting some template courses here soon. However, it right now, gives you a really good understanding for you and your team of how to build in Losant and how to get started with your applications quickly. And then you have the Deeper Dive Series. We have more that covers, like Heith mentioned, the Template Library on Experiences specifically and even some of the other application templates that we've produced in the past. A ton of hands-on tutorials in the docs and in the blog and lastly, the forums where you can always ask your questions and we'll be there to help you. A couple other save-the-date things as you're paying attention to me today on this webinar. On February 9th, we're having a webinar called — Using Azure IoT Edge and your Losant Edge Compute as your Complete Edge Deployment and Management Solution. On March 12th, you could join us for a webinar on Multi-tenancy and that's going to be a good topic. Lastly, you can join us for a webinar on Device Positioning Using QR Codes. And just a pro-tip, the QR code is another template in the Template Library, so that'll be a really good thing to pay attention to as well. Now, to hop into Q&A. Looks like we have a couple of questions. Our first question is — what are some other good resources to learn about Handlebars? What I’m going to do I’m going to pass that one to you Heath because Heath, I guess taking away from this webinar and learning about Templating and learning about Losant, what are those pro tips, those good takeaways, those good resources that people can go to get better at Templating?
Heath: Yeah, definitely. I think you showed it there at the end, the Handlebars JS documentation is fantastic. They also have their version of the Template Tester in their documentation. So, any Templating-specific things, I think I would point people towards the Handlebars documentation. But when building or testing inside of Losant, I showed off two of our...my most favorite features, the inline or the in-workflow Payload Tester — I think Taron's getting ready to show that off now — as well as the documentation Payload or Template Tester with the documentation one having the added value of being able to give larger input and see larger output. To learn more about Templating, I think those are really my main resources. Specifically, for Handlebars, I would take it more towards the Handlebars documentation and then when coming into Losant and building with templates and using data within Losant, the Template Tester, the docs and the Payload Tester in workflows are my two favorite choices.
Taron: Awesome. Thank you. And we have another question. Can I define my own template? That is a great question. I’m actually going to cover that. In the presentation, when we got into the realm of Experiences, we talked about those inline helpers. I can pull up the inline helper that you have here. That was in our layout. Really, the way for you to define your own helpers, kind of to obtain that functionality, you have this inline helper, which kind of gives you the ability to define that Component and reuse that logic in multiple places. However, this is very powerful and again this is on the same page but you also have access to Components to get that same reusability. But the most important thing is that all the helpers that you see in the docs, so, Format and Multiply, those are just things that Losant added. So, feel free to let us know on the forums, of any helper or any transformation that may be interesting to you and then we can get that in to the Losant Template Engine.
Heath: Yeah. I think just to add a little bit more to that, Taron. You as a developer can't make your own helper within Losant just on the fly. We have to do that on our side within our Template Engine itself. So, again, just like Taron said, feel free to drop us a line on our forums and we can certainly work with our engineering team to get that in for you. You still there, Taron?
Taron: Yes, I am. Sorry about that. Just to recap, we have all of our resources available to you from the docs to the forums, so you can go and learn more. Be sure to save the date for our webinars. There's going to be a lot of good content coming down the pipeline for you to learn and really become a better user within Losant. Thank you so much for joining us. Again, please reach out if you have any questions. Thank you all very much. Have an awesome day.