


Taron Foxworth: Hello everyone. I am so excited to present to you today. Thank you so much for joining the Losant Deeper Dive Webinar. I want to start off by saying that I hope everyone is staying safe and healthy and we really appreciate you taking the time with us today. The one thing to keep in mind is that this entire session will be recorded for you and your colleagues. So, if you or someone from your team or someone couldn't make it, you will be able to share this entire thing with them right after. We normally get it up here soon so to you can start to share that with your team. What I can say is, though, all of you who joined us today, you're going to learn a ton. The reason why we did the Deeper Dive Series is to really take the time out to dive deep into some Losant concepts and if you're new to Losant, I highly recommend you stay on board. You're going to learn a lot. Things will get pretty deep, but we're going to expose you to a lot of the platform and you're going to see a lot of the things that Losant has to offer. On the other hand, if you're currently a Losant user and you're already deep in, hopefully, and I know this content that you're going to see today is only going to help you do things better and faster within Losant. Now, who's speaking today? My name is Taron Foxworth. I also go by Fox. I'm the Education Leader at Losant. You may be familiar with me. I am the instructor for Losant University and I also work on the education team at Losant who does some of the document support. Dylan is one of our lead UX engineers. Dylan is awesome. He's one of the brains behind what you use and interact with every day at Losant and he's going to be the one today walking us through the Asset Tracker template. Then we have Brandon Cannaday. Brandan Cannaday is our Chief Product Officer. He sets the vision for Losant and the product itself. And Brandan is on board just to help us with Q&A here at the end just in case you have any questions. So, be thinking of those. If you do have any questions, feel free to just use Zoom's Q&A feature. While I'm talking, Brandan and I are going to be listening for your questions so we can get those answered. And if we don't get them answered here, we typically try to answer them after. Now, for all of you people who just joined to learn about Losant, this is where I can explain to you the high level of Losant and what Losant is. So, Losant is an enterprise IoT platform. We like to call ourselves an application enablement platform meaning that we give you the tools to allow you to create your own connective solution. And those tools are really separated. We like to separate them into components. When you purchase Losant, you have access to all of these tools all the way from Edge compute, where you can have local control for your devices, to devices and data sources to data visualization visualizing it all the way to your end-user experiences, we try to cover those core components you would need to build that connected solution. And the one that we're going to be talking about today, the application templates, I like them because they bring together a lot of these component and give you great examples on how to use them. I can't wait to tell you more. Before I get into that, I do want to share a little bit about our customers. We rarely share about our customers. We have a lot of experience building IoT applications, and I think what's nice is that we get to take all of those learnings and expertise that we do have by working with customers and then put that in a platform and deliver the best thing for you. So, getting started on templates. The reason why I really like templates is because they bring together all of these resources. So, when you create resources within Losant you're creating devices, you're creating workflows, you're creating experiences. What if there was a world where was a world where you could actually take those, export them, and share them. That's where templates come in. And what we did with templates is we created a couple for you. And today, we're going to be talking about one of those. Overall, I like to think of the why behind templates as grouped around what you see here. So, first is really Architecture guidance. As you start your application from a template, we give you a starting point. We give you a place, a set of devices, workflows that you can start from to build your applications. And what that allows us to do is help set the stage of what your application could look like in Losant. The next is Implantation best practices. I always recommend people building in Losant to develop their own standards, whether that's between notes and workflows engines, and device names. But these templates allow us to show you what we think some of those best practices are here at Losant. And most importantly these are excellent starting points for your own application. So, if you're building an IoT application, you can come in here, click-choose the template, and then now you have this application that you can work from. And if you're already building in Losant, these are great examples that you can pull into your application as well. And then, I'd like to say that these are demo-ready. And what that means is we get a lot of customers who just want to show off Losant to their team, which is their customers. Well, these templates give you a great way to do that because they all come with simulators and are all ready for you to show. You just start the template, start a workflow, and then boom, you can actually demo Losant. Today, we're going to be focused on the Asset Tracker template. This template is based around the use case of asset tracking. So, this template will show you a little bit of, okay how do we track devices moving between two distribution centers? How do we actually monitor events on these shipments? And then, I think the beauty of Losant and where asset tracking comes in is, how do you actually start to pull in other data along with where the asset is? And that's what we're going to be talking about today. And the last one is, how do you actually build this into an application that you can sell to customers or you can give to customers? And that's really what this template is giving you a great example of and a great starting point from for your application. So, now what I'm going to do is, I am going to hand things off to Dylan Schuster, our lead UX engineer, and he is going to walk you through the application template.
Dylan Schuster: Thank you very much, Fox. Just getting set up here to share my screen. Once again, my name is Dylan Schuster. I am the lead UX engineer here at Losant. For the purposes of today's presentation, you can think of me as the primary author of the Asset Tracker template. Just to check really quickly, Fox, you can see my screen fine, you can hear my voice okay before I get moving any further?
Taron: Yes, sir.
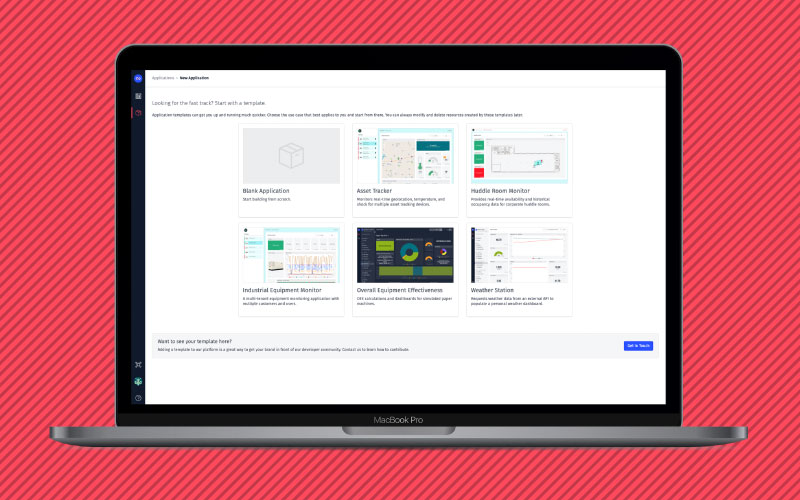
Dylan: Great. Just to reiterate what Fox said, hope everybody is staying safe, happy, healthy, sane in this rather weird time, at least here in the US. Hopefully, we're getting over the curve here and we get back to something resembling normal pretty quickly. Okay, so, what is the Asset Tracker template? This template is a great starting point for any Losant application whose purpose is to… you guessed it. Track the position, objects, shipments, anything really moving out in the real world going from Point A to Point B as well as tracking any other telemetry data that may be generated while that is in transit. This template does not work especially well for tracking assets that are moving indoors. For example, keeping track of equipment moving around an office, just not really designed for that. This is much more around GPS data, things that are moving more than a few meters at a time. So, some examples of use cases where you'd want to start with a template like this. Shipments, this one is pretty cut and dry. I've got a pallet. I've got a rig. I've got a semi-trailer that is moving from point A to point B and I want to know where it is. I want to know what's happening to that shipment along the way, and I want to know when it arrives. Actually, the data simulator that is built into this template is following something along those lines, we'll get it out a little bit later. This template can also be used for local fleets. Think of food trucks. Think of the service sector. You've got repair vehicles, repairmen moving around in a city area. You can use that for dispatching purposes. I have tow trucks listed here. In the early days of the company, we actually had somebody approach us with a use case where they wanted to track the location of the tow trucks in their company, but they were also hooking up to the systems on the truck to tell when the bed actually lowered and raised because they were having issues with drivers basically pocketing the money and pretending that the tow never actually occurred. So, this was a way of the owners of keeping the drivers honest, which falls into that additional telemetry data half of GPS tracking other assets moving around. So, another good use case there. Law enforcement, that's another one that actually came out of an early customer of the platform. They were building a platform to help law enforcement actually keep track of suspects. They would get a warrant. They would attach a tracking device secretly to a suspect's car and they'd keep track of where that suspect was going and at what times. And they were doing things like checking to see if the suspect was going into or out of a certain geofence. Or if Suspect A was coming in close contact with Suspect B they could start to weave a case together in that way. Then, of course, e-scooters. They're everywhere. This is a good use case. One of our developers in the office actually built a proof of concept using Bird's not public API so it broke about three months later, but we had a little screen in the office that was keeping track of where all the local scooters were and what their battery lives were and everything like that. These are all pretty good examples of where you would want to use this Asset Tracker template in a real-world scenario. And I kind of touched on this across all of these, but what we see at Losant as setting us apart from other asset tracking solutions is our ability to layer additional data on top of that GPS location, whether it's coming off of the device itself, whether it could be from third-party services. A good example being if I could tap into a traffic API to tell me that my shipment is probably going to be late. I can know that ahead of time knowing that that rig is going to have an hour and a half backup because the highway is shut down. A lot of that extra layering on of additional information was what we really see as the benefit that Losant brings versus other asset tracking solutions. So, getting started with this template is pretty simple. I am here logged into my Losant account. I'm on the new application screen. I get to that screen very easily by clicking this application icon over here and clicking the Add Application button. You see all the templates that are currently available, Asset Tracker front and center. If I click on that, it's going to ask me to name my application and choose an owner. Now, you'll see that I currently have my sandbox selected. All of our templates are designed to fit into a sandbox meaning that the resources that are included in the template are low enough in number that they should fit into a typical user's sandbox. My purpose is I have an organization I am going to create this application into. Let's do that really quickly here. And then once this application is actually created, you'll see that I've got a handful of resources. We'll go over in more detail it's actually included in this template over the course in this webinar. But also, that includes a readme which has some additional information about what is included here and some links to documentation. The only thing we need to do at this point is go into our Workflows inside of this template, and we want to enable data simulator, which is going to, for this template, generate some fake data for us to actually build out our experience, and also the event logger which is a key component of this template. And then, go have lunch. Go out. Take a walk. This template looks best when it's been running for a little while. For this data simulator to do us work, it's going to run every couple of minutes. It eventually builds up a rich data set for you to actually build your experience on top of. And of course, all that data can be cleared out when you're actually ready to take this thing live. So, before I get into what is actually in the template, let me go to the finished product here. I'm going to switch over for the rest of this demonstration to another version of this exact same template. This one's been running for a little while. You can see I've logged a heck of a lot of number of events, just so we can see this thing really built out. The finished product we're going to find under the Application Experience. So, I am inside of this application. I came down to the Edit page on my Experience and up here in the URL is where I can view my finished product. I'm going to log in with test credentials. You can find these, by the way, these test credentials in the readme down here. That one actually needs to be updated. And then it's Q-E-R-T-Y-1-2-3. Now quick note, this is actually a little thing that Google Chrome started doing about a week ago. I promise Losant has not been hacked. Our solutions have not been hacked. But I do want to point this out because, potentially Chrome is telling us here that that is a garbage password. For the love of Pete please change that password. And I will reiterate that to all of you if you are going to start with this template and build your own app, come in before you go anywhere else, go into the Users & Groups, find this user, and change that user's password. Otherwise, you will get that dialog. And of course, the password I typed in there is a pretty easy one to guess, so always a good practice to change that. So, finished product. What we have here is a pretty typical application experience. We’ve got a list of devices on the left. These are all the devices that are inside of my application and on the main pane here on the homepage of this experience is an Overview Dashboard. This is allowing me to see the location of all of my devices where they currently are. Then also any events that have been logged against those devices in the last 24 hours. You see, it just updated right there. And then if I were to click on any one of these… well, if I click on the pins, I can get some telemetry data that is associated with the device right now, the current shipment ID, the current temperature, shock value, orientation, battery and signal strength. And I can also, from the events, list down here, click on one of these to get additional information about an event. You can choose to enable this feature. I have in this template to allow for your Experience users to actually acknowledge these events and resolve them. For example, shock event is OK. Update that. And the next time this updates, that particular event will go away. Then I'm going to go down into a detailed page here by clicking on one of the devices on the left, a lot of the same data you saw on that previous screen, except illustrated a little bit better. The map is only showing the one device in question, and then all of its additional data is being blown up here into some gauges, battery level value, shock value, orientation and temperature. And also, the current status, which is it is currently in transit, looks like it is on its way from Indianapolis to Columbus right now. Now, before I get too far into what is actually included inside of this template, I do want to touch on a real-world application. So, once you actually take this template live, of course you're not going to be using a data generator workflow like we're doing here. You've got real devices that are recording real data and you want to get that data over into the Losant platform. So, here's an illustration for a few different options for how you could do that. Again, I just want to reiterate Losant is hardware agnostic. We don't care what your hardware is so long as it can make a connection to the internet and record its data up to us. There are a number of different methods. I'll illustrate a few of them here. We take it from there. First option being a standalone GPS tracker. Now, in this case you probably have a tracking device that is, of course, giving its GPS data probably has a cellular modem in it that is able to connect either to the Losant MQTT broker, which is the preferable option in this case. Or you can send data up to us using our REST API. Just to touch on the broker being a preferable option, MQTT is a far more lightweight protocol than HTTP is, which is what the REST API would be. Of course, use whatever your hardware makes available to you, but if you have the option, I would strongly recommend you going MQTT. You're going to get a heck of a lot more out of your battery life using that method than you would be using that of a REST API. And in that case, you're reporting your data directly into Losant. Second option is a third-party integration, and this is probably the most popular option if you're going to use off the shelf hardware. If you were going to, after this webinar, type into Google, "GPS tracking devices," you'll find a whole bunch of different options, and what most of them have in common is that the hardware and the platform, or I should say the… Yeah, I guess we'll call it the platform itself to where it's reporting, are a package deal. You buy the hardware, turn it on, it's automatically sending whatever data it's generating up to the service that is powering that device. And then, from there what you want to do is, there are a number of different methods, most likely a webhook. You could also use a Losant integration. Pipe the data directly from that third party service over into the Losant platform. Just a few examples of this, one of them would be Verizon's ThingSpace. We're building a critical asset tracker with them. Their hardware reports directly up to the ThingSpace service and then ThingSpace is actually piping the data directly over to Losant. Another option would be Particle, which is a good option for proof of concepts. You get some of their hardware. It's very easy to provision, pushes the data up to Particle and then we actually, in the case of Particle, have a first-class integration, a Losant integration where you can take that data directly from Particle into Losant and start logging it to your devices and your application. Electric Imp being another one. They're not so much a hardware vendor, but more of a secure connectivity system. It actually works the other way for Electric Imp. They have the integration built on their side to automatically connect the data over to Losant. You wouldn't have to really do too much set up there. They've already got that built in. And then another option even would be Twilio's programmable SMS. We saw a case where somebody was using a Queclink, Q-U-E-C-L-I-N-K, hardware had a little cellular modem in it and essentially what it was doing was sending a text message over to a Twilio number. And then based on the content of that text message you can parse that and turn that into something that Losant can understand either on the Twilio site or also on the Losant workflow once you pipe that data over to the platform. And the third option, this is probably less popular than the other two, would be to use Losant's Edge Compute. So, you would have an edge compute gateway that is serving as a gateway to a number of other sensors which we would call peripherals in Losant terminology. Those peripherals could be connected to the gateway. They could be hardwired. They could do Bluetooth Low Energy, LoRa, a whole number of different options there. But the idea is that the sensor data gets off of these individual devices over to the edge compute gateway and the edge compute gateway takes care of reporting up to the Losant platform, again using either a MQTT connection or via the REST API. This would be a good one, the good option if you've got items moving in transit over areas that don't have a very good connection, good internet connection so you can actually log all this data locally on the device, hold onto it until you do have a better connection and then report it up. This would include even crossing the Atlantic Ocean or just driving to the Badlands with a shipment, or a whole lot of different possibilities there. We do have a Losant University course on edge compute if that is an option you're looking into, I would strongly recommend you take a look at that Losant University course to learn a little more about how that all fits together. So, what is in this template? There's a lot, but there's a few things I want to touch on, some key components that set this application template apart from the other ones you'll find in the catalog. All of them are going to make use of the workflows, but there's a couple key things inside of the workflows you'll find here that I want to point out. This template is a great showcase of Losant's events feature. Touch on that for logging anomalies that take place over the course of the shipment. And then we also, of course, use dashboards. You saw those in the finished product earlier, but there's a couple blocks specifically I want to touch on and their configuration for how we're using those because those blocks, that we'll touch on, are pretty critical to any asset tracker solution that you're going to build. So, starting from the top, this template includes five devices. These devices are nearly identical. They all have these attributes defined here. Location, of course, being GPS data that it's pulling off. Just to back up a little bit, an attribute in Losant parlance is a type of data we are expecting to be recorded for the device in question. I already mentioned location, but there's a few other ones here, temperature, orientation and shock. These are numbers that would be coming off of your tracking device to tell you a little bit more about what's going on in your shipment. Pretty much every GPS tracker also includes battery and signal strength, so we went ahead and included those there. And then shipment ID and distribution center ID. I imagine you're going to have something very similar in your final asset tracker applications, but for this case we're using these two in conjunction with our data generator to keep track of where these devices are in relation to distribution centers and also to group their trips by a unique shipment ID. The only thing that's different about these devices, these sort of devices, is this tag down here that's simid. The device tags are meta information that you can attach to devices, actually to a lot of resources in the Losant platform, but devices here specifically. This is just simple key value pairs to tell you a little bit more about that particular device if you want to do queries against all devices matching a certain tag value, which is another thing we're going to touch on a little bit later here in this presentation. Template also includes data tables, one data table. Now, this is a pretty lightweight use of data tables. We're using it here as Fox mentioned, to keep track of all of our different distribution centers that we're making use of in our data generator here, specifically the coordinates. We'll get to that in a little bit. There's a much more robust use of data tables in Brandon's Industrial Equipment Monitoring webinar. The replay is available if you want to go back and watch it. A general rule that we always try to hammer is that a data table should be a read-heavy write-light resource, meaning that this should be a store for meta information only. You should not be writing your device state data to here. If you find yourself writing a significant number of data table rows, you're probably not making the best use of data tables and you want to actually try something else. And you can reach out to us on our forums if you are experiencing something like this and we've got a lot of people who work here at Losant monitoring those forums who've got a lot of good insights as to how to best architect your applications. I got two application workflows. Those are the ones that will be enabled when we first kicked off our new application. I'm going to start in the data simulator. Now, there's a lot going on here. I'm not going to touch on too much of it. Just to give you a quick fly-by The data generator, the way it works is we're going to get all of the devices in our application that match that device tag that we saw earlier. And for each of those devices... got a lot going on here. So, primarily, the main thing that's going on is that these devices are moving in a loop between… let me go back and show you here, map… these devices are moving in a loop from Indianapolis to Columbus down to Cincinnati down to Louisville and back Indianapolis in perpetuity. The trip takes about 8 hours and 20 minutes. In case you're interested in generating something like this, I actually got this, I built this route using openstreetmaps.org. You can put some stops in there along the way and then ask it to actually output the coordinates for you. That's what I did to build this. If you're going to build your own data simulator and you want to watch assets moving along a certain path, that's a great place to do it. In addition to moving along the path there, we are also depleting the battery over the course of this shipment, random fluctuation to temperature and orientation, randomly, every once in a while, exhibiting a shock in it as in something jostled our shipment a little more than we would be happy with. And then as these are leaving the cities that I mentioned before, we're actually kicking off a new shipment ID on each of those devices. One thing I do want to touch on inside of here is the geofence node. Now the geofence node is a branching workflow node that allows us to determine, given a coordinate, whether that coordinate exists inside of a geofence that we define. Now, in the data simulator, we are pulling the coordinates for each of our distribution centers out of the data table I showed you a little bit earlier looping over those and trying to figure out if the device's position falls inside one of those geofences. So, that's what we're doing right here. The coordinate we're checking is the device's next coordinate. And then, we're checking it against each of the distribution centers. So, in this case it's a variable because we're doing it inside actually two loops. So, what's pretty neat about the geofence is you don't have to do it that way. You can actually draw or type a geofence in. So, let's say I just want to know if anybody is within, we'll call it … somewhere near Cincinnati, 1,000 meters. It draws this nice little circle around a town in northern Kentucky called Taylor Mill matching that coordinate and that radius. What's even cooler is that you can actually draw a polygon. So, if I want to, for example, tell… this is going to be rough, tell me if my device is anywhere in the great state of Ohio. Oops. You can actually draw your geofence around there and it will, after drawing it, spit out the coordinates and map that geofence. And then if your point falls inside of the geofence, it will branch down the true path. If it's outside, it will branch down the false path. Again, this exists in the data generator, but this is a node that you are almost certainly going or be using over the course of your development of any asset tracker solution. I just wanted to make sure to point that one out. Going back to our workflows, I also want to touch on the event logger. This is the primary driver of, or the driver of the events that are logged inside of this template. So, just a quick fly-by here. What's going on is every time one of my devices reports state, and that's going to be every time my device simulator workload fires for each of my five devices, I'm checking to see if the temperature orientation or shock values fall outside of what I have deemed acceptable ranges. And if they do, I'm going to create an event. This is just some mutation of the payload to get the right data inside of there. What should the name of the event be, etc. I'll create an event to log into the application to tell me that that happened. Now, in the case of temperature and orientation, you'll see that I've got these extra nodes in the middle here. Since, if the temperature falls outside of the range, it's probably going to stay outside of a range for a significant time in a real-world scenario and I don't want to keep logging over, and over, and over again that the temperature is outside of my range. You're just going to spam the system. So, what we're actually doing in that case is checking to see if we have already logged the event for the shipment ID in question and of that particular type. And if I do find an event... I'm just bailing out, which is if this event exists, this true path here that goes nowhere, I don't need to keep logging in over and over again. I'm not doing that for shock. We determined that really just to illustrate the two different possibilities here. Then in the case of shock, let's go ahead and tell us about every single shock event that occurs no matter if it's happening multiple times inside of the same shipment. So, we're bypassing that extra check right here. Touch on the two dashboards. Again, you already saw these when we did the preview the finished product. But I do want to talk about the configuration of these two blocks right here. The first one, this is a GPS history block. I'll just zoom out a little bit here so you can from the preview. So, what I am mapping here is all of my devices that have a simid tag regardless of its value. And that's what you get here. That’s, in this case, all five of the devices inside of my application. I'm also returning additional attribute data along with these devices. Now, we added this checkbox here just for a little color for everybody because if you don't need that additional information in your map, I would recommend returning no additional attributes. It is going to speed up this call a little bit. You're just kind of building the performance. We do need it in our case because we are using that additional information to populate this little info bubble right here. This particular one that I clicked on is currently at the Louisville Shipment Center under this shipment_id and these are its current values, it's telemetry data. That is configured down here in this pop-up display. There's a little bit of information here about how to use Handlebars templates to spit out the information you're looking for inside of this bubble. And then also, they're all green right now, but we can also change the color of our pins based on the values of these attribute values. Right now, they're all green, but we can turn them red. For example, if a temperature falls out of a range, shock falls out of a range, etc. Also, I want to touch on the events block right here. So, if the title of the block says this is all the events that have occurred in the last 24 hours, how do we achieve that? Well, first of all, I've built an advanced query here for my block. I only want events that are in a new state. So, please don't show me any that have been acknowledged or resolved. And, as far as the creation date, this template you see right here, this actually came out of one of our forum users was trying to do something like this and we came up with this Handlebars template that you see right here. Essentially what it is saying is, given the current time, format it down to… we're actually rounding to the nearest minute, and subtract 24 hours off of there. This is in milliseconds. And then what I get back in result is all the events that were created in the last 24 hours. I also have this Allow Updates box checked right here. This is important if you do want to allow your Experience users to actually make up dates to the events also. Without that, the demonstration I showed earlier where I actually clicked on one the events in the experience to get the Modal would not work. It's a permissions issue. It's up to you whether you enable it or not. And then down in the experience, I'm not going to touch on this too much, there's a lot going on inside of Application Experiences so much that we decided to host at least one webinar in the subject. That is coming up, I believe it's on May 12th, Tuesday May 12th. That's hosted by yours truly. We're going to go over in more depth what an application experience is and how to build them out. How to get your device data into your Experience pages. How to allow users to sign in, to build dashboard pages. It's going to be a pretty broad topic. So, if you're out there trying to build application experiences, I highly recommend you attend that webinar. There's going to be a lot of useful information there. I will point out two things very quickly inside of this, which would be these two pages right here. The dashboard overview page. This one's pretty much a straight pass through whenever this page is rendered, which is being rendered by this route up here, this GET devices route which is essentially our homepage. One user is logged in. Just rendered that review dashboard that we were just looking at, spit it out into my template. The other one is the device dashboard in individual device, so that would be this guy right here for one individual device. I'm going to point this out very quickly. You see this ID that's up in the path right here, that represents inside of this end point this variable right here called deviceid. That corresponds to the deviceid of all of the five devices that we touched on earlier in the presentation. So, when somebody requests this page, which they do so by hitting this route, I want to render my Detail Dashboard, but, and this is important, as a context variable, I want to pass in that request.params.deviceid which is that value right there. This is called a path parameter. And when I pass that in as context to the dashboard, I'll come show you very quickly on the detail dashboard, we'll just take this one as an example. All the blocks have something similar to what I'm about to show you, but the query is mapped to the context variable for deviceid. And that is how we're able to only build one detail dashboard but allow us to display information for specific devices inside that same dashboard not having to rebuild the same dashboard five times. One last thing I do want to do for you very quickly just to demonstrate that these templates are starting points. They are not ending points. You can create new resources. You can delete resources. You can blow the whole thing away and start over if you like and only use it as a learning experience. But, just to illustrate that, let's say that inside of this template, we decided that we want to send a text message to one of our experience users — We'll refer to this person as the refrigerator repair guy — every time that we get an event telling us that our temperature is falling outside of our range. So, how we do that? First thing I need to do is actually mark our friend Test User here as the person in question. I'm going to add two tags. First, let's put a phone number in there. And let's put an alert for, we'll say, temperature. And we'll say this user. Okay. How do we accomplish our goal? We can do so with the workflow. I'm going to add a new workflow. I'm just going to call it Texter. And now, we want to trigger this workflow every single time we get a new device in the system. However, not just any new device. So, coming down here you see we're going to check only new events. And I'm going to change the level to Critical. Now, Critical is what is mapped to our temperature events inside of here. I'm going to say this, and I'll come back very quickly just to show you. All the different events, most of them are shock as you see and there's an orientation event. Do we have a temperature one here? Let's do this. There's one. When we log an event, we are giving it a title, shipment outside of range. We are associating it with one of our devices. We're also adding a couple of tags to that, which would be the shipment_id under which it happened. We are using that to determine whether or not create new event that you saw in the previous workflow, and also the type which is the temperature event. I'm also getting the raw value right here. It fell just below zero degrees which was my threshold. We're recording that as the message on the event. Back to my workflow, my Texter workflow here. So, every time we get a critical event, a new one, we could map that to the subject, but this is good enough for our purposes here. What do I want to do? Well, first thing I need to do is find the relevant Experience user. That would be the User Get node. We're going to attach that to here. We want to actually find these users by tag query. We're going to do alert for temperate. This was one of those two tags we added previously. Do you want to get multiple users? I only have one for now, but we're going to go ahead and get multiple and then I'm going to put the result of that operation. Add a path to my payload, "working.users." Okay. Next, I want to loop over all of those users. So, I'm going to drop a Loop node on here. And again, only one, but just to expand on how this could be done for multiple people. Working.users it the source that I am looping over. And the current user I am operating on we're going to call working.currentUser. Cool. Now, inside the loop for each of my users, which is again available at working.currentUser, I want to send a text message. Now, I'm going to use the SMS node here. This is fine for demonstration purposes. In a real production environment, please, please, please do not use the SMS node. You instead want to use the Twilio node. And create your own Twilio account, get your own SID and auth token in there. The reason being that the Losant SMS, behind the scenes, actually is using Twilio. It's using Losant's personal Twilio account. However, for that reason, we do establish rate limits per application. And there are certain thresholds as far as cost per message that we will not exceed. We have had users not have messages delivered because they were trying to send to international numbers, the cost of which went over our threshold. So please use the Twilio node if you're actually going to do this in a production setting. Now, what do I want to send? We want to sent to the number working.currentUser.value.userTags.phone. That's a mouthful. Very quickly, just the currentUser that we're looping over .value because that's where we actually put the value because we have additional properties, we're exposing there such as whether this is the first the last iteration, the userTags.phone would be the phone number that you saw me add in the user object before. What is my message? Well, when I log an event, this is the information I have available to me that comes in the payload when an event comes in. So, let's put the subject of our event inside of the text message. Let's go line break, Shipment, data.eventTags.shipment_id. That is one of the tags that we are logging on the event. And let's put our message. Let's put the result at working.currentUser.smsResult. and then we'll just throw a Debug node in the middle here so you can see how it went. Go ahead and save that. Now, to test this, let's just create an event. Use a Virtual Button and then tie an Event Create node to it. Let's go ahead and change the subject to TEST Temp Outside Range. We're going to choose critical, which is important for our purposes because we're only going to fire this for critical events. Let's set our template to, Value recorded at 5.67. We could choose any device here. It doesn't really matter. And then let's put two tags on this event. Type is temperature and shipment_id, just so we can kind of match everything that we see in the event that comes in. And we can just type anything here, 121212. Let's save it. And let's see how we did. There we go. I don't know if you guys just heard that, but my phone just buzzed on the table next to me giving me the message that came through. So, when I clicked this button, it logged an event that triggered this and then sent a text message to user in question. So, just to recap, and then I'll turn it over to Fox for questions, this template is a great starting point for any outdoor asset tracking solution. In addition to that, even if you're not doing an asset tracking solution, but you want to learn more about how Losant events work, download it. Play with it. I should say, create an application from it, play with it. Pull some learnings from it and then you can, of course, discard it when you're done. I'd say the same thing about the data generator workflow. This is one of the robust data generator workflows you'll find in all of our templates. You might want to pull it just to look at that and learn a few tricks if you're trying to build something like that for yourself. And, with that, I will turn things back over to Fox.
Taron: All right. Awesome. Thank you so much, Dylan. What I'm going to do is tell you all what your next steps should be from this. And, also set aside some time for some Q&A. In this case, what Dylan showed, as he mentioned the entire time, the templates are really a starting point. And as you're building your application the whole idea is that you're using these templates to learn how to build effectively within Losant and to literally have a great thing to look at as a resource. So, there's two places where you should totally go after this. So, with every readme that we do have in the application… with every template, sorry, that we do have within the application we published a readme with them. And this readme talks a little bit about the story that Dylan was mentioning, what the template… the key Losant things that the template covers and also information on how to get started and the user accounts for experiences and so on. So, there's a lot of good information in that readme for you. So, be sure to look at that. And next, really, and this will cover… a lot of you were asking, "devices, how do I get a device to do this?" or "does Losant provide devices?" So, the one thing is that Losant's only software. We don't provide any hardware. Our value is that we're hardware agnostic. So, we support a wide variety of hardware as long as the data can get to the internet, you can get it in Losant and use all the things that Dylan was talking about today. But, specifically, here's how you get started with a template. So, first, update devices and send data. So, each device, they have attributes. Those attributes are in this case a GPS value. In the asset tracking world, you may not have to change that. You may have to add other attributes that you want to check. Maybe it's a cold chain monitoring solution and longitude GPS you want to include some temperature data in there. So, really that's what… you take the template, you kind of make it your own. That's the first route. The second route is you find hardware to support your use case. So, this was a question that asked, so currently Losant doesn't have any pre-list hardware that is supported by this template. But, because we're hardware agnostic, so really if the data can get to the cloud, so if you can find an asset tracker that can get data to the cloud, that's a good way to know if it can integrate with Losant. But, if you need help here on the second point, we have our in-house solutions team, and they will be happy to work with you to help you figure out what hardware will make sense. They do a lot of proof of concepts with our customers. So, they're a great resource to turn to. And lastly, for all of you who are currently building in Losant, everything that you see in these templates, you can literally copy and paste into your application. So, if you see something that you like, or see something architected or a technique, the templates provide a great way for you to take those and drop them right into current app. Also, be sure, while you're all here, save the date. There are more. So, Dylan mentioned his. So, that's the one on the left, that May 12th. And that one, Dylan is going to dive a lot deeper into experiences. On the left is the Huddle Room one. We're going to talk about the Huddle Room template, and that's done by your truly. It's going to be a great time. I promise. Be sure to join. So, let's talk about Q&A and further learning. Most importantly, the Losant docs are always there for you to look at as a resource. The forums, we are always willing to chat with you. So, if you have any questions or you're building something cool within Losant, let us know in the forums. Losant University is there for you to get you started with Losant. I'm biased, very biased, but I think it's a great tool for you to use as you go about your Losant journey. And lastly, there's a ton, a ton of helpful tutorials in the blog that will also teach you a ton. so, we try to provide, and we're continuously trying to provide more resources to help you learn about Losant. Now for some questions. So, Dylan, I think this one is a really good one. So, you were talking about the devices and the way that data gets to Losant. There was a question on option two. I'm going to put this on the screen for you. But, yeah, could you give a little bit… a brief explanation of the third-party integration, what you were talking about here?
Dylan: Yeah. Sure. Actually, if you want to hand me the screen back, I can demonstrate that a little better here.
Taron: Of course.
Dylan: Let me grab that. Okay, the question is touching on… we're are we at here? There we are. The question was about integrations. I had mentioned that you could use a third-party integration to actually pipe your data over to Losant. So, just to touch on what that is, you see under this Integrations tab over here on the left, you can add an integration to your application. This will automatically, basically create a stream, like a pipe from some other third-party service directly over into your Losant application. We have a couple different options here if you're doing an asset tracker, I did mention Particle. Now, we do have this first-class integration with Particle. I don't have any of these values offhand, so I'm not going to set one up. Another option would be connecting to another MQTT broker. Now, maybe, maybe the off-the-shelf hardware you're using in that case where you're purchasing a GPS tracking device and it is reporting its data up to some other service that pipes over us, maybe they have an MQTT integration. If they don't, what they almost certainly do have is a webhook. A webhook is basically just a URL that you can send data to on the web. I'm just going to call this one Test Hook. Forget about all the verification stuff for the moment. The idea would be that it would be on the third-party platform side, their responsibility really, I guess, yours as the person setting it up, to integrate every time that a message comes into that service to send the data over to Losant via a webhook or one of these other integrations. Just going into a workflow really quick here. You see I already deleted the event trigger because it was sending me spam. The triggers would be, in the case of a webhook or an MQTT, these would be… the MQTT and the Particle triggers would be under the Integrations tab. The webhook would be that webhook I just set up. But anytime we get a request to a webhook or a message on one of these integrations, we can kick off a workflow. In the case of the broker, we can actually specify it to a certain topic. And now, once we get that message, there's probably going to be some intermediary nodes in here to get the data in the format you need. But when you get the message from Particle or from the MQTT broker, we can take the data we're getting in that message and actually report it as device state using the Device State node right here. And let's say we reported its values, I don't know, maybe battery was under payload path of data.body.attributes.battery, this is all of course going to depend on your integration. I don't know what this value is going to be for your particular case. But the point is that using those integrations that I mentioned and also the webhooks, you can fire workflows from those points. And once the workflow fires, we can use the Device State node to take the data we're getting out of that message and actually report it as state data on one of your Losant devices. Hopefully, that answers the question.
Taron: Beautiful. Yes, no, I think that makes a ton of sense, Dylan. For your next question is, how can I create my own template? And then, if I create my own template, how do I share that with my team or my customers?
Dylan: Sure. So, at the moment the best way to go about this is to come into your Application info tab. Now, first thing you want to do is build out your application exactly the way you want it for your template. And you'll find, under the Application Info link right here in the left column, we have an Export button. This allows us to export all of the resources that are in this template. You see we have a couple of checkboxes here. Yes or no, do I want to include the devices, the rows inside of my data table, and then the application files. This is important to note, there are certain things that will never be included in an export, anything that has to do with security, unique access keys, and API tokens. It will not include events, actually or device state data. So, it will be pretty much everything configuration-specific other than security. And it does not also export Experience domains and slugs because these actually need to be unique across the entire platform. Anyways, I digress. You can export it. Think about that for a second. It's actually going to give you a zip file you can download the file. Okay, great. Now you've got this file in hand. You can send that to anybody you want. You can post it on GitHub if you want to. But if you want to actually use that, and once you have that zip in hand you can come into… we'll go into this organization I've created here. And I have this import button where I can import that bundled zip. Or I can actually also just drag it right onto here. Now, this kicks off a job. Depending on the size of the bundle, it can take a little while. So, you see it didn't show up immediately, but if I refresh, I'm almost certain it will be there. There it is. That was the one I was working on before. This is a brand-new application that includes, just to demonstrate that texture workflow that I had just had. That's the easiest way to make your template available to other users. You export, send the file, and then have them import it. You will notice that just as it did when I created from a template, your workflows are going to be disabled by default. So, once you actually import, you're going to want to enable all of these workflows to get your application up and running.
Taron: Awesome. Thank you so much, Dylan. So, for everyone else on the call, what I'm going to do is... and if you don't mind, I can pick up your screen again, Dylan.
Dylan: Oh yeah. Sure.
Taron: So, just to recap, here are all the places you can go to get information. For the last webinar, we followed up in a forum post all the questions that we weren't able to answer. I'll be sure to do the same thing today. So, be on the lookout for that soon. So, the questions that wasn't answered I'm probably going to answer it in the forums for you. So, be sure to look for that. Also, be sure to look for the replay after this as well so you can share this with your team. But I really appreciate you taking the time with us. Thank you very much for listening. I hope you'll have an amazing day. Until next time, stay connected.