


Heath Blandford: All right. Welcome, everyone, it is now 1:02 Eastern, and we're going to go ahead and get started. Thank you all for being here. I couldn't be more excited to be talking with all of you on this beautiful day. Today, we're going to be taking a deeper dive into a new template that harnesses the power of EnOcean IoT Starter Kit, and Losant's cornerstone tools to deliver a complete end-to-end solution. Today, we've got a few different speakers. My name is Heath Blandford, I'm a Customer Success Engineer here at Losant. I'm joined today by a star Solutions Architect, Kevin Niemiller, and our own Chief Product Officer, Brandon Cannaday. Before we go any further, I do want to provide a couple bits of information on this webinar. We are recording this webinar so that we can make the replay available to you in a few ways. We're going to send you an email with the link to the replay, and the recording will also be made available on Losant's YouTube page, as well on our Deeper Dive page on our website. Now, we love hearing your questions, so I would like to point out a few key features in the Zoom conference. You can use the Q&A feature or the Chat feature to post questions, and I myself will be monitoring those throughout our time together. Then at the end, I'll moderate a Q&A session with both Kevin and Brandon to get to those questions. Now, let's do a quick review of Losant and our Enterprise IoT Platform. Losant is an industry-leading IoT platform. As an application enablement platform, Losant provides enterprises with the building blocks they need to create their own IoT products. The Losant platform consists of five key components to help customers achieve that IoT product. We have End User Experiences which allow you to build a fully functional web interface that lets users interact with your connected devices. We have a Visual Workflow Engine which is the low-code brains of your connected solution. It's how you trigger email notifications, create events, send commands to connected devices, and much more. We have Data Visualization Tools which allow includes integration [Inaudible 00:02:08] notebooks for more advanced analytics. These allow you and your end users to see what your connected devices are doing. We have Data and Devices which allow you to create a digital twin of your devices in the field as well as integrate with other services that have data you care about. And finally, Edge Compute, which is a suite of functionality that enables you to execute business logic right at the edge. Our customers utilize these five tools, these five components, to create robust IoT products that they put in front of their end users. Losant is a leader in the industrial, telecommunications, and smart environment spaces. And we've offered this platform for all sorts of customers ranging from startups to companies in the Fortune 100. If you're interested in learning more, please reach out and we would be happy to set up some time for a much more in-depth conversation about how Losant can help you develop a connected solution. Now, while... I am so sorry. What am I doing here? I'm sorry. [Laughter] While Losant provides the software foundation for IoT, we surrounded ourselves with a great ecosystem of partners that help create this IoT solution. This includes strategic partners that we share go-to-market strategies with, solution partners who help you develop your end-to-end solutions, and technology partners that provide hardware, connectivity, and other services to round out your IoT solution. Again, I couldn't be more excited to have you all here today. I'm going to pass this virtual mike over to Kevin and he'll help to get us started with this Deeper Dive webinar.
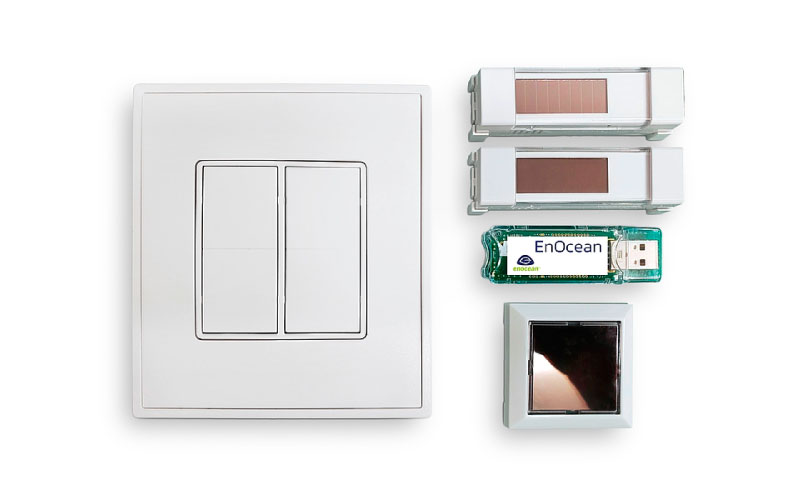
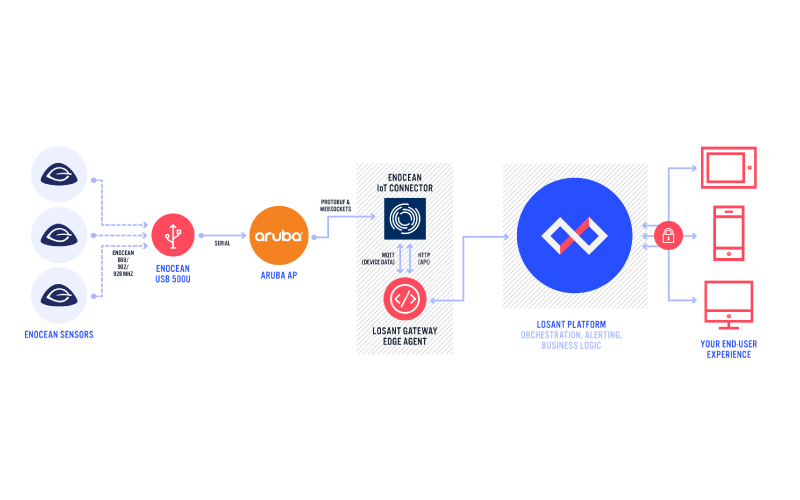
Kevin Niemiller: Yeah, thank you, Heath. As Keith mentioned, I'm Kevin Niemiller, and I'm a Solutions Architect at Losant. My role at Losant allows me to work closely with a number of Losant customers toward building a smart environment solution like the one we're going to go over today using EnOcean and Aruba hardware with the Losant platform. Before handing it off to Brandon to walk through the application template, I want to talk about the overall solution and how EnOcean, Aruba, and Losant are coming together for a complete end-to-end solution. In a smart environment, it's all about knowing more about your environment to help make better decisions. We see a lot of companies monitoring water and energy usage, occupancy of huddle rooms and meeting rooms, lights and HVAC usage across a campus, indoor air quality, and many more. To build your smart environment, the first step is really to find the hardware that can do the sensing of your environment. This is where EnOcean comes in. They make self-powered sensors that can do a lot of the sensing that I just mentioned. And since they're self-powered, they don't require any wires to power the sensors, or any maintenance to change batteries. Most sensors are powered from ambient light and store that power on the sensor to be used when the lights are off, or in the case of their rocker pad light switch, the mechanical pressing of the button generates enough energy to send the EnOcean telegram. The EnOcean telegram is sent over the 902 megahertz frequency band, and that telegram contains the unique identifier of the sensor, and the data the sensor is reporting, such as motion detected, temperature, or humidity. So, now that we have sensors scattered throughout our environment that can sense that environment and provide data, we now need to get this data from the sensor to an end-user experience to visualize that live data. This is where Aruba comes in. Many of these buildings and campuses already have Aruba access points strategically placed to provide Wi-Fi to employees. These same Aruba access points receive the EnOcean sensor data and forwards the data over a typical network to get the data to the application responsible for displaying the data. Now, we're at the last part of the solution where we need to ingest this data somewhere and provide a way for users to interact with that data. This is where Losant comes in. The data from the Aruba access points will ultimately make it to Losant where we can visualize and interact with the real-time data. With this data in Losant, we can now draw meaningful insights into the data as well. An example of this with occupancy monitoring is showing heat maps in a building of the most-used areas throughout the day, or building a report of the most-used conference rooms at different times throughout the day. You can also use this occupancy data to justify adding more huddle rooms or additional space if needed. Let's jump in more to this solution technically to show the architecture of how all of this comes together. We have the EnOcean sensor sending EnOcean telegrams over the 902 megahertz frequency. They also have other frequencies depending on your region. That data gets sent to the EnOcean USB transceiver that is plugged into each Aruba access point on site. The EnOcean USB transceiver forwards the data over serial to the Aruba access point where the access point will then forward the data over Protobuf and WebSockets to the IoT connector. The IoT connector then parses and transforms the EnOcean data into JSON data to be sent to the Edge Agent over MQTT. From here, the Edge Agent can now forward the data to the Losant cloud. Now that the data is in Losant, we know the power that comes with that, where we can build low- to no-code workflows to do orchestration, alerting, business logic, and ultimately provide a multi-tenant end-user experience for different employees and customers to log in, and only see the data they have access to. In the application template that Brandon is going to go over, he will be focusing on the second half of the diagram, so from the IoT connector to the Losant end-user experience. Let's check out one more slide that will talk more about the IoT connector and Edge Agent before passing it to Brandon. Starting with the IoT connector, it is software and deployed using Docker. EnOcean provides a Docker compose file to help you get up and running quickly. Like I said before, the IoT connector receives data from all Aruba access points on site, transforms that data from the EnOcean telegram into JSON format, and then exposes that data over MQTT. This is the reason the IoT connector is so important in this solution. Since EnOcean is the subject matter expert with their sensors and the EnOcean telegrams, we are leaving it to them to properly parse the hundreds of different EnOcean sensors, and then output that transformed JSON data over MQTT. As new EnOcean devices come out, you can coordinate with EnOcean to get the latest IoT connector that will support those new sensors. All sensors that will be used on site must be provisioned within the IoT connector for the IoT connector to properly parse its EnOcean telegram. This is done over an API built into the IoT connector. The Losant Gateway Edge Agent is also software and deployed with Docker. In our current customer use cases, both the IoT connector and Edge Agent have been installed on the same gateway or VM. So, Brandon has made one Docker compose file that incorporates both the IoT connector and Edge Agent that will come in the application template. The Edge Agent acts as a local MQTT broker to receive the JSON data from the IoT connector. The Edge Agent also acts as a MQTT client to the Losant cloud platform so that it can do two things in this scenario. It can send the EnOcean JSON data over secure MQTT to the Losant cloud platform. And secondly, it can also receive commands from the Losant cloud platform so that the Edge Agent can interface with the API built into the IoT connector to do things like adding and removing sensors from the IoT connector. At this point, I'm going to go ahead and pass it to Brandon so that he can walk us through the application template.
Brandon Cannaday: Thanks, Kevin. Welcome, everybody. Once again, my name's Brandon Cannaday, I'm the Chief Product Officer here at Losant. And I'm going to be walking us through an application template we developed to help anyone that is interested in getting started with EnOcean get off the ground a lot faster versus starting from scratch. So, Kevin did a quick overview of this side of the architecture diagram. The template I'm going to walk through covers this side of the architecture diagram. So, EnOcean provides a lot of great instructions in order to properly configure, get your sensors through the USB stick into the Aruba gateway, into the IoT connector, and then our template provides instructions for this half. Our template's really kind of two major parts. One is what we're calling orchestration which is the remote management and remote configuration of the EnOcean sensors. So, from this end-user experience in the browser or mobile app, you can go through the Losant platform securely into the environment where the IoT connector lives, where the actual smart environment sensors are, and you can provision, onboard, and control the EnOcean sensors. And the other half is the opposite direction. So, once data's been received from the IoT connector, how do I securely get that up to the cloud, and then onto dashboards and into the hands of the customers of the smart environment solution? So, just like all of other application templates, whenever you go into Losant and click New Application, you'll see this new template – the EnOcean IoT Starter Kit Template. And we designed this template around what EnOcean calls the IoT Starter Kit. That comes with four sensors, comes with IoT connector, basically comes with everything you need to build a proof of concept in order to explore the EnOcean technology. So, we've done the application enablement, the visualization, the orchestration, around that starter kit. Everything I'm going to demo today comes out of the box in this application template, so when you click Make Application, you get everything that I'm going to show today. And I'm going to be going in and out of some Losant resources, showing a lot of the implementation details of Losant, so if something catches your eye that I may not go into further details about, go ahead and drop us a Q, or a question, using the Q&A section, and I'm happy to kind of circle back and show some more details about any of the implementation that you want to see more of. So, the first thing I'm going to show is going from the user experience down. So, when you create an application from this template, you'll notice the application does not come with any devices. We don't create any devices for you out of the box. And that's because devices must be provisioned with the IoT connector. It needs to know the specific details about your device, its unique identifier, what type it is, in order for it to start collecting information and parsing that EnOcean protocol. So, this template comes with a end-user experience, you can find it down here in the Experiences navigation menu. And then at the top, you'll see the URL for your experience. When you click on that and log in, you'll be immediately redirected to the Provision page. And I do want to point out most of the user interface I'm showing here was built using our other library templates. Including this form, this header, the entire layout behind it, those all came from installing templates from our Template Library. So, you don't have to start from scratch and build a form and build the workflows to accept that submitted data. You can get there a lot quicker if you kind of just browse around the Template Library. And I do want to point out a past Deeper Dive, if you are new to the Template Library. One of the best ones you can do is probably Building Application Experiences in the Template Library. These are going to be excellent Deeper Dives that go into details about using the Template Library and how to automatically get a login page, a password reset page, the layouts behind it all. So, I definitely recommend checking out those two past Deeper Dives if you're new to Losant and Experiences. So, when you do get the IoT Starter Kit, you flip a sensor over, and there's some details written on the back of it, and that's the information we have to enter here. So, what I'm going to do is fill some of this out. I've got the double rocker pad that comes with the starter kit, so that's what I'm just filling in here. Friendly ID is anything you want to call it. Location, well, I'm just at my desk so I'm going to put there. And this EURID is the most important piece, that's the unique identifier for your device. So, before I hit Submit, I want to go through and show some of the workflows that's going to happen. This template comes with kind of a unique implementation that we haven't demonstrated before, about kind of queueing requests down to the device. You see I've got this Pending Provision Request table up here, right now there are no pending requests. And the reason we have to queue this up is because we don't know what the internet connection is between the Losant platform and wherever this gateway is. Maybe the internet connection was lost, maybe there was a power outage, and if you've used Losant for a while, you know commands, we're going to send a command down to this gateway to do that provision request, are fire and forget. So, if that connection is gone and we attempt to send a command, that provision request could be dropped. So, what this template's showing – and I'm going to go into details of this – is a queueing mechanism. We want to queue up this pending request, and the platform can try as many times as needed until that gateway comes back online, and is able to fulfill that request. So, I'm going to quickly go through the workflows that make that up, and then I'm going to hit Submit, and we're going to step back through them, and see a real provision request go through. I'm actually all connected up to an actual EnOcean IoT connector, and set up in our office lab. So, I'm going to submit this in just a moment. But here are all the workflows. The first is the workflow handling the actual provision request. So, if you've ever done anything with Losant Experiences, the workflows are what fulfill requests. So, when I hit that Submit button, it's doing a normal HTTP post to an endpoint, in this case it's /provision, that's going to trigger this workflow, and then we're going to do some work. Then there's a cloud workflow, so that provision request is just submitting an entry to a queue, and I'm going to go into the details of all this in a moment. And then there's a cloud workflow that's constantly checking the queue. I've actually disabled this timer here. This will be enabled if you install it from your actual application, from the template. But I disabled it, that way I can kind of slow this down, and kind of explicitly trigger this so we see what's going on. That's going to grab all the queued items and then try to send all the commands, and then this also receives the responses back from the Edge Agent, and completes the provisioning process. Then we get down to the Edge Agent itself, this is what's handling the command. I've got the Live Look window open, lets me open a debug stream to my gateway, and see what's going on. Command'll trigger, it'll make the actual provision request. EnOcean's IoT connector does expose a REST API. But one of the major benefits of this template and putting Losant on top of an environment like this, is access to a local API can be inconvenient or sometimes not even accessible. If you've got technicians outside of that local internet, they're not going to be able to hit that API, and raw access to API is prone to errors, and it might be a little bit more challenging compared to just creating a nice orchestration UI. So, that's the three workflows that are going to happen. Let's go ahead and go all the way back and hit the Submit button and see what happens. So, I'm going to hit Submit. Immediately, we see we've got a successful provision, and then my table just updated with a pending request. So, let's go to the provision request workflow, and we can see now I've got an entry in the debug panel. Debug panel's going to be your best friend if you've ever worked with Losant or are new to Losant. Make sure to put debug nodes everywhere. We can see what happens in this request. When the provision endpoint is invoked by the browser submitting that data, that's going to put it on the data property in the payload. There's the body that was submitted, and we can see right there. Super easy, I've got all the fields that represent the information I just typed in – My Desk is the location, the Double Rocker Pad, and now I can use this information in the rest of my workflow. First thing I'm going to do is do a validate payload. Really important to validate all input in any application that you're doing. We've got the Validate Payload node, this takes the JSON schema application. Basically, I'm just saying, "Well, the type I expect is an object and it needs these properties." You can go through the documentation of the JSON schema spec and figure out how this works. But if it doesn't match that, it's just going to bail, and just send the person back to the Provision page with Success False, let them know they got an error. The provision queue itself is just made up of a Losant data table. So, all this request is doing is accepting the information and putting it in a table, that's it. So, it's a really quick request, it's just adding the information to the table and then replying to the user saying, "Okay, I queued your request." And again, we're just inserting a row with the information unique to that sensor you're trying to provision. Then all we do is redirect them back to the same page with Success True, and that gives them that nice success message. So, if we go look at the data table, here's the data table that we're inserting into. If I refresh that, we'll see now I've got a row in here. We'll go ahead and look inside, and there's my row of the request that contains the same details I entered through the form. This is also a really nice way to just capture user input. You may not be using it as a queue, but if you need to capture user input and put it in a data table, this will be a really nice template to look at for an example of that. So, there's the EEP, this is actually the EnOcean sensor family. This represents the code for a double rocker pad. So, as part of the IoT kit, you'll have four different EEPs, friendlyID, location, and that underlying ID. So that'll sit in this data table until our application workflow decides to process it. And what this workflow's doing out of the box, every minute it will attempt to process all of those queue messages. What I'm going to do is go ahead and click the Virtual button, and which means I can just do this right now. So, you can see there's the request out, and immediately I got the response back. If your gateway's connected, this is a very fast process. Let's go ahead and check this top part out real quick. I am just querying all rows from the provision queue data table, looping through all those rows, and sending a device command to my gateway, just with the exact information from that row. So, that command's going to go down and hit the data table, or hit the Edge Compute device, and that's this workflow. And you can see over here, I did get a debug output indicating I received a provision command. So, there's the command trigger. The first thing we're doing is we're going to hit the EnOcean's API. So this is kind of that high-level abstraction orchestration on top of those low-level APIs that Losant's really good at. So, there's the URL for the API request, we're basically posting to their device's endpoint, and there's that same information we just collected. If everything went successfully, we should get a result back from EnOcean with a status code equal to 200, which is a HTTP code for A-Okay. Then we can move on. So, we're checking that status code here, we got 200, then we're going to publish a response back to Losant's broker. So, Losant's broker can be used for basically any arbitrary communication. Might be a pro tip not everyone knows. A lot of people may know of those device-specific topics like State and Command, we're actually using the Command topic up here. It's kind of special Losant topics. But your devices can communicate on basically any topic. You can kind of do your own application-specific or domain-specific communication over the broker. It's just that Losant isn't going to do anything with it out of the box. It doesn't really know what you're putting into it, it's a really good way to send information through Losant to your devices, to your workflows, and that's what's happening here. So, we're replying back to the cloud or publishing to the Losant broker. The topic is provision response. And we're sending the ID that we got in the original request – data, payload, ID. So, if I expand, data, payload, ID, you can see that right here. And this is actually the row ID of the data table row that contained the provision request. So, we're just sending that right back and saying, "This row we successfully provisioned." So, if we go back real quick to the provision queue and refresh that, we'll see it has been removed. So, we've replied back, said, "That's good to go." Now, let's check here real quick and see how that was actually removed from the table. That's another trigger in this same workflow. We are using the MQTT trigger. Whenever a message is published to the provision response topic, we're going to trigger this workflow. So, we're going to go ahead and get that data table row. The body that we're sending is just the ID of the row. If you remember from the Edge workflow, the data was just the row ID. So, data here, that's all we're publishing, that's the row ID. So we can directly query that here, just give me the row where its ID matches the information that was given to me. Do a quick check, make sure we got any. Who knows? A device could have sent a really weird ID, or an ID that may have already been provisioned, so quick check makes sure we actually have a pending provision request. This part here is looking up the recipe. So, at this point, I have an EEP of the device that I need to create. Here's the row right here. So, the provision request contains the EEP, the device family of whatever device type was requested. So, now I want to create a device, an actual Losant representation of device, from that EEP. And where I'm doing that relationship is inside globals. So, up here in globals, you'll see I am containing a mapping. This is in application globals, which are automatically made available into all of your application workflows whenever they trigger. So, for all of my supported EEPs, I have a mapping EEP -recipe, that contains the ID of the recipe I need to use when creating this device. So, that's what we're doing here. We're creating a device, looking up the ID stored in globals, and then we are setting some basic information on the device. I'm just setting the name to that EEP, set the name to whatever you want. It is a peripheral to the Edge Compute. This is using our gateway and peripheral model. Edge Compute devices are also gateway devices. And this is mostly a permissions model. Edge Compute and gateway devices are allowed to report state on behalf of their peripherals. Normally, devices can't report state for other device IDs, that would be denied by our platform for security reasons. But if you opt into it and you associate a device with a specific gateway, when that gateway receives information, it is allowed to report state for that other device. And I'll show that when we go the other direction in that diagram, receiving data from EnOcean. And then we're setting some tags, setting the EEP, the unique ID, the friendlyID. Basically the information that the user provided, we're adding those as tags on the device. This is a great use of tags. Tags are designed for kind of that non-changing, static meta information related to a device. So let's quickly check out one of those device recipes, see what else is in those. This template comes with four device recipes representing the four devices in the EnOcean IoT Starter Kit. The double rocker's the one we just used, let's jump in there. You can see recipes are really useful to provide some information out of the box. So the EEP, I didn't actually have to specify in the Device Create node, because it'll be created automatically, but then we just have the tags here and that Create node will be setting those. The other really valuable thing for device recipes is it does create all the recipe, or the attributes, out of the box. Some devices can have hundreds of attributes, so you don't want to go into the Create node, and be specifying hundreds of attributes in there. You can get those for free automatically through the device recipe. So the rocker pad, it's a double rocker pad, has rocker A and rocker B, they're next to each other. Then a signal strength and then just the status. Okay, so at that point, if we go back to devices, we will see our new device here. It is now created, it's waiting on some information to come from EnOcean. And we're basically done with the provisioning. If I switch back to the Provision page, go back to the Home, you'll see the double rocker pad is here, it's got basically an empty dashboard because the switch hasn't been activated at all. But I did add a device earlier, the multisensor which also comes with the starter kit, just so we can see some of the data. And this is the next part of my part of this Deeper Dive is going through how does data come from the sensor and make it back up to Losant. So, let's jump back to the diagram real quick and kind of do a quick review of what we just did. From the user interface, I submitted a post request to Losant. Losant kind of queued that up, then it sent a command to the Losant Edge Agent. The Losant Edge Agent invoked the IoT connector's API to do an actual provision of that device. It came back and said, "Perfect. That worked great." It then published an MQTT message to the Losant cloud, it again did a little bit of work, removed that row from the data table, created a device, and now that device is available in the user interface. So, let's talk about the other direction. What happens when data is received to the IoT connector and then forwarded to the gateway? We need an Edge workflow down there that's basically acting as protocol translation. We get asked a lot, like does the Edge workflow...do they do protocol translation? And the answer's absolutely. That's one of the primary use cases. Especially at the Edge, you're going to get data from hundreds or thousands of different types of sensors that span the IoT ecosystem. So you got to be able to massage that data and translate that data into something your platform, in this case Losant, expects. So, let's jump to the Edge workflow here and look at this real quick. So, whenever data is received by the EnOcean AP, it forwards it to the IoT connector over WebSockets, and then that forwards it over MQTT to the Edge Agent. This configuration is all done as part of the instructions provided by EnOcean. They've got nice step-by-step instructions, the Docker compose file in here kind of creates the link between this container and our container. So, following all those... And we do link those. Let me go back to the Read Me very quick. We do link all those instructions right down here in the Setup. So, this section, very important, it links to the instructions from EnOcean on how to get all that set up. So, this is the Edge workflow that's running on the gateway inside that Edge Compute device, receiving MQTT data from EnOcean. And you can see it's been sitting here for a while, receiving some information, and we'll look at one of those payloads in a moment. What happens is this triggers on the telemetry topic with a wildcard. Basically any device ID can be swapped there. This is defined by EnOcean, EnOcean basically says, "I will publish to your broker on this topic whenever I get data," so that's what we're listening to. The raw data is sent as an encoded JSON string, so we're just going to quickly decode that so it's easier to work with on the payload. And then we're going to do a peripheral query. What's really nice about the Edge Compute device is, in peripherals, is Losant will take care of syncing that information down to all of your Edge Agents. So as we provisioned that Edge Compute or that double rocker switch as a peripheral to this Edge Agent, what Losant did behind the scenes was publish information down to this Edge Agent, saying, "Hey, I got some new peripheral information for you." Then we're allowed... It stores all that in a local database, and then we can do some queries locally for those devices. And really what we're looking up is "give me my peripheral" where the EURID matches whatever sensor was reported by EnOcean. And if it's not found, that's okay. There might be devices coming through that just our application doesn't know about, or haven't been provisioned yet, so we just ignore them, and then maybe they'll be provisioned later, and we'll start accepting that information. This Create State function node, this is really the heart of that protocol translation. This is where we're taking the information in the EnOcean format and changing it to represent Losant. And the major thing is EnOcean sends some state information as strings, like open and closed, and we're just converting those to numbers to represent zero and one. Our time series database works really well with numbers, so if you can have a numerical representation, you can do some really nice aggregations on that information. Then we're reporting up this device state, so we're grabbing the ID that we looked up from the peripheral, and just reporting that object as device state. So, let's go ahead and look at a incoming payload and see what this looks like. So, here's one where some information was received. Look at the telemetry data that it gave us, gave us the data, and this is for a multisensor, that multisensor, that dashboard I showed a little bit ago, it's got a bunch of sensors on it. And you can see this, what EnOcean sends, is an array of keys and values – key, value, key, value. Basically, this Create State function node is going through this format of data and reformatting, where Losant prefers or only supports where it's key, colon, value. So it's kind of just remapping this information, changing some of the values that are reported as string data to a more numerical representation. Basically just a protocol translation between one and the other. So, the other thing I want to show is what happens here. So, now data's being reported up to the device by the Edge workflow, and now we can see the specific dashboard that represents that device family. In a lot of our other application templates, we have a list of devices just like this. By the way, this device list also comes from the Library template, so easy way to get a list of devices. So, in a lot of our other Deeper Dives and [Inaudible 00:34:04], we have a list of devices down the left side, and when you click on one, you see the same dashboard, because it's the same type of devices. This one is showing something a little bit different. So I can click through here and I'm dynamically showing the dashboard for this family of devices. So, this is not something we've demo'd before, but I wanted to dig into this, as it's another really useful implementation, even if you're not doing EnOcean. There's a lot of applications where you may want to change the dashboard based on which type of device you're showing. So, that's the other thing I'm going to dig into next. So to do that, let's open up our Experiences, and let's look real quickly at what I'm querying here. So, the endpoint I'm looking at is basically slash, the home, and then I'm passing a device ID in a query parameter. So, if we go back to the application, what I'm going to need to look at is there's the endpoint request, that'll get invoked, and it's going to trigger the home workflow. So, let's go into there real quick, let's go ahead and refresh this page so we can see a debug. Output, again, debug node is going to be your best friend. And also if you've not seen this new Timing tab, this is a really powerful new feature that we've recently released. If you mouse over this, you can see it highlights the path of nodes that was taken between the trigger and the debug node. The Timing tab then breaks down the execution time of each of those nodes. So, if you've got maybe some workflows that are periodically timing out, or some workflows just taking a long time to do, this Timing tab is going to be great as a way to figure out where your time is spent. You can see in this one, most of my time is endpoint reply, but my overall time's only 44 milliseconds, which is a great workflow time, so I'm not really worried about any specific time in this workflow. If you want to learn more about debug timing and building [Inaudible 00:35:58] workflows in general, definitely check out this Deeper Dive. It's our most recent one, How to Build Workflows That Scale. This goes into some best practices and some tricks, and the page I'm at is losant.com/deeper-dive, or deeper-dive-webinar-series. And here, you can see replays for all of our past Deeper Dives. So in this workflow, I'm not going to go through a lot of this, I think what I'll focus on is mainly finding the dashboard ID. So, what's happening here is when I request the home page, I'm going to get the list of all devices, because I need that to render this list on the left. Then I'm just checking if there's no devices. If there are no devices, I'm just going to do a redirect back to provision. That's why the very first time you go to this End-User Experience and log in, you will be redirected to the Provision page, because you've got no devices to view. If you did hit the home page and you didn't pass a device ID, I can show that briefly. If I just take this device ID off and just hit the home page, you'll see I'll immediately be redirected back to the home page with the device ID on there. That's done right here. If I've got no device, I just redirect it with the device that's first in the list. Then I'm going to go ahead and grab the device that was requested on that query parameter, do a quick check to make sure that device exists, because anybody can just go in here, change this to whatever they want, and you got to make sure that device exists. If it doesn't exist, like that, you can see I'm just redirected back again to the first device in the list. And then finally, we're down here and kind of the meat of this is how do I know which dashboard to show based on the device I'm looking at? So, that's again, what you saw earlier was this kind of globals mapping. In my application globals, I have a mapping of all the EEPs and the dashboard I want to show, and also the recipe. So here's that mapping. So whenever I click that double rocker pad, I can look up this global and I know, well, that's the ID of the dashboard I need to show for this device. So that's done right here. I'm grabbing the EEP, which is stored on the device tag, it's appending "-dashboard" on it, so it matches this. And then I'm down here doing a lookup. Basically here, I'm creating the key to query by, and then here I'm looking up globals from that key, and putting the result on working.dashboardid. So if we expand working.dashboardid, there's the dashboard ID I need to show. And then endpoint reply, I'm sending...I'll be rendering the home page. I'm going to show this next – I'm rendering the home page, and sending it the object at working. So I'm sending it this whole object. So when I render the page, I'll have access to all this information. I've got the devices to render the list, I've got the details about this current device, and I've got the dashboard ID to show. All right, so let's check that out. I'm rendering the page called page home. Let's go look at that page. Going back to the Experience overview, my home page is right here. Let's go ahead and click on that. And you can see it's pretty short, there's not a lot going on here, but let's go ahead and refresh this page again. Just like the debug output will be your best friend in workflows, the render log will be your best friend in Experience pages. So, Experience pages, the template you created on the left was rendering the context you have available on the right. And that object, that working object I sent through the workflow, is put on pageData. So I know there's a lot of confusion when people are new to Losant of like, "Well, how does the data get from the workflow into my page?" And really, the short answer is whatever you send out in the endpoint reply node will be placed on your page context in the pageData section. And in another Deeper Dive that is really good for that is Advanced Templating. So, this one, I'm going to highlight three or four times because if you're new to Losant, this is one you definitely want to check out. This goes through kind of the complete data flow of from a request coming in, through a workflow, and then getting out to a page, and then shows some of the more advanced and powerful features of the templating engine. So, looking at the template itself, here is where I mentioned the device list is actually from the Template Library, it's the tl-device-list. Whenever you see "tl" in an application or a demo, it likely came from the Template Library, "tl" means Template Library. So, then I'm passing pageData devices, you can see that right there, pageData devices, that's my collection of two devices. Then I can kind of control how this component renders things. So, I can change the label. In this case, I'm rendering a friendlyID. What happens when you click on one? Well, it's a link, that's how I can navigate back to home with the query parameter, and then which one should be selected. Still, I'm looking back at that query parameter, and if the current item matches whatever's stored here, I know to highlight it blue. But what's kind of more critical and something we've never shown before in a Deeper Dive is our element helpers. The element helpers are available in the documentation, so let me navigate there real quick. If you go to the Experiences section in our documentation under Views, you'll see down here you've got some helpers. And I'm using a couple of these. So, Experiences, main menu, Views, and then finally, the Helpers section. So, the section Helper, I'm actually using the fillSection helper to render that component, the device list. And then also you've got the element helper. So, this is how you can dynamically basically create a dashboard page. So, if you want to come and you want to see the complete documentation on this helper, you can see that here in the documentation. Going back here, you see the fillSection. This is provided by the layout, so I'm using some of these layouts that are provided by the bootstrap for layouts library template, and they provide a section for that left column. So, if we fill that, we can place information in that left column, which in this case is device list. Then the main content of the page is a dashboard. This is actually what happens if you create a dashboard type page. So here, if I did page type dashboard instead of custom, behind the scenes, it's actually rendering this helper, but we can also use it explicitly. And kind of the key piece of information is right here, this dashboardid. So dashboard is pageData at dashboardid, you can see that right here, pageData dashboard ID. So, the workflow did the work of looking up the right dashboard ID, and then I can render a dynamic dashboard using this helper. And the other critical piece of information is the context. So, even in all of other templates that have lists of devices, the dashboard will have a device ID context variable that allows us to set which device is being rendered. So here's a syntax to actually set that device. So in this case, I'm setting the context to an object, where one field, the device field, that matches the name of my context variable. I'm setting that to pageData device.id, you can see, if I can expand pageData device id. That's right there, pageData device id. So the render log is going to be your best friend inside Experiences when you're doing these pages like this. So that allows us then to... Well, actually, one thing I want to show, this is new, I don't think we've showed it off before, is this Render Preview. This is super cool, because I can now see updates in real-time, and I can also set which context I would like to use. And what's really nice is I can use a recent render log entry, the one I just got, update that. Then if I go to Render Preview, the inline dashboards don't show up in previews, but I can see all of my devices here and everything else. So, if I wanted to go back and kind of see what would happen, maybe I didn't want to use the friendlyID as the label, I wanted to use the EEP. I can just change it, hit Render Preview, and you can see I immediately can see the output. So, the Render Preview's a pretty new feature, definitely recommend going and exploring that, it can be really helpful when you're developing these pages to kind of see how your changes are impacted in real-time. So, that's what gets us back to here. When I click on these devices, that round-trip, it's triggering the workflow, looking up which dashboard to show, and then using that element helper to put the dashboard right here. The very last thing I'm going to show is kind of where you can take these applications. This template is designed to be a starting point. We've distilled it down to just the core reference implementation that's easy to understand so you know how to make Losant work with EnOcean, how to do that orchestration and provisioning, also how to receive that data and get it up to the cloud. Losant's platform is designed to be built on top of, really, it's an enablement platform that enables all kinds of use cases and applications developed on top of the sensors that you might have. This is one that we have, it's a lot larger. So, it's a lot larger, more sophisticated implementation. I think if we just dropped you in that as a template, you might be looking around like, "What the heck's going on?" But a lot of what we have put in the template has come from this larger app. It's got a lot of nice features. If you want to check this one out, you can reach out to us, and we can give you a thorough demo of kind of this larger application. This fits a lot of other needs and can really bootstrap some other types of use cases. Actually, our solution architect who presented right before me, Kevin, developed a lot of this, so hopefully, you can get a demo with Kevin and he'll tell you how all this works. So, what I've covered here is both getting commands, that orchestration provisioning from a remote experience into EnOcean, and then also receiving sensor data through the USB dongle, into the AP, into the IoT connector, into the gateway, and then finally, up to Losant where then it can be displayed to those users. So, with that, I'm going to hand it back to Heath for finishing up and Q&A. Heath?
Heath Blandford: Awesome. Brandon, thank you so much for that detailed overview of this new template. That's pretty cool to see how quickly we can get up and running with these new IoT Starter Kits from EnOcean. Before we jump into Q&A, I do see that we do have a few questions, there's just a few things that I want to mention. We love hearing that you're enjoying the Losant platform. But those stories don't only matter to us. If you're enjoying your experience with Losant, we would love for you to write a review for us on Capterra and G2. I would also like to mention some very exciting news – the return of in-person conferences. Just like Brandon mentioned, Kevin will actually be at Realcomm in Scottsdale, Arizona, on November 2nd and 3rd, with the EnOcean Alliance, at the EnOcean Alliance booth, where you'll be able to meet Kevin, get a rundown of this exact template, and kind of where you can build on top of those things. And then we have a very exciting Deeper Dive scheduled for November 16th, where we'll be talking about a brand new Edge offering from Losant, the embedded Edge Agent. As always, no feature in Losant is released without being fully documented. You saw Brandon show off our documentation, docs.losant.com. We also have some great resources, Brandon also showed off the Deeper Dive Series. And we also have some hands-on tutorials in our blog, as well as Losant University, which will help you hone your skills as a Losant developer. Now, I see we have a few questions, like I mentioned, so let's get into Q&A. Kevin, first question for you. What Aruba APS models, or access point models, are supported for this template?
Kevin Niemiller: Yeah, it's a great question. So, first thing, the firmware. The firmware on the AP must be Aruba OS 8.7.0.0 or higher. In the IoT connector docs that are linked in the application template Read Me, it lists that firmware version. It also has a table in there of it looks like at least 10 different Aruba APs that are supported. The important part is that is has a USB port for the EnOcean transceiver, and that the USB port supports the correct power for the transceiver.
Heath Blandford: Perfect. Yeah, that's great. Brandon, this one is a question for you. What happens if the Edge Agent or the gateway loses internet connection or is down for some reason?
Brandon Cannaday: Yeah, yeah. So, I guess I only covered the one direction from the cloud down. So, that provisioning queue is one of the main reasons that was added, was to support the gateway going down. So the cloud will continue to retry provision requests, but I didn't cover the other direction. So, if the internet connection is down and the IoT connector is still sending data into the Edge Agent, where's that go? The Edge Agent will automatically buffer data, so the Edge workflow I showed ended in that device state node. All MQTT requests and data sent through the device state node are buffered by the Edge Agent. They're all sent published with QS1. So if we don't get a [Inaudible 00:49:58] from the cloud broker, those will be tried again. So, no big deal if the internet connection's down. Once it's reestablished, the Edge Agent will automatically replay all that historical data and make sure that reaches the cloud.
Heath Blandford: Awesome, great. Kevin, actually, a question for you, in kind of the similar vein. So, Brandon talked a lot about it, and you mentioned as well, how we're kind of running these as a Docker compose file in kind of connected through Docker and running on a gateway. Does the EnOcean IoT connector have to run on site or can it run in a private cloud like Azure or AWS?
Kevin Niemiller: Yeah, another good question. So, the Aruba APs have the ability to send the EnOcean data securely to the IoT connector in a private cloud. So, yes, the IoT connector can absolutely be ran in the cloud. In this architecture, it is still recommended to run the Losant gateway Edge Agent next to the IoT connector, so in the same private cloud as well, to securely send the EnOcean MQTT data to the Losant cloud platform, and to also securely accept commands from the Losant cloud platform to provision the EnOcean sensors in the IoT connector. One more note with that – if your site loses internet connectivity, then any data during that time is basically lost. However, if you install the IoT connector and Losant Gateway Edge Agent on site, just like Brandon mentioned, then the Edge Agent can buffer that data, and send that data to the Losant cloud platform once the internet connectivity is reestablished.
Heath Blandford: Great, yeah, it's nice to see that we can give people some flexibility in that realm, in that space. Last question, and again, Kevin, it's for you, as you are the most familiar with this template and EnOcean. Is it required to provision every EnOcean sensor that is on site to this IoT connector?
Kevin Niemiller: Yes, it is. So, the EnOcean telegram that is sent from the sensor and makes it to the IoT connector does not contain the sensor type. The sensor type or model in EnOcean world is called the EnOcean equipment profile, or EEP for short. So, this means the IoT connector does not know if the data came from a multisensor or an occupancy sensor, since the EEP was not included in the telegram. When a sensor gets provisioned to the IoT connector, the unique identifier of the sensor, known as the EURID, that gets stored along with the sensor type, the EEP. This means that the next time the IoT connector receives data from that sensor, it knows how to parse the data, and expose the JSON data over MQTT. This is one of the reasons why this application template is great to use with EnOcean sensors, because we have already created a form in the web application that on Submit, it will interact with Losant cloud workflows and Edge workflows to create the sensor as a Losant device, and provision that sensor in the IoT connector.
Heath Blandford: Great. All right, those are all the questions that we have for this session. Again, just before we wrap up, I want to remind you that we are going to send an email to you with a link to the replay, and this replay will also be available in a couple different places – our YouTube channel, and that Deeper Dive web page that Brandon showed off. If you have any questions, feel free to reach out at forums.losant.com. And if you'd like to learn more about the Losant platform, send us an email at hello@losant.com. Thank you so much for joining, and we will see you on the next one.