


Heath Blandford: Okay, everybody. Welcome to another Losant Deeper Dive Webinar. I know I say this every time, but I really do think we have another great deeper dive planned for you today. We’re going to be taking a look into how you can leverage Losant to corporate BACnet devices into your smart environment. You’ve got two of us today. My name is of course Heath Blandford. I’m a success engineer here at Losant. And I’m joined today by one of our star solutions architects, Kevin Niemiller. Before we go any further, I want to provide a couple of bits of info on this webinar. This webinar is being recorded so that we can make the replay available to you in a few different ways. We’re going to send you an email with the link to the replay, and the recording will also be made available on Losant’s YouTube page, as well as our Deeper Dive page on our website. Now, we love hearing your questions, so I’d like to point out a couple features here in the student conference. You can use the Q and A feature to ask questions and the chat feature to also ask questions. And I’ll be monitoring those throughout our time together. Then at the end, Kevin and I will have a little Q and A session with those posted questions. Let’s do a quick review of the Losant Enterprise IOT platform. Losant is an industry leading IOT platform. As an application enablement platform, Losant provides enterprises with the building blocks they need to create their own IOT products. The Losant platform consists of five key integrated components to help customers achieve that. End user experiences, which allow you to build a fully functional web interface will let your users interact with your connected devices. A visual workflow engine, which is the low-code brains of your connected solution. It’s how you trigger email notifications, create events, send commands to those connected devices, and much, much more. Data visualization, which also includes integration with Jupyter Notebooks allows you and your end users to see what those connected devices are doing. Devices and data sources allow you to create a digital twin of your devices in the field, as well as integrate with other services that has the data you care about. And finally, Edge Compute, which is a suite of functionality that enables you to execute business logic right at the edge. Our customers and partners utilize all five of these integrated components to create the robust IOT products they put in front of their customers. Losant is a leader in the industrial telecommunications and smart environment spaces, and we’ve offered our platform to all sorts of customers ranging from startups to companies in the Fortune 100. If you’re looking to learn more about Losant, please reach out, and we would be happy to set up some time for a much more in depth conversation. While Losant provides the software foundation for IOT, we’ve surrounded ourselves with a great ecosystem of partners that help create this IOT solution. This includes strategic partners, which we share go to market strategies with, service partners who work with you to develop your end to end IOT applications, and technology partners that provide hardware, connectivity, and other services to round out their IOT solution. Again, I couldn’t be more excited to have you all here today. I am going to pass the virtual mic over to Kevin, who will get us started with the webinar. Kevin.
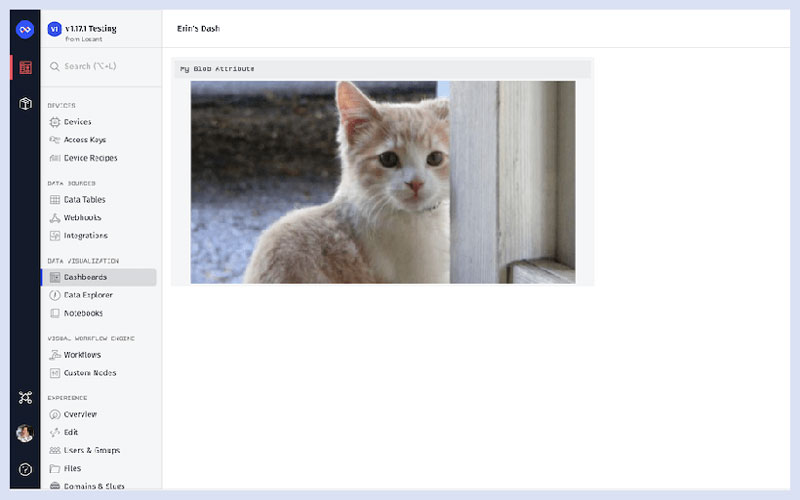
Kevin Niemiller: Yeah, thank you, Heath, for that great overview on the Losant platform. I’m excited to talk about BACnet with everyone here today and use the Losant platform to build an IOT product to easily monitor your smart environment. To start, let’s first talk about what a smart environment is and how value can be gained from this smart environment. A smart environment is a way to take your current environment or facility and make it smart by connecting all these devices and systems to something that can help us understand that environment better. And in the case today, it’s connecting these devices and systems to the Losant Enterprise IOT Platform. Now that we have these systems connected to Losant, we can get a good understanding of what is happening in our environment for all of our systems in one place on one dashboard. Access levels can be set to ensure corporate engineers and building management companies can see all campuses or all buildings while restricting access to facilities managers or the end customers to only see specific buildings of campuses. The value of the smart environment comes from monitoring energy usage, calculating space utilization to ensure you have enough desks, powder rooms, conference rooms for your employees or tenant, and cost savings by detecting a leak immediately or being able to turn off lights or the HVAC unit in specific areas when there is no occupancy. Now that we have a good understanding of a smart environment, let’s discuss exactly what BACnet is. Back net is a standard communication protocol for building automation and control networks. It is an open standard for cross vendor integration. This means that it provides a way for products and services made from different vendors to all work well together. To simplify, the BACnet protocol enables us to find other BACnet devices on the network, read device information and real time data from those devices, and write or send commands to those devices. Now that we have a good understanding of both the smart environment and BACnet, let’s discus some use cases on how BACnet can help enable the smart environment so that we can gain those insights and that value that we just discussed. So, remote monitoring. Those equipment that is used in a facility uses BACnet so we can pull in data all the way from a temperature SetPoint in a conference point to the damper position that is supplying air to that room. With remote monitoring, we can also shift from preventative maintenance to condition-based maintenance to efficiently and properly maintain facilities’ equipment as needed. Energy usage. The equipment in a facility that typically uses the most energy such as air handlers and boilers to name a few are typically on this BACnet network, so now energy usage can be captured and then calculated. Orchestration. I mentioned this earlier, but now that we have a standard protocol, it makes integration between different systems easier such as integrating with conferencing system to automatically adjust the HVAC SetPoint in a conference room when a known meeting is coming up or upon detecting occupancy in that room. Alerting. Once you have this equipment connected over BACnet to Losant, it is easy to immediately alert when something critical happens such as a leak being detected, a trash can becomes full, or a bathroom needs to be cleaned. This slide is just scratching the surface on possible use cases for your smart environment to deliver value to your company or to your tenants or customers. Let’s give a quick overview of what we will be doing in the technical demo and the goals we’re trying to accomplish with this demo. This technical demo is going to be split into two parts. The first part is going to be learning the BACnet basics with Losant and with a contemporary controls BACnet thermostat as our BACnet device. We will use the BACnet who is known to discover BACnet devices on the network, in this case the thermostat, then use the BACnet Read Node to read device information, as well as real time data from that device. And finally use the BACnet Write Node to write to or command these BACnet devices. The second half of the demo is going to look at what’s next and what is possible now that we have the basics down. After all, the goal is to easily monitor all BACnet equipment in a facility. So, I’m going to walk through an application that was built to take those BACnet basics and automate the process of finding new devices and capturing real time data from those devices. Let’s go ahead, and jump in, and start building. I’m going to ahead and switch tabs. I’m logged into app.losent.com. So, I am in the back end of the Losant platform. You know that by seeing the blue Losant icon up here in the top left. If I come over here on the left nav, we’ll see the five major components that Heath mentioned. I’m going to go ahead and click workflows. We’re going to skip past the Cloud application workflows, past he experience workflows that build that custom API layer, and we’re going to go down here into our Edge workflows. I’m going to skip these first three because we’re going to be using those in the second half, and we’re going to focus on this BACnet basics Edge workflow for now. What we plan on doing… And you can… We’ll come back to these top nodes here. But what we’re going to do is we’re going to walk through these six steps right here. And each time we go through a step, we’re going to be using data that we found here using BACnet in the next step. So, the first step is we’re going to find all devices on our BACnet network with the “who is” command. We are then going to read device level information to know what those devices are. We’re going to read the BACnet object information, so the back-end objects that we will later transform into Losant device attributes to save into our time series database. With those BACnet objects or attributes, we’re going to create a Losant device with those attributes. We’re going to read the BACnet real time data to store that Losant device. And then finally we’re going to command the BACnet device using the BACnet Write Node. So, let’s go ahead and get started with step one, which is BACnet “who is.” I’ve already built this first workflow, so we’ll go ahead in here and jump in. Let me click this virtual button. And just a reminder, we’re going to be using virtual buttons a lot here. But in the second half, we’ll be automating this process, and we won’t have virtual buttons in there. So, if we go ahead and look at the “who is” command, what we have right now is I’m leaving all the defaults the same. So, the broadcast “who is” IP, we’re just leaving it the default. The broadcast “who is” in incoming IM port, we’re leaving it at 47808. The scan time is once we send out that “who is” command, we’re going to wait 30 seconds in this case for these BACnet devices to respond back. For this demo, I’ve set max devices to one just so we don’t have to wait those 30 seconds. But in the second half of the demo, this will be cleared out so that we can pull back all the devices into the application. So, now that we ran this, let’s go look in our payload at working.backnetdiscovereddevices and see what we came back with. So, if we open this up, what we can see is that we have found once device. This is the unique identifier…the BACnet unique identifier for that device. We found the address, the port, and the vendor ID. We’re now going to use this unique ID and this address in order to do step two, which is to find out what this device is. So, we know we have one device out there in our network, but we don’t know what that device is. So, let’s go ahead and find out what that is. I’m going to go ahead and drag over a virtual button here. Now that I have a virtual button or any node over here I can actually select it, and then I can go ahead and click on other nodes to autoconnection it for me. So, I’m going to go ahead and use the BACnet Read Node, and then I’m going to use a debug node so we can watch it run. Now that we have the BACnet Read Node we need the IP address, which we already know here. So, let’s go ahead and copy that and paste that in. We’re going to leave the host incoming port and the time out all the defaults. We now need to read an object type. So, this is when this first node is going to come into play. You can see an object type here of device. So, we’re using this device type here so that we can read device level information and find out exactly what this device is on our network. If I go ahead and flip tabs here to the backnet.org website, you can see the properties of a device object. So, we have a lot of different properties here. The two for this demo we’re going to be reading is the object name and the object list. The object list is going to be all those BACnet objects that we can read real time data from that we will eventually turn into Losant device attribute to collect that time series data. So, the first one is device, like we mentioned. So, I’ll go ahead and select that now. The object instance that we have here is going to refer to this unique identifier we have here. So, let me go ahead and type that in now. The property that we want to read is that we mentioned for this one we’re going to be reading in the object name and the object list. So, those are the two we’re going to use in this node. I can either type in object name here and have it show up. Let’s go ahead and call this “object name” now. We’ll select this one to device again. We’ll use the same instance. In this case we’re going to do object list. Instead of typing it out, I’ll just type in a number – 76. We’ll call this object list. Where we want to save this onto our payload is I’m going to call it working.backnetresult. So, now that we have that built, let’s see what we get. Let’s go ahead and save this. We’re going to click the deploy button. I have the ability to deploy this to one or many Gateways. I’m going to deploy it to one for now. You see that this live look became blue right away. That means that this workflow is already deployed on my Gateway, and we can go ahead and do a live look on it. So, I’m going to go ahead and click this button, and we’ll see what we get here. Let’s go ahead and dive into it at this level. All of these are pretty well nested. Okay, so now if we take a look at this, we read back the object name, so it’s a WiFi BACnet thermostat. And we’ve also read back the object list, and we can see that there’s 120 different BACnet objects that we can transform into Losant device attributes if we would like to. Just to look at a couple of these… Let’s go ahead and open a couple, and we’ll talk through and explain what’s going on here. Okay, so the couple that I’m showing here, you can see that we have according to our common BACnet object enumerations…we have an analog input. That is instance zero of analog inputs. We have another analog input, which is instance one of these analog inputs. And then we actually have another one, is an analog value down here because it’s type two, which is instance three. And we have a lot of other different object types here, but we’re just going to focus on one analog input for now and one analog value for now. If you’re wondering what an analog value is, it gives me the ability to push back or to write to it a new value. So, now what we want to do now that we know what this device is and we know all of the different objects that are here… We still don’t know what these objects are. So, we need to use this information in step three so we can read back BACnet object information to find out exactly what that object is. So, let’s go ahead and do that now. I’m going to go ahead and copy this workflow and just paste it in here. We are going to scroll down here. Instead of using device level, we’re going to use analog input for the first one, which is type zero. The instance that we’re going to use is going to be zero this time. Now we need to figure out the object property ID that we want to do. So, flipping tabs one more time, I’m going to scroll up here to analog inputs. So, here is an example of a BACnet analog input, all of the properties that are associated with it. We’re going to focus on the object name, so we know what it is. But, again, there’s a lot of other values that you can pull from here. And in the next Edge workflow we build, we’re actually going to be using the present value. So, let’s go ahead and use the object name now. We already have that set up. Let’s call this analog input instance zero object name. The next one we’re going to use is an analog value this time. We’re going to use instance three since we’re pulling from this one down here now. We want to use the object name for this one as well. And in this case, we’ll call this analog value instance three object name. Let’s save, deploy. We’ll wait for that live look to go blue so we know it’s deployed. Let’s click this button. Now let’s dive in and see what we got. So, there’s the first one or the second one I should say. Here’s the first one. What we just pulled in is the analog input zero is the current temperature, and the analog value instance three is the heating temperature SetPoint. Now that we know a couple of the device attributes that we have, we can actually go ahead and create a Losant device with a current temperature and heating temperature SetPoint as attributes on that Losant device. So, we can start collecting this real time data up into the Losant Cloud. So, let’s go ahead and do that now. I’m going to come back over here on the left hand side and open up another component that Heath mentioned, which is devices. If you remember from what Heath said, the device is the virtual representation of your physical object. We’re going to go ahead and add a new device. I’m going to add this as a peripheral device, and it’s going to be connected to the Edge Compute, the Losant Edge Agent that’s running. So, let’s go ahead and create that device now. I’ll call it thermostat. We’ll have it tied as a peripheral. And we’re going to tie it to our Gateway. I’m going to create this device. I’m going to type in our attributes – the current temperature and heating temperature SetPoint. Both of these are going to be numbers. Let’s go ahead and update those. So, now we have a Losant device that’s built, and it has two attributes on it which is where our real time data is going to be saved to so that we can save it into our time series database. Every time we say data, we’ll be able to see it actually pop up here into our device log. So, let’s go ahead and start reading in that real time data now. I’ll go ahead and copy this workflow again. We’ve already done step four, which is creating that Losant device. Let’s go ahead and move this over to step five now. So, step five, what we want to do is we’re going to leave the analog input and instance zero the same, but we want to read the current value. So, we mention how these objects have a present value as a property. We’re going to use that now. Let’s go ahead and change this to 85, which is present value. We’re going to call this current temperature since we know what it is now. We’ll do the same thing down here in changes to present value. We know this is the heating temperature SetPoint. Let’s go ahead and save this, deploy it. Go ahead and open a live look. We’ll go ahead and press this virtual button, and now let’s see what we got. Okay, so what we just pulled in now is we have the current temperature, which is set at about 61.7. And we have the heating temperature SetPoint, which is at 59. So, now that we have these values, we can start taking those values and saving it up to the Cloud to that Losant device that we created. Because if we go ahead and flip to that Losant device now, you’ll see that we still haven’t reported any state yet. So, let’s go ahead and do that now. What I’m going to do is I’m going to modify this workflow that we just built. So, I’m going to make room for my orange device state node here. We’re going to update this to be the peripheral device since this peripheral can report its state on behalf of this Gateway. It’ll fill in these attributes for me that I’ve already set up. I’ll come over here and rick click on this value to copy the full key path. I’m going to use handlebar templating and paste this in here. Handlebar templating allows us to take dynamic information off of our payload and use it in a node, paste in the next one. We’ll get rid o this virtual button, and let’s put in a timer node instead. We’re going to run this every five seconds in this case. Let’s go ahead and save, deploy. So, now what happened is this workflow was deployed. It’s going to start running every five seconds. It’s going to go ahead and do a BACnet read for us. Once it does that BACnet read, it’s going to save that data over onto our payload. This device state node can then get access to that using those handlebar templates I mentioned. The device state node will then…ever time this device state node runs and fires, this is what causes the data to be sent from your Gateway running in your local environment in your facility to send this data security over MQTT into the Losant platform. So, if we flip back to our Losant device now, you can see that we’re starting to save data into this Losant device. And we have all of this data saved historically. So, the next step would be to start visualizing this data in a dashboard. We’re going to do that here in a second, but I want to show one more thing, step six. So, step six is now going to command the BACnet device. We’re going to write to it. We’re actually using a device command trigger node here. What this means is I can actually command something from the Cloud, send the command from the Cloud down to this Gateway or this workflow, and have it do something. So, what we’re going to show here in a second is that I’m going to change the heating temperature SetPoint. When I click the submit button in the dashboard, it’s going to send that value down here, trigger this workflow, pass that new SetPoint to the BACnet write node. The BACnet write node is then going to send that new value to the BACnet device on your local environment. So, let’s go ahead and look at this BACnet write node one time before we go ahead and do that. I’m also going to open this up one more time because I’m going to need some information in here for this node. Okay, so here’s our BACnet write. You can see that we have a lot of the same config up here that we had for the read. I’m going to leave all of those the same. We’re going to come down here, same set up with analog value, instance three. We want to write to the present value. The property index template is just a unique identifier for this BACnet objects. So, you can see that that unique identifier is right here, so I’m just going to use that in my write node. We’re going to write a real time value since it’s a decimal place. And the value we’re going to write is actually using those handlebar templates that I mentioned since we want to pull this dynamic value off of our payload that came from this device command. So, let’s go ahead and jump into the dashboard now and see what that looks like. I’ve already created a dashboard here. I actually have a header up here that will tell you the device, and we see that we have no information and no header yet. The reason is is because I built this dashboard with context variables. So, you can configure context variables by going up here into the settings page. What context variables allow me to do is build one dashboard for all of my like devices. In this case, all of my like devices are a thermostat. So, any time I have a new thermostat I can use this one dashboard for that. Let’s go ahead and update this. We can see for the thermostat that we just started capturing data for we have the real time current temperature. We have the heating temperature SetPoint. We have all of this as historical data. And we have the ability to push down a temperature to that device. So, let’s go ahead and unlock this. Let’s change this from something like 59 up to 64. We’ll go ahead and set that temperature SetPoint. And, again, when I click this button, it went ahead and sent a command down to the Gateway running in your local environment. It gave it the SetPoint of 64. It passed it to the BACnet write node. The BACnet write node commanded the device to go to that SetPoint. So, we can see it already went ahead and did that. We have 64 here. And we can also see that over here in our time series graph. So, that completes what we’re going to do for BACnet basics. I’m going to remote this timer node since we’re going to automate a lot of the stuff, and I’m going to be pulling data from here as well. So, what I want to do now is we’re going to jump to the second half now, and we’re going to show how we can take these steps here, and we’re going to include a lot of these steps together in one workflow so that we can automatically find devices and then automatically read real time data from them. To do that, I need a web application. We call them end user experiences, multi tenant so multiple customers can log in and only see their data. In order to initially set this up, what I did was I came over here, I touched upon another one of those components that Heath mentioned, which is our end user experiences. The first time you click on any one of these it’s going to see that there’s not a web application set up yet. So, it’s going to ask me, “Do you want to set one up? And if so, do you want Losant to bootstrap it for you?” And I selected yes to that. When I selected yes to that, it gave me a web application that you see here where I can come in and change my logo. I can change my branding. I can even enter in a URL here. They’re all on Losant. We call those slugs. Once I get this thing working properly, I can go ahead and add my own domain here, so on Losant’s, it’s not there. And then I can also start adding my own links, which is what I did with this devices one. So, if I go ahead and click on devices, what I want to do next is show you the Edge workflow that I built that goes and finds all of the BACnet devices that are on my BACnet network and creates a list of them here. This one workflow is also going to associate all of the BACnet objects associated with this device. So, if you remember, current temperature was one of them, type zero – analog input, instance zero. We also have another one down here, which was the heating temperature SetPoint that we were looking at as well, which was two for analog value in instance three. So, what I want to do now is let’s jump back into the back end instead of this front end web application that your customer is going to be using, and I want to show you how we got to where we’re at right now. So, how did we get this object list associated with all of these different devices that we can populate here? The first thing I’m going to do is I’m going to jump back into Losant devices. I’m going to pull up this device here that was representing that on the front end. This device was automatically created based off the Edge workflow that I’m going to show you next. And when that Edge workflow created this device, it went ahead and filled in a name for me based off the BACnet object device name. It created it as a peripheral, and it connected it automatically to the Gateway that found it. In addition to this, it also filled in a lot of device tags for me automatically. So, the instance number of that device that we found from the “who is” command, that’s important when we want to read from the device. The property index, which is important when we want to write to the device. As well as a lot of other attributes that we need when we’re reading and writing such as the address and the port. I’ve also added in two other tags of my own. So, this is the default interval that I want to be reading from this device every 900 seconds. I’ve also included a protocol tag here where I can specify BACnet, Modbus, OPC UA, things like that. In this case it filled it in as a BACnet device for me. So, let’s go ahead and jump into one of those workflows now so we can see how it created this device. So, back to workflows. We’ll come back down here, and we’re going to go first into the BACnet auto discovery workflow. In here, you can see that we have three different triggers that are going to be triggering this workflow where we’re going to be doing BACnet basics step one, which is that “who is” command. Each one of these nodes up here represents one of these bullet points here. So, the first one is our device connect. Every time the Gateway is powered on, whether that’s the first time we put a Gateway in a facility or if we power cycle the Gateway, it’s going to trigger this for this workflow to run. I have a simple schedule set up to run every Sunday to Monday at midnight to kick this workflow off, see if there’s any more BACnet devices. Then we’re also using that same device command that we’re using in BACnet basic step six when we wrote. This will allow me to use a dashboard to send a command down so that we can go ahead and do a “who is” command immediately to find any new BACnet devices. So, in any of those cases when this runs, it’s going to call my BACnet “who is” command. You can see I have all of these as the defaults. When it finds multiple devices, it’s going to save it in my payload at this path right here. Once we get all of these BACnet devices, we’re going to use the loop node to loop through each one of those. So, it’s going to dive into this loop node now. So, now we’re looping through each one of those BACnet devices it found, and the BACnet “who is” command is passing us that information such as the instance number, the IP address, the port, things like that. The very first thing we’re doing is we’re using the peripheral Get Node. So, the peripheral Get Node allows us to pull in peripherals that are connected to this Gateway. So, what happens is any type a new device is added up into the Losant Cloud, connect it to a Losant Edge Agent like we have here, we have the ability to pull in all of those peripherals by using this node here. And what’s great about this node is that if you lose internet connectivity to the Losant platform, all of this data from the Cloud has already been synced for this node here, and we have that saved into the local database running on that Gateway Edge Agent. So, we’ll continue to work even without internet connectivity. So, what we’re going to do is we’re going to take that instance number that was just given to us from the BACnet “who is” command. We’re going to query all of our Losant virtual devices based off the instance number and see if we have a device that already matches this instance number. If we do, we’re going to go next, and we’re just going to just skip to the next BACnet object or the next BACnet device and run this workflow again. If we don’t have this device, we’re going to go down this path, and we’re going to do BACnet basic step two, which is read device level information to find out what that device is. So, let’s go ahead and look at that now. If I click on BACnet read, we’re using the handlebar templates since the BACnet: Who-is command passed that to us. And then we’re reading the device level commands of object list and object name. The very next thing that I’m going to do is I’m going to want to start creating a Losant device based off this information I’m finding. So, if we look at the Losant device schema… And I already have a tab open for that. This is the JASON representation of a Losant device and how we create one. So, I need to follow this schema in order to create a device. So, if we flip back here, I’m using the mutate node to do exactly that. Based off the information that I just read in this BACnet read, I’m going to give my Losant device the name of the object name of the device. I’m also going to do a couple other things. I’m going to start filling in these tags. So, the instance number, the property index, the IP address, things like that. You can see all them here. You can see that we’re setting it as a peripheral device. And the last thing you’ll notice is that we’re creating an array of attributes. However, that array is blank right now. It’s empty. What we need to do is take all of those BACnet objects that we just read… So, remember there are about 119 of them. We need to loop through each one of those using this loop node to find out exactly what each one of those BACnet objects are. And this loop node is basically going to create that array that we need for those attributes. So, let’s go ahead and look at that node now. So, when we first come in here, we can now see that we are doing BACnet basics step three, which is to do a read of that object. So, we’re looping through, reading each object and finding its object name. Once we find that object name, we’re basically creating a Losant attribute. So, in that schema, this will tell you how to create a Losant attribute. The important parts of it is that you need a name and that you need a data type. But I’m also filling in attribute tags for each one of these attributes, so meta data. Because if you remember when we do a read or write, it’s important to know the type, analog input, analog value, and the instance of it. I’ve also included some other tags here that I’m going to use later on. By default I’m going to go ahead and say that I want to pull this attribute. I want to read its real time data. Once we do this with the working attribute object, I’m going to use the array node, and I’m just going to push that object into my Array Node here. That array will then be passed down to the create device node here so that we can create the device. You’ll notice that to create this device, I am not using the purple device create node. And the reason is is because this does not exist in the Edge workflows. The reason it doesn’t exist is because this Gateway where these Edge workflows are running is in your facility. And if someone were able to get that Gateway and know the username and password and log into it, the worst case they would be able to masquerade as that device, and they wouldn’t be able to create a lot of devices or other things that we’ve basically blocked them from for security reasons. So, to do this what I need to do is I’m going to use the MQTT Output Node. I’m going to take all this information that I just collected from those couple of BACnet nodes. I’m going to pass it to my create device node. I’m going to push all of that data that I just found to an application or Cloud workflow at this topic. So, let’s go ahead and look at that application or Cloud workflow now that’s pointed at this topic to see what happens next. We’ll come over here to workflows. We’re up here in the application or Cloud workflows, create BACnet device. We see it here. What I’m going to do is I’m actually going to push some data to it just so we can see data flowing here over MQTT. So, here’s that data. The first thing I’ll point out is with this MQTT Node, we’re basically using the same topic we had here. So, BACnet, that wild card for that device ID create device. The data that was pushed from the Edge through this MQTT Node is all shown here in this data object here. So, if we look at a couple of these real fast, we’ll see that we have all of those tags that we were just looking at, and we have all of those attributes that we were just looking at as well in the form that Losant accepts these attributes in. So, let’s quickly look at this workflow. We come down here. We’re just doing a sanity check. We’re making sure that this device doesn’t already exist within Losant. If it doesn’t, we’re going to go ahead and do BACnet basic step four, and we’re going to create that device. When I create that device, we’re going to be using the name that we found, the BACnet object name. We’re going to be encoding all of those tags that we found over here and storing that on this device. And then we’re going to be doing the attributes as well. You can see for their attributes, we’re actually only doing one attribute. We’re not storing all 119 of these device attributes yet. And the reason we’re doing that is because I’m actually going to take all this data in Jason form and save it as a Blob attribute. The reason is because this thermostat has 119 different items, and I might only care about 5 of them to be collecting real time data. And other devices probably have even more than 119 BACnet objects. So, I want to be able to select which ones I want to be pulling in as real time data. So, let’s go ahead and jump to our Losant device now to check out this attribute. So, if we flip over here to attributes, you can see that we have this one attribute right now, so BACnet objects formatted into Losant attribute form. It’s a JSON object, Blob storage. I can go ahead and click on the signed URL to get the data for it. Let’s go ahead and do that real fast. Let me go ahead and open that up and see if I can show it here. So, you can see that just how we had it in that application Cloud workflow where we were creating a device, we have all of these attributes now. So, current temperature, active temperature SetPoint. We have the data point and all of those attribute tags that we care about. So, now let’s figure out how we can start collecting real time data into the Losant platform for these objects. What I’m going to do real fast is I’m going to go ahead and open up a Losant experience workflow. This is that custom API level that you can build for your UI for your experience. This is actually the workflow that is generating the page that is showing all those BACnet objects in my web application over here. So, I’m going to go ahead and click on devices here. I’m going to click on this device. Let’s real quick just show how this went ahead and ran when I navigated to that page. The very first thing that we’re doing is a device get based off that query primer that I passed in. Once we find that device information, we’re putting it on our payload, that working.device. And we’re saying that we want to see this attribute. So, if we go ahead and open that device now, working.device.compositestate, we can see that same signed URL that I was just looking at before. So, how do we get this JSON object so that we can see all of those? We’re going to use the HTTP node to do that. So, the HTTP node is pointing at the same URL that we have here. It’s going to request that information, and then it’s going to save it on my payload here as working.attributes. So, if we open this up, we can see all of those attributes that we had before. And now I can display all of this information on this page like I’m doing right now. So, now let’s say that we want to automatically start capturing some of this data. What I’m going to do is I’m going to check the box for a couple of these. I’ll do current temperature, and heating temperature SetPoint like we were doing before. I’m going to go ahead and click update. When I click the update button, that’s going to go ahead and update this information back here. So, let me go ahead and refresh this page really fast. You can see that it added these two attributes here. When it added those two attributes, it included all of these attribute tags that we needed as well so that we can read from this device here in a second. Now if we go back to this device, and let’s update the frequency of what we’re pulling it from down to five seconds… We’ll do an update, and we’ll see that we immediately start pulling in real time data from that device. It starts capturing it right away for us. If I go ahead and refresh this page one more time so we can flip over to our device tags you can also see that the interval updated from five seconds. So, now what I want to do is I want to go show you the workflows that are running that are using this interval right here in order to pull data as well as using these attributes in order to pull data into the BACnet device. But real quick before I do that, let me show you the workflow that updated all of this to create these attributes. If we go back to this experience workflow and now we look at this one which is the post… So, when I click that submit button, the very thing we do is we do another device get to get the device that we’re pulling data in for. We’re going to do the same thing and pull the BACnet objects formatted into Losant attribute form. We’re going to pull all that in over HTTP again. And then we’re going to use a function node here. What this function node is going to do is it’s going to create a new Losant device attribute from a BACnet object if it is the first time this device was checked. If we’ve already had I checked to capture data from it and w no longer want to capture data for it anymore, we’re going to update the pull attribute device attribute tag to false, so we stop collecting that data. And then we can also update the display name of these different BACnet objects. Once we generate an object for all of this information for the different objects that were checked on the front end page, we’re going to pass it to the Losant API node. And in the Losant API node, we’re using the device patch resource and action in order to update all of our attributes and attribute tags. Once we do that, we can check to see if we need to update the device based off of its device name, which you can see here. Or the update interval milliseconds like I did before. So, now that we understand how this front end application was working, let’s go ahead and jump into those last two Edge workflows that we have so that we can see how we’re pulling in data. So, let’s look at the sequencer node. This isn’t specific to BACnet. But what’s happening is we’re running this every second. We’re pulling in all of our peripheral devices regardless of what protocol it’s on. We’re capturing the current timestamp. We’re looping through each one of our peripheral devices. Each time I do a pull from a device and I read from a device, I’m actually capturing the timestamp that I did that, and I’m storing that in workflow storage here. So, now I check to see has the interval expired where I need to read data again. If I do, I go ahead and capture that new time in the workflow storage, so I have it for next time, and I’m using this HTTP Node to invoke the web server that exists on the Losant Edge Agent. By invoking the Losant Gateway Edge Agent web server, I can actually call other Edge workflows. So, what I’m doing is I’m going to call itself local host 80-80. You remember we had a device tag on each BACnet device and had a protocol of BACnet, so that’s the protocol we’re hitting. And then we’re also passing in the device ID for this device. So, let’s go ahead and jump and look at the very last Edge workflow that is being called by this HTTP node. So, if I open this one up now we can see the request is coming in here. This only works for /BACnet devices. We’re going to do a peripheral get based off that query primer again of the device ID. If I pause this, we can go ahead and look at that. So, there’s the device ID. What we need to do now is with this device working that peripheral, let’s go see what this looks like. So, working.peripheral. Here is all of our tags that we need in order to read from that device to do BACnet basic step five. We also have all of these attributes that we’re going to want to read from. You’ll notice that the first two of current temperature and heating temperature SetPoint have a pull attribute set to true, and this Blob storage has it set to false because we don’t want to try to read that from the BACnet device. So, now what we’re going to do is we’re going to loop through all of these attributes and set the up into a form that the BACnet Read Node will accept in order to read all of these objects at one time. So, if we click on the BACnet Read Node, we have great documentation. I’m going to click on this check mark. If we scroll down, this is the array that we need to build that includes type, instance, property ID. It’s going to be 85 for present value for us. And the key of what we’re reading. We need to create a long list array of all the attributes we want to read. So, that’s exactly what this is doing. It’s basically taking a BACnet object. It’s creating storing from the type, the instance, the property ID, and the key. It’s pushing it into an array here – BACnet read array. We then pass that down to the BACnet Read Node so that we can use that here to read all of those BACnet objects. Once we read all of those, we’re going to do one more loop. This loop is actually going to associate all of that BACnet data we just read from this BACnet Read Node to our attributes here so that we can store it in a nice form like this that shows us the attribute name, the device attribute name, and the real time value. So, if we look at this loop node real quick, we’re storing up that BACnet object, and you’ll see here that we’re taking the name of the attribute, so current temperature, and setting it equal to the BACnet read result we just did, which was the value – 61.7. And then we’re taking that object, and we’re putting it into working.update row. Now we can use working.update row here in our device state node, and we know what happens every time this orange device state node fires. That’s what’s causing the data to go from the Gateway securely over MQTT up into the Losant platform. One last thing to show real quick is if I come back into this BACnet device… Let’s say I uncheck the heating temperature SetPoint here, and I click update. Let’s go back to our device here, and you’ll see that we are no longer collecting data for the heating temperature SetPoint because the attribute tag for pull attribute would have been updated to false. I’m going to go ahead and pass this back to Heath at this point since that concludes the technical demo part of this.
Heath Blandford: Awesome. All right. Kevin, thank you so much for that awesome overview of BACnet and how you can integrate BACnet with Losant for your smart environments. Okay, before we jump into a Q and A… I do see that we have a few questions. I just want to mention a few last things. We love hearing that you’re enjoying the Losant IOT platform, but those stories don’t only atter to us. If you’re enjoying your experience with Losant, please we would love for you to write a review with Capterra and G2. I also wanted to mention that coming up in May, we do have a Losant partner deeper dive that is in the works with Senet. So, stay tuned for more information on that. You can keep up with that information at Losant.com/deeperdive. Kevin did mention quite a few awesome topics or great little things about Losant. Specifically the Blob attributes, which you can find in our documentation/devices/Blobs. And we have a great Gateway Edge Agent walkthrough which you can find also in our documentation. Which leads me into a great segue – no feature in Losant is released without being fully documented, but you also have some options to reach out with questions in our forums. And we would love for you to take a look at other deeper dives as well. If you’re looking to hone your Losant kills, you can take a look at Losant University. Okay, Kevin, the first question – if I have one thermostat or more than one thermostat or more than one back end device, how can I establish a relationship between each of those devices and each device in Losant so that no duplicate workflows are run or there’s any sharing of data? Can you kind of go over a little bit how devices are associated in Losant to physical devices out in the field?
Kevin Niemiller: That’s a great question. I think this question was asked probably in the first part of the demo, and hopefully the second part of the demo helped answer this question where we just built a “who is” Edge Workflow in order to find all your devices and automatically create one thermostat or hundreds of thermostats if that’s what you have automatically in the Losant platform for you. So, hopefully that helped answer that question. One other thing to add is that we also have a concept of Losant device recipes. If you wanted to, you could actually set up a device recipe that has all of the tags on it already. It has all of the attributes on it that you want to collect already. And then you can create multiple devices based of that device recipe.
Heath Blandford: Perfect. Perfect, yeah. That makes a lot of sense. I know that you mentioned both MQTT with the Gateway Edge Agent and then also making HTTP requests with an Edge workflow. Could you kind of go over what the best implementation is for BACnet and BACnet devices? It is MQTT? Do we prefer HTTPS? Would love your take on that.
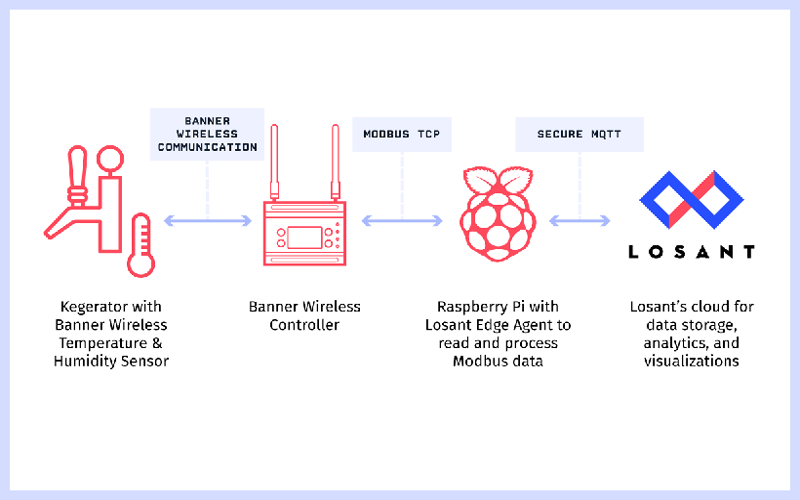
Kevin Niemiller: Yeah, that’s another great question. So, HTTP is a great way to push data into the Losant platform. We can get real time data right away that way. When start talking about BACnet, the key is that we need to have some sort of Gateway that’s running onsite in your facility so we can talk those local protocols without having to expose your BACnet devices to the public internet. So, we use the Losant Gateway Edge Agent running on a Gateway in your facility that can talk to those local devices over BACnet. And then it forwards that data over secure MQTT into the Losant platform. So, what you could do… And MQTT is a great way because it’s pushing data outward, so you don’t have to open up firewall ports and things like that. It’s very secure. And it also gives us bidirectional control so that we can send commands back from the Cloud down to that device. Whereas if we were using HTTP to push data, it’s really only one way to do that.
Heath Blandford: Oh, okay. Perfect. Yeah, that takes a lot of sense. Another question is we showed… So, we talked a lot today about BACnet. But what about other services like Modbus, LonWorks, KNX? I’ll actually take this one. The Losant Gateway Edge Agent has a lot of southbound connectors that we provide first class support for things like Modbus, TCP, and Serial, SNMP, and a few other ones as well like Allen-Bradley directly to PLCs. But the Gateway Edge Agent is just delivered as a doctored container. So, any device that you can run Docker on the Gateway Edge Agent is perfect for. So, you can implement kind of other services, other containers that can run next to the Gateway Edge Agent and then communicate with internal HTTP requests as well as the local MQTT broker. And then there’s another question that I see – when to expect the Windows based Losant Edge Agent. We don’t really have any plans currently for a Windows based Agent. But as I said, the Gateway Edge Agent is just a docking container. So, any machine and OS that can run docker, the Gateway Edge Agent is a great example or great use case for that. I do want to be respectful. I do see some other questions in here. I do want to be respectful of everyone’s time. Those of you who did ask questions that we didn’t have time to get to, I will reach out to you personally and get those questions answered. But again, thank you all for joining us. I will be sure to again, like I said reach out to those who asked questions offline. And we’ll see you in May for the next Deeper Dive. Thank you all. We’ll see you soon.