


Aidan Zebertavage: All right, everyone. It is now 1:02 PM. We are going to go ahead and get started. Thank you very much for joining this Deeper Dive webinar. If it is your first time joining us here at Losant for one of our Deeper Dives, welcome, and if you're a returning attendee, welcome back. We are excited to have you all here with us today. My name is Aidan Zebertavage, I’m a member of Losant's education team and I serve as our Technical Evangelist. Just briefly, before we get started, a couple housekeeping items. For your awareness, this webinar is being recorded and the replay will be made available to you in a couple different ways. After this webinar, we'll send you an email with a link to the replay. Additionally, the webinar will be made available on Losant’s YouTube page as well as on our Deeper Dive webpage. Now, today, we are very lucky to have Dylan Schuster, Losant's Director of Product Platform and he's going to be introducing us to a new addition to the Losant platform, our template library. Dylan's going to be taking us through Losant template library that we just launched last week and speak to how Losant developers are going to be able to use this library and the templates it contains to bring their application development to the next level. Afterwards, myself, Dylan and Taron Foxworth, Losant's Education Lead, will be available for a Q&A session here on the Zoom call. Now, speaking of that Q&A session, throughout today's webinar, if you do have questions that you'd like to ask, I’d like to point out a couple of key features here in the Zoom conference. You can use the Q&A feature or the chat function to post questions and I’ll be monitoring those throughout the call. At the end of the presentation, I’ll moderate a Q&A session with those posted questions. If you do have to leave early, not a problem. The Q&A will be posted as a pdf alongside the replay link after today's presentation. It'll also be emailed to you and we will be posting it in the Losant forums. Prior to handing it over to Dylan to speak directly about Losant's template library, I’d like to do some level setting around Losant and our enterprise IoT platform especially for those of you on the call who are new to Losant. Losant is an application enablement platform. What that means is that Losant provides enterprises with the building blocks to create their own IoT applications. The platform itself consists of five key components that help customers achieve that. They are edge compute, our devices and data sources, our data visualization suite, our visual workflow engine for building your business logic, and finally, our end-user experiences. We like to think of these as your building blocks to a full IoT solution. Our customers and partners utilize these tools to create the robust IoT applications that they then put in front of their end-users. Losant is a leader in the industrial telecommunications and smart environment spaces and we've offered this platform to a range of customers including those in the Fortune 100. If you are interested in learning more, please reach out and we'd be happy to set up some time for a much more in-depth conversation. Now, while Losant provides the software foundation for IoT, there are many other components that have to come together to create a full IoT application. We've surrounded ourselves with a great ecosystem of partners. This includes our strategic partners with whom we share sales and go-to-market strategies, solutions partners, who work with our clients to develop end-to-end IoT applications, and lastly, our technology partners that can provide hardware, connectivity, and other services to really complete a full IoT solution. With that, on to the focus of today's webinar, which is Losant's template library. With that, I will hand it over to Dylan, let him share his screen and we will get started.
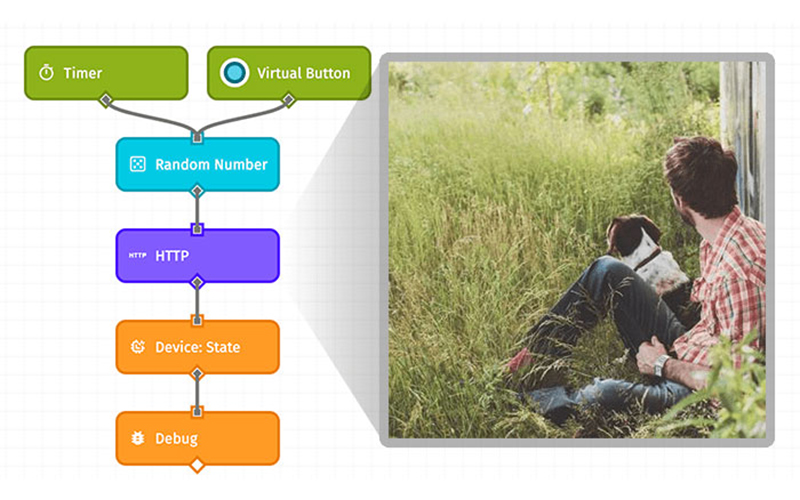
Dylan Schuster: Thanks a lot, Aidan. Let me get set up over here. Thank you to everybody for taking time out of your day today to go over this new feature with us, the template library. Hopefully, this will make your day a little bit less busy as we really think that this is a really, a key feature that we're adding to the Losant platform to really make building your IoT applications a lot faster and easier over time. Simply put, we're proud of this. This is something we've been working on for a long time. We really think that this is going to be a major driver in making the platform much easier to use, much quicker to develop your applications on top of. We're just going to go over. today, we'll talk about what is the template library in more detail. We'll spend a little time building out a demo application with resources from the template library just to show it in action. So, how you can actually implement it within your existing applications and then as Aidan touched on, we'll recap and do a little Q&A as always to go over any questions you may have. Go ahead and get those questions in at any time and we will cover them at the end. Just a little bit of background first before we really dive in. When we first founded the company, we decided that what was going to be our differentiating factor, what was going to make us different from the competition was usability above everything else. You see the quote from Charlie on the left side of your screen about making that decision early on in the history of the company. Really, we've been validated on that point over and over again. Most of the people who are on this webinar today, if you're an existing user, you probably stuck with Losant because you found us to be quite usable compared to the other platforms that you find out there. We also were validated on this point by a MachNation study that compared building on top of Losant versus Azure. They found us significantly easier to use specifically when it came to building out an application experience and exposing that information to end-users when it came time to do so. That's really what the template library is all about. Great, what is it? The entries in the temple library are a lot of common flows components, a lot of things that we're seeing being used across a number of IoT applications of all different sorts. These are things that can be dropped into any of your existing applications to take them to the next level to speed up development at any point. Now, you may be saying, "Well, templates, didn't you guys already do that?" We did introduce the full application templates a few months ago. The difference there between the full application templates is that those are more full use cases end to end that are very specific to very certain use cases, overall equipment efficiency, asset tracking, things like that. The difference is in the template library, these are individual components that are not full applications themselves but things that can be dropped into an existing application and they're more general use case, things that we're seeing being used across a whole lot of different kinds of applications. Like I said, it can be implemented at any stage of development. There are templates in the library that really help you get going from a proof-of-concept perspective, whether it's data generators and things like that, through that middle section where it comes to business logic, rolling that on top of the application all the way down to then finally, exposing that to your end-users, which you see here. Just some examples of each, data simulators. This is everything from demonstrating how to use blob attribute data. So, if you've got a device that's reporting camera data, how to actually use that in your application and actually display it on a dashboard, device recipes that are specific to certain types of hardware. That'd be at the proof-of-concept stage. In that middle layer in the business logic, we've got everything from our entire custom node catalog has now been ported in to the template library making them a lot easier to use. Alerting and provisioning. So, automatically connecting a device to the platform when you power it on and give it an internet connection, templates built around that. And then all the way down to the end-user experience side which is probably where you're going to get the most use out of the template library where you're going to find the most bang for your buck as far as time saved. This is going to be UI frameworks, components that can be dropped in to an experience page for navigation, things like that, as well as common user flows, everything from authentication to data management. Why should you use this library? Number one reason it's going to be that's going to dramatically speed up your development time. We're talking in some cases hours, certainly hours. In some cases, even days. These are components that are designed to be dropped in with little to no configuration. As you can see on the left here in this screenshot, this is actually a workflow from one of the templates that are in the library. There's quite a lot going on there. In addition to the time savings, you can also expect some security and usability best practices. There's a number of things that you just want to leave to the experts and that's what you bring in the template library resources too because these have all been built by members of the Losant team. They are built with security and usability in mind and they can be dropped in, like I said, any existing application regardless of your actual use case. And then finally, you can use these same templates to learn from examples. You may find a template that doesn't do exactly what it is that you're trying to accomplish in your application but it gets you pretty close. These templates, once they're added to your application, you can edit them. You can make any changes you want. In some cases, you can even re-import a new copy of the template back into the library. You can use these as starting points to try to get closer to the functionality you are actually trying to achieve. That said, let's check it out. What I have here is, we'll call it a mature application. This is a number of refrigeration trucks driving across the Midwest. These trucks are reporting their location and also the temperature of the cargo bed once a minute. We've got built...we've already got that working. We also have here an overview dashboard just to see the location of each of these trucks. We've also built a Detail Dashboard, which takes advantage of dashboard contacts to show me information about any one given truck and where it is and its temperature data at any given time. This is our starting point. What we're going to demonstrate here is how can we use the template library to take this application to the next level, to start to roll in... You know, we have at this point, basic visualization and basic data reporting. Now, how can we start to act on this data and then ultimately, how can we expose this information to end-users? In any application today, if you go into your navigation over here and look in the left, you'll see the link for the new template library. Let's go ahead and click on that. What you'll see at that point, we've got a list of categories over here on the left and then some templates on the right. These are actually featured templates right here but as you browse around the categories, you can see, based on the chosen category, a whole number of different templates that we have. Now, we got a lot in here. I already touched on the general categories as to what is in this library. How do we decide what to build? Well, there's really two channels there. Number one, is our users. Most of what you see in the catalog here comes from suggestions or really from questions that our users are posting in support channels and support forums. How do I this, how do I that? Enough people ask those, we have this philosophy that if one person asks it, there's probably four people who have the question before and that's going to be another 15 who have the question after. That's a great case for a template. In fact, I’ve got three, I think three. Yeah, three from the last four days that we have lined up for this exact purpose to build these out as templates. People are asking questions in support forums, how do I do this or that? Well, that'd be a great template. I'm sure somebody else will do that same thing. So, we're going to be rolling those out over time also. So, if you are a user, please keep giving us your suggestions. Keep asking questions because if you're trying to solve these problems, other users probably are as well. At the same time, we've got a number of device recipes inside of here and also some integrations with some third-party services. Some of these come from our partners, so be it hardware partners or third-party data platform partners. If you want to be represented here in the library, please let us know. Please reach out to your contact here at Losant. We'd love to represent your hardware your third-party services in this library and make it easier for our mutual users to work together. That said, back to our use case example. We've got our existing application, which by the way, as much as I tried, I couldn't actually get the budget to have five refrigeration trucks driving around the Midwest. The base of this template itself was also built from entries in the library including this asset tracker template right here and also, the... Here it is. The nimble link device recipe right here. That was the starting point for where we're actually going today also, which illustrates that you can also use the templates that are in this library to get started at the proof-of-concept stage. Let's say, given this application, what we want to do is let's start out with a simple one. Let's say that our end-users of this application are based in the United States. However, our sensor reports data in the Celsius unit. So, what can we pull out of the template library to help us fix that problem to start displaying that temperature information in a different format? Well, let's take a look here. Let's look for temperature. Here, we have a Convert Temperature custom node. Now, this node is nothing new. This node has been around, it was one of the very first ones we developed actually when we introduced custom nodes as a feature a while ago, a year and a half or so ago now. What's different now is that previously, if you wanted to use an existing custom node that was part of our catalog, you had to go to a GitHub repo, you had to download a zip, you had to import it into an application. It was a lot of work. Now, instead, we've got the entire catalog browsable inside of your application interface and with one button, I can import that template. And if I come into here, there it is, our Convert Temperature node. Now, you can't use it yet. We only have the custom node in here. Let's write a very simple workflow that will do the conversion for us using that new node. Let's call this Temp Conversion. We'll say that every time one of our devices in this application reports state but only for the temperature attribute. We want to use our custom node to report... We've got an input unit of Celsius, an output unit of Fahrenheit. Our input is going to be coming off of the payload here, which is the data that's being reported under data.dot. In this case, it's going to be temperature. "data.temperature." Let's put that under the payload under "working.temperature." And then after we've converted that, we can actually report it back as stated on the device. Let's put in the device state node. We want to use the trigger ID, which is the device that actually reported. We're going to report... We're going to call it tempf. We're going to go working.tempf. Let's save that. Now, the only problem there is that we don't actually have that tempf attribute defined on our device yet. Let's go into the device. It's here. We could go in individually and add that attribute here but why pass up an opportunity to show off our Bulk Edit feature where we can actually update all these devices at once. If you in the devices list if you click this little button in the top right corner of the list and click on Update Devices, we are going to add a new attribute. We're going to call it tempf. It's going to be a number. Yes, I understand I’m updating all of these. There we go. We updated five devices just to show that it's there. There's our new attribute. Now, with our workflow still open, let's test it. Let's submit a temperature value of 0, which should equate to 32°F. Okay. Sorry, I forgot to drop the bug node on there. Let's try it again. There it went. Okay. That was pretty easy. Let's instead, do something a little more difficult. Let's say that, okay, so our refrigeration truck has two jobs. Job number one is to go from point A to point B. Job number two is during that transit, to keep the cargo within an acceptable temperature range, which for your refrigerator, is between 0 and 4°C. Now, if the temperature falls outside of that range or really goes above 4°, we need to tell somebody that they need to take a look. It could be as simple as the driver just opened the door to unload, the door is open for five minutes and then the temperature went up. By time they closed the door five minutes later, the temperature's back down. We want to auto resolve these events if the temperature returns to a normal status on its own, number one. Number two, we want to avoid the case of creating noise, which is, you know, these devices are going to report state once a minute and if the temperature is at 4.1°C, we're going to get an event every minute. At that point, it starts to become noisy and stops to become useful. We only want to create that event the first time it crosses that unacceptable threshold and we're not going to create another event until it falls well enough below the...back into the acceptable range. If I look in the template library right here, let's pull open this alerting workflow. This is pretty much exactly what I just got done describing, Latching and Events. This template right here will create an event, give it a condition and it will automatically resolve that event and not create another event when a certain reset condition is met. We get a lot of questions about the latch node. This one up here. This is kind of the key to making the whole thing work. That's why we wanted to include this in a template to demonstrate how this works. Now, each of these templates comes with a readme that describes how to use it, any configuration that's required. In this particular case out of the box, the template assumes a device with a temperature attribute. We got that. It should have two attribute tags, max threshold and reset threshold. Well, those, we do not have but we can add those pretty easily. Let's go ahead and import the template from our application overview. Again, we're going to bulk update our devices here to add those max and reset thresholds. We can add attribute tag values to our temperature attribute. We're going to call this one Max Threshold and we're going to set the value of 4, which is going to be the point at which we want to create an event. I would actually also need to add the reset threshold. To attribute tag set on the same attribute. Set reset threshold to 3. So, create an event when the temperature hits 4°C, resolve and do not create another event until the temperature hits or falls below 3°C. Now, the workflow that we just added, you'll find right here under latching and events. One thing that is important to note is that application workflows, when they are added to the application come in a disabled state automatically so as to avoid any unwanted side effects. We'll go ahead and enable that and we'll take a look here. This does require a little bit of configuration in that... We've got notes all over these workflows that kind of describe what each of these nodes is doing and how to change the behavior if you want to. In this case, we need to say that any time one of our devices in our application reports, we're just going to say only temperature right here, that's when we want this workflow to fire. Let's come in here and let's force temperature again. Let's set it to 4. Our workflow fires. You can see it follows this event create path right here. If we go look at our applications events, there it is, we just created this event. Now if I come into here and I force it again down to 0, let's call it 3, my event's gone. If I come in and look at my resolved events, you can see. There it was when we created it. Here's when we resolved it and the value that it recorded that. It's pretty cool. We've just now rolled in a little bit of that business logic on top of that here which is to create events in the system given a condition and not to create another event and optionally, I should say, to resolve that event, which we can, if we don't want to automatically resolve the events, you can just cut this entire section of the workflow off, which has a note in here describing that using an entry from the template library. Now, we've added that, we should probably...let's put that on our dashboard here. Let's add a block for an event list. It's going to allow updates. Here's all of our open events right now. Actually, it looks like another one just came through while we were doing another part of the demonstration here. Sensor number four. Now, this is on our overview dashboard, which going to show all devices that currently have an open event associated with them. Let's go ahead and add this block also. By the way, just click this little clone block button if you've not used that yet. Pretty neat little feature where you can actually take a block and clone it across dashboards. As you can see, we have a number of dashboards called Detail Dashboard. Let's add it over to our Detailed Dashboard. Now, we do need to change it a little bit because we don't want to show all devices and their events on this list. We only want to show ones that are open and match our context variable device ID. It may have auto resolved by now but let's see if number 4 is on there. Yeah. Yeah, it already resolved. You can see the temperature came back down right there. Okay. Now, we've added, this was of course, not part of the library itself but we've taken the events created by that and created two dashboard blocks in our existing application that can reflect those events that we're managing now inside of the application based on that entry from the template library. Okay, what's next? Let's build out an experience using what we've done here. Now, like I said, when we kicked off, this is really where you're going to see the template library really come to life and really start to save you a lot of time. Let's say we want to do a classic two-column layout. We're going to have a header, we're going to put a list of devices on the left and on the right, we're going to display a dashboard, be it the overview dashboard if we're on our homepage or a detail dashboard if you're looking at a specific device. The title list template is called Bootstrap 4 Layouts. If you've never heard of Bootstrap, it's developed by Twitter. Yes, that twitter. It is a CSS, HTML CSS framework for common UI components normalization of styles around buttons and layout and form elements. Pretty powerful framework, very widely used and more importantly, it's got a pretty robust ecosystem of themes that the community has built that can be laid on top of any one of these. We made the decision to base all of our templates that have user facing code like components and things like that on this Bootstrap 4 system. Now, you don't have to use it if you don't want to. The rest of the components in the library and the pages everything will continue to work. They're just going to look a little funky until you apply your own custom styling on top of those. We've actually been using this framework for a while now in our existing experience system or if you want to, you know, just start up from scratch. We've found that the majority, the vast majority of our users stick with this and just build on top of it so that's why we made the decision to do that. Let's go ahead and import the Bootstrap 4 Layouts template. Now, we're not done yet. We're going to want to only expose this information to users who are signed in so let's get a login flow. Classic email and password, submit. You become a signed in user. You can sign out. In addition to that, no respectable login flow exists that doesn't have a Forgot Password flow assigned to it. Now, this is my go-to example when it comes to why should I use a template library. Something like a forgot password flow is very easy to screw up. You can make it very difficult to use, you can make it insecure. Unless you are a web developer by trade who has experience doing this kind of things, this is exactly the kind of case that you want to leave something like this to the experts. If you were going to try to build this on your own, it could take, even if you do it right, it's days of effort. The layouts, the workflows, testing. This is the quintessential answer to why should I use template libraries. This is a great example right here implementing this Forgot Password flow. It only takes a couple pieces of configuration. You got to create a couple application global variables and actually of course, add a link into your login page to actually get to that flow, which we'll take care of that in a little bit. And then we're going to add one more template inside of here. We said we wanted that two-column layout that you see right here. Let's add this device list component right here, which is what we're going to use to populate the left column of our layout. Now, this one is actually... It's unlike the other three we just added. This is not layouts or workflows or pages, this is actually components. An experienced component is a reusable piece of code that can be used multiple times inside of one page, they can be used inside of themselves. What's different about these is that they're invoked quite differently. You have a handlebars helper right here. I want to display a component of this name. You parse it some context and then you can actually parse it named arguments which you see down here, which allows us to control the display, the output of what this component spits out without having to dig into the code too deeply, of the actual component. Let's import that. Okay. We're done with templates. Let's take a look at our experience and look at all this that we just added. All this comes from those four templates that we just created right here. Let's take a look here. Nothing so far This is expected because we don't have our home prop created yet. We'll get to that in a minute. Let's come into our login page. This was created from our login template. If you look in a lot of these pages, you'll see a comment right here that basically says you can remove everything above this line and below this line if you're going to roll your own layout, which we are. If I come into here... This is before... I've not saved that page yet. I just want to show you where we are beforehand. This is the existing page without me deleting any of that code. And then I’m going to go in here and choose the Narrow Width Single Column layout and save it. Other than the addition of the header bar at the top, you see we're now using this new layout. This is important because we're going to want to share this navigation across multiple pages. We don't want to go add that into every single one of these pages right here. We're going to do the same thing for the Forgot Password flow, similar comment exists. There it is. Save that. I forgot to add my link to my Forgot Password flow. We'll just put that underneath the input right now. When I come back to my login page, there's my link. I'm going to put in... I forgot to choose a layout for it. See, that's why it's important. Narrow Width Single Column layout. There we go there. There we go. Now it's styled correctly. If I put in an email address, you're going to see here, it's going to give me this error because I didn't actually configure those globals yet. There's some nice helpers built into these components also to kind of warn you and say, "Hey, by the way, you forgot to set such and such variable." I'm not going to bother with that right now. Let's keep moving on to other things we can demonstrate here. We're going to have to create a user so we can actually test this out. I'll call it test.example.com. Chrome is going to yell at me about using a garbage password. Please use strong passwords when you're building for production use. And then if I come back to here and log in. Forgot password page. I'm going to put in an incorrect password first just to show that we do indeed get this. It retains the email address. This is typical for a login flow to keep the email address and we have it because this is probably the part they screwed up. Now, I’m on a home route, which is still not built. Let's go do that right now. Let's create an endpoint. We're going to display an experience page, @/, which is my home route. I'm going to create a new page. Let's call this one Overview Dashboard. We'll build that page in a minute here. The layout we want to use a Full Width Two Column layout unlike for the narrow, [Inaudible 00:31:21]. This is going to take up the entire width of our browser, left to right with the list of devices on the left then we're going to put our dashboard on the right side. We actually do need a workflow for this because we need to generate the list of devices that are going to go into that left column as page data context, which I’ll show you shortly. I want to allow any authenticated user to see this page, which means that anybody who is not logged in, we're going to redirect them to the login page. Let's review our choices and there, we just created our review dashboard. I'm also quickly... Actually, let's go ahead and edit this really quick. I need to change this to a dashboard page and the page I want to render is my overview dashboard. I don't have any context variables to set for this one. While I’m here, let's create our Detail Dashboard page. Again, we're going to use a Full Width Two Column layout which came from our pack from the template library. This is going to be a dashboard page referencing the Detail Dashboard. Now, in this case, I do need to set a context variable which is going to be the device ID variable. We're going to pull that off of the... For now, we're just going to put the device ID as a query parameter, I’ll show you what a query parameter is in a minute, as opposed to a path parameter. Because we're an actual production app, we probably create a new route /devices and then redirect that back to home or vice versa and so on. Let's put that on here. So, now, we've got our two pages. Okay. Where are we at? Let's take a look. All right. Here's our overview dashboard. Here's my header with my signed in user. This also came from our Bootstrap 4 Pack, this navigation with a little drop down for the user up here. We don't have our list of devices over here on the left and as a result, we have no way of navigating yet to our detail page. So, first, let's go into our workflow here. This is the one that we created. This is pretty simple right now. Anytime a request comes into the home route, turn around and spit out the overview dashboard page. We're going to modify that a little bit. Let's drop in a device get node. We want to return, we're just going to say all the devices in our application which is anything with this nimble link and LIT2 device recipe tag. We do want to return multiple devices. We don't need to include any additional attributes for now. Let's say we're going to put this under pagedata.devices. Let's save and deploy. Now, we're not done yet. We've got this data that we're parsing into the page. We need to tell our endpoint reply node where to find the data that we're generating in this workflow that is then going to be exposed to the rendering engine. This is another sticking point. Something that a lot of people have questions about is, okay, I’ve got a workflow. I've built a data object. I now want to parse that down to one of my experience pages and then in the page, I can do something with that context I’ve parsed down. As you saw up here, it's under pagedata.devices. Let's, for a page data source, use a payload path and we're just going to say page data. We'll parse the whole object down right there. Okay. Other changes we need to make is that we need to know the difference between an overview page and a detail page. Let's use a conditional node. The way I can tell that, if I come back up here and look at the payload, the sample payload from my endpoint is that it's going to be parsed in as a query parameter. That's going to be under data.query... In this case, we're going to call it deviceID. So, in my conditional node, let's put an expression of data.query.deviceID, if this property exists, we'll branch down the true path, if not we, we'll branch down the false path. Under the false path, meaning we don't have a specific ID defined. Let's continue to render our overview dashboard. But in this case, true path, let's render our Detail Dashboard. Okay, let's come back. Shouldn't see any change yet. If I put something on my URL, okay, that's actually good. It's actually pointing to the Detail Dashboard page. Obviously, this isn't a real URL and because of that, doesn't pass our validation and we can't actually display. We'll fix that in a second. If we come back now into our layout, our Full Width Two Column layout, which is what both of those pages are using to render inside, you see this right here. This TL left column section. Now, this is called section block helper. This can actually be overridden on a per page basis where we're using something called... Actually, in a component using something called a fill section, which given a name, will go back up into the layout and replace the content with what you put inside of there. We're just going to go ahead and put in the default content. Go ahead put this is in as the default content. I'm going to go back into the template library and I’m going to find... Where was that? That's our device list component. Here's an example usage right here. Actually, this matches exactly what we want because the context that we're going to parse into the component, we want to be our array of device objects, which is under page data.devices as defined in the workflow. Let's drop that in. Let's see what we got. Okay. We're getting there. There's our list. But if you click on one of these, you'll see it's not doing anything to my URL, just adding a hash. We need to define the URL for where these links should actually go. I can do that as I mentioned when I was first importing this into the application, we've got these named arguments down here. We're going to use three of them. Let's go with the link. Actually, we're going to use two. We'll leave the name the way it is. We're going to add in our own custom link and we're also going to define which of these should have a selected style to it. If I come back in here and I’m going to parse these. Breaking them onto additional lines is not required I’m just going to make it pretty and make it a little easier for everybody to follow. The order of the named arguments doesn't matter. These two appear, they do, the name of the component and the context. After that, it doesn't really matter. I'm going to call my link. Now, something important to note here is that this is a template that is resolved against the currently iterated item. I have a device object in hand under this right here. That's the scope of the helper at that time. What I want to do is pull off of there, it's going to be a query parameter, which means it goes in the URL following a question mark, equals... It's going to be deviceID = and we're going to say "this.id" In addition to that, I’d like to add a selected state to these so I know which one of these I’m looking at. Per the arguments here, there is a selected argument, the ID of the device mark is selected. Okay. Well, I’m parsing that in my query, that's good. Let's say selected=quest.query.deviceId. Okay, no change so far but if I grab one of these, there we go. And such luck, we have one that actually has an open event right now also. There's number one. Looks like it's on its way north to Indianapolis. Here's number two. I can always go back to my home up here. One other thing I’ll add in, and this is just a demonstration of the Bootstrap framework more than anything else, I mentioned that you don't have to know too much about the code to actually adjust the layout in certain ways. Bootstrap handles a lot of that stuff for you using utility classes. I just happen to know this one off the top of my head, the syntax being m for margin, y for the y axis, therefore, top and bottom and 5 being a degree, 1, 2, 3, 4, 5. These are all very well-documented on their website getbootstrap.com. If you do want to stick with this framework, I’d recommend reading up on that. It's a heck of a lot easier than reading up on HTML and CSS. And then we'll also add in here just a title. There we go. You can see, I don't know if you guys are seeing this as I’m resizing my browser window and sharing my screen but it's actually collapsing to a single column layout with the devices on the bottom as I adjust my browser size. We got pretty far there in, what, 30 minutes maybe a little bit longer than that, using the resources of the template library to take an existing application that was just past the proof-of-concept stage, it was ready to start rolling in the business logic and then ultimately, exposing this to end-users. We built in user authentication and Forgot Password. We've got our Two Column layout here for navigating simply between a list of devices and displaying a dashboard for each. Hopefully, that really showcases the power of the template library and everything that you can find inside of here. As I mentioned before, we really want to hear from you our users about the kind of problems you're having or the places you're getting stuck because in a lot of cases, you're not alone and there's other people wrestling with the same problems and we can solve these in the template library. We intend to continue to roll out updates to this pretty regularly. Like I said, we already have a few lined up that are going to come out probably in the next three to four weeks based on feedback from users. With that, I’m going to turn things back over to Aidan and we can open this up for questions. I see we have a few already. Aidan.
Aidan: All right. Thanks, Dylan. Really appreciate it. I think your point there at the end on just being able to take all of us here on this Deeper Dive webinar through the buildup of the basics of an application in just, you know, 30 minutes. I mean, that right there is a is a huge powerful feature for Losant. As you said, we do have a couple questions that that came through during your presentation. For those of you still on the call, if you have more questions that pop into your head here in the next few minutes please continue to use the Q&A feature and the chat feature. Now, prior to diving into that Q&A with Taron and Dylan, I just want to point out a couple of really important resources that Losant provides for our customers. We have Losant documentation. Every feature in Losant set is released with accompanying documentation and we take a lot of pride in our docs and they are excellent resources to use when developing with Losant. We have Losant University. Losant University has a combination of video training, hands-on workshops, and assessments and it provides really, the fastest way possible to gain an understanding of the Losant platform. Of course, we have our Deeper Dive series which you're joining us for here today and we have our whole history of Deeper Dives currently hosted on our YouTube page. We have a variety of hands-on tutorials available both on our blog and in our documentation. Our education team are always releasing new tutorials, how-to guides that can really help our users develop everything from like a simple experience page all the way to a hardware-specific device, you know, connectivity guide. And then finally, a plug for our forums. We have a great developer community that interacts on our forums at forums.losant.com. It's a great place to not only ask questions for support from Losant experts but it's also a great way to help your fellow Losant developers. November 10th, Taron will be back with us actually leading a webinar on the implementation of single sign-on. And then on November 17th, please join us where we'll be joined by Devin Saavedra and Bob Cressen. They are from Losant partner KS Technologies and they'll be leading us through a webinar on — Turning your trash into treasure using Losant and sensors. This Deeper Dive will introduce a new application template that was actually developed by KST for Losant and it allows new developers the ability to quickly visualize and act upon distance sensor information. It's going to be really valuable for all types of Losant developers but especially those who are interested in smart environment applications. Please check out the Deeper Dive webpage at losant.com for more information. If you do want to get in touch with us to learn how Losant and IoT can work for your enterprise, please reach out to us at hello@losant.com. Now, as I said, we do have a couple of questions that have come through. I'll invite Dylan and Taron to join me here and we will get into it. Dylan, the first question that came through and I know you touched on this a little bit at the beginning, but how can our developers add their own templates to the library that can then be used by their own developers on their team?
Dylan: You cut out a little bit of [Inaudible 00:45:34] there. Hopefully I heard. How could our developers... Okay. You cut out a little bit there in the middle but I think what I heard was how can our developers add their own or essentially, create their own templates to add to the library?
Aidan: Yes, that's correct.
Dylan: Sure. I should have touched on this when I was speaking before but all of the templates that you see in the library are actually hosted on a public GitHub repo, github.com/losant/... Actually, I’ll try to find it for you real quick. But what if you want to create your own templates... Here we go. Github.com/losant/losanttemplates. We'll make sure to include that in the material that goes out at the end of the webinar. Not only are the library templates, the partial templates that we demoed today but also the full application template inside of there. If you have an idea for a template and you'd like to see it get into either those catalogs, you are free to open a pull request in that repo. What you want to do is isolate your application down to just the resources that should be included in the template. You can then... Actually, Aidan, if you want to give me your screen really quick, I will demonstrate this.
Aidan: Yeah, no problem. Go ahead.
Dylan: Sure. One second here. Just to demonstrate the exact thing I just... The actual process that we, the Losant developers did. Let's say I wanted to export the current state of the template library, which is everything we just added here as a template. I'd want to come down here into my navigation and export it. Just a note, when you're exporting resources, it's going to strip out events, domains, access keys, and API tokens, things that are not reusable in other contexts. That's going to give you a zip file that you can download. And then what you want to do to create a pull request or to actually get one of your entries in the catalog... Oops. Github.com. There we go. Is, come in here into pull requests and you can open up a new pull request. Probably actually open as an issue and then attach your file and then we can take care of the pull request from there. But this is your interface for getting your templates into the library. You can also reach out on the forums. You can put in a zip there if you'd like. And then what's going to happen after that point is a Losant develop... Well, multiple Losant developers are going to pull it down, they're going to run it. They're going to come back with feedback if they have questions or if they have things that they'd like changed. This is going to be true of anything that comes through the catalog. It's all going to be vetted by multiple members of the Losant team before it gets its way into the template library. But this is your way to do that. You can come in here into this GitHub repo and create an issue or a pull request, include the zip file and we will happily review it, very happily review it and get it into the catalog into the library if it passes all the standards. No promises but we have been known to send out swag for things like this before particularly when users contributed custom nodes in the past. So, if you do have something that you'd like to contribute, you could safely bet on a t-shirt or a mug or at the very least a shout-out for your efforts because we do greatly appreciate it.
Aidan: Awesome. Thanks, Dylan. I think actually while we're on this topic of extending the library and how we're going to continue to support it. When you were taking us through the Deeper Dive, you obviously highlighted how we separate out the templates to align with the different components of Losant. Are there plans actually, because the one that we didn't really highlight is around you know specific dashboard type templates, so are there plans to add dashboards to the template library in the future?
Dylan: Yes. Now, in the case of dashboards, where you're going to find more value as opposed to an individual dashboard itself is going to be more advanced use cases of specific dashboard blocks. Now, we're going to end up packaging those up as an actual dashboard but think, for example, if you ever tried using the custom chart which is based on the Vega and Vega-Lite data visualization schemas, these are pretty complicated. I don't have one off the top of my head but it's a very powerful tool that can be used to develop charts of a whole different, kind of like a whole wide variety of different kinds of charts and it's all based on an adjacent schema that you would enter inside of here. I would see us doing a number of templates that are based around examples using the custom chart framework, possibly also custom HTML, which this actually runs a block inside of an iframe, inside of its own scoped container where you can expose data into it. I see that being more of the use cases than it would be like a dashboard at large, more so demonstrations of ways to configure these blocks to get some really powerful results out of them given an input of data from your application.
Aidan: Great. Yeah. I think that that customization that you touched on with each of the templates regardless of which component it aligns to is going to be really powerful. On that note, one of the questions we got was, as you import these templates into a, even especially a mature application, if we have customers who have already developed some of the front-end work on their experience side, how can they change the theme of their template pages and some of those components to align with their own branding when they're presenting that end-user experience to their end-users?
Dylan: Sure. Yeah, I kind of touched on this a little bit when I talked about the Bootstrap framework. Let's take an example of somebody who's not using Bootstrap at all. They have their own custom UI and you want to, we'll take the Forgot Password flow. The endpoints, this endpoint, that endpoint, this one, that one. These are all still relevant. The workflows, which are far and away the hardest part, these are all still relevant for getting... Excuse me. That's clicking the endpoint. You'd still want to import something like this and probably what you want to do at that point is you'd come into the Forgot Password page and well really, you'd probably just render your own Forgot Password page you've already created inside here, something like that. But you can blow this away. The only thing you need to do is, assuming you don't change the workflow itself, is make sure you've got an input with a name of email and you probably put your validation on and everything like that and make sure it submits as a post request to the URL in question. All of this, you probably want to keep also because this is all the error handling that comes back but you could put your own HTML in here. You could say instead of a invalid reset token, you could say, "Page four, something went wrong." The UI is probably the easiest part of these to change when it comes to something like in particular Forgot Password flow. Similarly, if you do want put your own style on top of this, you've got some options. You can come into your layout and you can add in your own style sheet. This one's actually pulled directly from a CDN on Bootstrap but you could add your own style sheet in addition to this that pulls in from your application files. You could put a style sheet inside of here and pull it into your pages. Similarly, and this goes back to the decision to go with Bootstrap, if you go to rapbootstrap.com, and there's a few sites like these, loads upon loads of themes that are built with this framework in mind that you can purchase for peanuts. It'll give you the resources that you can then take and add into your application to get different color themes, different layout styles, things like that. Hopefully, that answers your question.
Aidan: Yeah, I think so. I think being able to understand that, yes, we are providing these baseline architectures and these great starting points, but that doesn't take away from the ability of seasoned developers to really tweak.