
Today's platform update delivers major new functionality for your IoT applications. Many of these features were inspired directly from your feedback. Others are stepping stones to larger roadmap initiatives. In either case, these updates ensure Losant's application enablement platform continues to grow and evolve to meet your current and future IoT requirements. Some of the key updates include:
- Application Import / Export - Export an application to disk and import it again as a new application.
- Streaming Endpoints - Endpoints Replies can be SSE streams by subscribing to MQTT topics.
- MQTT Topic Restrictions - Control a device's access to specific MQTT topics.
- New Device List Block - Major enhancements made to the existing Device List Block.
- Notebook Context - Provide custom data to your Notebooks from workflows.
- New Experiences UI - Major improvements made to the Experiences user interface.
Application Import / Export
In our previous update we released Application Cloning, which provided much of the technical groundwork for today's release of Application Import / Export. When you perform an export, nearly every resource that makes up an application is exported to disk. You can then save, modify, and share this export in any way you'd like. You can then import these files to quickly create copies of an application.
Application Export
Before you can import an application, you'll first have to export one. The export functionality can be found in the Export tab under the Application Info main navigation menu.
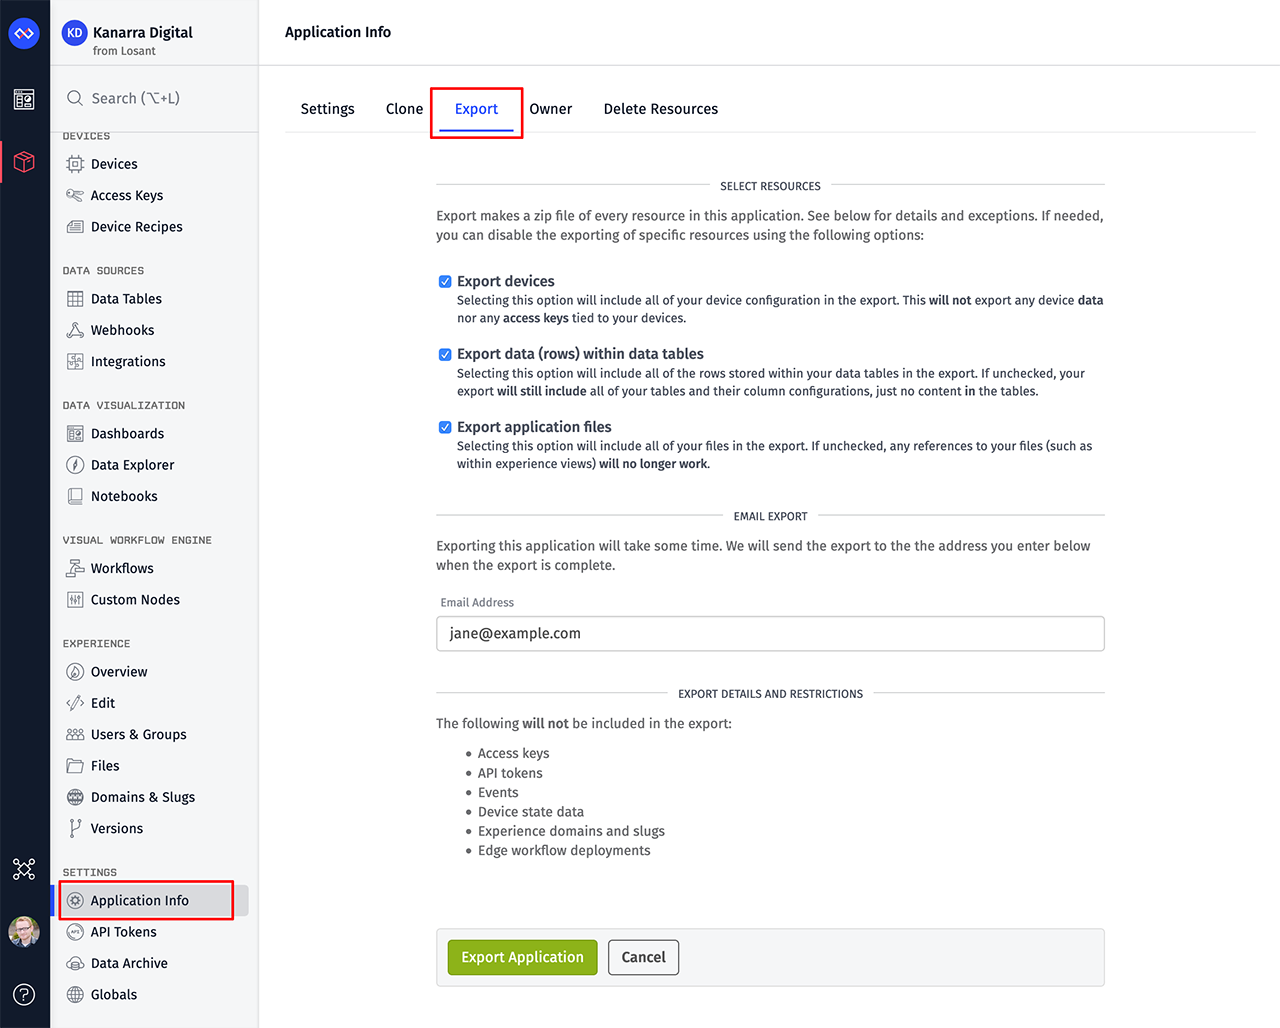
Depending on the number of resources, exporting an application can take a while. For this reason, you may see an Email Address field on this export screen. If so, a download link will be emailed once the export is complete. If your application is small enough, you'll be immediately prompted to download the export. In either case, the export will be a zip file. When you extract it, you'll see a folder structure and YAML files that represent the resources that make up your application.
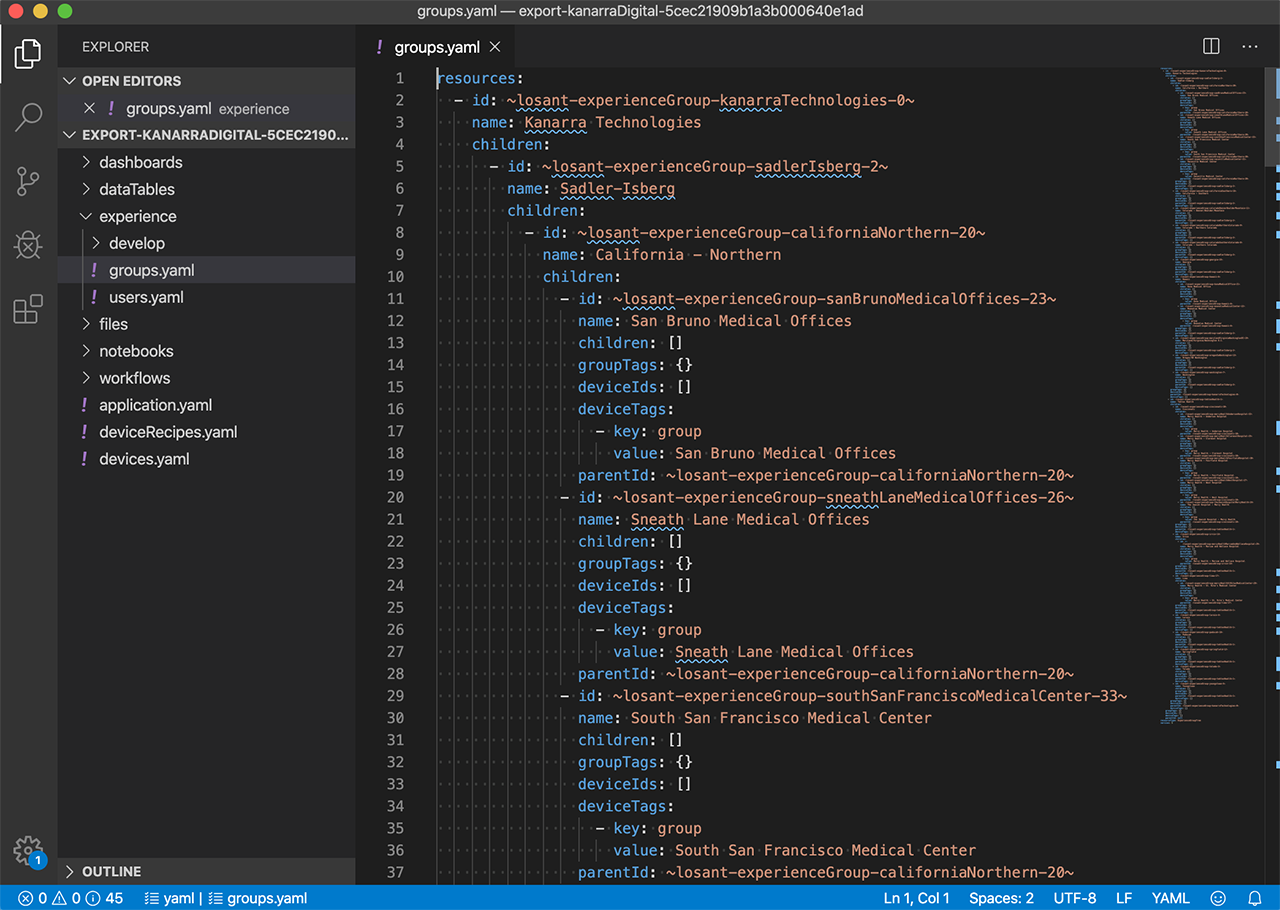
All of these files are human readable, which makes it easy to use things like Git to independently version control your Losant applications. You can also directly edit these files if you'd like to manually make changes. A common edit may be to replace actual devices and users with an example set, which can make imported applications a little cleaner.
Application Import
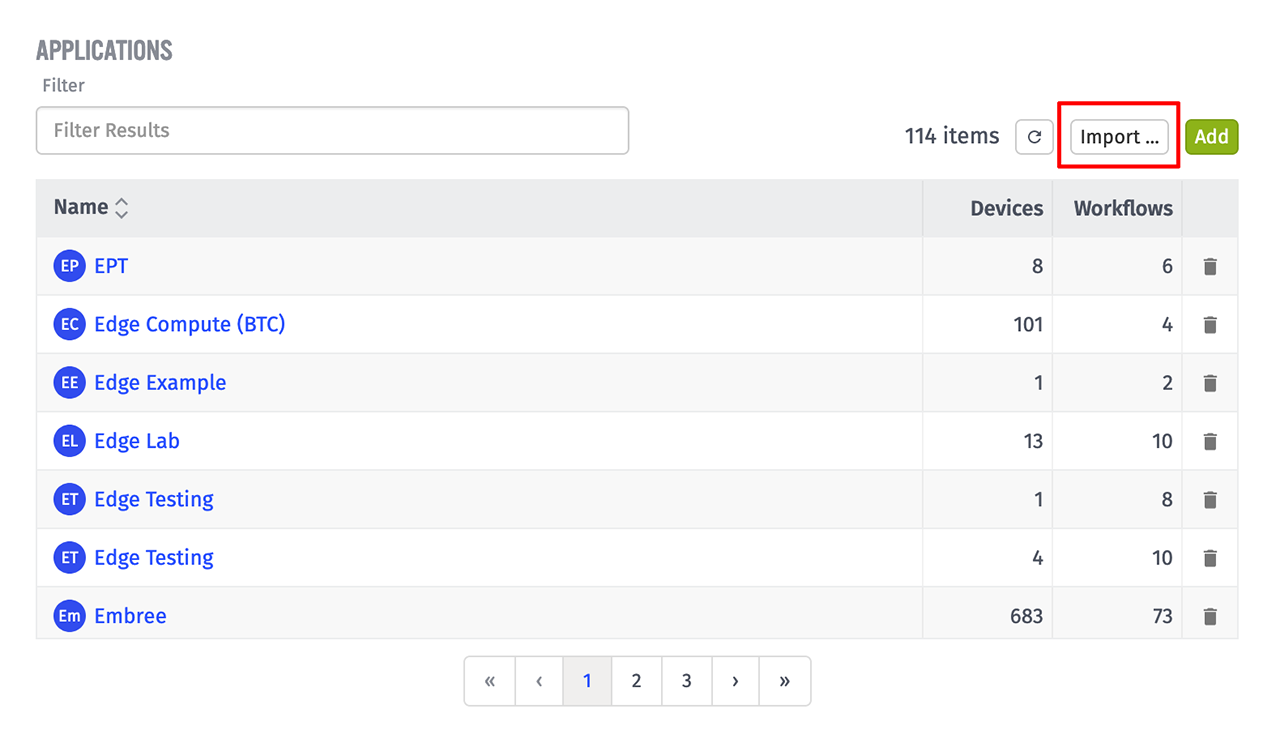
The primary purpose of exporting an application is to create new applications based on that export. You can import a previously exported application as a zip file using the new Import button on your organization or Sandbox overview page.
If the application is small, you'll be immediately redirected to the new application's overview page. If the application is large, you'll receive an email when the import is complete.
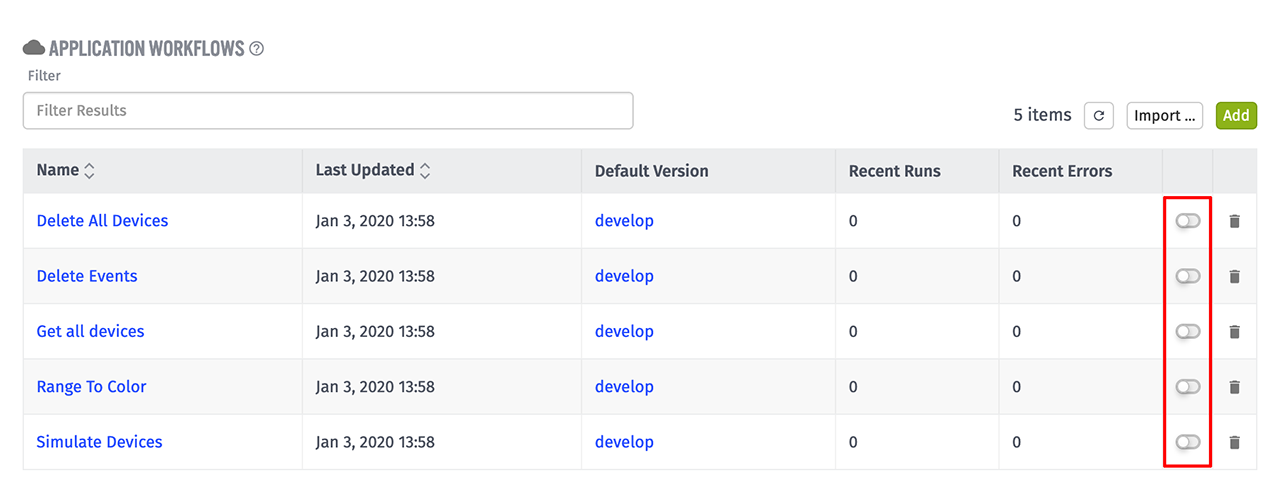
Application Workflows and Integrations are automatically disabled for imported applications. This is to ensure unexpected logic is not executed until you're ready. You can quickly enable all workflows on the workflows overview page. Integrations can be enabled on the specific properties page for each integration.
Since IDs within Losant are globally unique, all resources in an imported application will have different IDs than the original application. The import process will take care of re-creating any relationships between resources using their newly generated ID.
Stream Real-Time Data to Your IoT Experiences
Every interaction with your application's experience starts with an Endpoint request. Prior to this release, endpoints were implemented with a request/response model, meaning each request resulted in a single response. That response was either raw data (e.g. a JSON API response) or a rendered Experience Page (e.g. a browser request for a webpage).
This request/response model made it difficult to build experiences that displayed custom real-time data. You were required to implement polling in your client-side JavaScript code to continually request an API endpoint over and over again to receive new data.
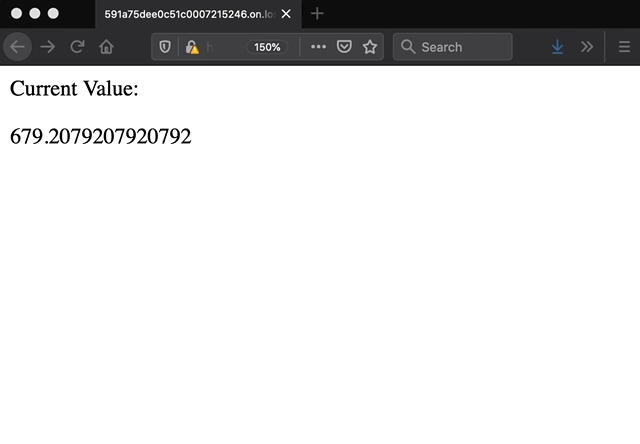
With today's release of Streaming Endpoints, you now have a new SSE Stream reply type option in the Endpoint Reply Node. This option allows you to reply with a Server-Sent Event (SSE) response, which will keep the connection open indefinitely, providing you the ability to push new data to the user in real time. To push data, the SSE stream can be attached to any number of MQTT topics, which means any time data is received on a topic it will be pushed in real-time to the connected client. We also added a shortcut option that allows you to quickly subscribe to a device's state topic, since pushing state data is likely the most common use case.
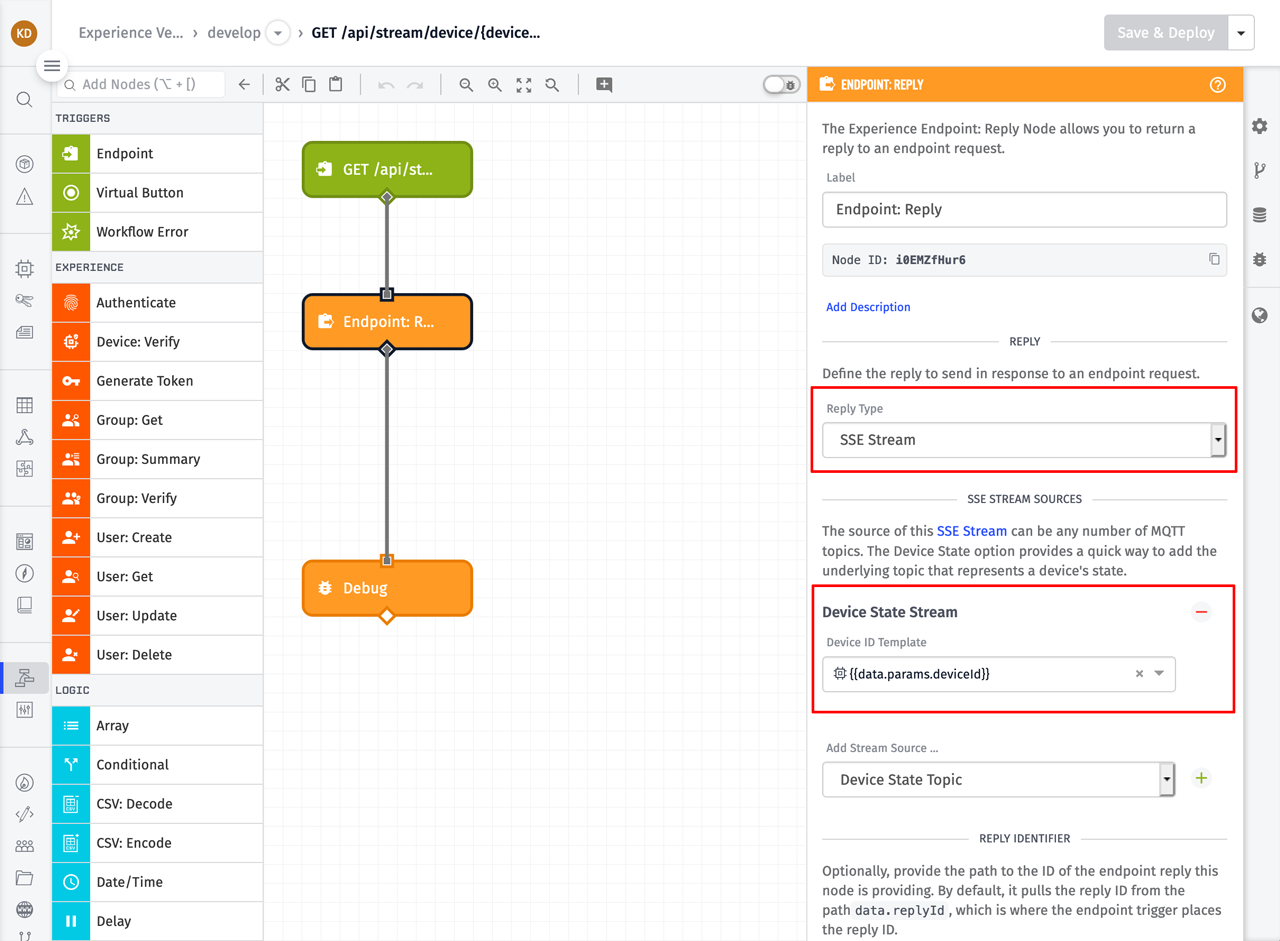
You'll have to use JavaScript to make an SSE request from the browser, but the code is pretty straightforward. Here's the entire page for the above example:
In the above example, the EventSource API is used to make a request to an experience endpoint. The endpoint's route in this example is /api/stream/devices/{deviceId}, but this can be anything you'd like. The deviceId query parameter is used in the Endpoint Reply Node to subscribe to the corresponding device state MQTT topic.
MQTT Topic Restrictions
Since streaming endpoints utilize topics on the MQTT broker as their data source, we foresaw a potential issue with the level of access your devices have to custom topics. Prior to this release, Losant only restricted access to device-specific topics (e.g. state and command) to make sure devices using different access keys could not see each other's data. Devices were able to access any other custom topic with no restrictions.
This level of access poses a problem since you may want to use custom topics as a way to stream data to your experiences, but you may not want devices to access those same topics. This is especially true for multi-tenant IoT applications.
With today's release, you now have much more control over which topics can be accessed with an access key.
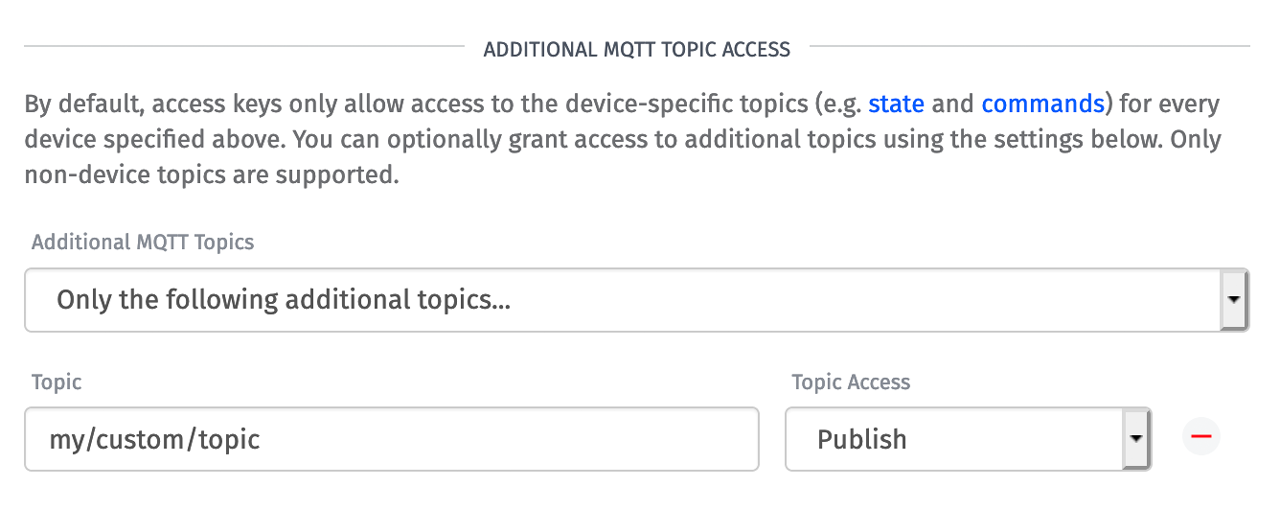
When creating an access key with the user interface, it now defaults to No Additional Topics, which means this access key can only be used to access the device-specific topics for the devices associated with this key. If a device attempts to access any custom topic, it will be rejected by Losant's MQTT broker. Access keys created by the Losant API still default to the previous behavior, which grants access to all custom topics. This was done to maintain backwards compatibility for anyone programmatically generating keys. Any access key created prior to this update will still have access to all custom topics.
If you'd like to limit an existing key's access or grant access to additional topics for new keys, you can do so in the Additional MQTT Topic Access section. Wildcards are supported and this list of topics can be changed at any time to dynamically grant or revoke access to custom topics.
A More Powerful Way To Display a List of IoT Devices
A couple of releases ago, we implemented a back-end optimization to cache "composite state", which is the most recently reported value for every device attribute. This optimization made it much easier to request and display attribute data in various places within Losant.
For today's release we entirely rebuilt the Device List Block to make use of this new optimization and add many new features that you've been asking for. The new block allows you to add columns for device attributes and tags, and provides much more control over how the data is presented to the user.
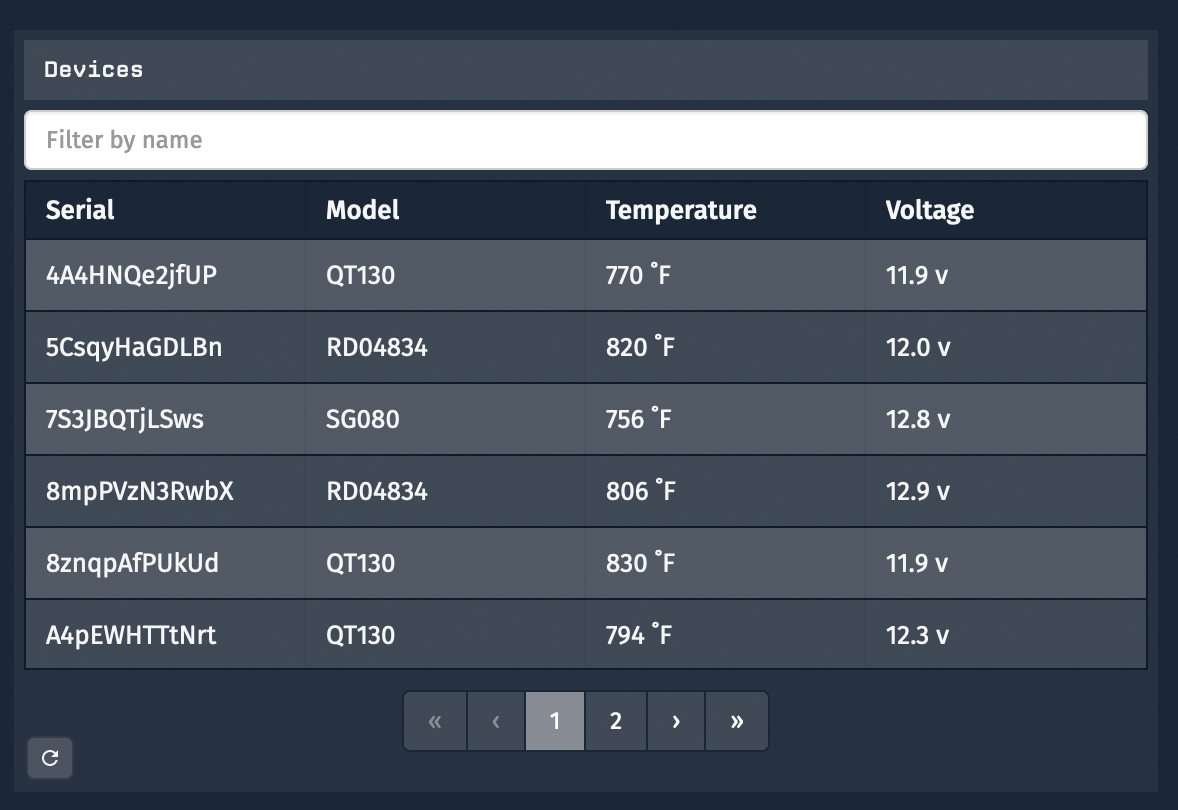
The screenshot above shows a device list block with information that was not possible to display prior to this release. The "Serial" and "Model" columns come from device tags. The "Temperature" and "Voltage" columns come from the most recently reported values for those attributes.
Nearly every column is templatable using both Handlebars and Markdown, which gives you a lot of control over how to present the underlying value to your users. For attribute columns, you also have access to the attribute's name, description, and tags. For example, if your attributes have a "units" tag, you could use the following template to display the units in the attribute column: "{{format value '0.0f'}} {{attribute.attributeTags.units}}". This template results in the "Temperature" column from the screenshot above.
Provide Custom Data to Your Jupyter Notebooks
Losant Notebooks were released in April of last year. Since then we've seen some impressive uses of batch processing on your IoT data. During this time we've also been collecting your feedback, and today's release of Notebook Context solves two major pain points you've been experiencing.
First, notebook context allows you to change the notebook's configuration at run time. The workflow that executes your notebook can optionally provide it a context object, which you can access using templates in your configuration fields.
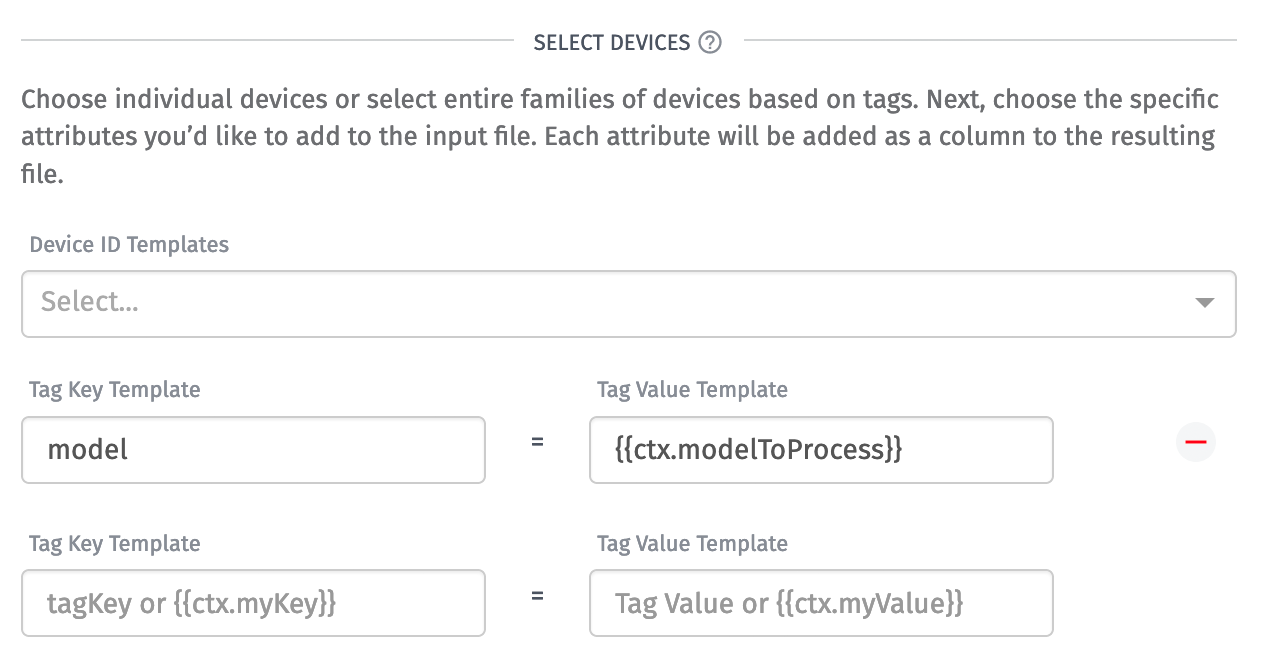
The above screenshot shows a good example of this functionality. Prior to this release, you were not able to dynamically change which devices were queried when a notebook executes. With this release, you can now choose a different set of devices for each execution based on whatever value the workflow provides through context. Almost every field in a notebook's configuration is templatable in this way.
Notebook context solves a second pain point beyond dynamic configuration. It also allows you to pass custom input data into your notebook itself. The context object provided by your workflow will automatically be written to disk along with all of your configured inputs. It's placed at INPUT_DIR/context.json.
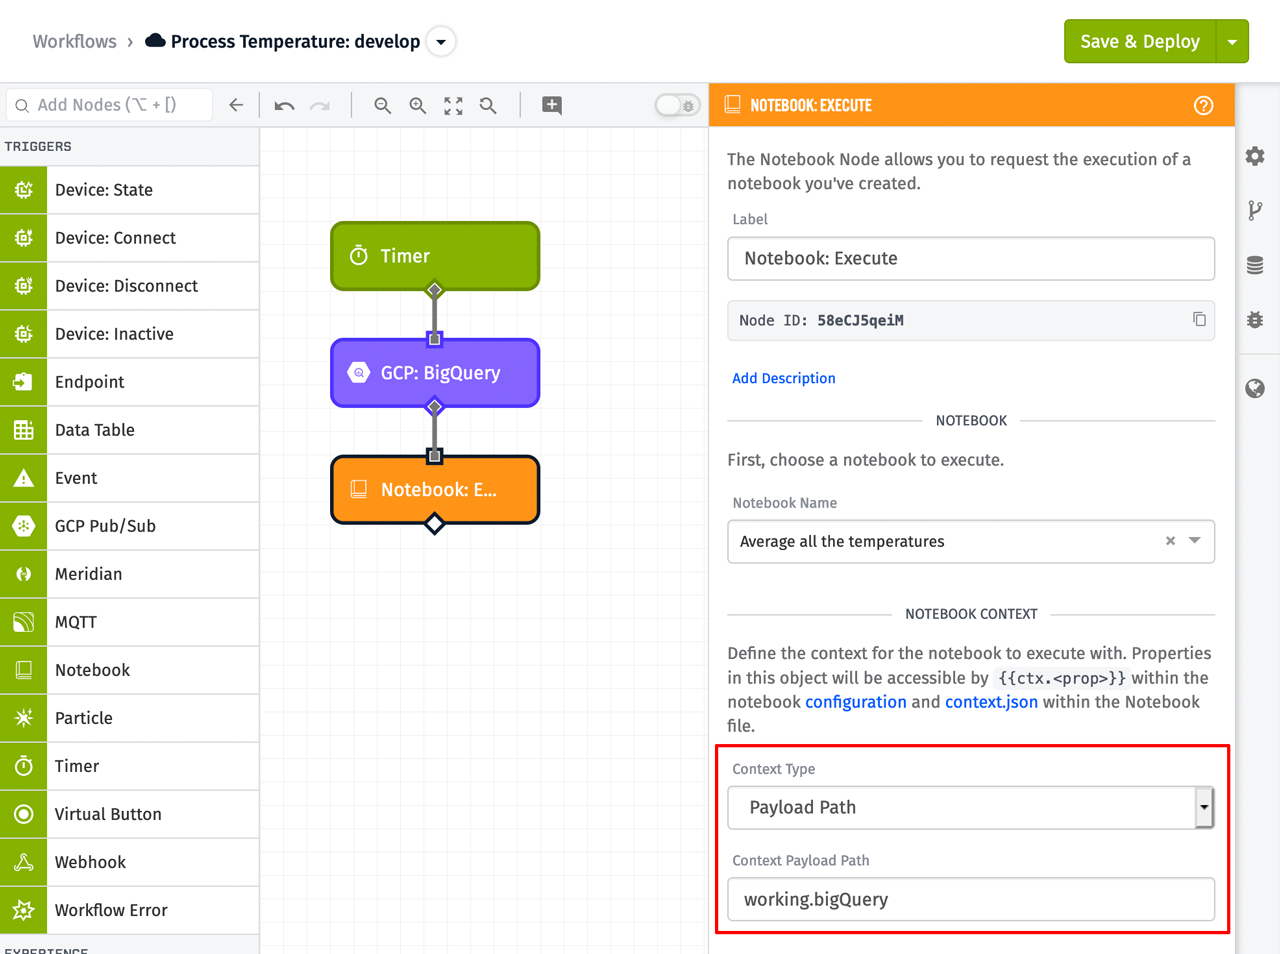
The screenshot above shows how to pass context to a notebook using the Notebook: Execute Node. In this example I'm querying additional data using the GCP: Big Query Node and providing that external data to my notebook using context. This allows me to combine and batch process data from both Losant and other external data sources at the same time.
New Experiences User Interface
Losant's End-User Experiences functionality provides all the tools necessary to build and publish completely custom multi-tenant IoT applications. In order to develop these applications, Workflows, Endpoints, and Pages all have to work together to deliver your user interfaces and APIs. To help you better understand how these resources interact and to better navigate between them, we've made a few major updates to the experiences user interface.
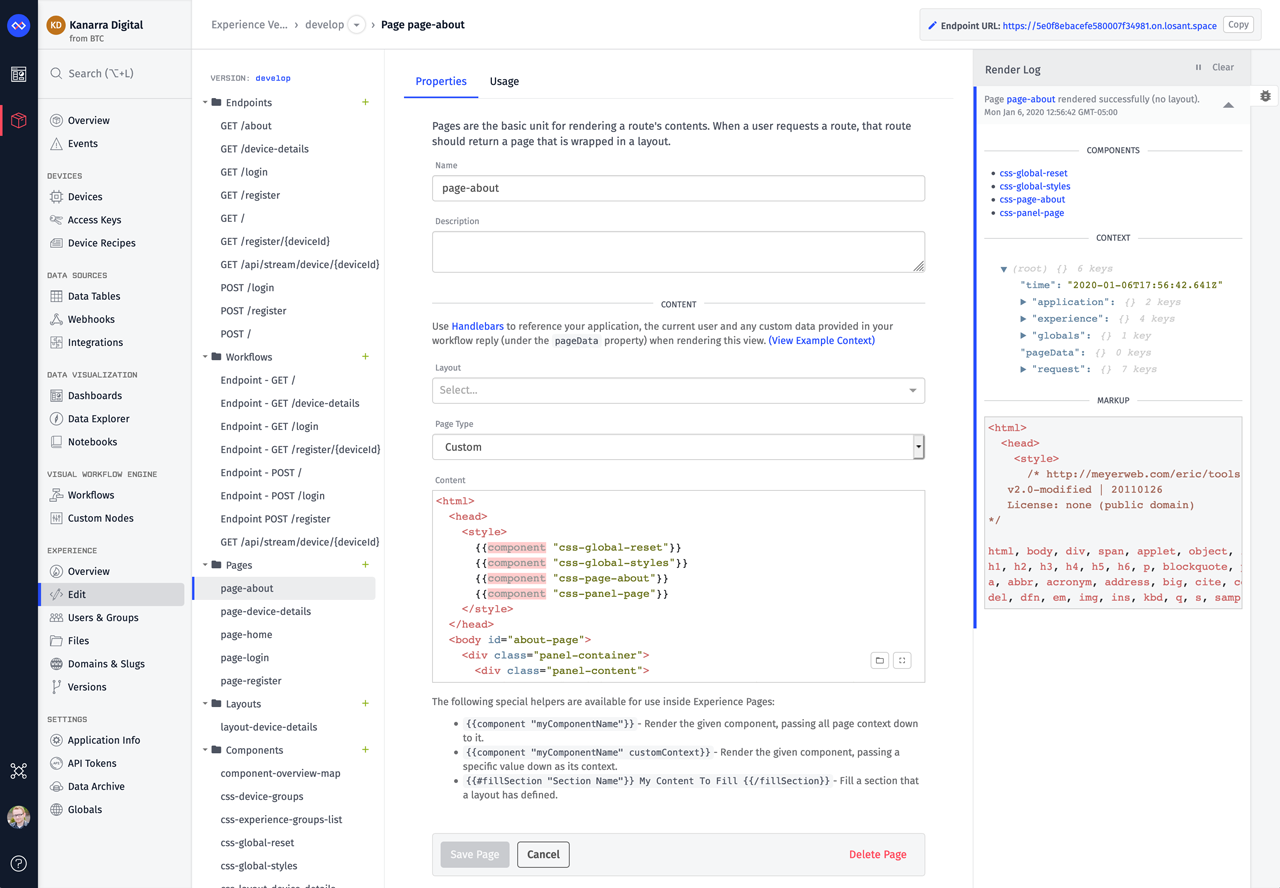
The first change, and the one you'll notice right away, is that we've reorganized all of the resources that make up an experience version (endpoints, workflows, pages, layouts, and components) into a folder tree. This provides a much more intuitive way to view and navigate between these resources.
We've also added a Usage tab to the configuration page for endpoints, pages, layouts, and components. This tab provides a quick way to view and navigate to the other resources that are interacting with or referencing the current resource.
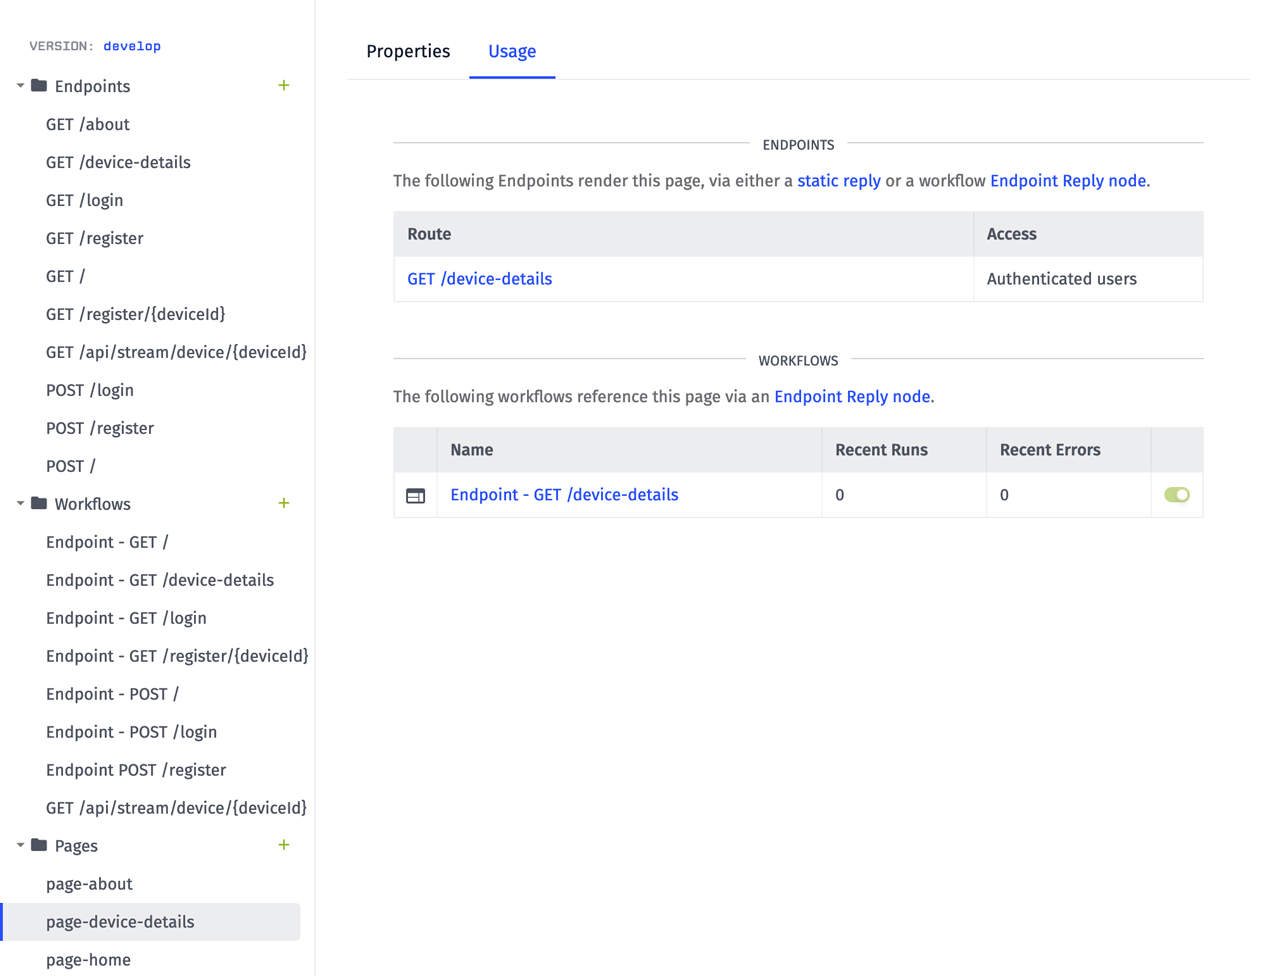
The screenshot above shows a common example of how an endpoint, workflow, and page all work together to render a custom webpage for a user. When the GET /device-details endpoint is requested by the user's browser, it triggers the Endpoint - GET /device-details workflow. That workflow queries the required data and replies with the page we're currently viewing. With this new tab, we can now easily see these relationships.
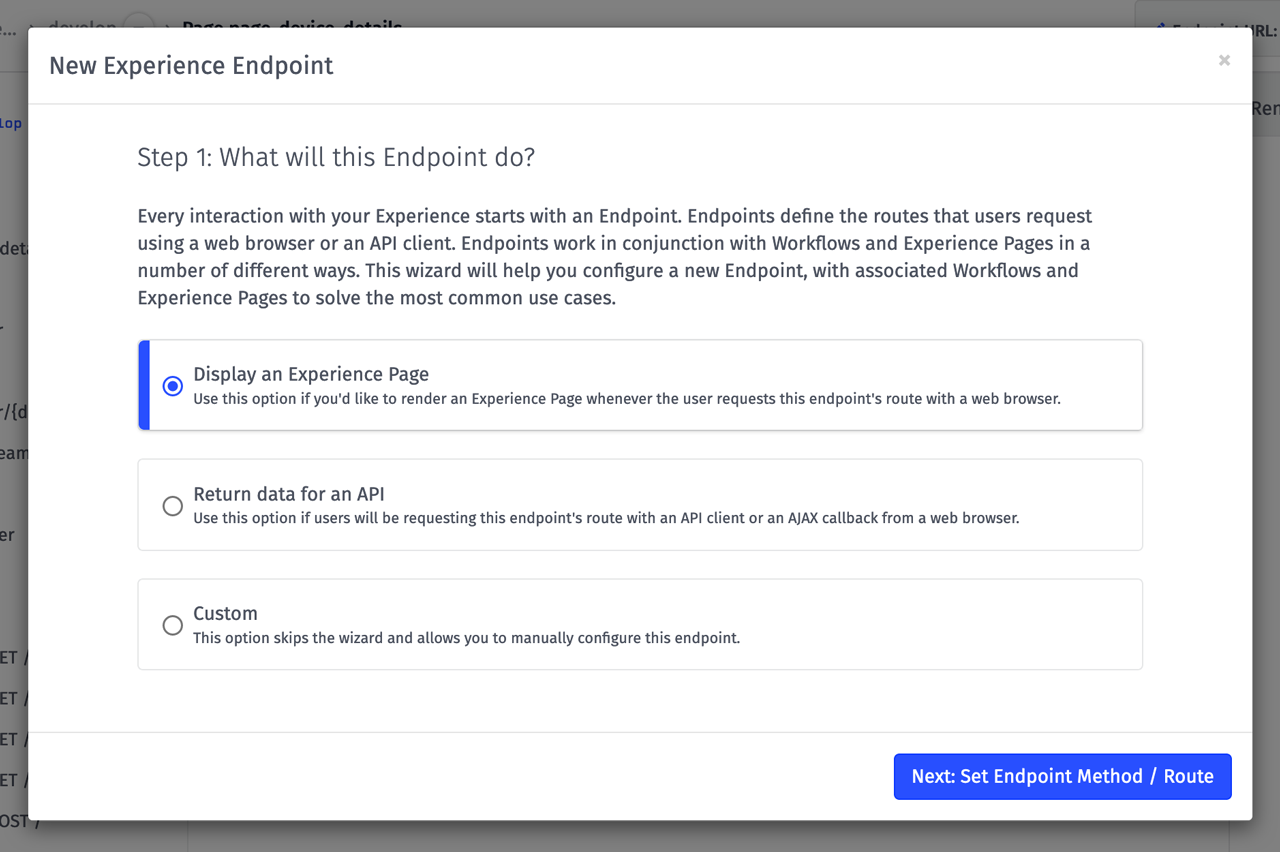
Initially setting up these relationships for every new page or API endpoint was not as intuitive as we'd like. To solve this, we've also added the Endpoint Wizard. Now whenever you create a new endpoint, you'll be guided through a series of steps that will automatically create the required resources and link them together.
Other Updates
- Events can now be used as a Notebook Input.
- Wildcard topics are now supported in the MQTT Trigger.
- JSON: Decode Node can now optionally place an error on the payload instead of halting the workflow.
- The pypdf2 and opencv libraries are now available in the Notebook Execution Environment.
What's Next?
With every new release, we really listen to your feedback. By combining your suggestions with our roadmap, we can continue to make the platform easy for you. Let us know what you think in the Losant Forums.