
Here at Losant, we like using Slack to receive alerts from our social media outlets. In this case, we wanted to be alerted when someone commented on one of our LinkedIn updates. First, we checked to see if Slack had an integration for that. At the time of this writing, this did not exist. Next, we checked to see if LinkedIn offered webhooks, which also was not available.
LinkedIn API
Luckily, LinkedIn does offer an API to get this information. Before we dive into this, you’ll need to obtain an access token from LinkedIn. You can follow these instructions. Now that you have your access token, there is an endpoint that allows us to get all recent updates and any comments if there are any.
That endpoint is:
https://api.linkedin.com/v1/companies/{{ globals.COMPANY_ID }}/updates?event-type=status-update&format=json&oauth2_access_token={{ GLOBALS.LINKEDIN_ACCESS_TOKEN }}&count=100&event-type=status-update
The response from that api comes back in this format:
Notice that each comment has a timestamp. We’ll use this to determine what comments have already been posted to Slack. If you want to learn more about this endpoint, visit this page.
The Losant Workflow
Now that we know how to retrieve the latest LinkedIn comments, we need to periodically request them using a Losant workflow and then send new ones to Slack.
If you haven't already, sign up for Losant and create an application. Next, create a workflow using the main “Workflows” menu.
Workflows are a powerful way to connect things together. Sometimes these things are physical devices, but this case, the things are two disparate services: Slack and LinkedIn.
This workflow will do the following:
- Every 15 min, check last 100 posts
- Sort through and check if there are new comments
- Post to slack
- Store timestamp of last recorded comment
- Repeat
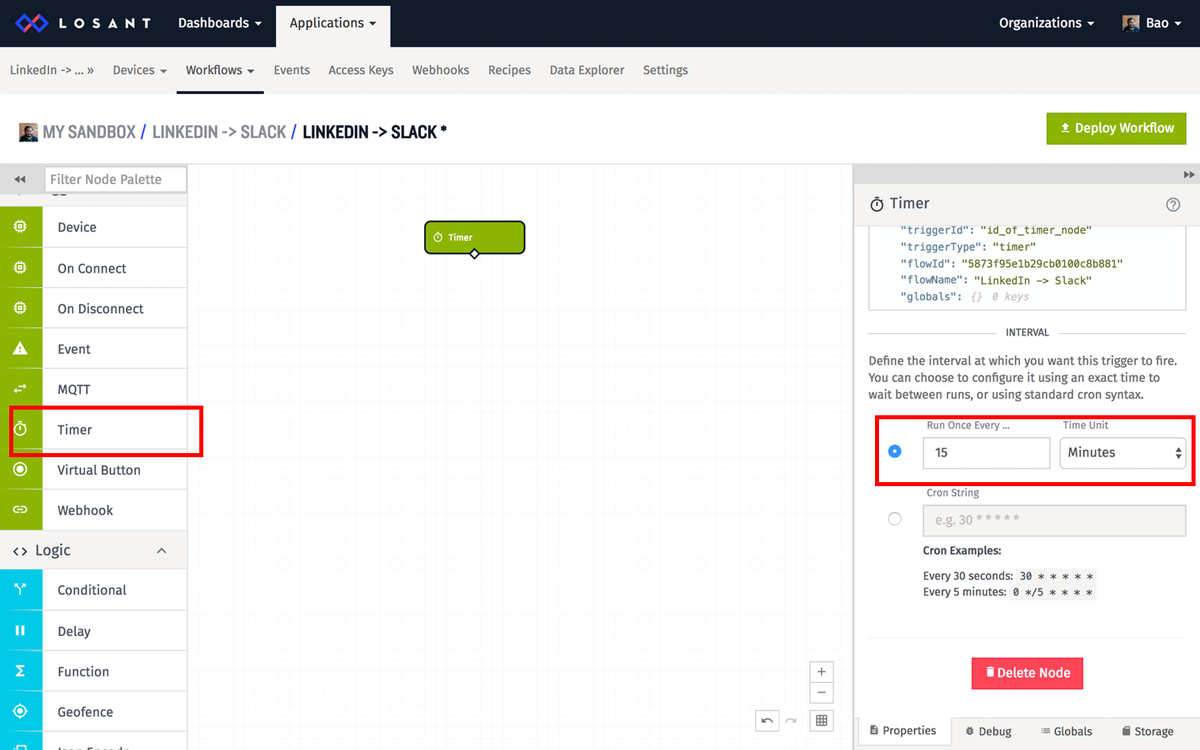
All workflows start with a trigger. Triggers can be buttons, device state reports, timers, and more. In this case, we want to use a timer to trigger the workflow since we’ll be periodically checking for comments. Drag the Timer node onto the workflow, and change the interval to 15 minutes. We felt like 15 minute intervals were adequate, but feel free to adjust the interval frequency.
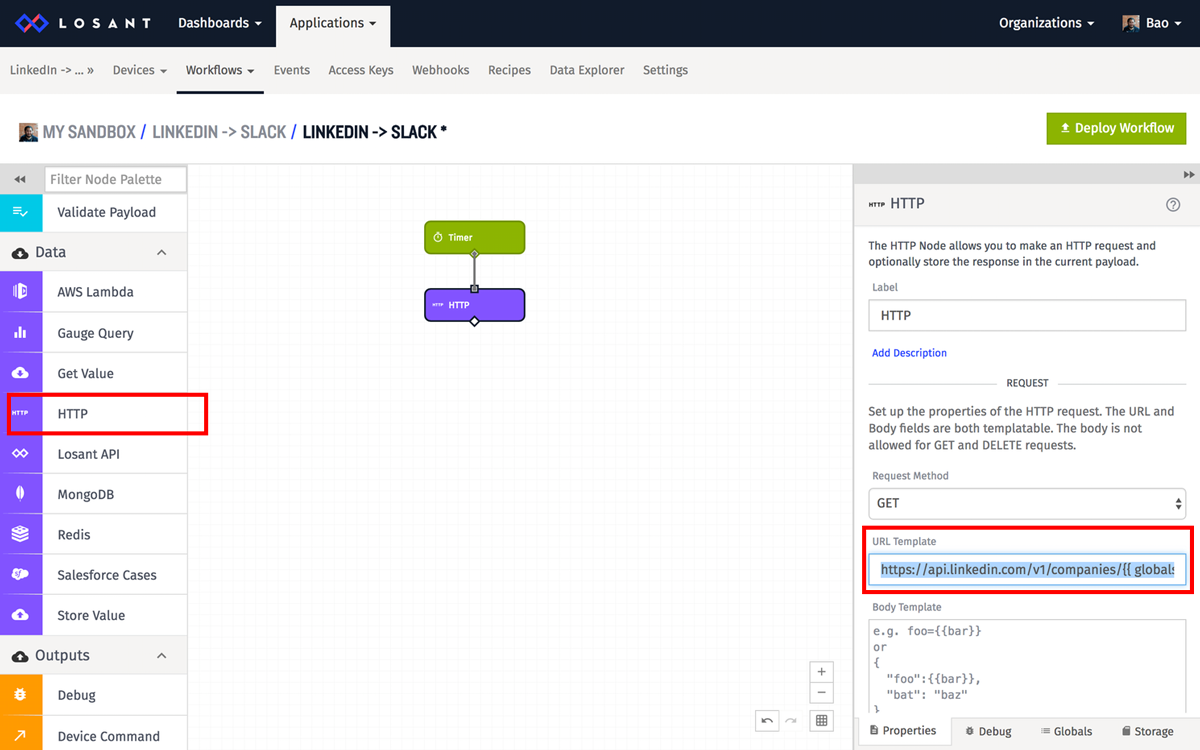
Next, drag the HTTP node onto the canvas. We’ll be using the HTTP node to call the LinkedIn API. In the HTTP node, set the “URL Template” value to the following:
https://api.linkedin.com/v1/companies/{{ globals.COMPANY_ID }}/updates?event-type=status-update&format=json&oauth2_access_token={{ GLOBALS.LINKEDIN_ACCESS_TOKEN }}&count=100&event-type=status-update
This is the url used to get the latest LinkedIn company updates.
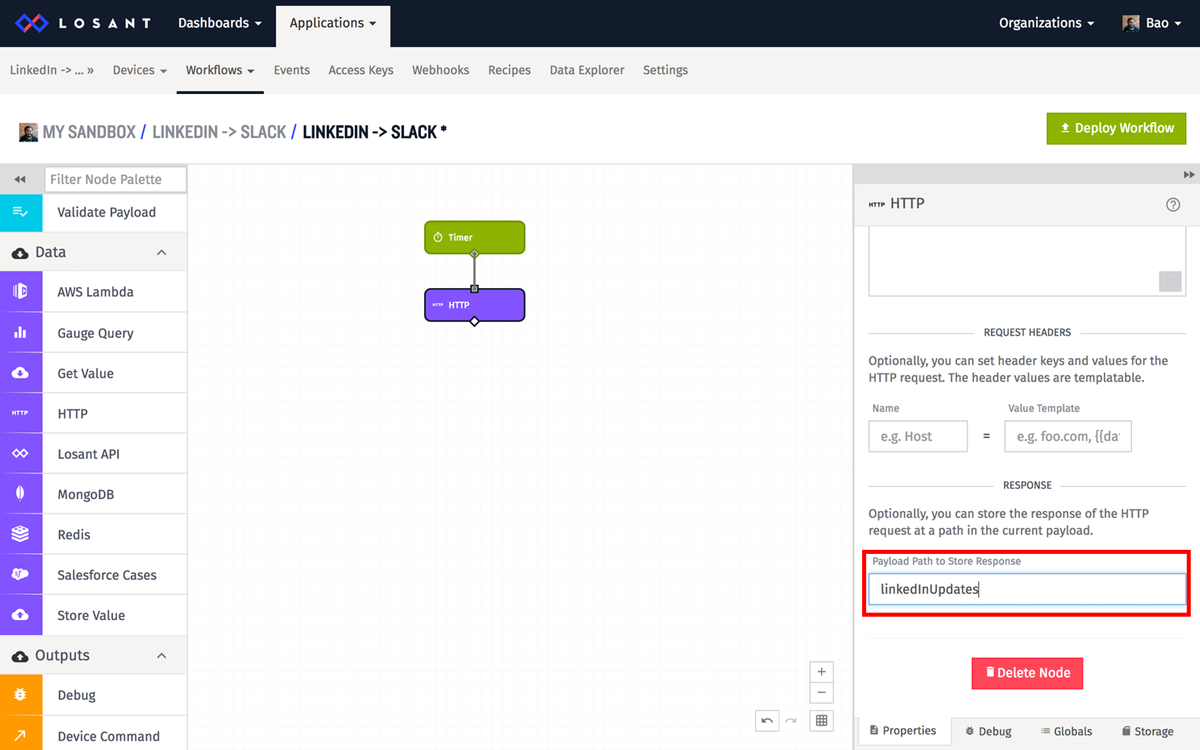
The HTTP node allows you to store the response of the data received into the payload. We’ll need to do this in order to sort through the returned data. Set “Payload Path to Store Response” to “linkedInUpdates”.
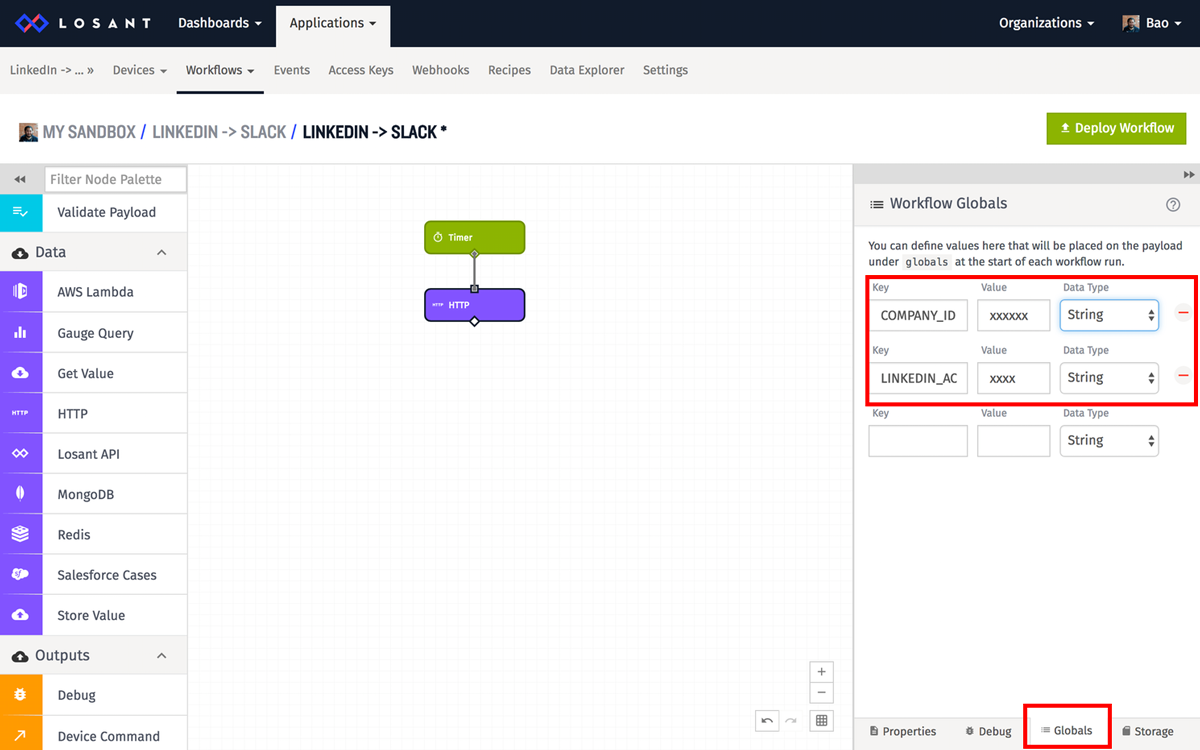
Also, notice that there are some references to global variables inside of the “URL Template”. You’ll need to set these values in the “Globals” Panel. Set “COMPANY_ID” to your company id in LinkedIn. You can find your company id in the URL string of your company page:
https://www.linkedin.com/company/12345678
It will be the number that follows “company” in the URL. In the above example, the company ID would be“12345678”. Next, set your LINKED_ACCESS_TOKEN to the value that you obtained earlier in this tutorial.
At this point, we can now test the data by using a Virtual Button and Debug node. Drag the Virtual Button node on to the canvas, and attach it to the HTTP node. Then, drag the Debug node and attach it after the HTTP node.
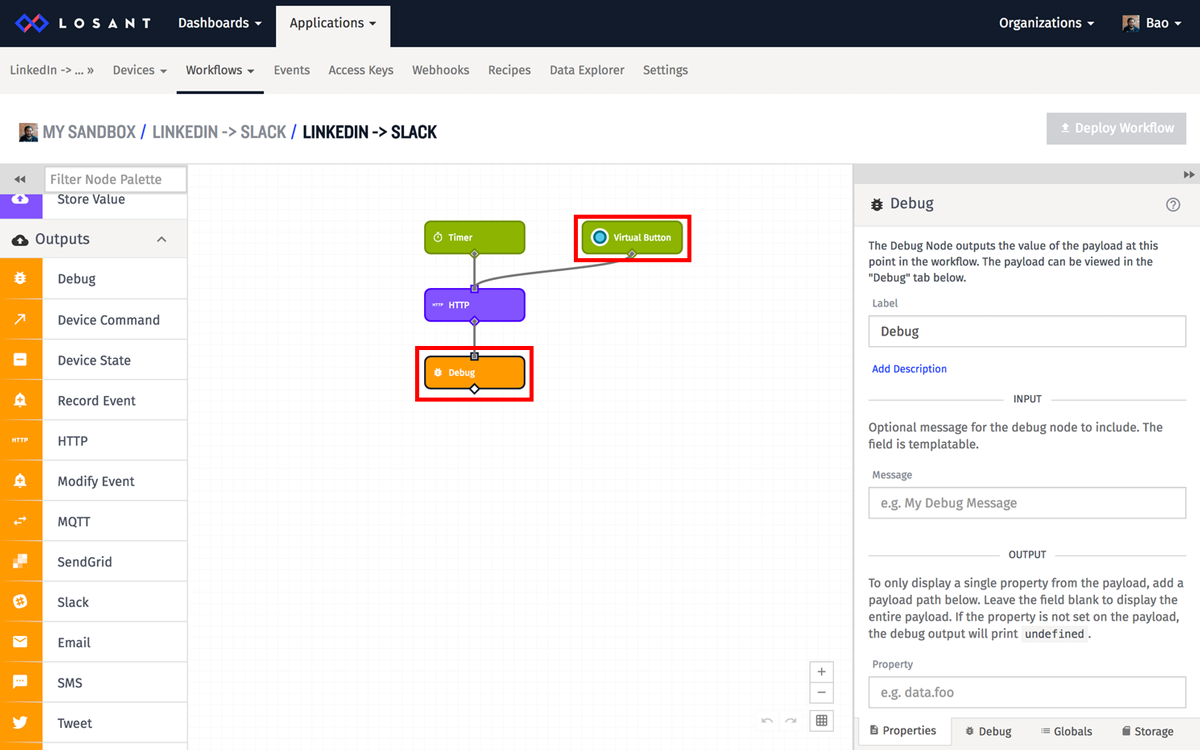
When you click the Virtual Button, it will trigger the workflow to call the HTTP node, which will pass the payload to the Debug node. The Debug node sends the payload details to the Debug panel. Click “Deploy Workflow” to update the workflow. After a few seconds, you should be able to test the workflow by pressing the Virtual Button. You should see the payload in the “Debug” panel. For the rest of the blog post, click “Deploy Workflow” after each step.
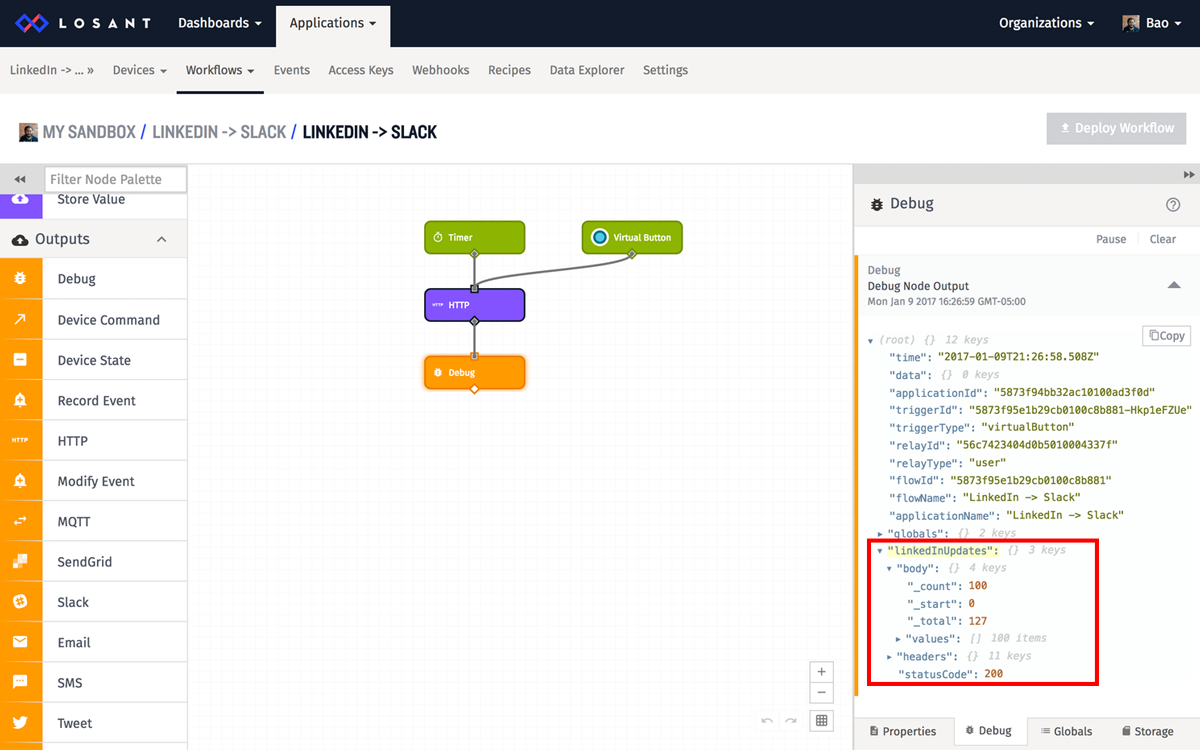
If you inspect the payload, you’ll see the“linkedInUpdates” property. You can click on this property to see the response of the LinkedIn endpoint. In there, you’ll notice that it has the following properties: body, headers, and status code. If the status code is “200”, then you’ve called the api correctly. If it is a “400”, inspect the body property to see the details of the error.
Now let's get the timestamp of the last comment we sent to Slack. The first time this runs, we will get the default value that we set, which in this case, will be “0”. Drag a Get Value node to the canvas and attach it to the HTTP node. Set the “Value Identifier” to “lastCommentTimestamp”, and “Payload Path for Value” to “data.lastCommentTimestamp”.
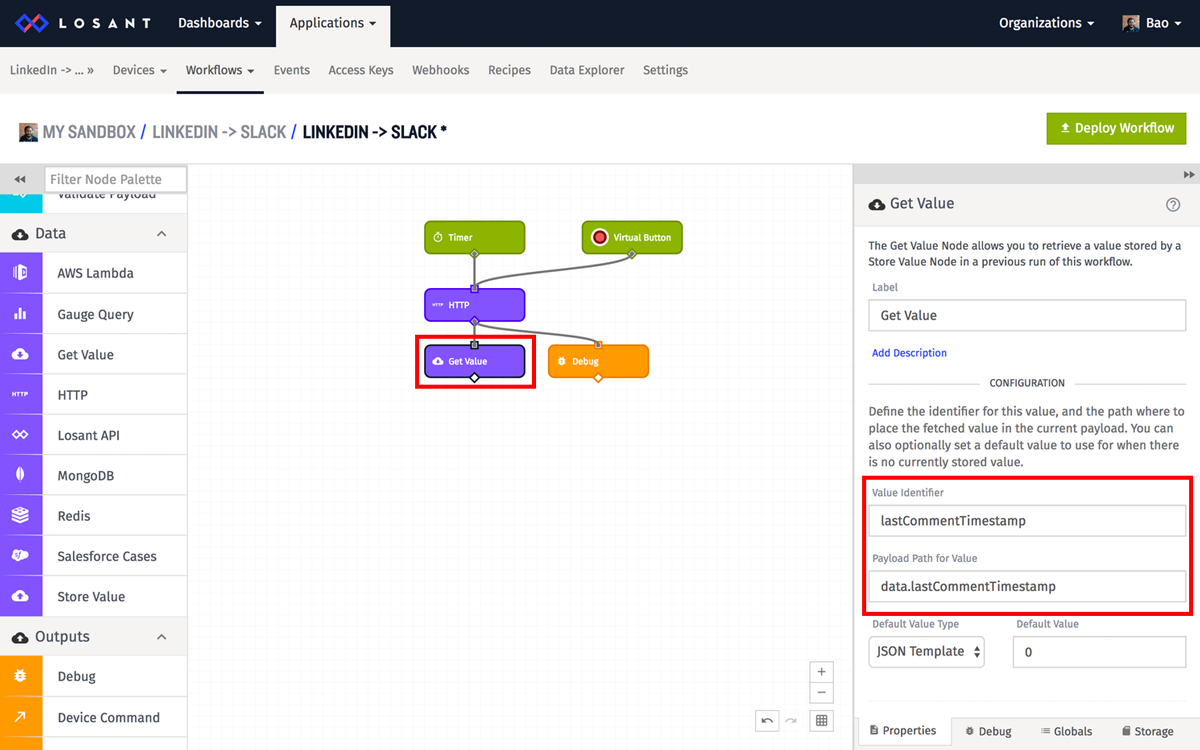
The Get Value node, combined with a Store Value node that we'll add later, allows us to store information between workflow runs. The get value node requires two configuration options: the ID of the value to get and where on the payload to put it. In this example, the ID is “lastCommentTimestamp” and the payload path is “data.lastCommentTimestamp”. So what happens is this node will lookup the stored value with ID “lastCommentTimestamp” and put the result on the payload at “data.lastCommentTimestamp”. You can get/store any data you want with any ID you want using these nodes. Losant takes care of storing this information for you.
At this point, we have all of the data we need to figure out how to post LinkedIn comments to slack. However, we’ll need to do some work to sort through the data to figure out what comments need to be sent to Slack. To do this, we will use the Function node. This allows you to write JavaScript code to transform the payload. Drag the Function node to the canvas and connect it to the Get Value node.
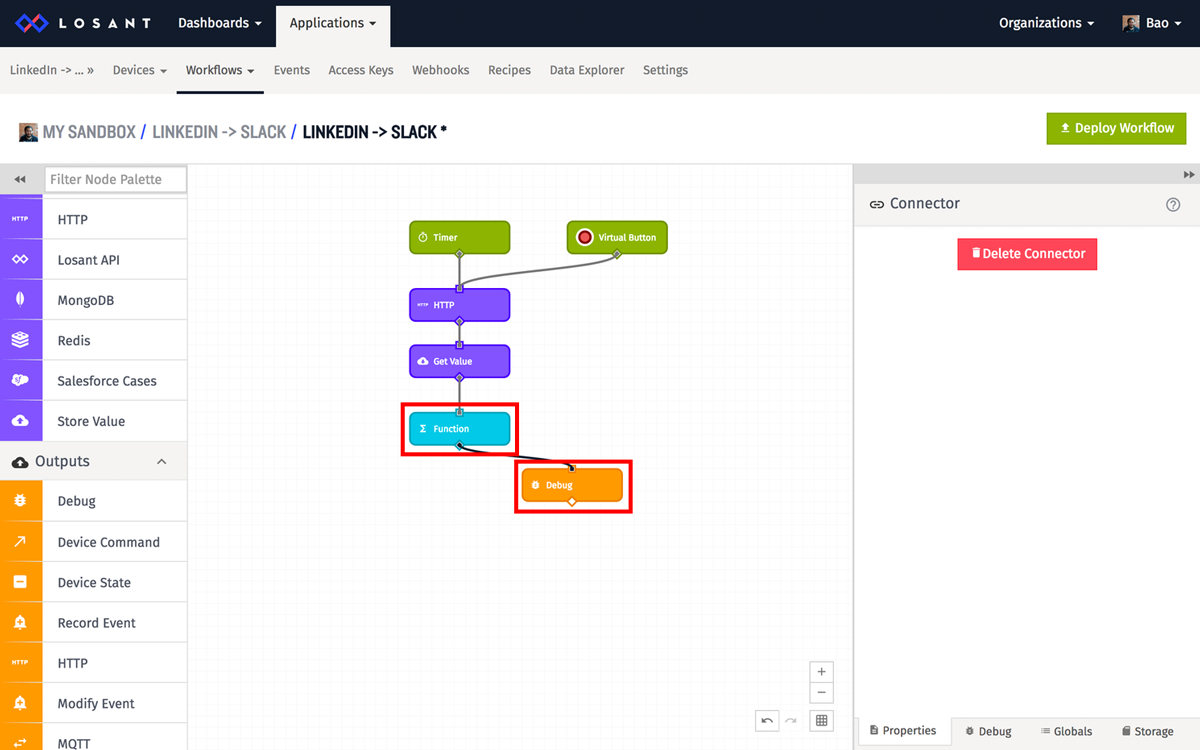
You can move the Debug node after the Function node to see the results of the Function node. Paste the following code to it:
This code filters through these updates, grabs the latest comments after the lastCommentTimestamp, and adds those updates to “payload.latestLinkedInUpdatesWithComments”. It also gets the timestamp from the latest comment. We’ll store this value later once we successfully post all comments to Slack.
Next, we’ll create a loop to go through each update and post the new comments to slack. The loop can be done with 2 nodes (Conditional node and Function node).
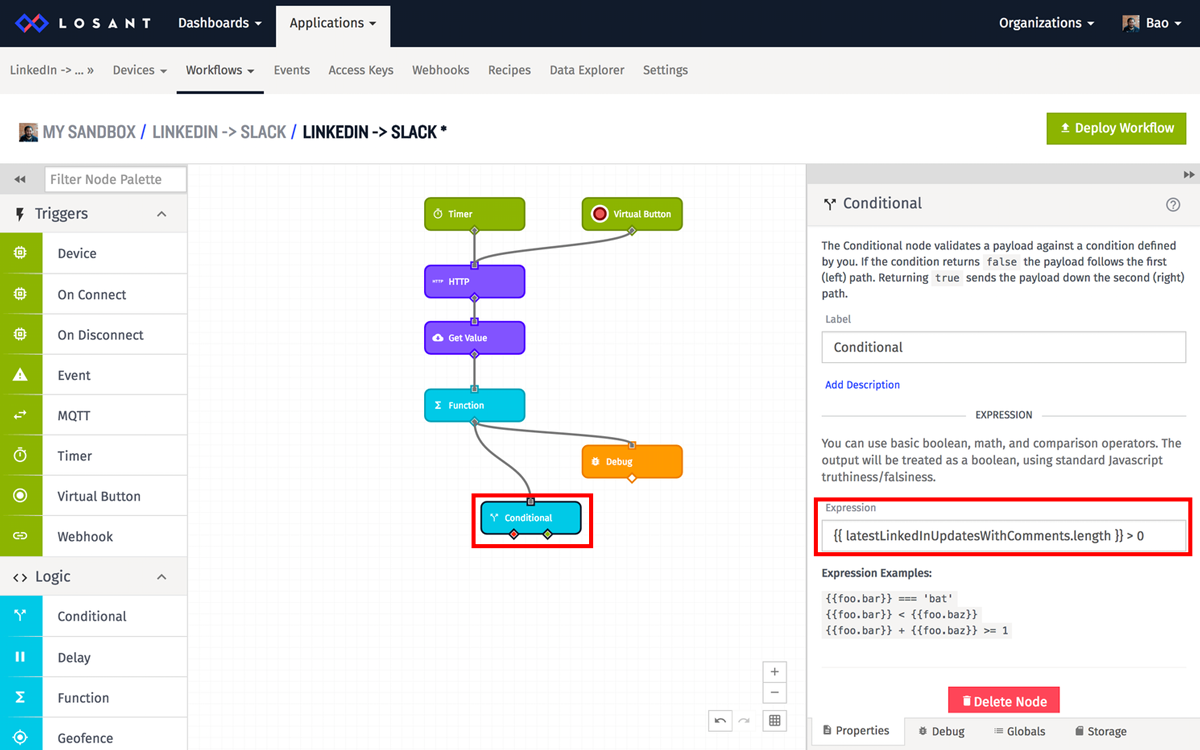
Drag a Conditional node to the canvas and connect it to the Function node. Add this to the “Expression” :
{{ latestLinkedInUpdatesWithComments.length }} > 0
The Conditional node checks to see if there are still items in our “payload.latestLinkedInUpdatesWithComments” array. If there are items in the array, then it takes the right path of the node, which will go into a function node.
Drag a Function node to the canvas and connect it to the Conditional node and rename the “Label” to “Pop Item” to avoid confusion.
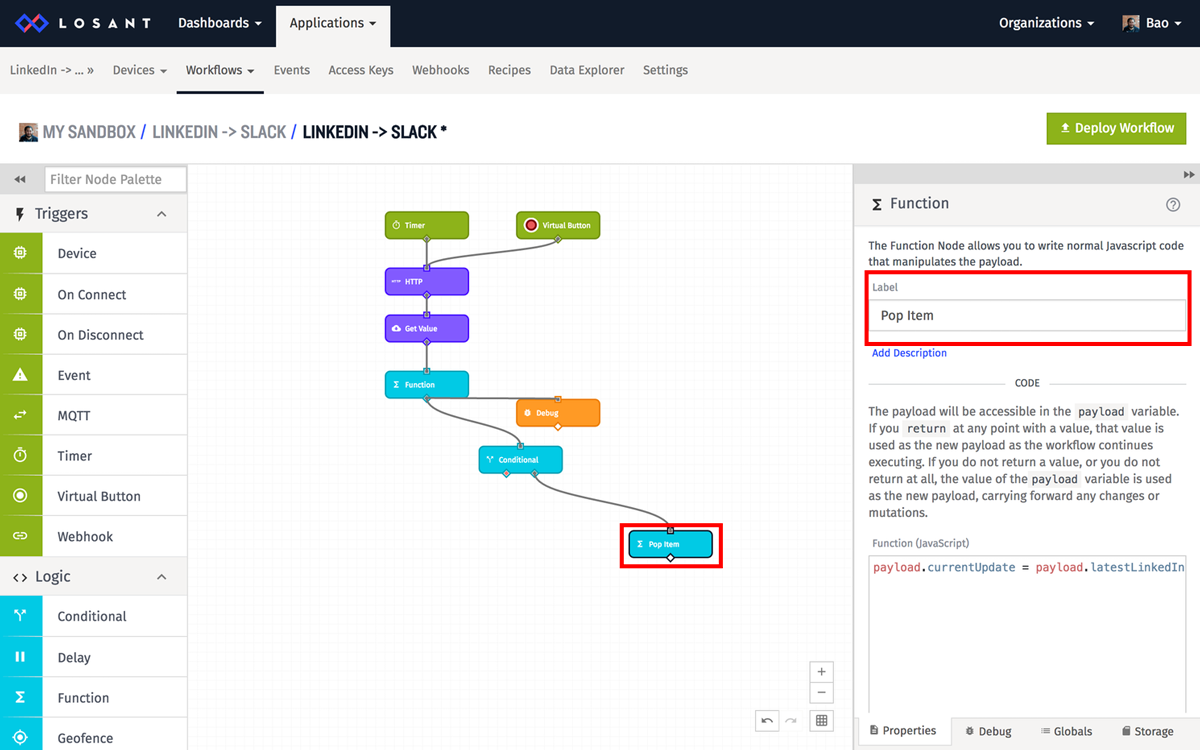
This code pops an item off of that array and sets it to “payload.currentUpdate”.
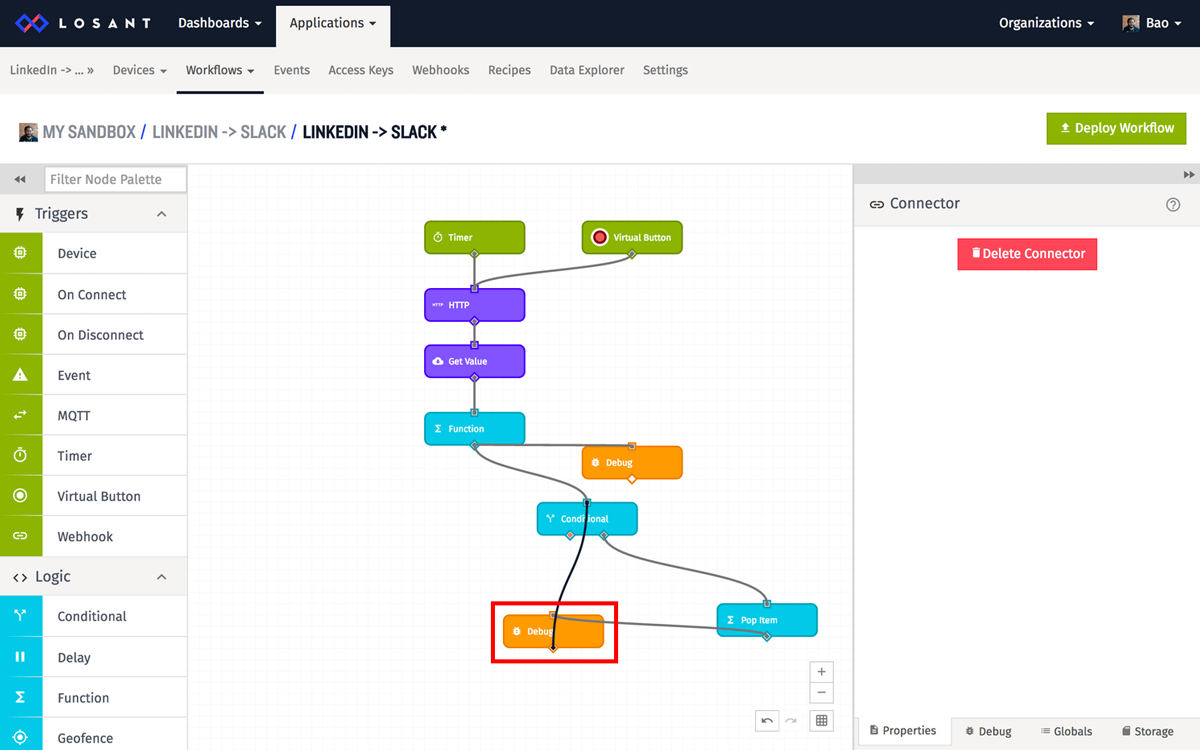
Then, we’ll add a Debug node into this loop and connect it to the Conditional node. This will allow us to see if the loop is working. The Debug node should output something each time the loop passes through. Press the Virtual Button to test it out.
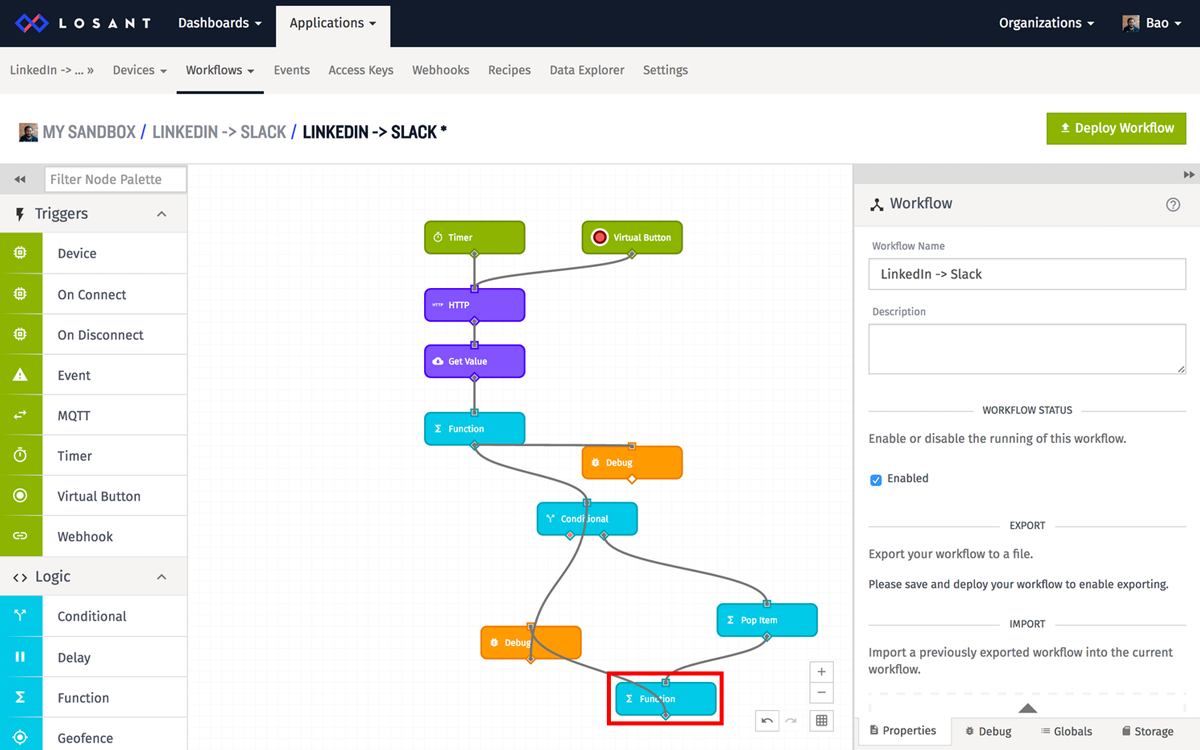
Now that we have our loop in place, we will add in more code to format the Slack post and to post to a Slack webhook. You’ll have to create a new webhook integration for your Slack account in order for Losant to post it to. Although, Losant does have built in support to post to Slack, I chose to use a function node with the HTTP node to post the information to Slack to use some of Slack’s advanced formatting features.
Drag a Function node to the canvas and connect it to the Pop Item function node. I also added a Debug node to the loop.
Paste the following code to it:
This code formats the content to be posted to slack by parsing through the update and comments within the update. It adds details such as who posted the comment, and link back to the original update.
Then, drag an HTTP node to the canvas and connect it to the previous function node. Connect the output back to the conditional node to complete the loop. Change the “Request Method” to “POST” and set the field to your Slack webhook that you setup earlier. Set the “Body Template” to:
{{ jsonEncode slackBody }}
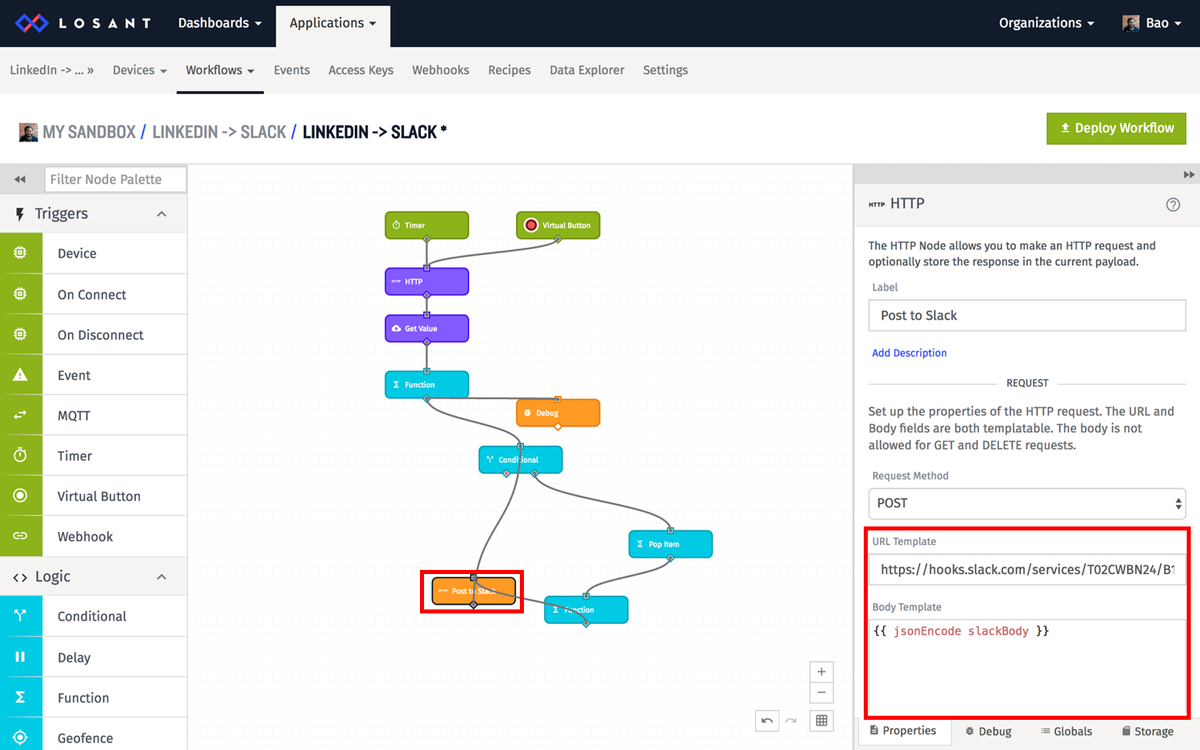
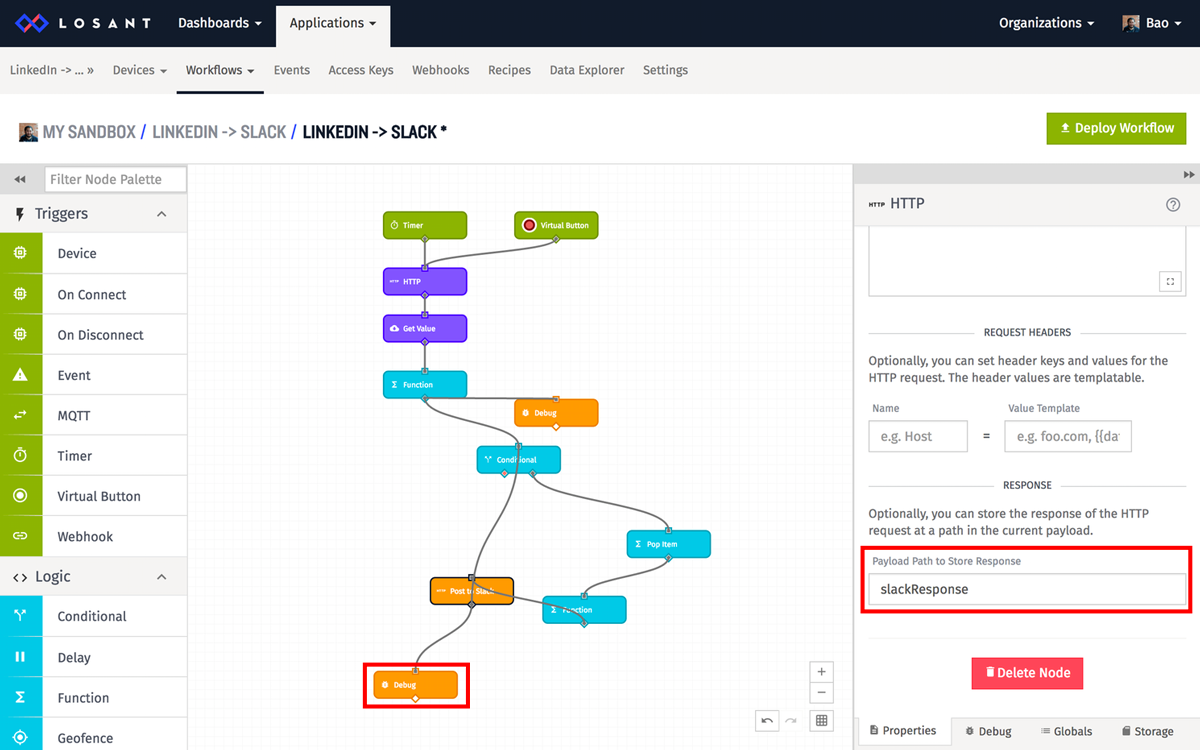
Set the “Payload Path to Store Response” to “slackResponse” to store the Slack Webhook response in the payload. I also added a Debug node to this.
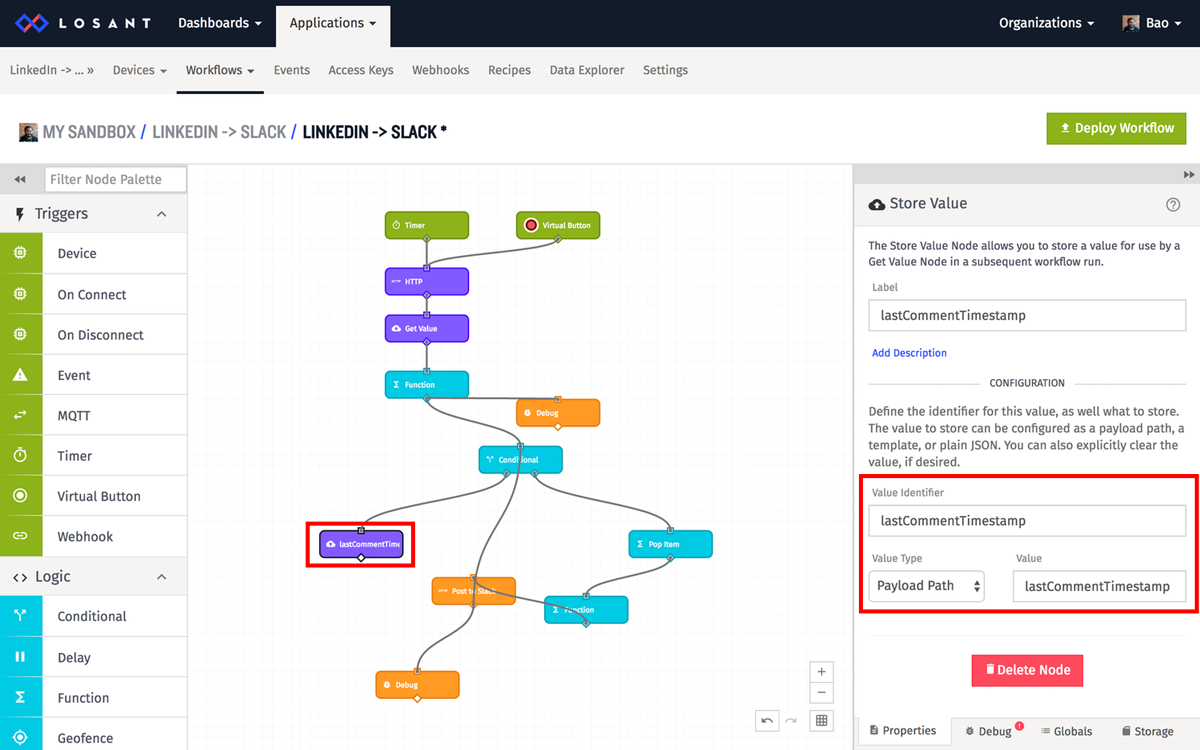
Next, we’ll want to store the value of the last comment timestamp after the loop is finished running. Drag a Store Value node to the canvas and connect it to the left side of the Conditional node. Set the “Value Identifier” to “lastCommentTimestamp”.
I also dragged a Debug node and set the “Message” to “Done” to let me know when the workflow was finished running.
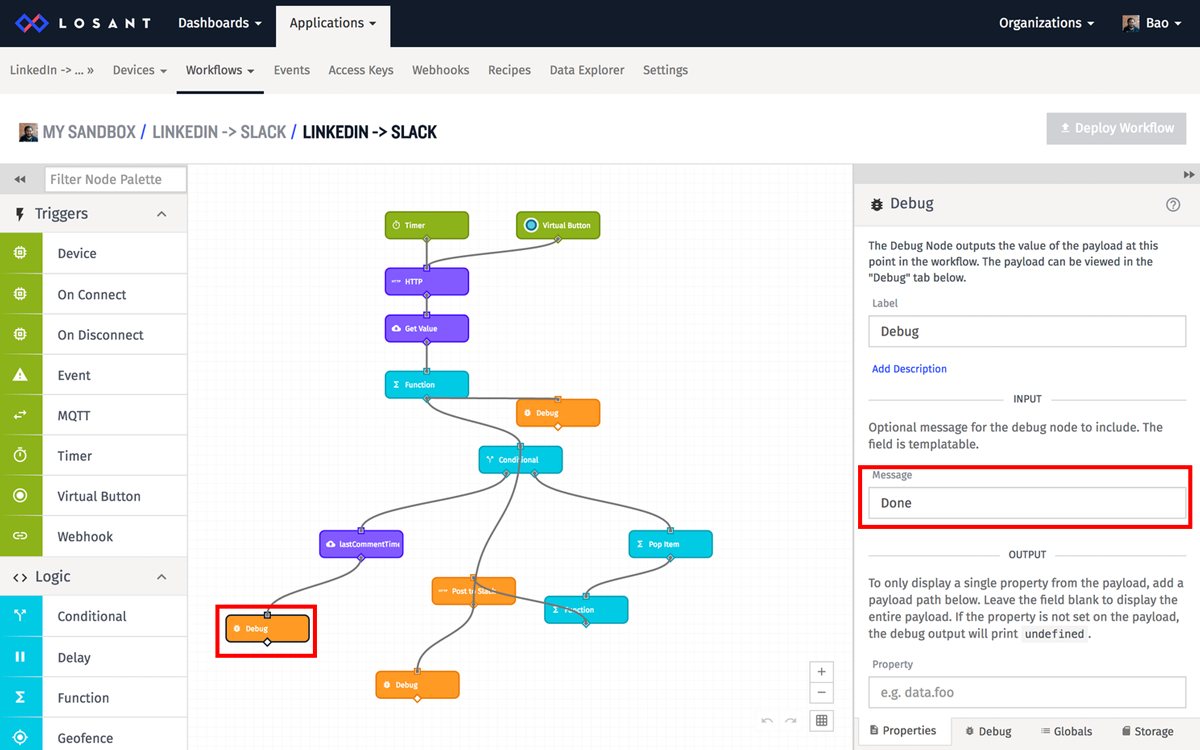
And that’s all folks. You can test it out by waiting for the timer to run, or your can press the Virtual Button.
If you want to extend this workflow to do more, here are some things that you can try out:
- Add in a process to email/SMS/Slack you when your auth token is expired
- Pull other stats from the LinkedIn API