
Across many different IoT use cases, the Raspberry Pi is a cost-effective gateway choice for early IoT development and proof-of-concept applications. To make it easy to utilize the Raspberry Pi in edge computing use cases, Losant provides an Edge Agent. This agent extends Losant's workflow capability to nearly any Linux gateway, including the Raspberry Pi. Before installing the Edge Agent, the Raspberry Pi requires upfront configuration.
The most common way to set up any WiFi-enabled Raspberry Pi is with a keyboard, mouse, and monitor. However, it is also possible to set up the Raspberry Pi in a headless manner, without the keyboard, mouse, and monitor.
The following approach enables you to pre-configure the WiFi credentials and enable SSH after flashing the operating system to the Pi’s microSD card. All communication between your computer and the Raspberry Pi is through a terminal. This approach is more complicated than the general setup, and we recommend that only users familiar with the Raspberry Pi and the terminal attempt this process.
Materials
You need the following materials for this tutorial:
- WiFi-enabled Raspberry Pi (e.g., Raspberry Pi 4, Raspberry Pi Zero W, etc.)
- A microSD card (e.g., 32GB SanDisk microSD card)
- Micro USB cable

Setting Up the microSD Card
To begin, you must flash the microSD card with an operating system.
Step One: Download Raspberry Pi OS
Raspberry Pi OS is the operating system created for Raspberry Pis. If you plan to connect your Raspberry Pi to a monitor, choose a version of the operating system with a desktop. If not, you may choose the “Lite” version.
Download and save the Raspberry Pi OS from the Raspberry Pi documentation.
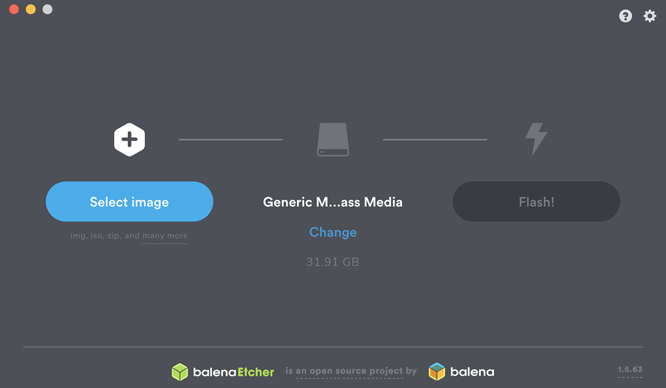
Step Two: Download balenaEtcher and Flash Raspberry PI OS to MicroSD
Etcher is a tool, created by balena, that allows you to flash operating systems to SD cards and USB drives. In this case, you'll use it to flash the microSD card.
To flash your microSD card using balenaEtcher:
- Download balenaEtcher using the documentation.
- Select the Raspberry Pi OS downloaded in Step One. Select the microSD card, flash.
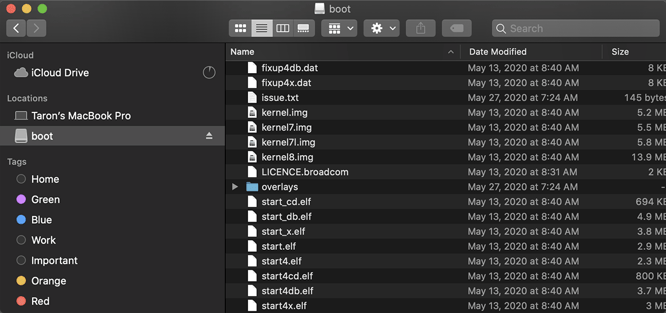
Step Three: Remove and Reinsert SD Card
Next, after the flashing is complete, remove and reinsert the microSD card from your computer.
This step is necessary because Etcher automatically unmounts the SD card. To confirm that everything is correct, once you reinsert the microSD card, you should see a new drive mounted on your machine called boot. See the following screenshot:
Step Four: Enable SSH
This file (no file extension needed) will enable SSH on the Raspberry Pi when the device starts.
In the boot folder, create a file called ssh (the absence of a file extension is intentional).
Step Five: Preconfigure WiFi
Next, you will create a file that represents the WiFi credentials for the network you would like the Raspberry Pi to connect to on boot.
To pre-configure WiFi:
- Create a file called
wpa_supplicant.conf. - In this file, place the following content:
- Update
WIFI_SSIDandWIFI_PASSWORDwith the SSID and password, respectfully, of your WiFi credentials.
Important: Ensure that you enter your WiFi information accurately. If the next step fails, you will need to redo the entire process.
Step Six: Boot the Raspberry Pi
Now that you’ve enabled SSH access and configured the WiFi you may boot the Raspberry Pi.
- Insert microSD card into the Pi.
- Power with the micro USB cable.
Now, after the Pi turns on, in about 30-90 seconds, it will fully boot and connect to WiFi. If the steps above worked, your device is now connected to the network and ready for you to connect via SSH.
SSH Into the Raspberry Pi
To SSH into the Raspberry you’ll need a terminal.
If you only have one Raspberry Pi on your network, you can SSH into the device via its hostname:
ssh pi@raspberrypi.local
Once you have more than one Pi on your network, a number will be attached to the hostname in the format of: raspberrypi-NUM.local.
NUM is the order in which your Raspberry Pi entered the network. You can find your device in one of two ways:
- If you have access to your router dashboard, you should be able to see all the devices listed on your network. If so, find the Raspberry Pi, and copy the IP address.
- You can use Angry IP Scanner to scan your network on your machine. With it, you'll be able to see the Pi. Once found, copy the IP address (it will be located along with the hostname).
- All Raspberry Pi MAC addresses will end in “B8:27:EB”
Note: The default password is raspberry.
What’s Next?
The Raspberry Pi is the perfect device to test the Losant Edge Agent. The agent allows you to deploy workflows to your connected Raspberry Pi and execute those workflows on the device itself.
To see an example of a Losant Application that would leverage a device like the Raspberry Pi and the Edge agent, see the Industrial Equipment Monitor Application Template Deeper Dive.