


Taron Foxworth: All right, I hope everyone is ready to get started. Thank you so much for joining us today. I do want to start off by saying that I really hope everyone is staying safe and healthy. We really appreciate you taking the time with us today. The one thing to keep in mind is that this entire session will be recorded. If you wanted to share this with team members or colleagues who couldn’t make it, it’ll be right there available for them right after the webinar. What I can say is though is that we’re going to learn a lot. We do these deeper dive series to talk about new features, present use cases to either teach you about Losant in general or to have you come by and learn a little extra about Losant here or there. We always try to keep a nice pro tip here and there so you can get some tidbits of knowledge to take away after each webinar. Today we have two speakers. Me, Taron Foxworth. I also go by Fox. I’m the education lead. I run Losant University and I also work on a lot of Losant’s educational materials. We also have Brandon Cannaday. Brandon is our chief product officer. Brandon spends a lot of time thinking about Losant and how to make it better for all of you. I’m really excited to hear about what he has to say for today. One thing to keep in mind, if you have any questions along the way, Zoom has an awesome Q&A feature built right in. It should be right in your little landing bar. Feel free to throw questions in there. I’ll be monitoring the entire time to collect all those questions and ask them to Brandon here at the end. If you have some questions for him, make sure you throw those right in. If you are new to Losant or just as a refresher, I like to describe Losant as an application enablement platform. We provide the resources you need when you want to build a connect solution. Everything from edge compute, all the way to putting that data on a dashboard, and even building an application for your paying customers. At Losant, we really want to provide those core components so you can be successful while building your IoT applications. We have a ton of customers. We really love and care about our customers. We have a lot of experience building IoT applications. I think the nice thing is that we get to take all of those learnings and expertise and put that in a platform and deliver the best platform for you. I think that’s what we really strive to do here at Losant. I hope that’s what you see here today. Now, on for the big one. Today, this webinar is about application templates and that’s what we’re going to be diving deep into. Templates themselves bring together all the Losant resources. What we’ve heard from you is that Losant is incredibly easy to use and really simple to build IoT applications. What we heard was that you wanted more examples of how these features work together within Losant. Templates are a way to solve that problem. Template are also a way for how do you actually take these resources that are in Losant and export them and share them with a team member. Templates also help to support that as well. The beauty about templates is that once you create your application, you get to start right from the template. This is live right now. I think this release went out last week, so you should be able to go and create these templates within your application. They’re there for really a couple of main reasons for you. One, architecture guidance. Every IoT application looks different and we couldn’t build these templates exactly the way that you need them, but they do have the foundation that you would need when you go to start these applications. For example, how do you properly use Systems? How do you properly use experience groups? These templates show really good examples of that. They also show implementation best practices. We have some awesome standards we’ve created here at Losant that we like to use as an application. I hear from you all the time about the standards you’ve created. These templates allow us to show you what we think is a good best practice for your applications. All these templates are also great starting points for your own application. We see that you a lot. You could use this template. Start from it and use the resources and everything included to kick off your own IoT application. This one’s my most favorite one. They’re all demo ready. If you want to show off Losant to your team or to another colleague, all these templates come with simulators and full applications so you can actually just demo Losant quickly and easily. They’re a nice way for you to show off Losant as well and a nice way for us to show off Losant to you, which is what we’re going to be doing here today with the new industrial equipment monitor template. This is a template as you can see on your screen. This is what Brandon is going to be walking you through to tell us a little bit more about. The first thing you may notice is that this looks like Kanara. Kanara is a demo application we’ve created to show off Losant. What we did for some of the templates is we use Kanara as a story around these templates to help them feel real. In this case, this template was built around industrial equipment monitoring. I manufacture filtered equipment and I would like to give my customers access into their filtered equipment. This template is a really good example of that. It’s going to show off how to have devices based off of power generators in your application. Say a live or a historical dashboard so the customers can actually see their generators. This template shows a really nice example of incorporating fault and maintenance data within your application. Lastly but not least, this is a great example of a multi-tenant application. This application not only serves one customer but many customers. These are the things that Brandon is going to be touching on today. What I would love to do now is hand it over to Brandon so he can tell you more about the industrial equipment monitoring template.
Brandon Cannaday: Thanks, Fox. Welcome, everybody. Once again, my name is Brandon Cannaday. I am the chief product officer here. What I’m going to do is use the industrial equipment monitoring templates as a way to show and highlight some of those implementation architectural best practices that Taron had mentioned. What I wanted to start with is what it looks like basically from your perspective when you do want to get started with a template yourself. Anytime in Losant when you create a new application, you’ll be presented essentially with this screen. This is your options for starting from a template or what we had before templates just starting from scratch. A little call-out at the bottom here. If there are any partners on this webinar with us today, please reach out and see maybe there’s some templates that we can collaborate on and get in here so we can get your product or technology in front of our customer base. What I want to do is start with industrial equipment monitoring and then show you how. What I’m hearing is I’m getting lost, my audio. Let me jump out real quick and jump back in.
Taron: While Brandon is hopping back in the audio, what I wanted to do is tell you a little bit more about the templates. The one thing to keep in mind and the really nice thing that we did do with all of these templates, so Brandon is going to show you this, all the templates also have README. Since they do come with stories and they do already have devices, and workflows, and Losant resources already set up within the application, this readme is essentially an instruction set for you. Not only is it an instruction set for you to use a template but once you start an application from this template, what you can do is now customize this README so now you can develop the standards that Brandon is going to be talking about and that you develop for your team. The README is also a place for you to document that within your application.
Brandon: If I could really quick. I did a quick power on, power off. Am I sounding a little better now?
Taron: Yes, you sound great. Awesome, I’ll hand the screen back over to you.
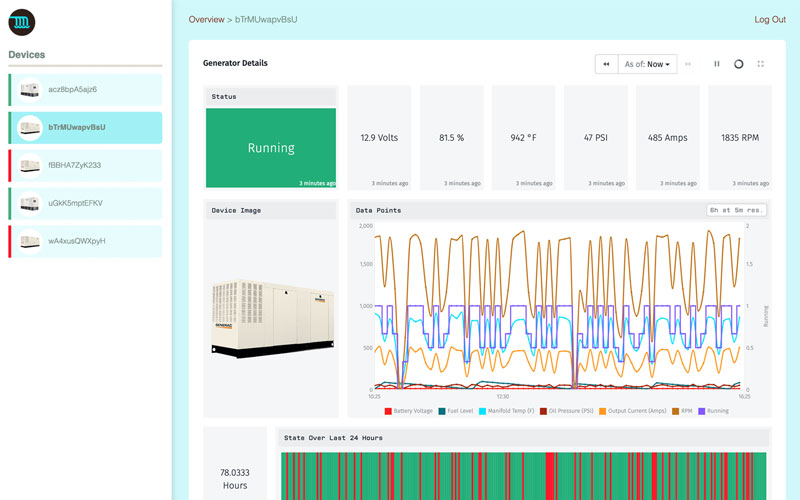
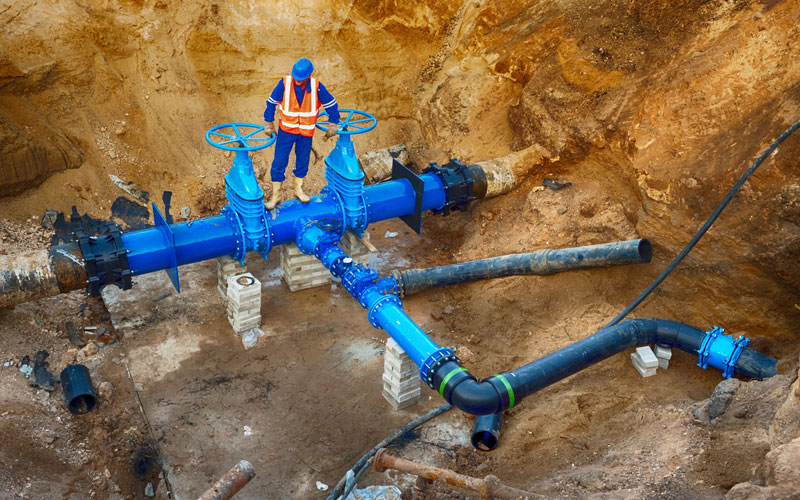
Brandon: Yeah, let me dive back in there. Sorry about that. A little bit of turning off and on again reset here works wonders. Picking up where I left off, I am going to just show you how to create your own template and get it initialized. All of our templates, except the weather station, do come with a simulator. You don’t actually have to have real equipment connected to see how data flows through one of these reference applications. As I mentioned, anywhere you create in your application, you will be presented with this screen. I’ll select the industrial equipment monitor. You’ll be presented with a little overview on the resources that this requires and how many you have left. We did design all of our templates to fit within your sandbox account, so you don’t have to have a paid organization in order to evaluate these yourself. I’ll go ahead and create the industrial equipment monitor one and then I will show you how to enable that simulator. Then what I’m going to do is switch over to one I’ve had running for a while because I’d like to see a little bit of that data build up before we continue. Enabling the simulator is about enabling a workflow, so if I go to the landing page here, the overview page, you will see that README. It does have instructions on how to enable the simulator yourself. What you’ll do is just click that link. That will bring up that workflow and then you’ll see a little option here to enable it. That will cause and start triggering data to flow through this application. Although this application is simulated, it does show some really good use cases that I’m going to dive into in a moment. What I want to start with here is the architecture that you’ll see in the real world. Since this doesn’t have actual devices connected, I want to show what it would look like with real devices. What we see most commonly is incorporating our edge compute, edge agent in order to read data from that industrial equipment. This template represents those large industrial generators. Now think about behind hospitals, behind schools, in a big enclosure. Usually, they have some kind of controller already on them that can be communicated with either modbus, PCP, or Serial, maybe OPC UA, maybe some ethernet IP but it’s powered by a PLC. There’s usually some way to tap in and get information out of it. That’s where our edge agent comes in. We can retrofit that cabinet. Put a small gateway in there. Then we can start reading that information that already exists to get that up into the cloud. This webinar, not going to talk much about the edge agent or edge compute. I would recommend checking out Losant University. There’s a whole course on the edge compute offering there so that’s a great way to learn more about that specific functionality. If we dive into the actual application that is created by this template, you can get there by clicking the experience the edit page. Then you’ll see the URL up in the top right corner. These are created by the application ID. A unique automatic domain that we create for every experience. You can add new custom names if you want. Clicking that is going to take us into the actual end user experience that your customers would be interfacing with. It highlights a couple of really common application trends that we see. One is an overview dashboard displaying aggregate information about the entire collection of devices that I have access to as well as the device list that I can quickly select and see details about that application. Even though it’s a simple application, it highlights a lot of implementation and architectural best practices that I’m going to step into especially around multi-tenancy. Even this one screen shows a few major pieces of multi-tenancy that you have to have. One is show me the list of devices I have access to and only I have access to. I shouldn’t be able to see other people’s devices. If I select a specific device, I need to make sure the device ID that I pass in is verified. I shouldn’t be able to just type in a random password. I’m sorry, a random device ID up there and get someone else’s device. Multi-tenancy is certainly a focal point of this webinar. I’m going to cover three things with this template. Each of our templates are designed around a specific subset of functionality. There’s two other deeper dives coming with two other templates. They’ll cover slightly different information, so definitely check those out. This one I’m going to step through is the multi-tenancy model. How did I create that? How did I architect that? More importantly, how do we utilize that for an actual application? I’m going to go into a small example of reference implementation, best practice for device images. Showing a picture of your device is very common. There are a lot of ways to do that within Losant. We standardize on a really good one that we would recommend. Lastly is a little bit about data tables. A very appropriate use for data tables to showcase fault information coming from that machinery. Let’s start with that tenancy model. What I like to really start with is a diagram. When you are out there designing what your tenancy model should look like, I would really recommend you start by sketching it out. Just on a piece of paper is fine. Some diagram like this that describes who your tenants are and how your devices and users are organized within your application. In this case, Kanara technologies, that’s a hypothetical brand that we created for demonstration purposes. It really represents the OEM in this. The actual industrial manufacturer, they want to be able to see all the equipment that’s out in the field. Being the top, they’re the original manufacturer. They should be able to see everything. Then there are tenants. In this case, a tenant is represented by a customer. These are hospital chains. A very popular purchaser of generators are hospitals. In this case, we’ve got two example tenants. This can scale out to any number that Kanara might have as customers. Then the actual devices are associated with those tenants. It’s organized like a tree because we found very commonly that you require this adoption of access up the tenancy tree. Even though Kanara doesn’t have any devices directly associated with it, because we provided that adoption mechanism, any user associated with Kanara will also have access to users associated with any trial tenancy needs then. This tree can be any number of layers. You can assign users at any layer to really control access through your tenancy diagram. Keeping this diagram in mind when we do switch to Losant, the users and groups menu item, we’ll see that same tree outline on the left here. That’s how you take that diagram you’re thinking about and represent it inside Losant. Before I got too far, I do want to call out. There is a blog article that I’ve written that does follow through this exact implementation in a lot of detail. I would recommend if you want to refer back to or get clarification on anything I might have said, definitely check out this blog article. It provides very in-depth overview. It’s losant.com/blog. Currently at the time of this recording, it’s the second most recent article but you’ll be able to find it. In Losant, the role of a group or the purpose of an experience group is to bring your devices and your users together. Your look in an application just has one collection of devices, a big long list. The purpose of a group is to really segment that list of devices based on your customers so that when customer A logs in, they only see their devices. When customer B logs in, they only see their devices. This is that tree that we showed in the diagram. I can add any number of groups I want here just by adding a new group, setting as parent appropriately. In this case, maybe there’s a third customer or third tenant. I’ll go ahead and add that. Then you can see I’ve got another tenant, another group. It’s really important to note that although I’m doing all of this through the user interface just clicking buttons, that’s a great way to get startvved, build up your original implementation. Everything I’m doing can be automated through our API and through workflows. If you’ve got an existing customer onboarding or provision in your flow and you want to integrate Losant as part of an automation or automated process that can all be done. You don’t have to go in here and click everything. It’s a good way to initially bootstrap your environment and then implement the automation later. Let's check out a single group. As I mentioned, groups are responsible for bringing your users and your devices together. When you do select a group, you'll see the members. In this case, I have one user. I can quickly add another user. Now this group has two users. Then I want to start bringing in new devices. That's the property tab. Then you see here is where you query the collection of devices that should be associated with this group. That's what finally brings all those users you've assigned to this group with their devices. Within Losant, you can query collection devices by very powerful ways. As a best practice, what I found to work extremely well is using device tags. Tags are a core concept on devices. They're designed for static information or grouping organization. What I’ve done is added a group tag to all of my devices. Then I just gave it the name of the group I wanted them assigned to. I like this method because it's human readable. If you're looking at a device somewhere else in Losant, you'll be able to see that group tag, see the name of the tenants assigned to rather than using something like an ID. The name is a little bit easier when reviewing or debugging device information later. I also like using tags because if you are using an automated provisioning process, you don't have to update two things to get a device added to a tenant. When you use a tag, any device created that has that tag will automatically be picked up by this association here. I don't have to add a device and then come back in a group and associate it later. All I have to do is add a device with that tag, then any user will automatically pick that up. With that, that's basically creating a high-level model. In this case, I now have three groups. Two of them actually have users. Those users or those groups are then associated with devices through tags. I created my model. That’s my tenancy model. At this point, we have to start using that model utilizing the structure in some meaningful way. I will note that this model can get pretty deep if you choose. In this case, there’s a larger example of a very similar application. You have the same hospital change but this case I have added regions. Those regions then have sites. Now think about maybe regional facilities managers. In facilities managers, I can now assign users to any level in this group. Based on where they’re assigned, they’ll pick up all the devices underneath them. You can nest this tenancy model as deep as required for your use case. The templates as implements one level nested and that one level is just per customer. Let’s look at how we use this model. Now that we set it up. We’ve got our groups. We’ve got our users. We’ve got the devices associated group. We need to start using them. If we come back into our application, we’ll see two primary use cases of that tenancy model. One is the list of devices on the left. I need to be able to ask Losant. I’m logged in as some user. What’s the list of devices I’m supposed to have access to? The other one in this case is when I select a specific device, you can see I’m passing in a device ID on the URL. I should verify that for security purposes. Meaning if I just type in some random device ID up there, I shouldn't be able to get someone else's device ID and see information. I need to be able to prevent access to that. Let's dive in a little bit on the experiences and see how this is utilized as part of this template. We've got a dedicated webinar coming up in May to go through experience in a much deeper model. I'm not going to go through a lot of it. I'll cover just enough to talk about this concept. Keep an eye out for some messages from us about that webinar in May. We're going to go into a lot of details on how these experiences come together. I will cover the very high level because it's important to understand what's going on and how that tenancy model is incorporated into this template experience. First, I'm just going to go through the same diagram. You'll see it inside your own application. The first is an important request. Every interaction with an end point starts with a request. On the template application, it's just requesting a home page. I'll switch back to that very quickly. You'll see I’m requesting the end point slash. Then I'm providing some information as a query parameter. That end point then triggers a workflow. The workflow is responsible for querying or fulfilling that request. In this case, that request needs a list of devices so I can render it in a list. Then if the device that was passed in that workflow should also verify that that user had access to that device. Then finally, it renders the page. In this case, the page has a list of devices. Let's check out that workflow very quickly. You'll see here on the left. We follow that same flow. We've got the end points. Here's the home end point. Here's the workflow that's triggered on that. Let's jump into that and take a look. This is the entire workflow that powers that page I was just looking at. You can see how quickly it is to fulfill or create pretty interesting websites and experiences within Losant. At the very top you see we've got that get devices. This is the node that is querying the list of devices to display on the left side of the screen. There are a lot of ways to query devices within Losant. In this case, I'm using an experience user ID. Losant automatically remembers logged in users and we will provide that user back to you on every single request, so you don't have to look up who's ever logged in or who made that request. We'll do that for you. We put that user information on the payload as experience that user. What I'm able to do here is do a device query and say, "Well, just give me all devices based on experience user ID." What that does behind the scenes is it goes over and looks over that tenancy model and says, "Where is that user in this tree?" Then it traverses the whole tree and all the devices association beneath them and says, "Here's a list of devices." Based on that tree you created that says user should have access to it. We go and just put that on the payload that way we can render that out with the page. We got a quick conditional because the homepage renders two different pages based on what's requested. It's either going to provide the overview page if there was no device query parameter. That question mark device that no ID was provided. It's just going to render the overview dashboard. If one was provided, we need to use the device verify node. You'll see the nodes here. A lot of our Experience Nodes do work with that group model and user model. The device verify node takes the device ID. In this case, that question mark device equals data.query.device. That’s what we provide for you. Losant automatically parcels all those query parameters. Puts those on the payload for you. Then it takes the user ID. It takes the user ID and the device ID and it verifies that that user should have access to that device based on that tenancy model. Because we have a nested tenancy tree and access does adopt up the tree, that device can be anywhere beneath the user. We’ll go ahead and say yes, they have access to it. We’ll take care of all that hard part about traversing that tree all the way in a deeply nested structure and saying, “Okay, somewhere beneath this user in this tree, because they’re a parent, is this device from this user. Go ahead and say yes they got access.” Then we grab the whole device and go ahead and render out the page. That’s really the high level of the tenancy models. Starts with creating the users and the groups, assigning those users to groups. Then you associate devices with those groups. Then association can be queried and utilized in a lot of different places in Losant including the workload that back experience. Just a reminder one more time, do check out this blog article. It goes in much more depth than I had time to cover on this webinar. The next thing I want to talk about is the device image. If we go back to the experience real quick, you’ll see there’s an image of a device in my list. There’s an image of the device on this dashboard. It’s very common for people to pass around and use images on devices. This is a really good, like Taron had mentioned, the implementation best practice parts of templates. There’s a lot of ways to implement an image of a device. This is one we found worked very well. It’s implementing the template so you can dive in and see specifically how we chose to do it. The first step is to put your images inside Losant files. Files is under experience. They’re really designed for images, maybe static CSS, job description. Things you utilize with your experience yourself. In this case, I go to the root of my files. I chose to put a device images folder and then I put my image in there. I could have lots of models of devices. In this case, the template comes with one. We didn’t want to use a bunch of your resources for sandboxes, so we just stuck with one. You can add as many images as you want to represent any number of device images. If I go then to the device, we’ll see what I chose to do or what I think is the great best practice is to use a tag. Tag points to the relative URL on that within files. I added an image tag, and it’s that device images folder, and the image for that. What I like about using the tag is, no matter where this device is used within Losant, dashboards, or workflows, or experiences, the tags come with the device. Which means that image path comes with the device as well. I can just tack on the file’s URL or use file helper, which I’ll show in a moment, and I can always get access to the image of that device no matter where it is. I don’t have to go look up that image anywhere else. It just comes with the device through the tag. We start with the dashboard. We’ll see there the image in my device. This dashboard is a context dashboard, which means one dashboard can work for any number of devices. The actual device ID that’s passed in is a context variable. I can use the device and just pass in the device that I want to look at. If I look at this block here, we’ll see there’s my file’s roots. Then what I am pulling out is the device context variable. That’s the device that’s passed in. I’m looking at its tags and then I’m using that image tag. Devices do support multiple or duplicate tag keys so I could have multiple image tags. You have to reference it like an array. I want the first one. Even though I only have one, I could have multiple so give me the first one. The file URL and basically what this gets replaced with at real time is that base URL device image whatever the image was. That’s a really good way to bring device images into a dashboard that uses context variables. The other place that it’s used is in that device list along the left-hand side of the screen. The workflow that we just showed back here, I am querying all the listed devices here that I want to render in that list. I do have the tag information there as well. If I look at this component, this is a component that the devices are passed into it so I’m just iterating over every device. This is just the list. Most of this is just filing around a list. Here’s that image right there. In this case, experiences do have a relatively new Helper called File. This is a nice little pro tip for anybody working in experiences. You can use the File Helper. That will automatically put your File’s root URL on there. You don’t have to put in a whole application ID and stuff. That’s not available in dashboard yet. We’re working down that path. That’s probably future. That’ll be in the next couple of releases. It is in the experiences. Then here’s that same payload path or same template path that we used on the dashboards. In this case, since I’m iterating over a collection, what a handlebar iteration does is reset the context inside the loop to whatever the specific item is in that array to this. This represents the device that came from the array above it. They’re tagged. There’s the image. There’s pulling out the first one. That’s two different ways you can reference an image of a device. One on dashboards and one inside an experience template. The last thing I want to show is data tables. This application shows a really good use of data tables. What I mean by good use is an appropriate use for the underlying technology. It sometimes can leave you in confusion about what am I supposed to store inside a data table. Our recommendation is fairly static data sets. This maps fault code information to additional metadata about that fault code. It doesn’t change that often. It’s not time series data. If you are putting time series data in a data table, we would recommend trying to figure out maybe a device that’s more in appropriate place. These are two different data storage technologies behind the scenes. Optimized for different use cases. Time series data is in a time series database. This data is in a database optimized for quick lookups so I can query a row or multiple rows based on the value of one of these cells. What I want to do here in this at the very end of my time here is I want to extend this template. As Taron mentioned, our templates are really designed as a starting point as well as reference of implementation. You can use them as a starting point. Extending them with new functionality is a really big part of it. This data table new fault code information right now are not really used in this template. They are used as part of the simulator. When the simulator runs every two minutes, it will pull. In very rare occasions, it’ll go grab a random fault code in order to simulate a potential fault. What I want to do is extend this to say well, when a fault does get reported, I want to create a Losant event. I’m going to create an event and show it but I’m not going to take a deep dive into it. The next webinar on event tracking next week does do a really good job of showing events. It does a really good use case of shock, and vibe, and temperature events, orientation events based on a real time geo asset tracker. What I’m going to do is show how a data table can be used in conjunction with an event. What I do recommend is keeping your workflows separate. Make a different workflow per functional idea. You don’t want one giant workflow. It’s hard to maintain. Right now, data is already flowing into this application. I want a workflow that it will create events based on that incoming data. I’m going to do a new workflow called create events. What I’ll start with is a device state node. The Device State Node gets triggered whenever devices report information, so reports their state. Our definition of state is basically to limit your information. Reporting a collection of Device Attributes. I’m going to do this based on essentially every device with a serial number. I want a trigger on every single device coming into Losant. Each of my generators. I really only want the fault description attribute. How this template works is the device reports up a description, basically, a two- or three-word description of a fault. Then that data table can link that description to some longer information. That’s what I’ll show here. These are descriptions that have been reported by the controller, by the simulator. Basically, by the device. It might report low coolant. Then what we’d have in state table is a much longer explanation about what that means. It could have some corrective actions. It could have some other information in order to mitigate that issue. What I want to do is create an event that contains this more additional information. That way if somebody is assigned to that event, they can figure out how to mitigate that. What I’m going to do is start with that. I’m getting those reported in. The first thing I need to do is query that table for that description so I can get all the other information. I’m also going to show a nice little trick here for testing this. It’s really hard to test with actual data. I’m going to show a virtual button and how to test an implementation like this using something like a button. The Device State Node works by reporting information on the data, object, and payload just like everything else. What I can do is simulate that using a virtual button. Let’s pick one of these. Let’s do low coolant. Now what I have is a virtual button that essentially reports information identically to how a device report information. You can see here it does, the virtual button for example. Payload does update itself to show exactly what you [Inaudible 00:36:39]. You’ll see how this looks on the resulting workflow payload. The last thing I want to do is actually a little trick to provide an actual device ID. In the workflow, you’ll see a trigger ID property on the payload. This is the ID of whatever caused the trigger to occur. On a Device State Node, that’s going to be the device ID. On the virtual button, it’s just going to be some internal ID that doesn’t matter. What I want to do on this Mutate Node is override the trigger ID to an example device. That way when the rest of my workflow runs, I have an example device that I can test with. Let me go just grab a device ID real quick. Another little trick is there’s this little copy ID button next to the name. That’s going to copy the device ID for you. Makes it easy to grab those and move those around. A Mutate Node is just going to overwrite that trigger ID with that actual device ID. There’s the new ID. Overwrite trigger ID and now these two paths produce identical information. Next thing I want to do is look up the row based on a description that came in. Table will get rows. I’m going to look in the warnings and alarms data table. Then I’m going to query a row based on that fault description. I can look up description. I do have description coming in either reported by the device or reported by my virtual button. I can put that back on the payload, fault details. Then what I’ll do is add a Debug Node just to make sure. I seem to have the information that I need. Save that. We’ll click the button. We’ll see if we got a debug entry. We’ll do working fault details, which I got one entry. There’s my entry. There’s low coolant, my description, and here’s all that extra information. Basically, the last thing I need to do is create an event with those details. Let me go ahead and add an Event Node. Another little trick, you can drag those directly onto a path and create them inline. The subject. Let’s go ahead and make the subject that description. Here’s another trick. You can right mouse click in the debug panel and copy the full path, so you don’t have to try to type all this out. Save you a lot of time. I’m going to make the subject that short description. I’ll make the level right now just error and the message I will make that long description, additional information. The device ID, I do want to associate this event with the device that caused it. I can do that at the template, trigger ID. That’s why I replaced the trigger ID with this Mutate Node for testing with an actual ID so that when the event gets created, I can test that. That point I have now receiving information or in this case, testing it, receiving the fault description whenever a fault occurs. Then creating an event based on that. If I save that, click the virtual button, and then go to my event page, I should see that event with all those details. There’s my event I just created. There’s the device associated with it. If I click into it, you can see the subject is that low coolant. The message is the longer information from that. This is a really good way to show how Data Tables might be used. That additional information might be used within the rest of your application. That covers my time here. What I really did want to show during my time here on this webinar was these three main points based on this template. If you join us for the future template, these three items will change. We show different information like systems, some geofencing, some geobased dashboard blocks. Certainly, look for those other templates that’ll show different information. With that, I’m going to toss it back to Fox to finish this up and do some Q&A.
Taron: All right, thanks, Brandon. Share my screen. As I briefly touched on earlier, and Brandon walked through this, each of these templates do have the application README. You could find those within the platform or within GitHub. I can’t wait to get to your questions. I’m so excited. Before I get to them, I did want to mention this one thing. What’s the next steps for you? How do you get started? The very first thing is update devices and send data. We modeled these templates after example devices that are simulated in the workflow engine. A good first task for you would be to take this template, update the attributes for devices you have, and send real data to the template. The next one would be maybe find hardware for your use case to support some of these examples and then update the templates to support that hardware. One thing that’s cool about Losant is we do have a really awesome POC process. Our solution engineers can work with you to find hardware and help you develop your use case to make sure you’re headed in the right direction. The last thing and the most important one is if you already have your application and it’s running in Losant, you can use these templates as examples and apply these concepts to your application. Everything that Brandon talked about today, you could start applying these concepts in your application. That’s really the hope and goal out of these deeper dives. Now what I would love to do is get to some questions. Brandon, to kick us off I would love to ask you the question I first asked you when we were talking about templates. This changed the model of Losant a little bit. Losant, when you created your application, you started from a blank canvas. Now with templates, we allow people to start from a template, a bootstrap. What are your thoughts on how does that change the platform and where we’re heading?
Brandon: Yeah, it’s a really good question. Over the years, we have been building a pretty big foundation, a platform foundation. During all of that time, we were asking essentially everyone to start from scratch. When you created an application within Losant, you were presented a blank canvas and we said, “Go to town. Good luck.” With the introduction of templates and you’ll see even more iteration on this feature. For example, our upcoming release has a concept of partials. Instead of creating an application from a template, you’ll be able to import partial templates into existing applications. What we’re transitioning away from is everyone starting from scratch to how can we help users start from preexisting implementations. We’re not asking everyone to build up a very similar stuff. Everyone has to make user login flow, and has to reset flow, and stuff like that. Our goal is to start shipping a lot of this functionality as templates and partial templates that you can start combining. Then add your domain-specific implementation on top. A lot of that common functionality we want to start providing for you.
Taron: Thanks, Brandon. That was really helpful. We also have another special guest on the line, Dylan Schuster. He is our lead UX engineer. He worked a lot on templates. Hey Dylan, I have a question for you. Can I create my own template? If so, how would I then allow my customers to go and use this template within their applications?
Dylan Schuster: Yeah, sure. Can you hear me okay?
Taron: Yeah, I can hear you perfectly fine.
Dylan: Okay, cool. At the moment, if you want to create your own template, the best way to go about that is simply to create your own application starting from one of the templates that we’ve added to the platform recently or just create a blank one from there. The thing to do after that, Fox would you like to share your…? Yeah, I guess to follow along and share your screen as I’m talking. Would be to actually export that application, which you can do under the application info box right there. You will see that you have some additional options when you’re exporting the application as far as including the devices, files, etc. One thing that is important to note when you are exporting an application is that the export will not include any of your device state data, any of your events, anything that is security related such as access keys and API tokens. You will not get any of that when you export the bundle. That will produce a file for you that includes all of the devices, workflows, everything that goes into making up the application. Now you’ve got a bundle in hand, what can you do with that? Well, now you can import that into your sandbox, as you see Fox doing right here, or also into your organization if you are an organization member. Just clicking that button in the top right corner to import or you can actually drop the bundle directly onto the table right there. One other thing to note is for our enterprise customers who have private installations, I don't know if any are on the webinar today, we can actually support your personal organization’s templates as a first-class template on the add application screen. Where you currently see if you were to go add a new application, you will see the industrial equipment monitor, which we’re talking about today. The huddle room monitor, the asset tracker. If you are one of our private installation clients, you can reach out to your representative here at Losant if you’d like to get one of your company’s templates into that catalog for your private installation.
Taron: Thank you so much, Dylan. Brandon, this next one is for you. Could you talk a little bit more about our use cases in the industrial space? Let me make sure I get that language correct. Can you share just some general use cases, especially around generator and power generator space?
Brandon: Yeah. Well, kind of and kind of not. If you are a client joining us today, you should be less secretive about what you’re working on so we can share your story. That’s a fun challenge that we do. A lot of the applications that we power are competitive advantages for our customers and a new product offering. They’re a little bit shy around letting us talk about those. I can talk about them in generalities. The industrial equipment monitor is really a high-level representation of what we see a lot. Power generation or other types of industrial equipment, they all fall into very similar use case, which is the industrial customer is manufacturing something. It’s really important to understand that what they’re using Losant for is not part of their manufacturing process. We’re solving the problem of what happens to that thing that I create once I deliver to the customers. I want to allow my customer to log into a portal and see information real-time about what they have created. Within there, some of the success stories are around more intelligent service offerings. One potential use case or one use case that we do have in market is around enabling service partners. The people actually performing service and maintenance on behalf of that company on their customer’s equipment. Their service professionals can come in and view information about it. There are also just very basic remote monitoring applications. A lot of my customers will login something very similar to Kanara and see what’s going on. Then there are emergency power use cases as well. They are power generation within critical environments. It’s very important that fuel level is good. It’s doing its run testing on a periodic basis because when the generator does need to turn on in those environments, it’s very important that they have a high degree of confidence that it’s going to turn on. They all revolve around a similar use case around providing that remote monitoring, alerting, notification in a centralized way so that no matter where your clients are in the world, where you customers are, the consumers of your product, they have instant access to that information.
Taron: Thanks, Brandon. The next question that I have, and I think this is a really great one. I can walk through the steps too if you want to go through them. Once you get this template, how do you actually go and add a real-world device without using a simulator? What process would you follow?
[Long pause]Brandon: Sorry, Taron. Was that question aimed at me?
Taron: Yes, that question was for you.
Brandon: Sorry, I thought you had said you could go through it, so I was expecting you to go through it. There’s a couple options. One is certainly onboarding new device. If we look at that diagram, I presented earlier with the edge compute offering, the steps are a little bit longer, but you would add an edge compute device. Install the edge agent on a gateway. It’s really any industrial or Linux based gateway. We have partnerships with Advantech and Dell. It’s really any kind of Linux based computer that you have access to, or you choose to use. With that agent installed, you then create workflows and deploy them into that agent. That is your bridge between your local environments. Yeah, that’s a good diagram. Thanks. That edge agent is that bridge between your local environment and the real world. That’s how you would do it in actual practice. It’s a few steps but just stepping back and reclearing my thoughts up a little bit. Grab a gateway, install the edge agent. The edge agent has a configuration file. You would provision device on the Losant side as well. That gives you an access key secret and device ID so it can make a secure connection back to the Losant platform. Then that workflow in the edge, that’s what interfaces with that local controller. That’s how you do it in the real world. Then there are some layers of auto-provision you can put on. Certainly, that’s the conversation if you reach out to Losant. Maybe you can get a conversation with a solutions architect. Talk a little more detailed on how an edge gateway can come online and provision itself. That’s a pretty common implementation as well. For getting data into Losant outside the simulator, it’s either MQTT, which is what’s outlined in this diagram. Our edge agent does utilize MQTT. We also support the Losant API, so if your device wants to instead communicate over Rust API, you can do that. There are also the Experience Endpoints. A little similar to an API but a little more customized. Same with webhooks. Then we have a number of first-class integrations. If you have already put a lot of effort into sending your device data to something like Google IoT Core or Azure IoT using their MQTT broker and you want to use Losant for the application enablement side, what we can do is actually subscribe directly to that third-party broker and bring the data over. You’ve already gone down the line of using someone else’s broker, that’s fine. You don’t have to use our broker. We can go ahead and subscribe directly to it and bring that data in. There’s a lot of ways to get data into Losant. We wanted to make it as easy as possible. When it comes to actually onboarding devices, you’ve got quite a few options.
Taron: Awesome. Thanks, Brandon. There’s one thing I did want to touch on. We did get a lot of questions about how do we integrate this into a different set of tools? I actually got asked about a couple set of tools, like pattern recognition tools or Power BI. The answer there really is the workflow engine. Anytime someone asks me, “How could I get data into or out of Losant?” That’s where the workflow engine comes in. As we were describing Losant components, we describe it as devices and data sources. The workflow engine is really your key way to bring in those other data sources or even push data from Losant into other data sources. As you all are thinking about those how do I integrate questions, really turn to the workflow engine. Either hopefully, there’s a node that we have to support it. For example, Brandon mentioned some Google services work even indirectly with the workflow engine. The best node of all is the ACTP node because if the service offers any sort of API, it should be API, you can tap into that data within the workflow engine.
Brandon: To put a little more flavor on that answer. Depending on how complex pattern recognition might be, we do also support the notebooks. Notebooks are the integrated execution of Jupiter Notebooks directly into platform. This will allow you to do really complex batch analytics on historical data sets. We’ll go ahead and take care of all the hard work of querying this mass amount of device data. We bring up a single-use VM, so security is very important for us. We’ll put all that data right next to your notebook in the VM. We’ll run your notebook, take the outputs, put them back into Losant. The output could be an image, a graph that you want to display on a dashboard, or the output could be classification. We do have the TensorFlow runtime in there. If it’s simple pattern recognition, it could be some kind of identifying information about the pattern that then you can come out and hook right into that event workflow that I showed. If the output is some kind of alert, you can then trigger an event so somebody can take care of maybe that anomaly.
Taron: Awesome, thanks, Brandon. The last question that I had is talking a little bit about that hierarchy model you were talking about with Kanara. It seems like we had a question about who were we? You mentioned we a couple of times. I think it’s easy to get confused on where the we is in the stack. Would you like to touch on that diagram a little bit more Brandon? Explain how that works a little bit again.
Brandon: Yeah, absolutely. I can share my screen again and have that diagram up.
Taron: I got it for you.
Brandon: Okay, perfect. Really the root of this tree is pretty flexible. In this example template, I might have said we a couple times. I’m sure I flip-flopped between we as in Losant, we as in the developer of the app, and we as the top of this tree. The Kanara in this example is the industrial equipment maker themselves. They are the people selling this product, selling this service to their customers. We see this a lot. It’s a really popular digital transformation trend especially on a traditional manufacturing companies where they have for decades sold a one-time expense. A generator. It might be expensive, $100,000, $200,000 but that’s it. It’s one-time expense. Maybe they get some maintenance revenue on it. These companies are transitioning now to starting to offer subscription services alongside the equipment they sell. In this example, Kanara is the manufacturer, the OEM. They are selling the generators, so think of them as a generator manufacturer. What they’re offering is the product that I showed built up in this webinar. A subscription service that their hospital customers, their tenants, their customers can sign into and see information about the equipment that they have sold. There are other very popular models. In this case, Kanara could be the direct OEM, but you could also be something like a Telco. It’s very popular for Telco companies to start offering vertical applications in the IoT space. In that world, they’re not the OEM but they are selling a service to an OEM. There might be Kanara OEM. Then even above Kanara might be a Telco. It’s just another step in the tree. The Telco could be made the whole thing. Their direct customers are OEM and those OEMs have customers that are hospital chains. You can take this application and move it up a stack as well and offer it to multiple OEMs, not just a single OEM.
Taron: Thank you so much, Brandon. I am going to wrap it up there for questions. If you do have more questions, feel free to shoot them out in the forums and we’ll be happy to get those to you. One thing I do want to mention, we mentioned this a couple of times, is there are more webinars coming up. There’s two more on a couple of the other key templates we created. One on asset tracking. That will be done by Dylan. You heard from him today. One on the Huddle Monitor Template done by yours truly. Then on May 12th, we will have a deeper dive on experience views. This one is going to be a good one. I don’t think you’d want to miss it. The last thing, always to get help and prefer the learning. The documentation is always there. We’re always there listening ready to answer your questions on the forums. Losant University is a tool that you could use to go and learn more about Losant. It covers all of the components that we talked about today. On our blog are a ton of great tutorials that are also great examples and learning tools you can use throughout your Losant journey. I would like to thank you all so much for sharing your time with us today. Again, stay safe. Stay healthy. Until next time, stay connected.