
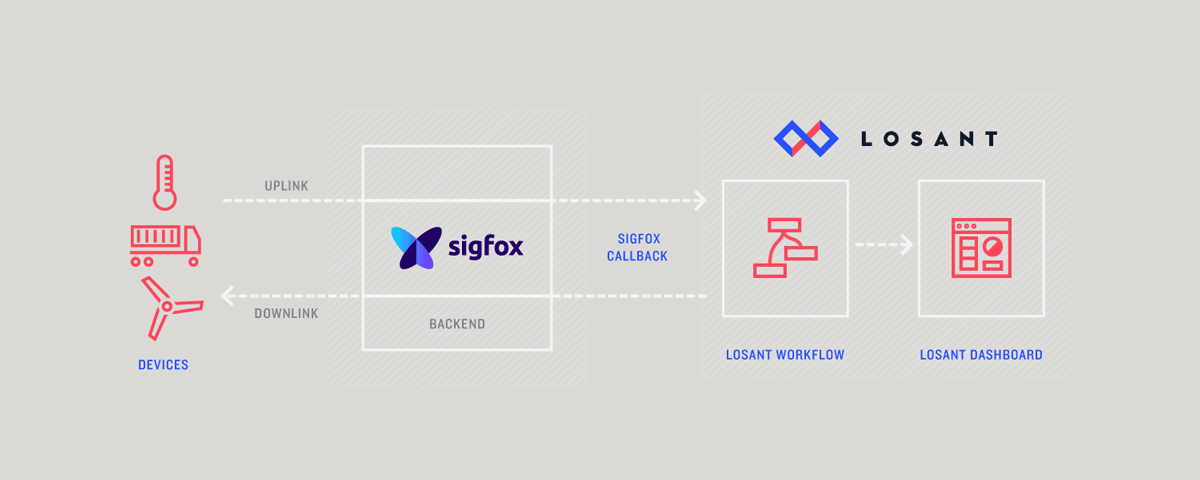
Sigfox is a leading IoT connectivity provider that provides a low-power and long-range wireless communication solution. Sigfox's seamless device connectivity, combined with the Losant IoT platform, provides a powerful combination for solution builders.
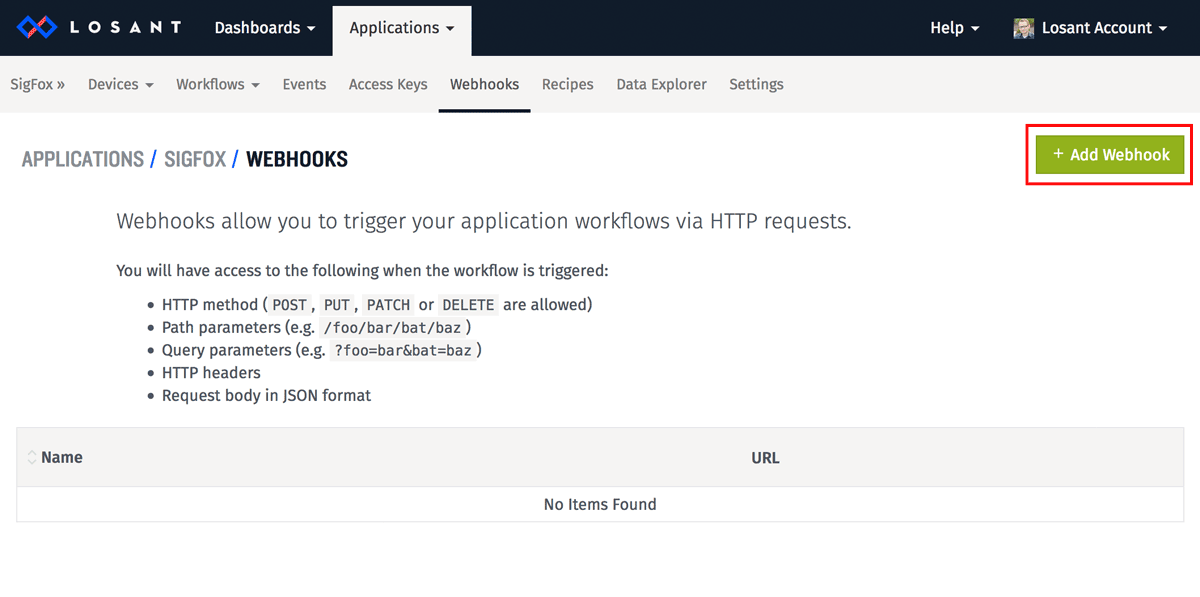
Create Webhook for Sigfox Callback
The easiest way to communicate between Sigfox and other services is to use a callback. Callbacks allow Sigfox to send any information reported by a device to another service using a webhook.
If you haven't already, sign up for Losant and create a new application. Then create a new webhook for that application.
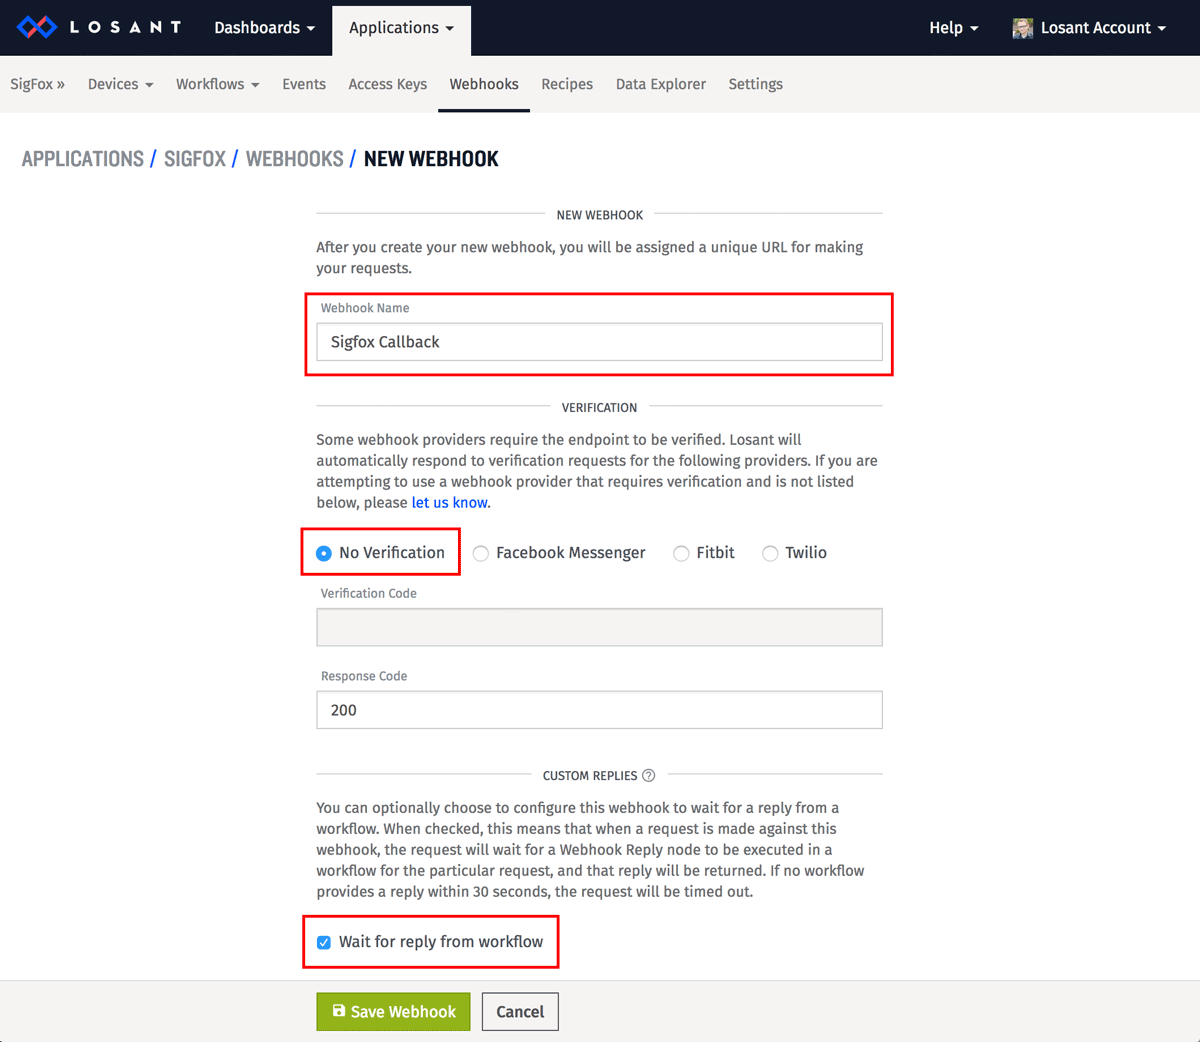
- Name the webhook anything you'd like.
- Make sure "No Verification" is selected.
- If you plan on replying to the callback with downlink information, check the "Wait for reply from workflow" option. If your device doesn't support downlink replies, leave this unchecked.
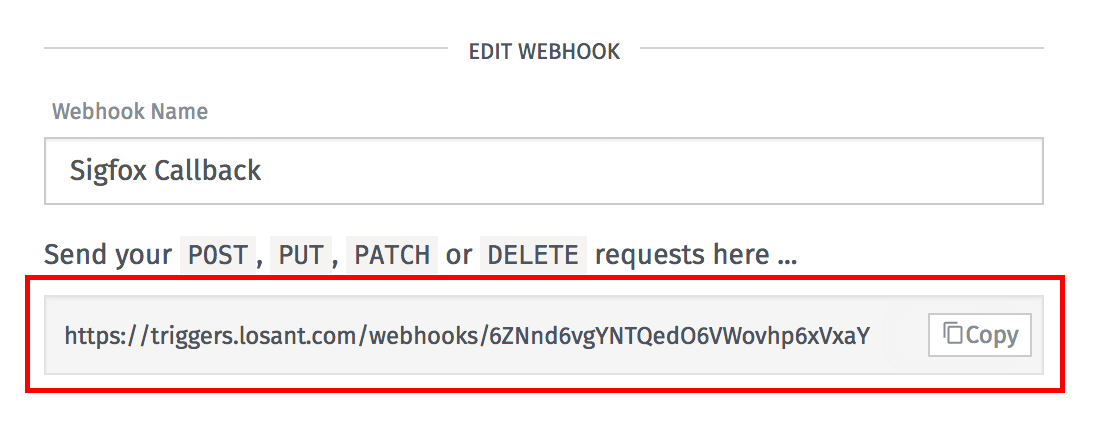
After you save the webhook, you'll be given its unique URL. Copy this somewhere convenient because you'll use it in the following steps.
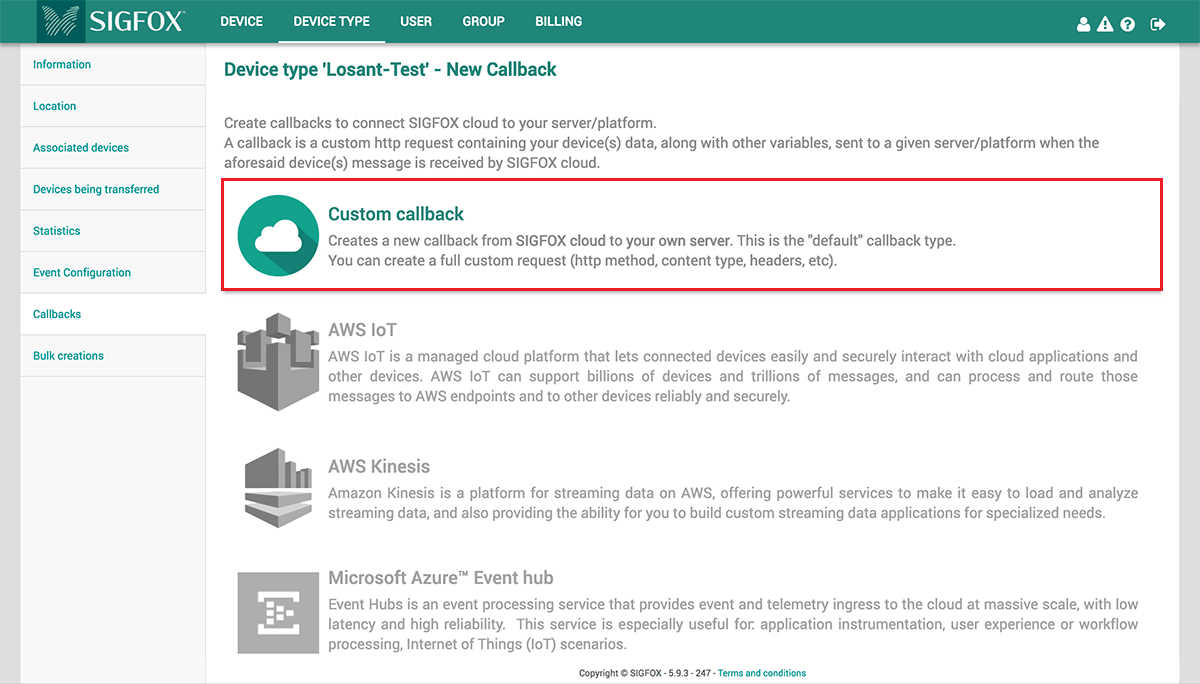
Next, go into your Sigfox backend and add this webhook to a custom callback for your device.
Sigfox Setup
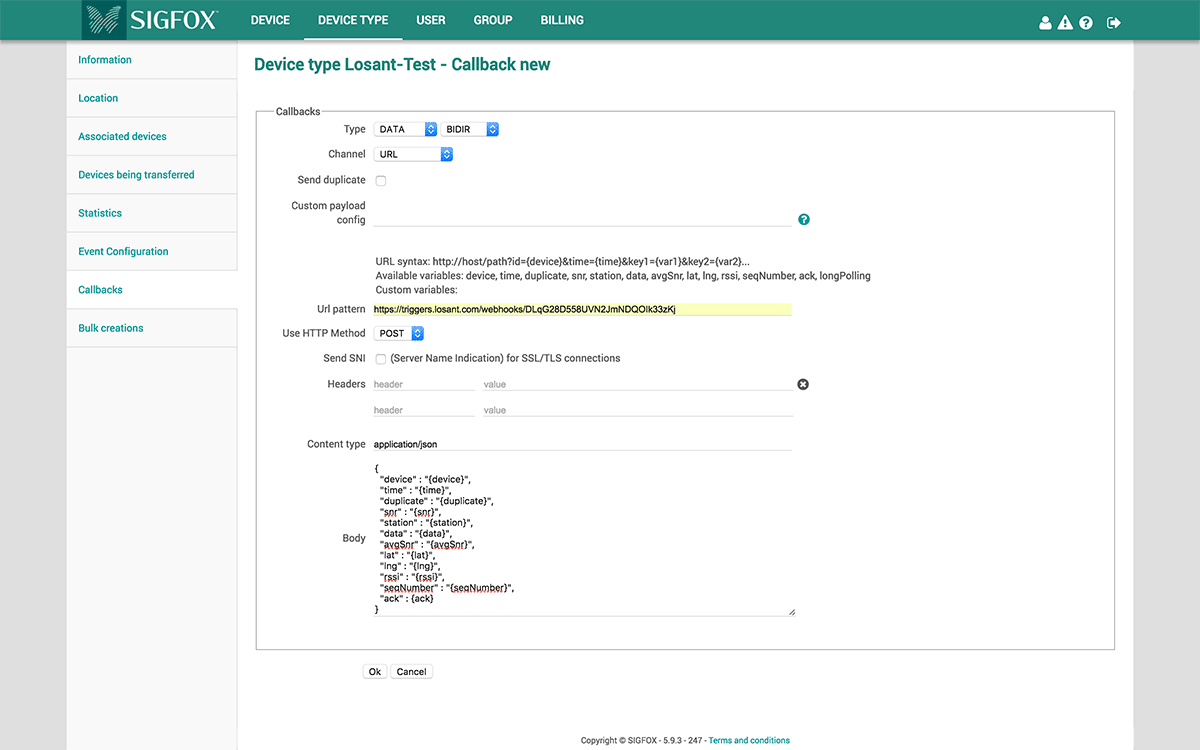
- Set
Typeto "DATA". Use "BDIR" if your device accepts a downlink response. - Set
Channelto "URL". - Set the
Url patternto the Losant webhook URL that you created above. - Set
Use HTTP Methodto "POST". - Set
Content type to"application/json". - Set the
Bodyto the following content:
{
  "device" : "{device}",
  "time" : "{time}",
  "duplicate" : "{duplicate}",
  "snr" : "{snr}",
  "station" : "{station}",
  "data" : "{data}",
  "avgSnr" : "{avgSnr}",
  "lat" : "{lat}",
  "lng" : "{lng}",
  "rssi" : "{rssi}",
  "seqNumber" : "{seqNumber}"
}
This body essentially sends all available Sigfox information, which is perfectly fine. It's better to have more information than you need, than not have it when you want it.
After you save the callback, you'll need to enable Downlink if your device supports it.
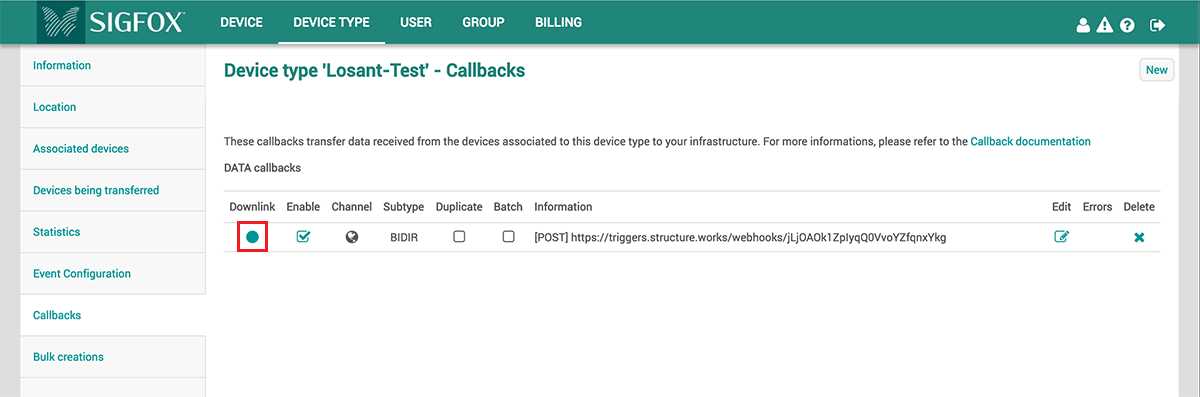
That's it for the Sigfox configuration. We now have Sigfox invoking a Losant webhook whenever one of your devices reports state.
Create Losant Device
Now we need to go back into Losant and start using this data. The first thing we need is a Losant device to represent your Sigfox device. Add a new device to your project using the Devices -> Add Device menu.
- Name the device anything you want.
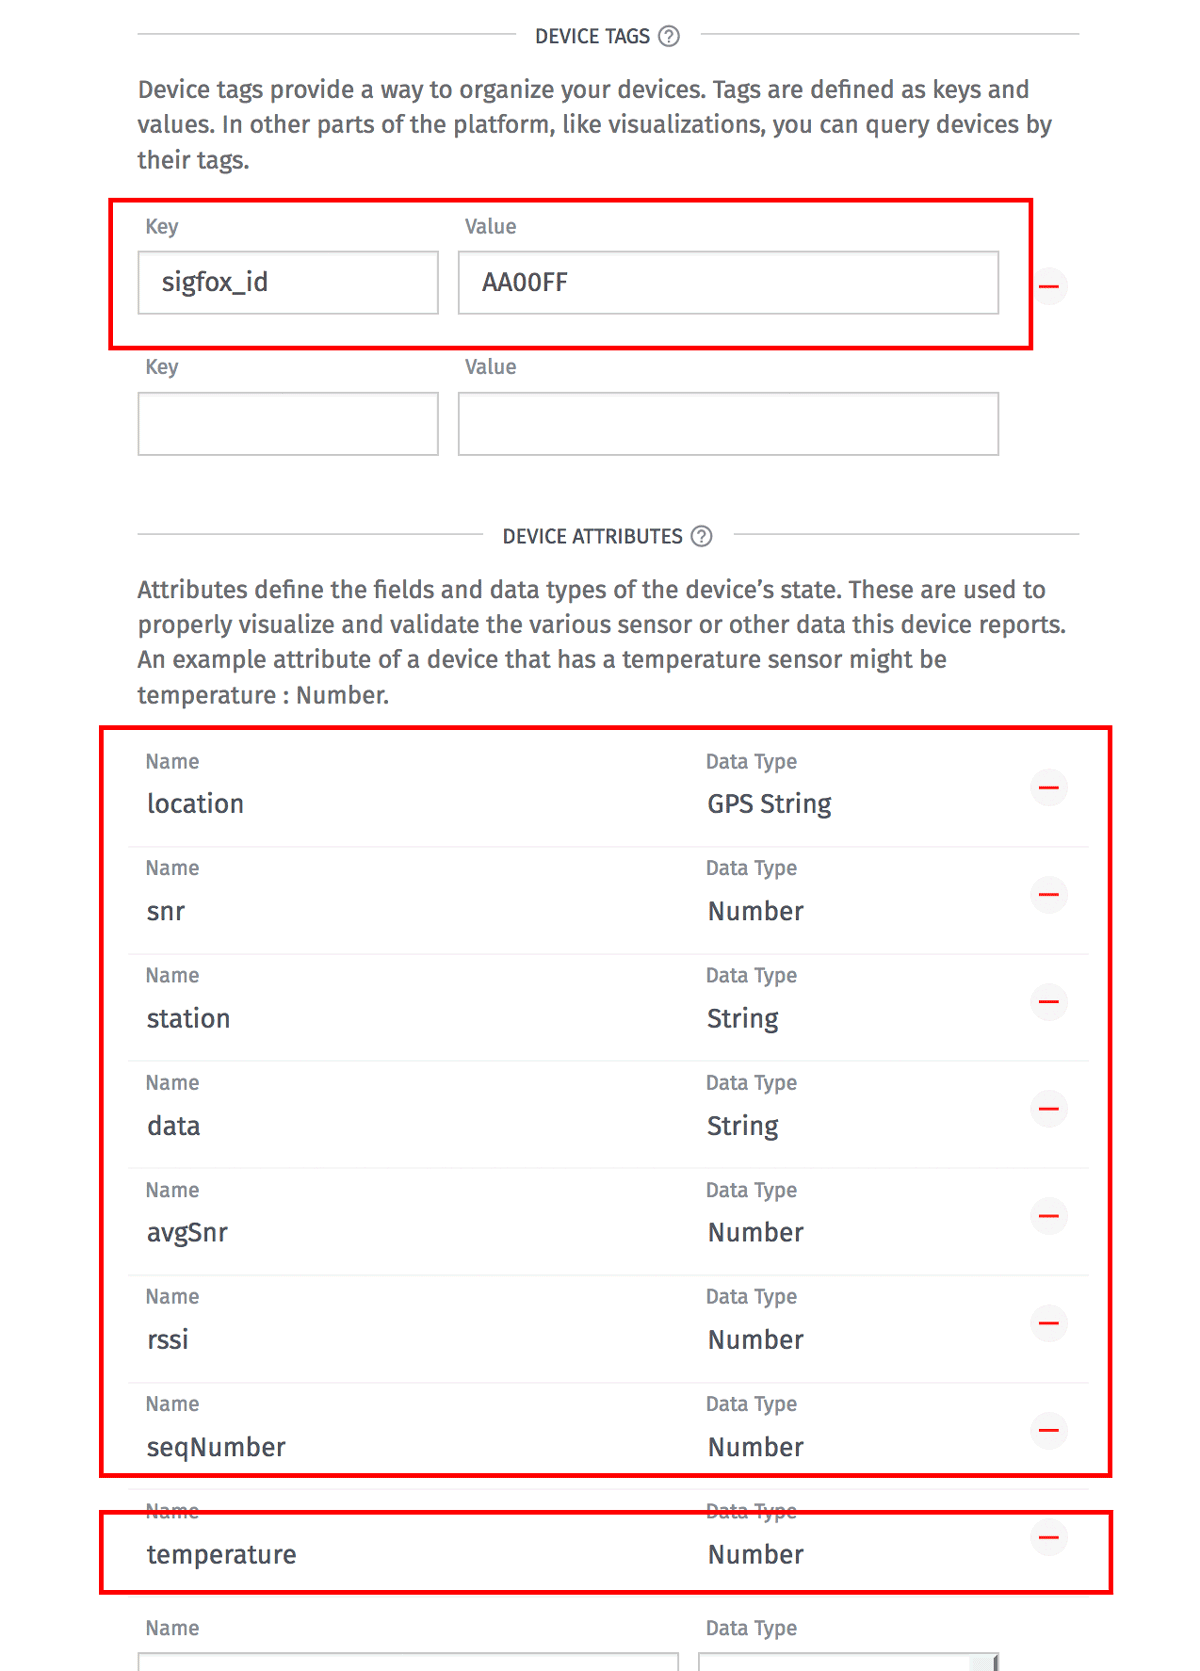
- Add a tag named "sigfox_ID" that holds the Sigfox ID of your device. We'll use this later to look up the appropriate device based on incoming data from the Sigfox callback.
- Add an attribute for each piece of data being pushed by the Sigfox callback. You may notice that each attribute maps to a JSON field in the callback body.
- Add custom attributes for each piece of data encoded in your device's data property. We'll be decoding this data in a later step and saving them on more usable fields. In the above example, the Sigfox device is reporting temperature.
In this example we're creating one device at a time, but if you have hundreds or thousands of devices, make sure to check out our device recipes and bulk creation tools.
Create Workflow
Now that we have a device, we can parse the incoming callback data and store it. To do this, we'll use a Losant workflow.
Create a new workflow and name it anything you'd like. For now, let's just verify we're receiving information from Sigfox by adding a Webhook trigger node and a Debug node.
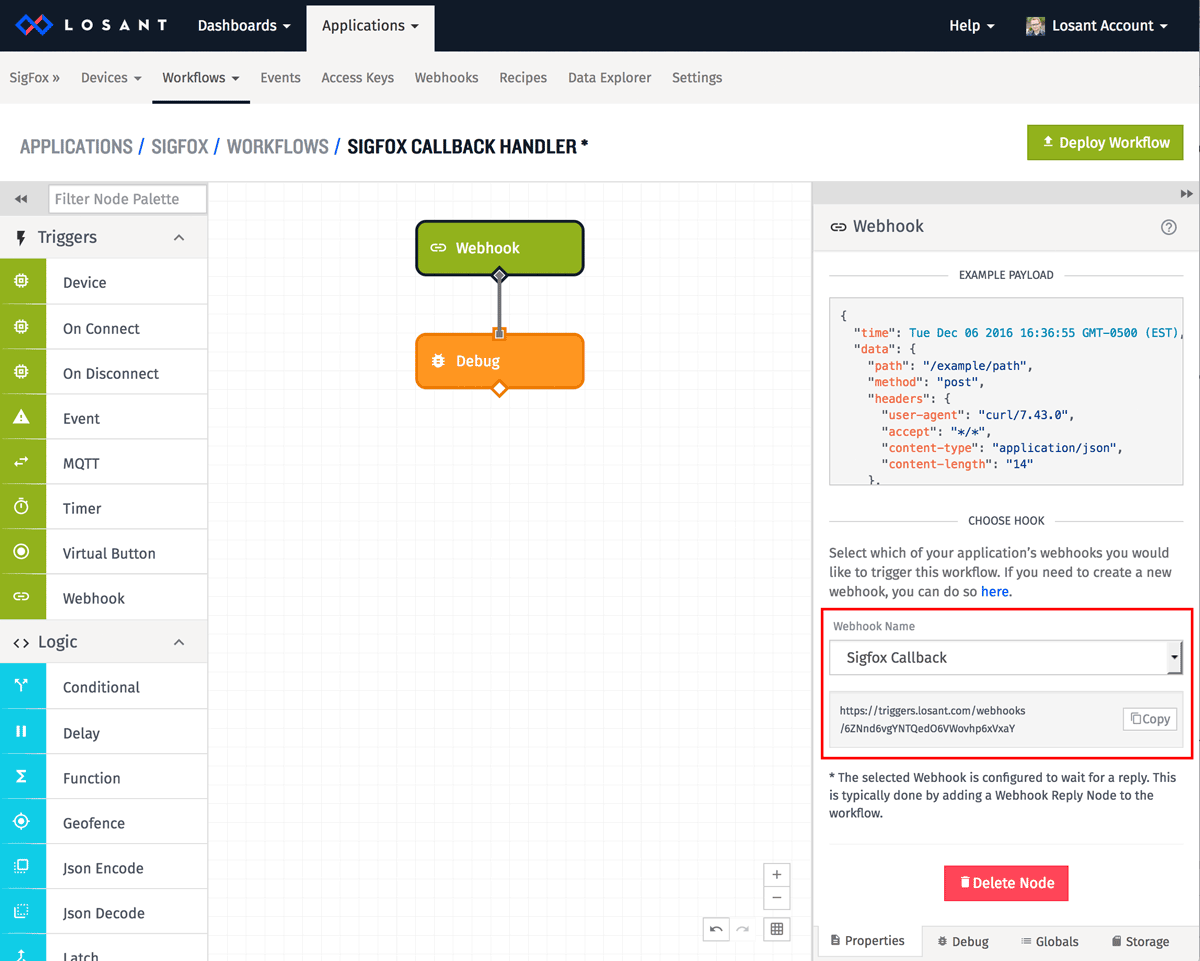
After adding the Webhook trigger, select the webhook you created earlier from the dropdown. If it's the only one, it will be selected automatically.
After deploying this workflow, you should see the data that Sigfox is sending show up in the Debug tab (bottom-right corner).
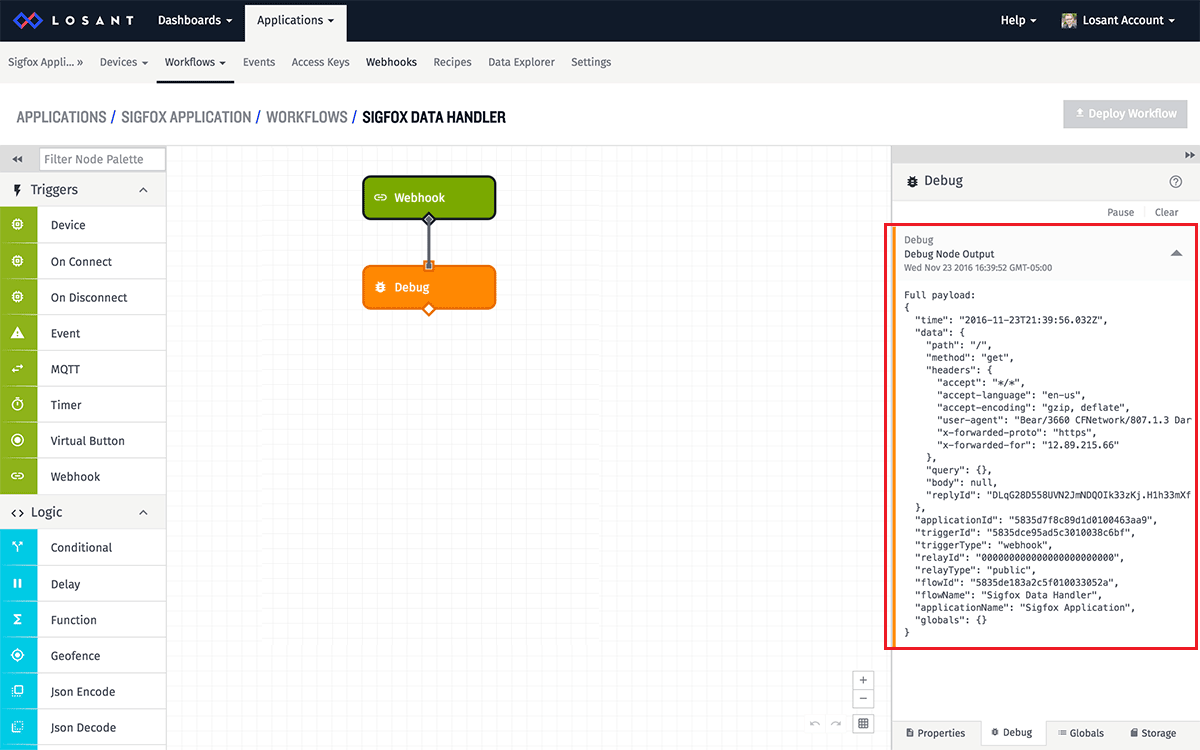
There will be a lot of information on the payload, but what we care about will look something like the following:
{
  "data" : {
    "body" : {
      "device" : "AA00FF",
      "time" : "...",
      "duplicate" : "...",
      "snr" : "...",
      "station" : "...",
      "data" : "...",
      "avgSnr" : "...",
      "lat" : "...",
      "lng" : "...",
      "rssi" : "...",
      "seqNumber" : "...",
      "ack" : true | false
    }
  }
}
This is what Losant calls the "payload". Workflows act on the payload as it flows through nodes. In the payload above, the Sigfox ID of this device is located on the data.body.device property.
The next thing we need to do is parse your specific data, which is located on the data.body.data property. What is in this field is entirely controlled by you and what your Sigfox device reports. All of the other fields (snr, station, lat, lng, etc) are all sent by Sigfox itself.
Since this data could be anything, we'll use a Function node to decode it.

In my example I've encoded the temperature in hexadecimal format on the last two characters of the data string, so the function I've used looks like this:
payload.data.body.temperature =
  parseInt(payload.data.body.data.substring(18, 20), 16);
Inside a function node the current payload is available on the payload variable. This function is decoding the temperature and putting the value back on the payload next to all of our other fields at data.body.temperature.
We now have all of our data and it's time to save it onto our device. The first thing we have to do is look up our device based on the Sigfox ID. We'll do this using the Get Device node.
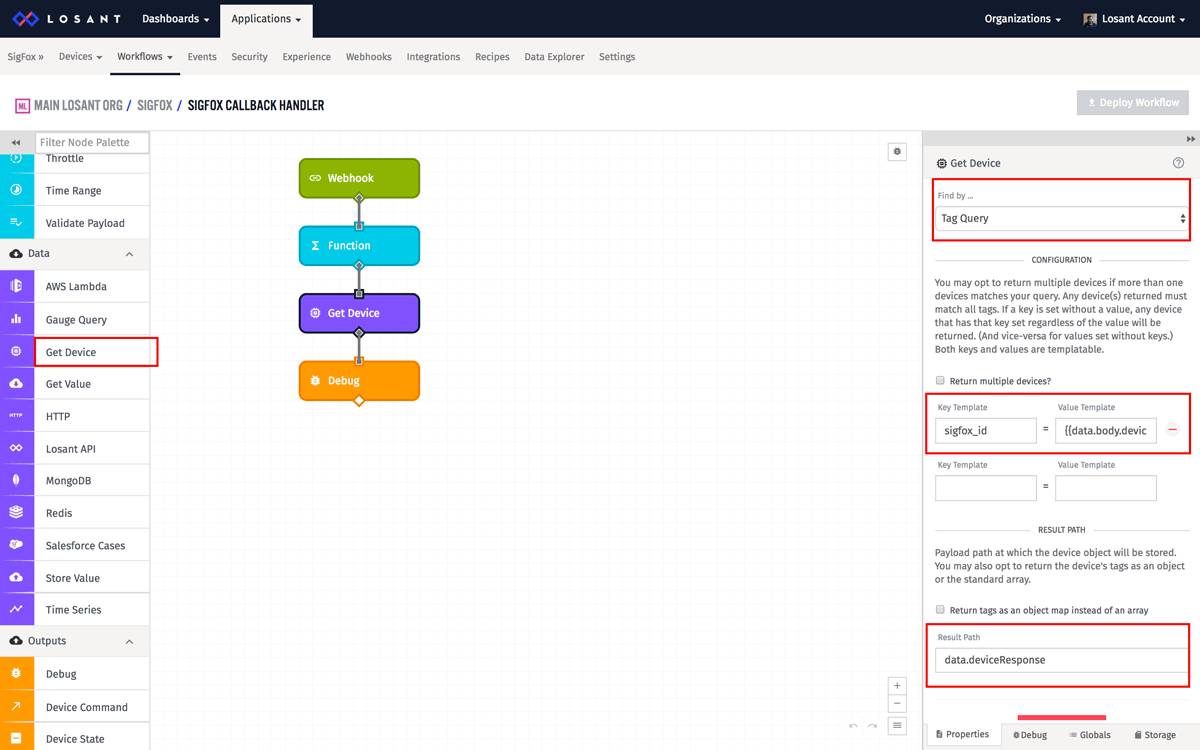
- Set the
Find BytoTag Query. - Set
Key Template tosigfox_id - Set
Value Templateto{{data.body.device}}
We want to find a device that has a tag key ofsigfox_idwith a value that matches the Sigfox ID in our current payload. - Set the
Result Pathtodata.deviceResponse. This will put the result of the device request back onto the payload so we can use it in the following steps.
At this point we have the data and we know the device. The next step is to use a Device State node to save this data onto the device.
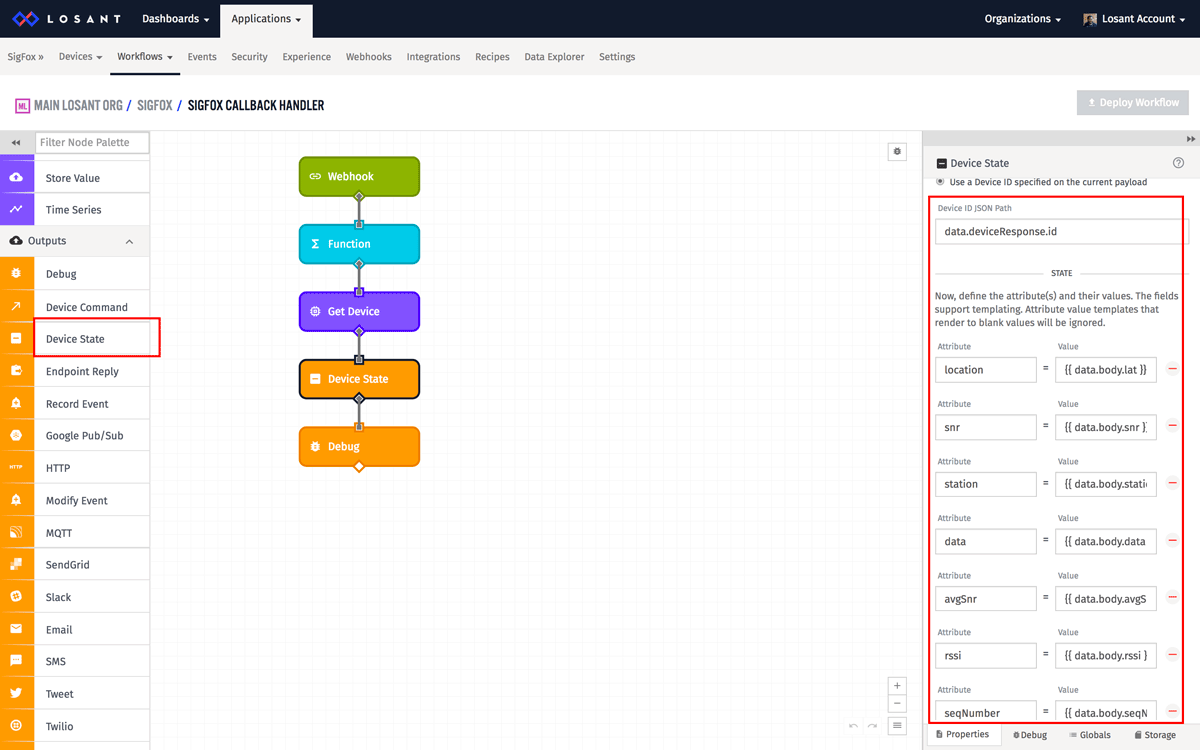
- Select the
Use a Device IDradio. - Set the
Device ID JSON Pathtodata.deviceResponse.id
The above path is pulling the Losant device ID from the Get Device node response - For the state, add an entry for each attribute:
location = {{ data.body.lat }}, {{ data.body.lng }}Most of these should be self-explanatory. Essentially we're pulling the value of each attribute off of the payload and storing them on the device. The only one that looks different is
snr = {{ data.body.snr }}
station = {{ data.body.station }}
data = {{ data.body.data }}
avgSnr = {{ data.body.avgSnr }}
rssi = {{ data.body.rssi }}
seqNumber = {{ data.body.seqNumber }}
temperature = {{ data.body.temperature }}location. Losant has built-in support for GPS coordinates and understands many different ways to represent them. Because of this, we can simply combine thelatandlngproperties and send them as a single attribute.
The last thing we need to do with this workflow is reply to the original incoming webhook. This is only required if your device is configured for downlink replies.
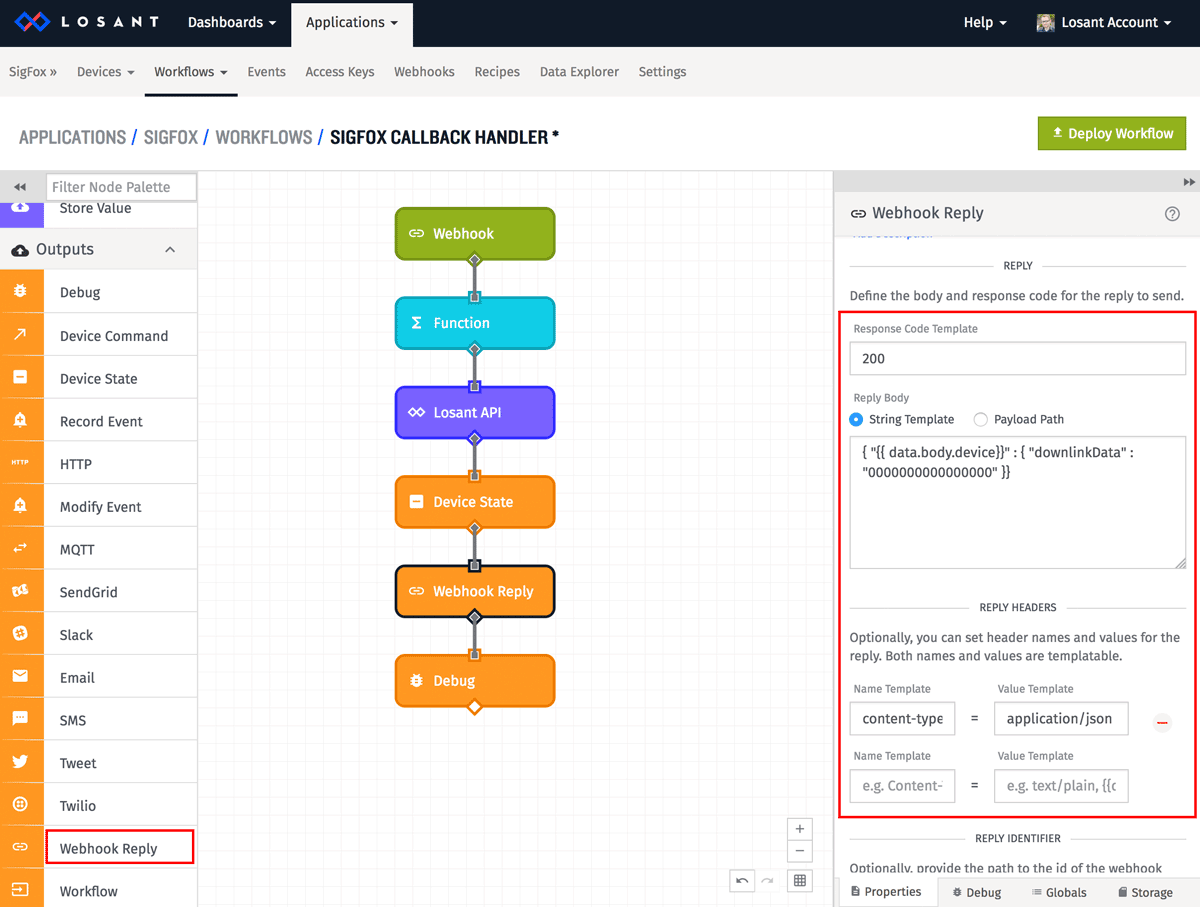
- Set the
Response Code Templateto 200. - Set the
Reply Bodyto:{ "{{ data.body.device}}" : { "downlinkData" : "0000000000000000" }}
In this example, thedownloadLinkDatais all zeroes, but you would replace this with whatever data was required to be sent back to your device. - Add a "content-type" header and set its value to "application/json".
We are now successfully collecting and storing data from our Sigfox devices. Losant workflows are very powerful and there many other useful things that could be done on incoming Sigfox data. For example, this workflow could be easily extended to send an SMS notification when the reported temperature of a device is outside a tolerance range.
Build a Dashboard
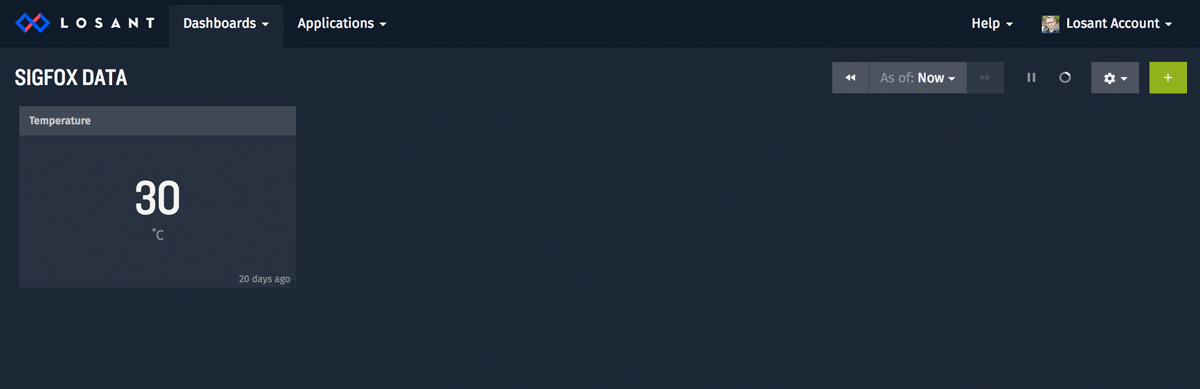
The last thing we want to do is build a dashboard and display this incoming data.
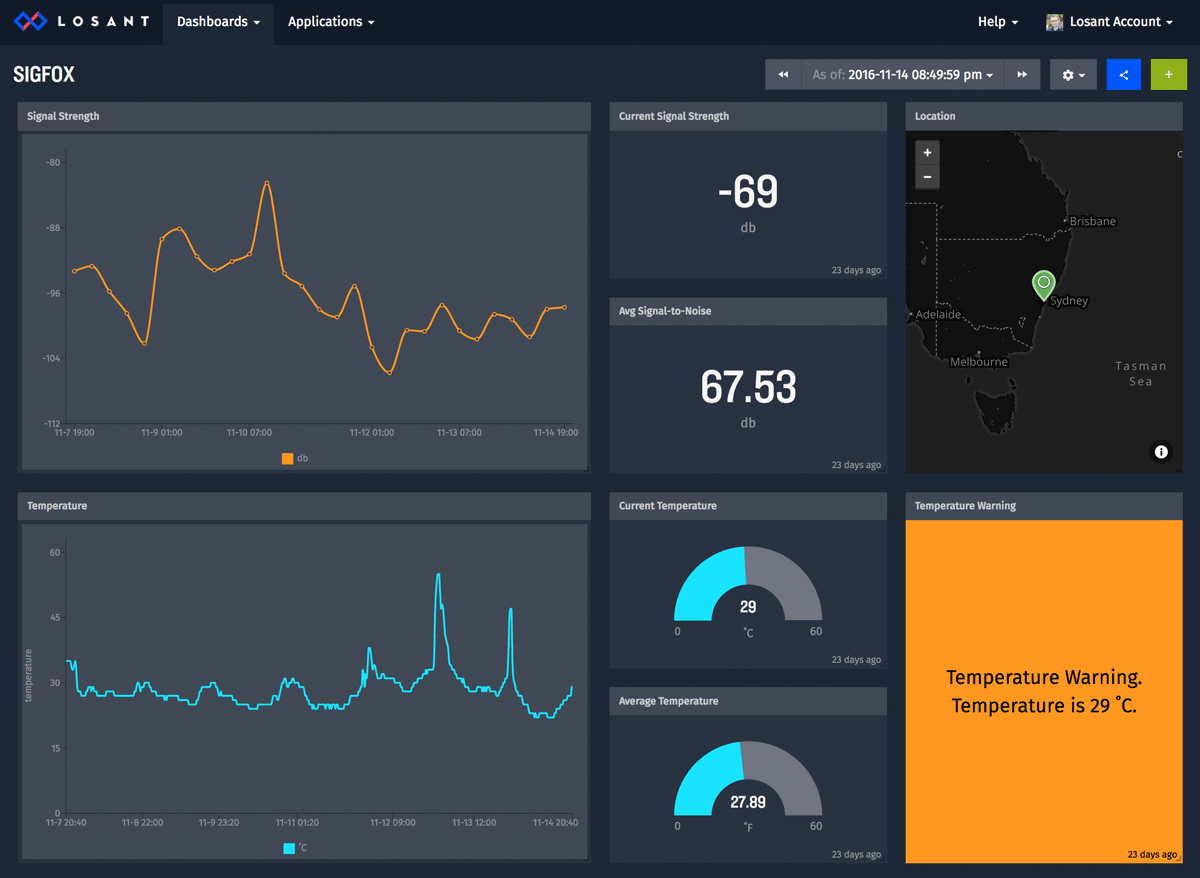
There are many built-in blocks available and what data you'd like to display often depends on the specific requirements of your solution. With that in mind, this guide will go through adding a simple gauge block so you can get an understanding of the process.
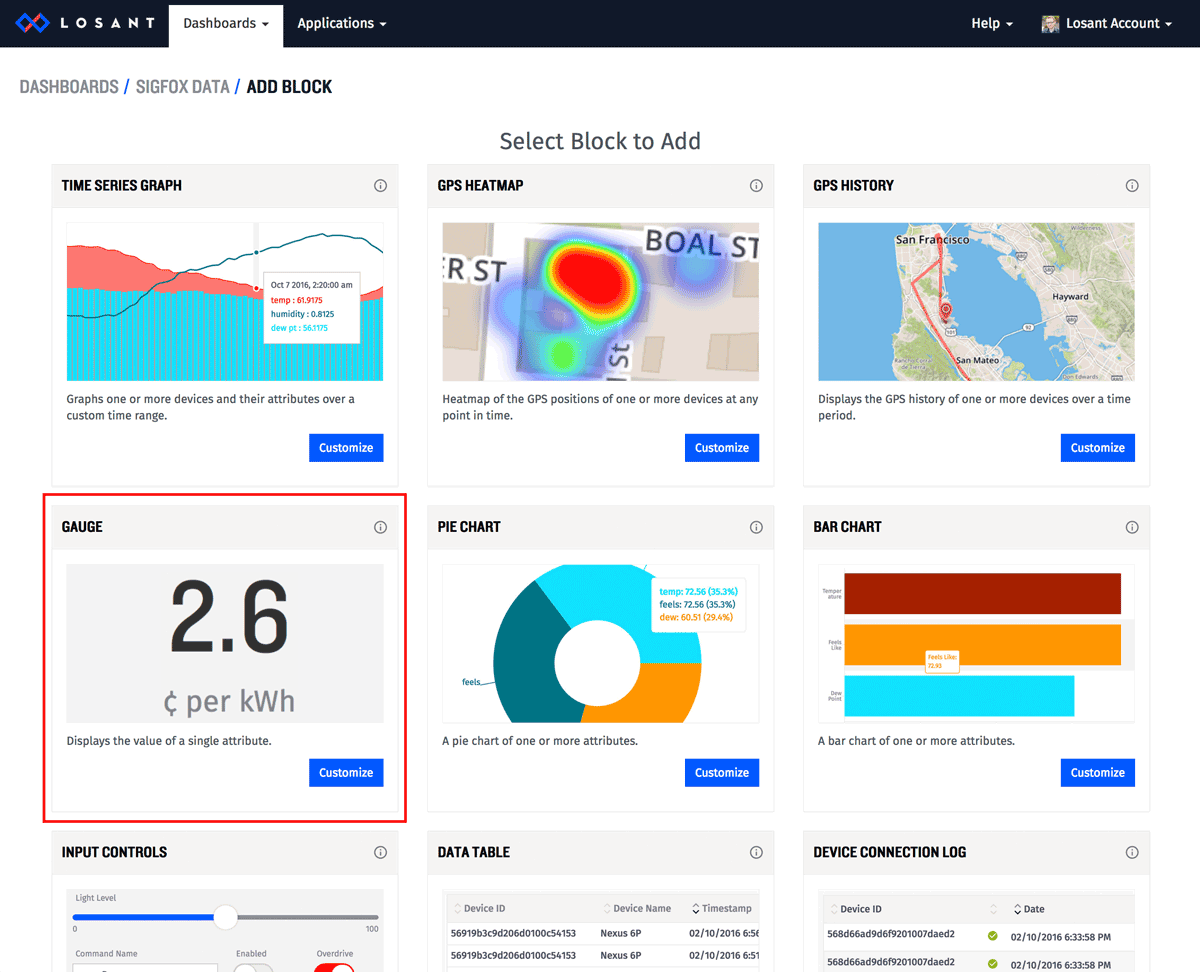
Create a new dashboard and name it anything you'd like. Then add a gauge block.
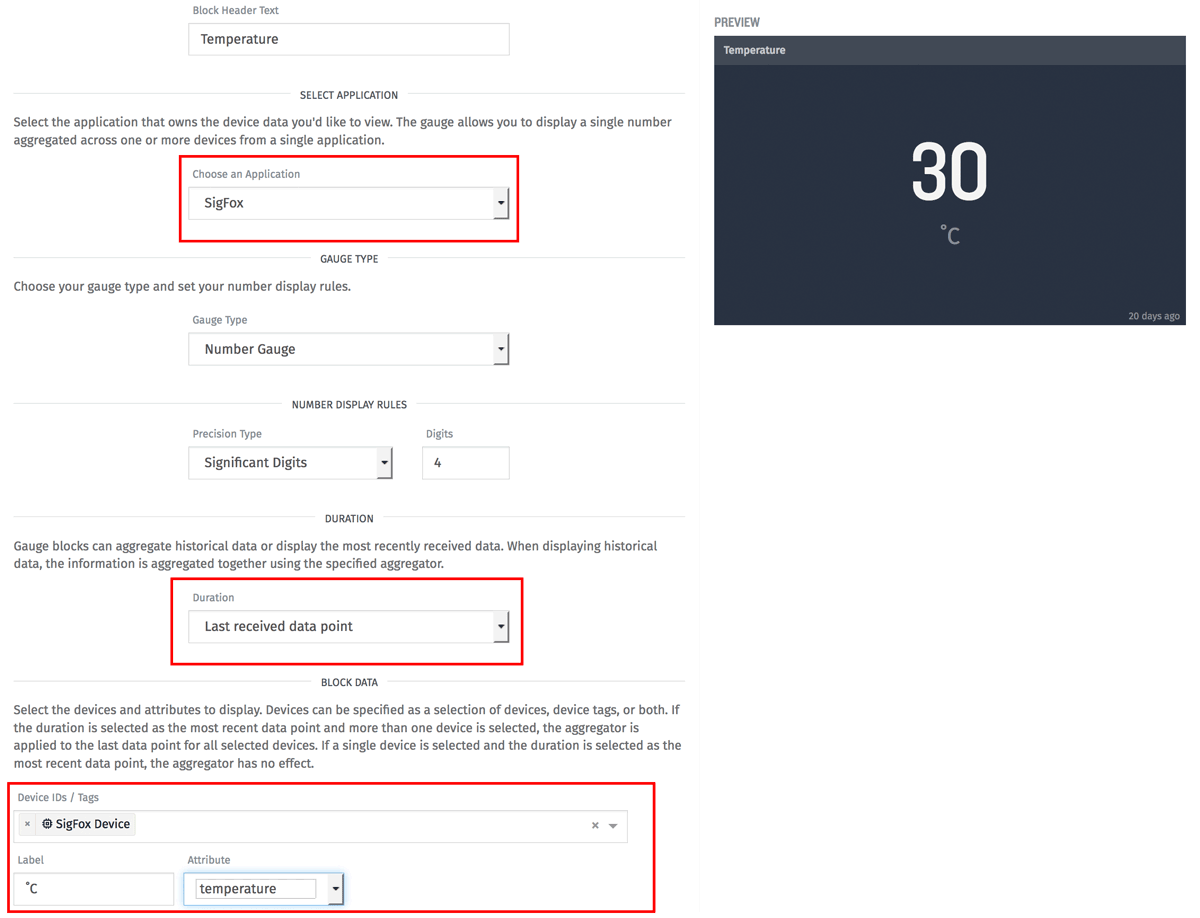
- Make sure the correct application is selected. If you only have one, it will be selected by default.
- In this example, I set the
Durationto "Last received data point", which will always show the most up-to-date information. - Select the device you'd like to view.
- Set the Label to anything you'd like.
- Choose the attribute to display. In this example, I chose to display the temperature.
Feel free to explore these settings to display the information most relevant to you. Once you click "Add Block", you will see your new block on the dashboard.
At this point you can continue adding blocks to your dashboard to display the data that's most important to you.
This guide is just the beginning. Everything we've done today sits behind the Losant API, which provides a powerful interface to build custom experiences on top of your workflows and device data. Sigfox connectivity and the Losant IoT Platform provide an end-to-end stack that accelerates developer efficiency and greatly reduces time-to-market.