
This tutorial was originally published to resin.io blog on May 31st.
Losant Edge Compute offers developers a visual, drag-and-drop editor for building logic workflows, which can be remotely deployed to any number of edge devices:

To facilitate the deployment and execution of edge workflows, an agent must be installed on each device. This is where resin.io comes in:
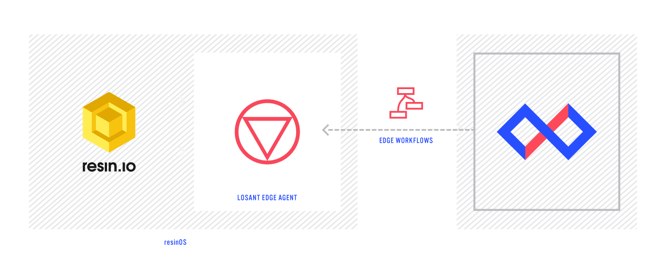
Losant distributes the Edge Agent as a Docker image, which resin.io can easily deploy to any number of edge devices. Once the Edge Agent is deployed, Losant is used to deploy and manage workflows.
This article will walk you through how to use resin.io to deploy the Losant Gateway Edge Agent, and then how to use Losant to deploy an edge workflow.
Sign Up for Resin.io and Install ResinOS
To begin, sign up for a resin.io account and check out resin.io's getting started instructions. Feel free to stop at the Deploy code step, as you will be deploying the Losant Gateway Edge Agent instead of the example given. Once you have resinOS installed and see your device on the resin.io dashboard, you’re ready to continue to the next step in this tutorial.
Deploy Losant Edge Gateway Agent
Resin.io works by deploying a Dockerfile. Resin.io’s servers then build that Dockerfile for you and deploys the resulting image to your devices. When using Losant Edge Compute, there’s no need to write and deploy any actual code, so this Dockerfile ends up being very simple. You only need to deploy the Losant Gateway Edge Agent. Below is the entire required Dockerfile:
FROM losant/edge-agent:latest-arm
EXPOSE 8080/tcp
Since the Losant Gateway Edge Agent is available as a Docker image, this entire Dockerfile only ends up being two lines. The first line will base this Dockerfile from the already existing losant/edge-agent Docker image. This example is using latest-arm, and you’ll have to change that based on your device’s actual architecture. latest-arm works for things like the Raspberry Pi and latest-amd64 works for things running Intel or AMD processors.
The second line exposes port 8080. The Losant Gateway Edge Agent comes with a webserver built in, and 8080 is the default port it listens on. You can use web requests on this port to trigger Losant Edge Workflows on your local network. You can also use resin.io’s public URL feature to trigger a workflow over the Internet.
Losant Edge Workflows do allow you to run any executables that are available in this container. If you have scripts or binaries that are specific to your application and would like to invoke those using a workflow, you can expand this Dockerfile to include any necessary dependencies you’d like.
You can now push this file to your resin.io repository to begin the deployment. When the deployment completes, you may see an error in the log indicating some configuration fields are required:
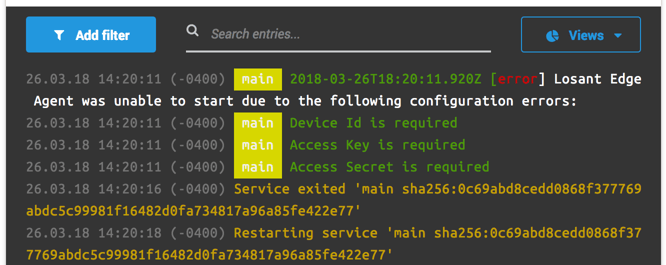
The next step in this guide will cover how to create those values.
Create the Losant Device
Now that you have the Losant Gateway Edge Agent installed, you need to create a Losant Edge Compute Device that will represent this agent. If you’re new to Losant, it may be a good idea to follow the Losant Walkthrough as a way to get an understanding of some of the core concepts.
If you don’t already have a Losant account, sign up for a free developer sandbox account. Once you’ve registered an account, create a new application and name it anything you’d like. After the application is created, add a new device:
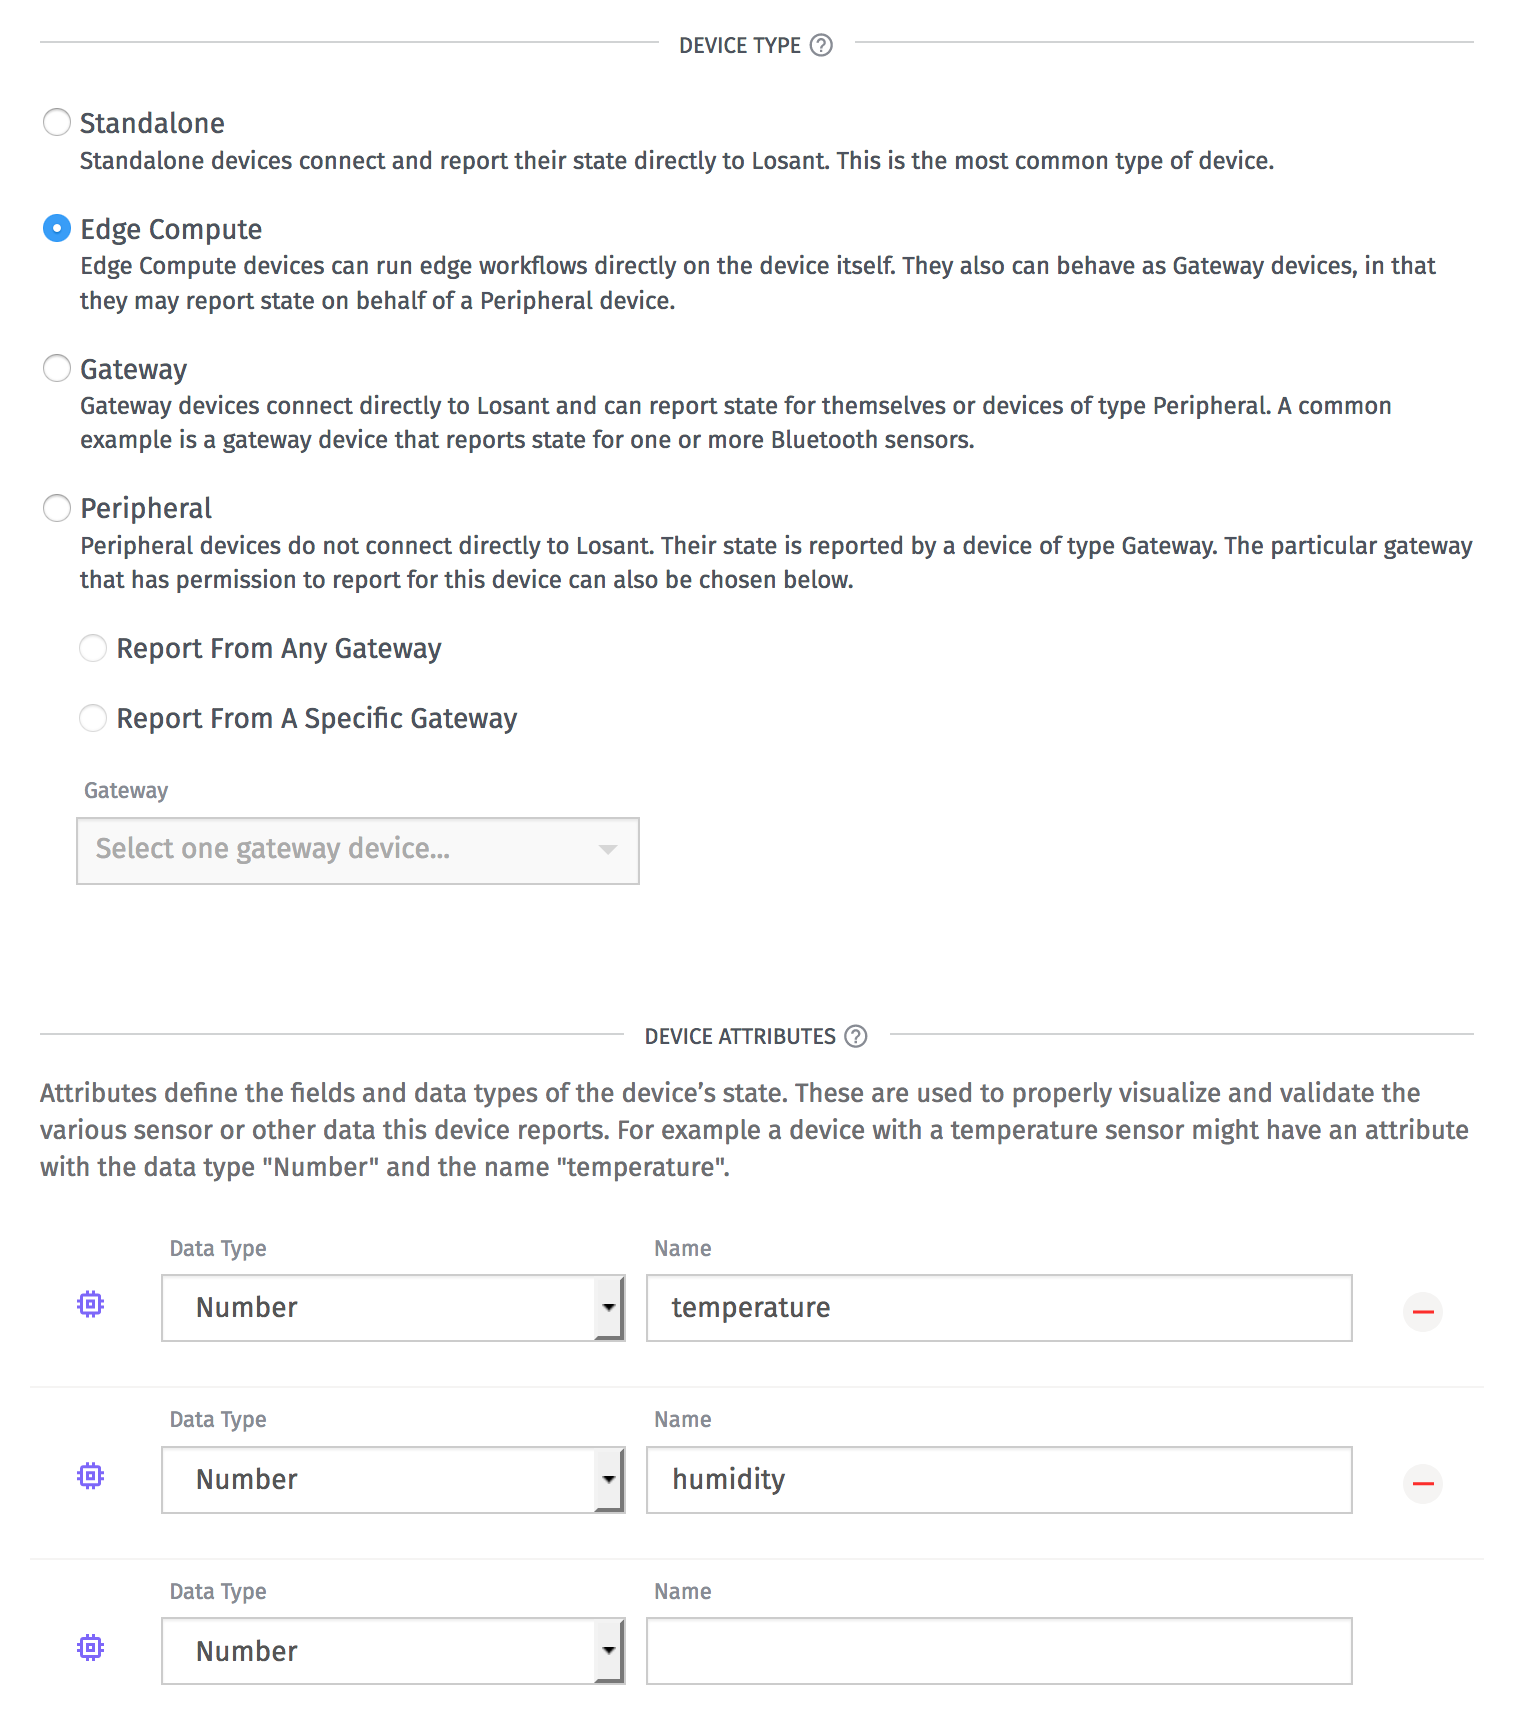
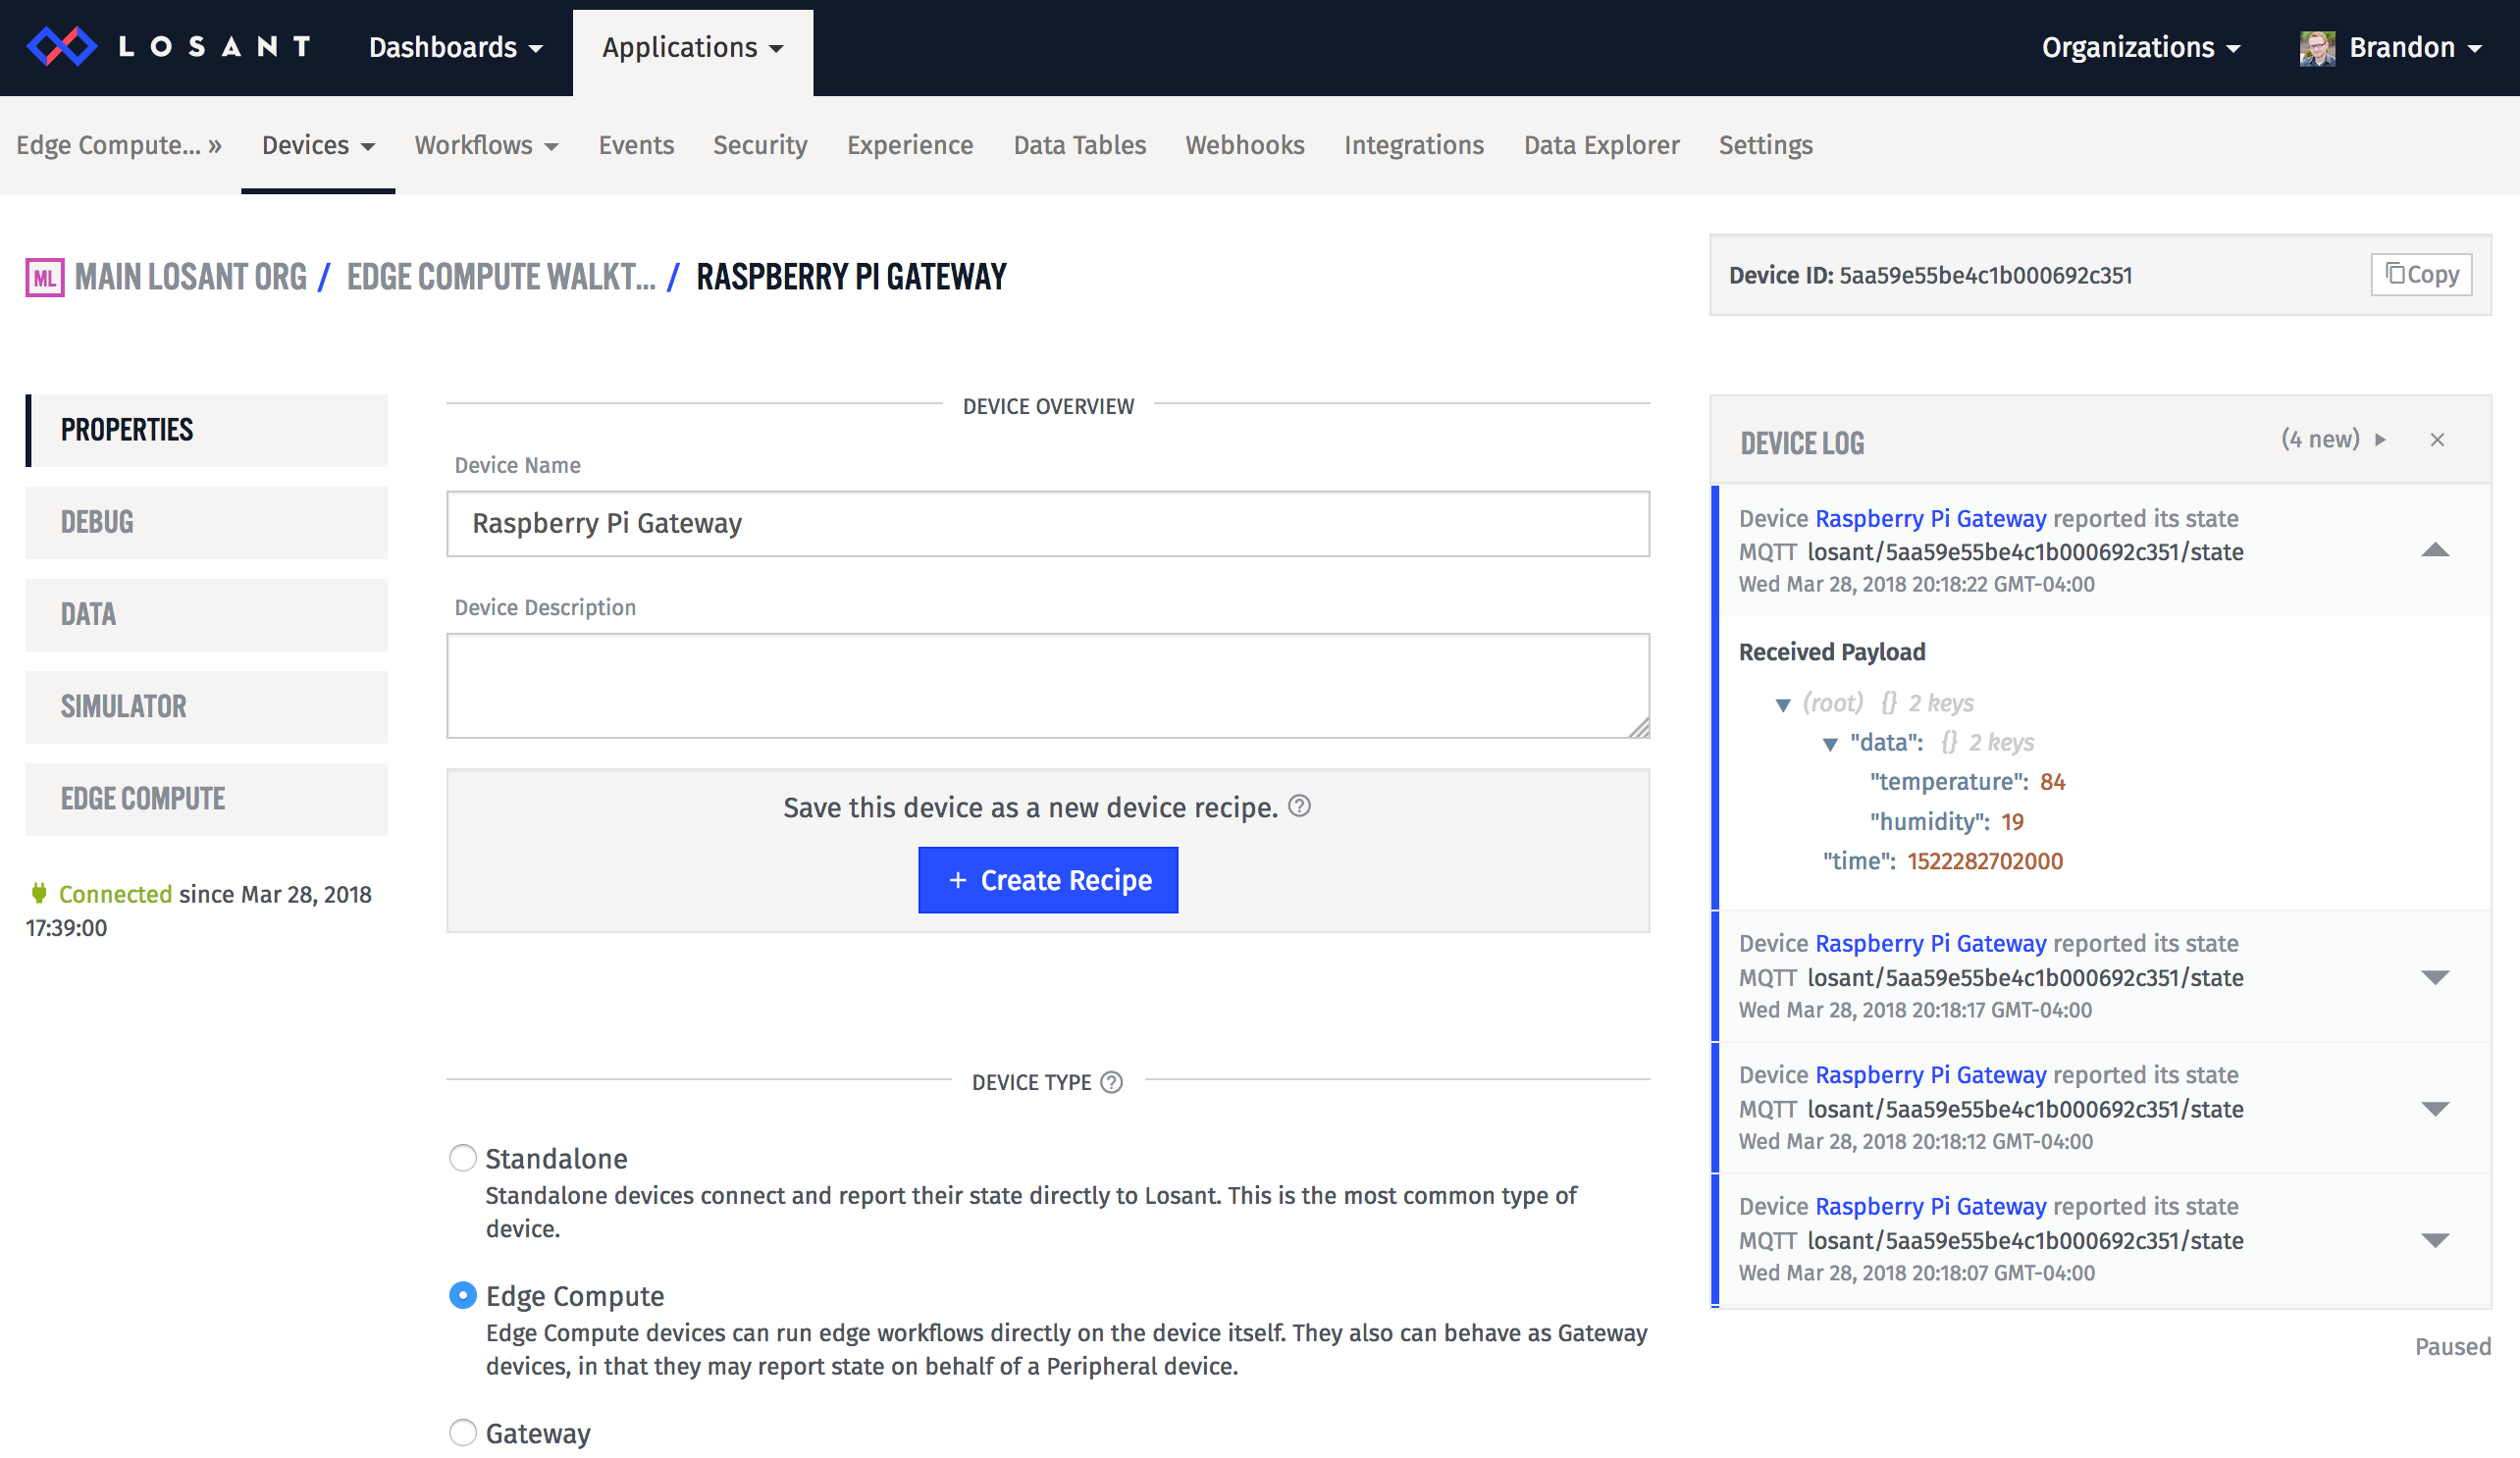
Losant has a few types of devices, but this guide will make use of the Edge Compute device type. Next, you need to configure the attributes that define what type of data this device reports. In this example, the device will be reporting temperature and humidity. Losant’s platform stores, visualizes, and reacts to your device’s data. Edge workflows make it easy to seamlessly transmit data from your devices to Losant’s cloud.
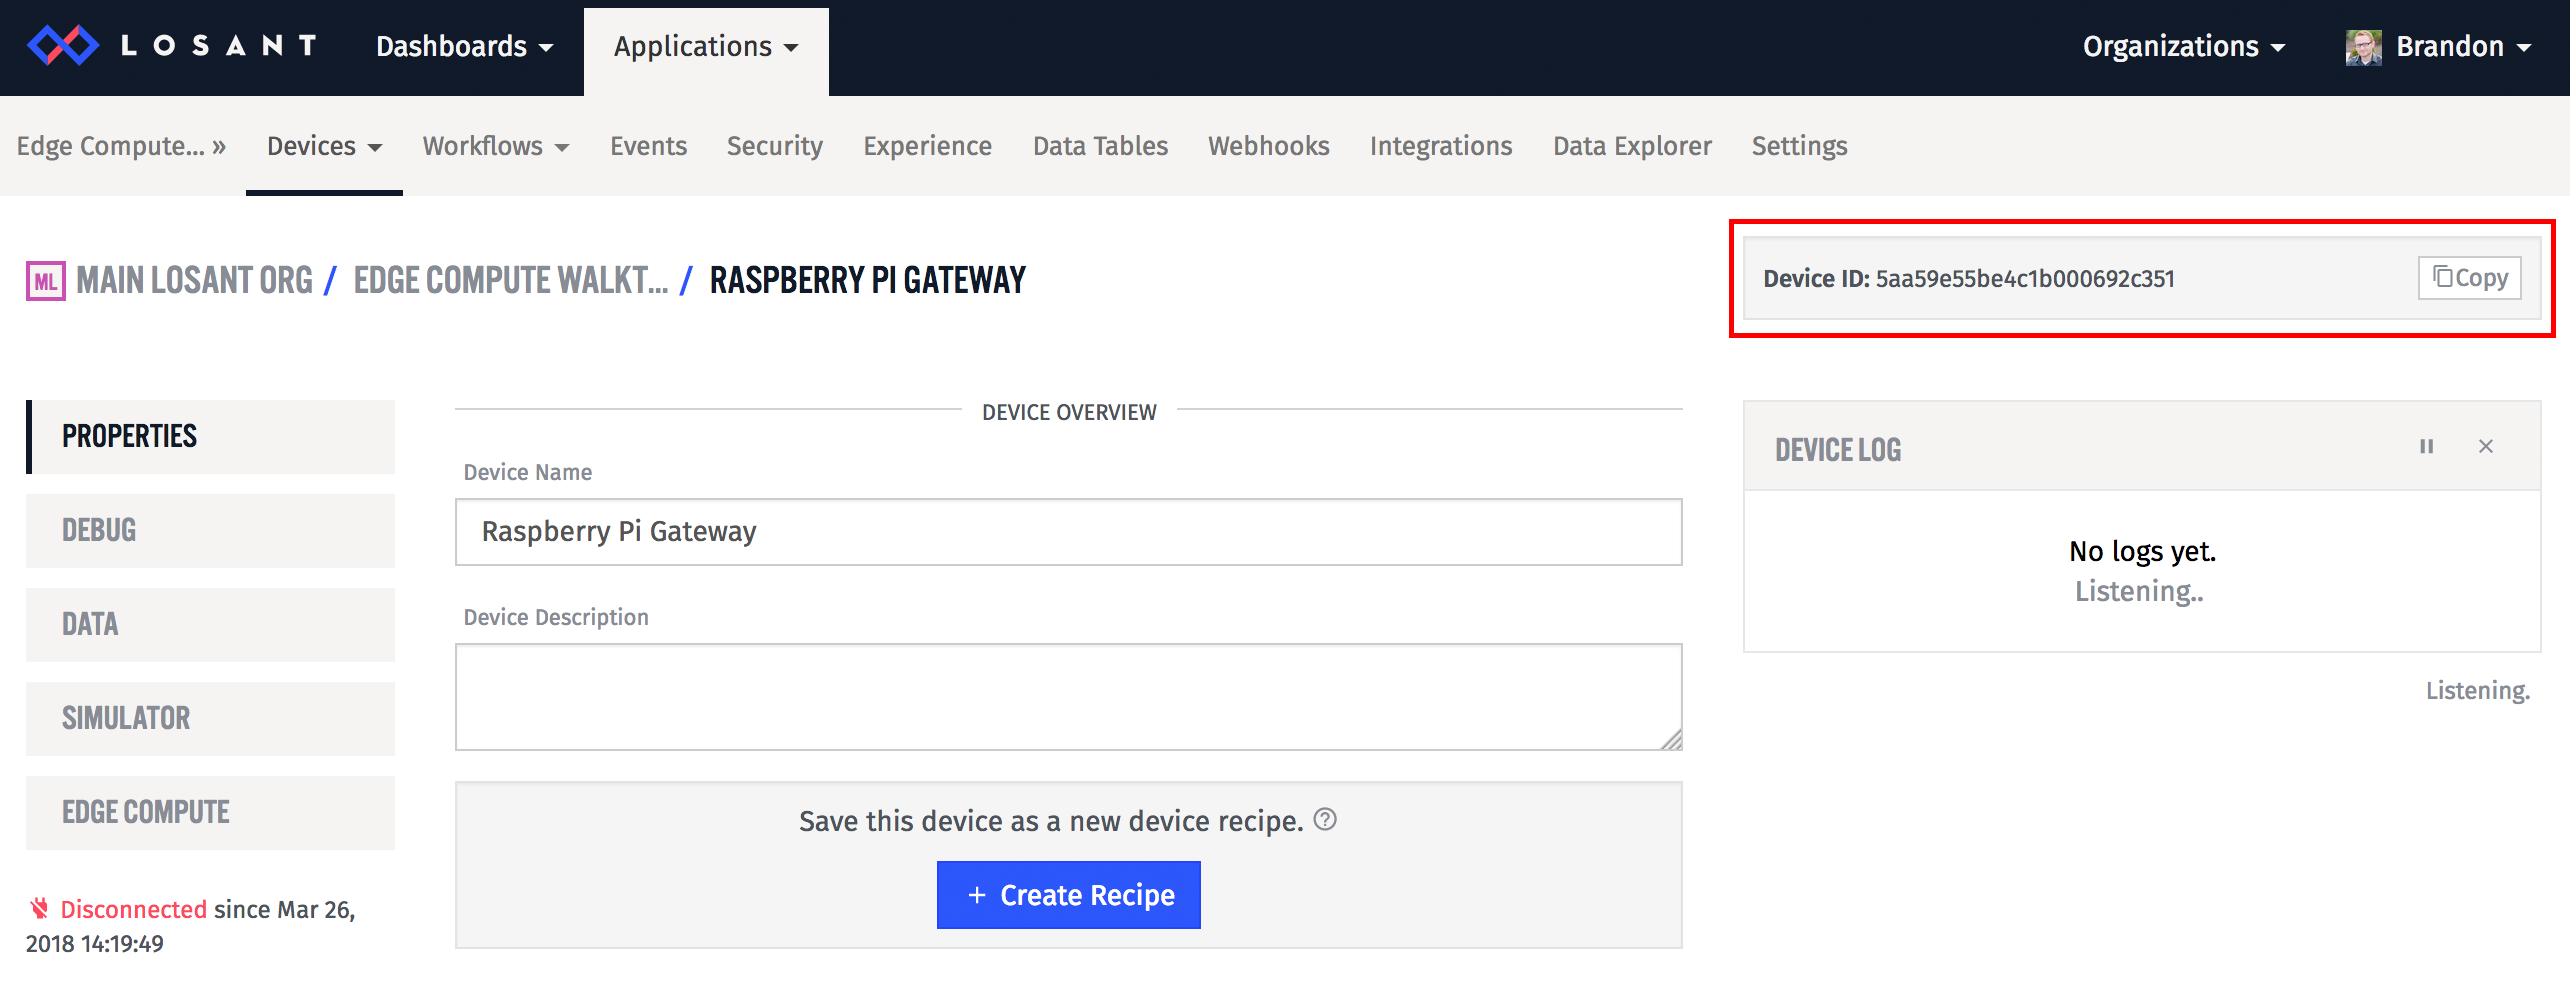
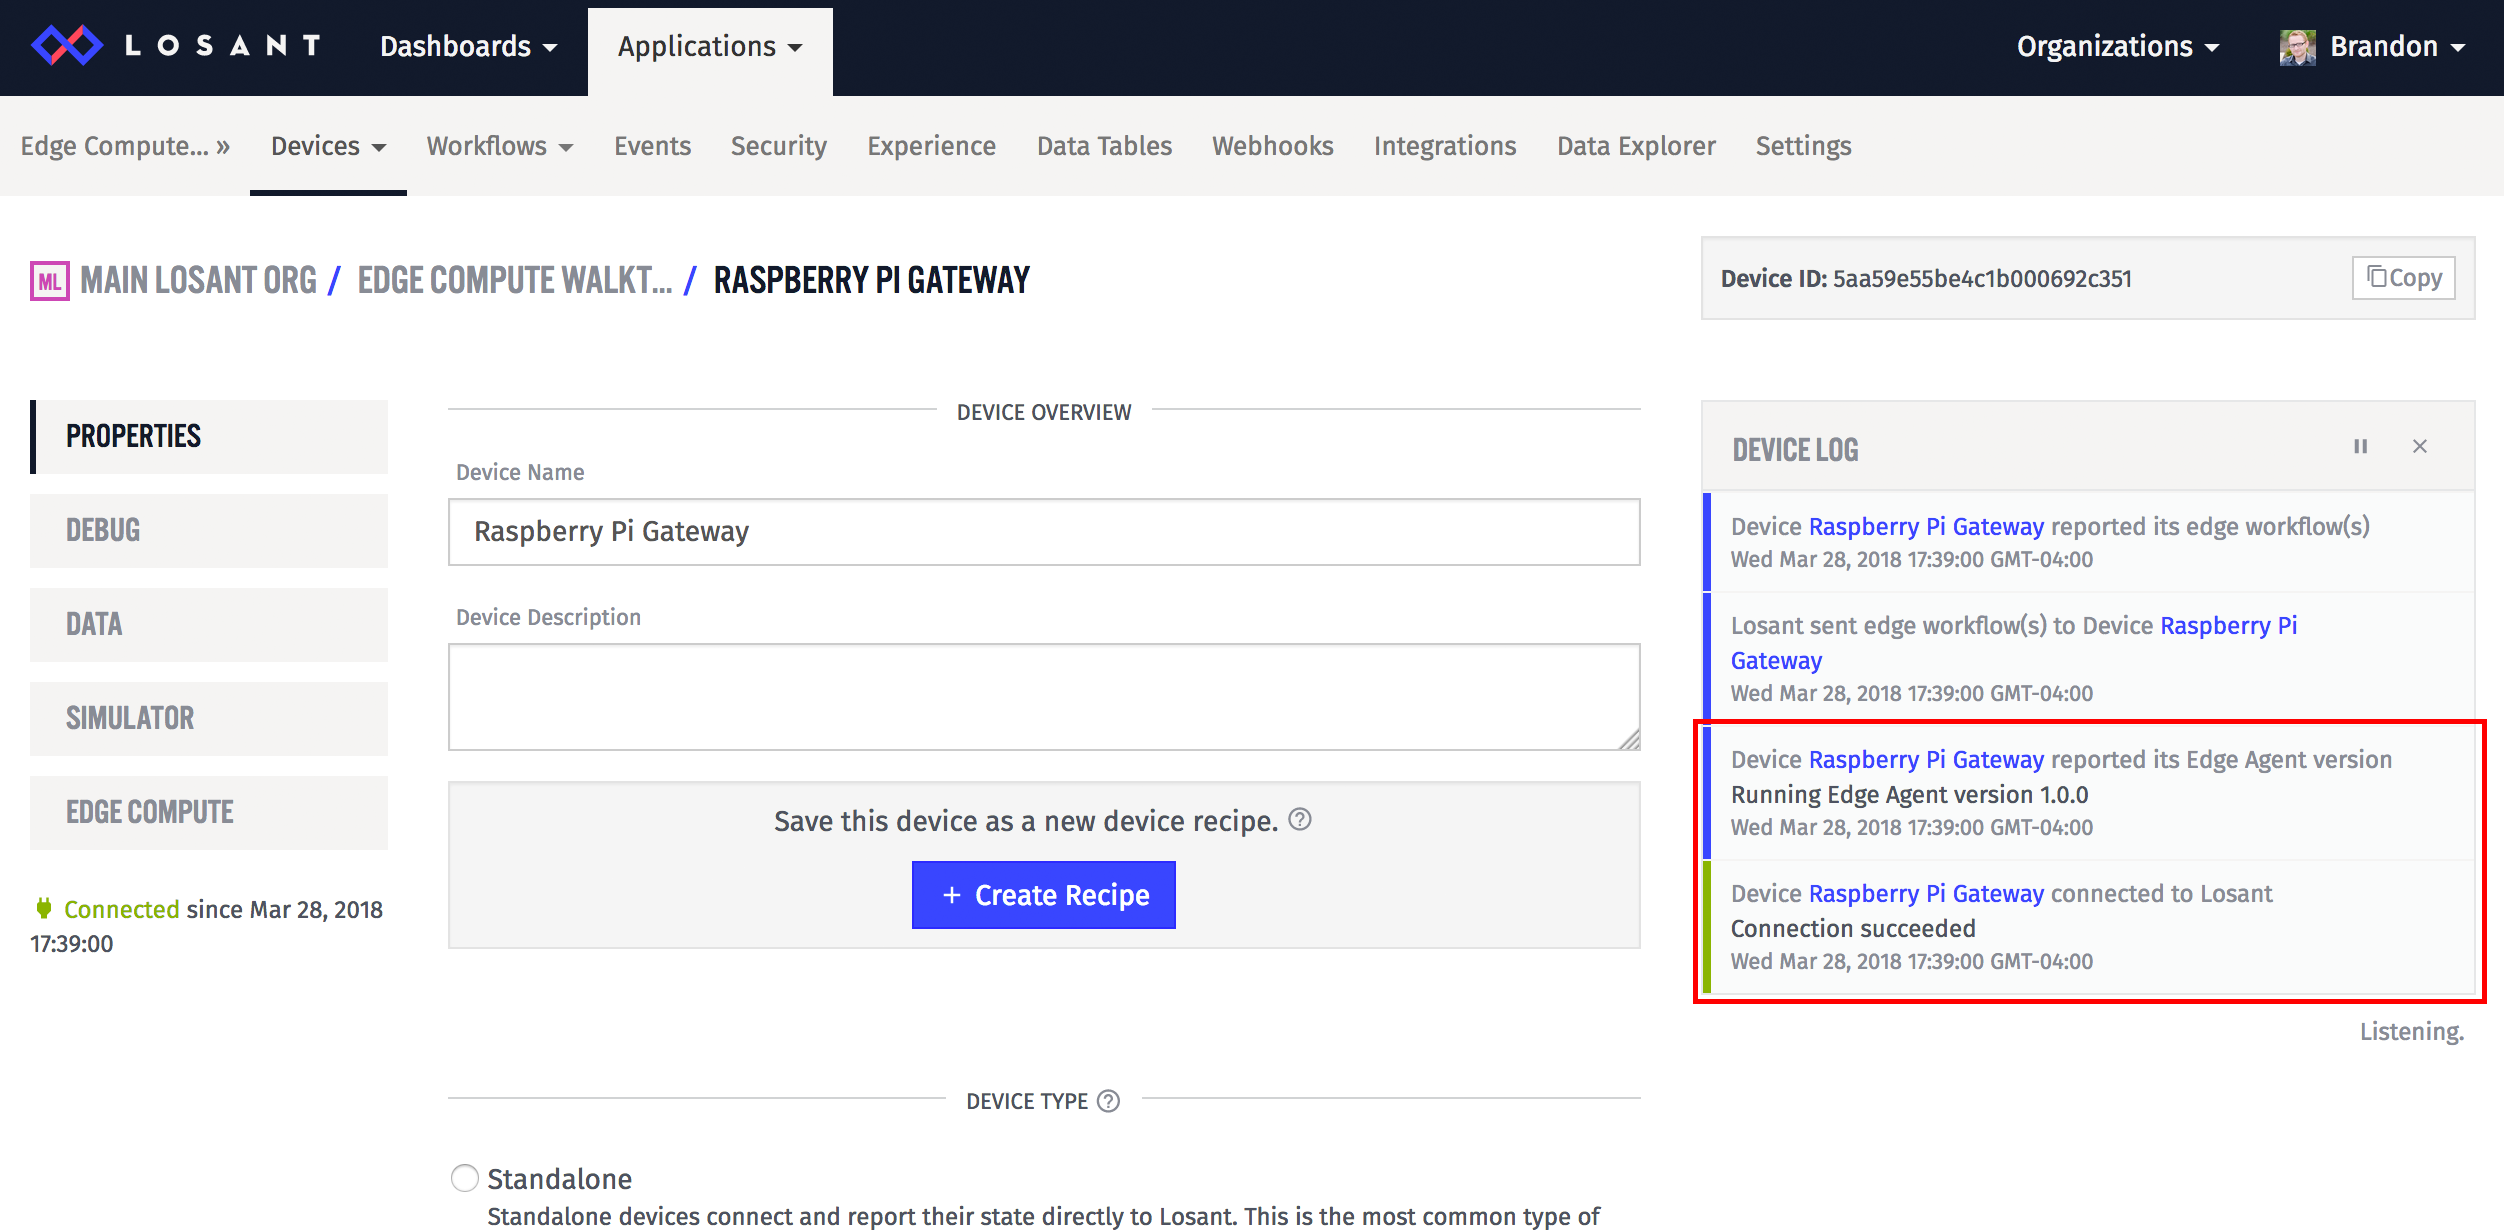
Once this device is created, you can access its ID on the top right corner. Copy this somewhere convenient because it will be used later in this guide:
Create Security Credentials
In order for any device to connect to Losant, the device requires an ID and an access key/secret pair. You’ve already got the device ID, it’s now time to create the access key and secret. Click the main Security menu and then click the Add Access Key button:
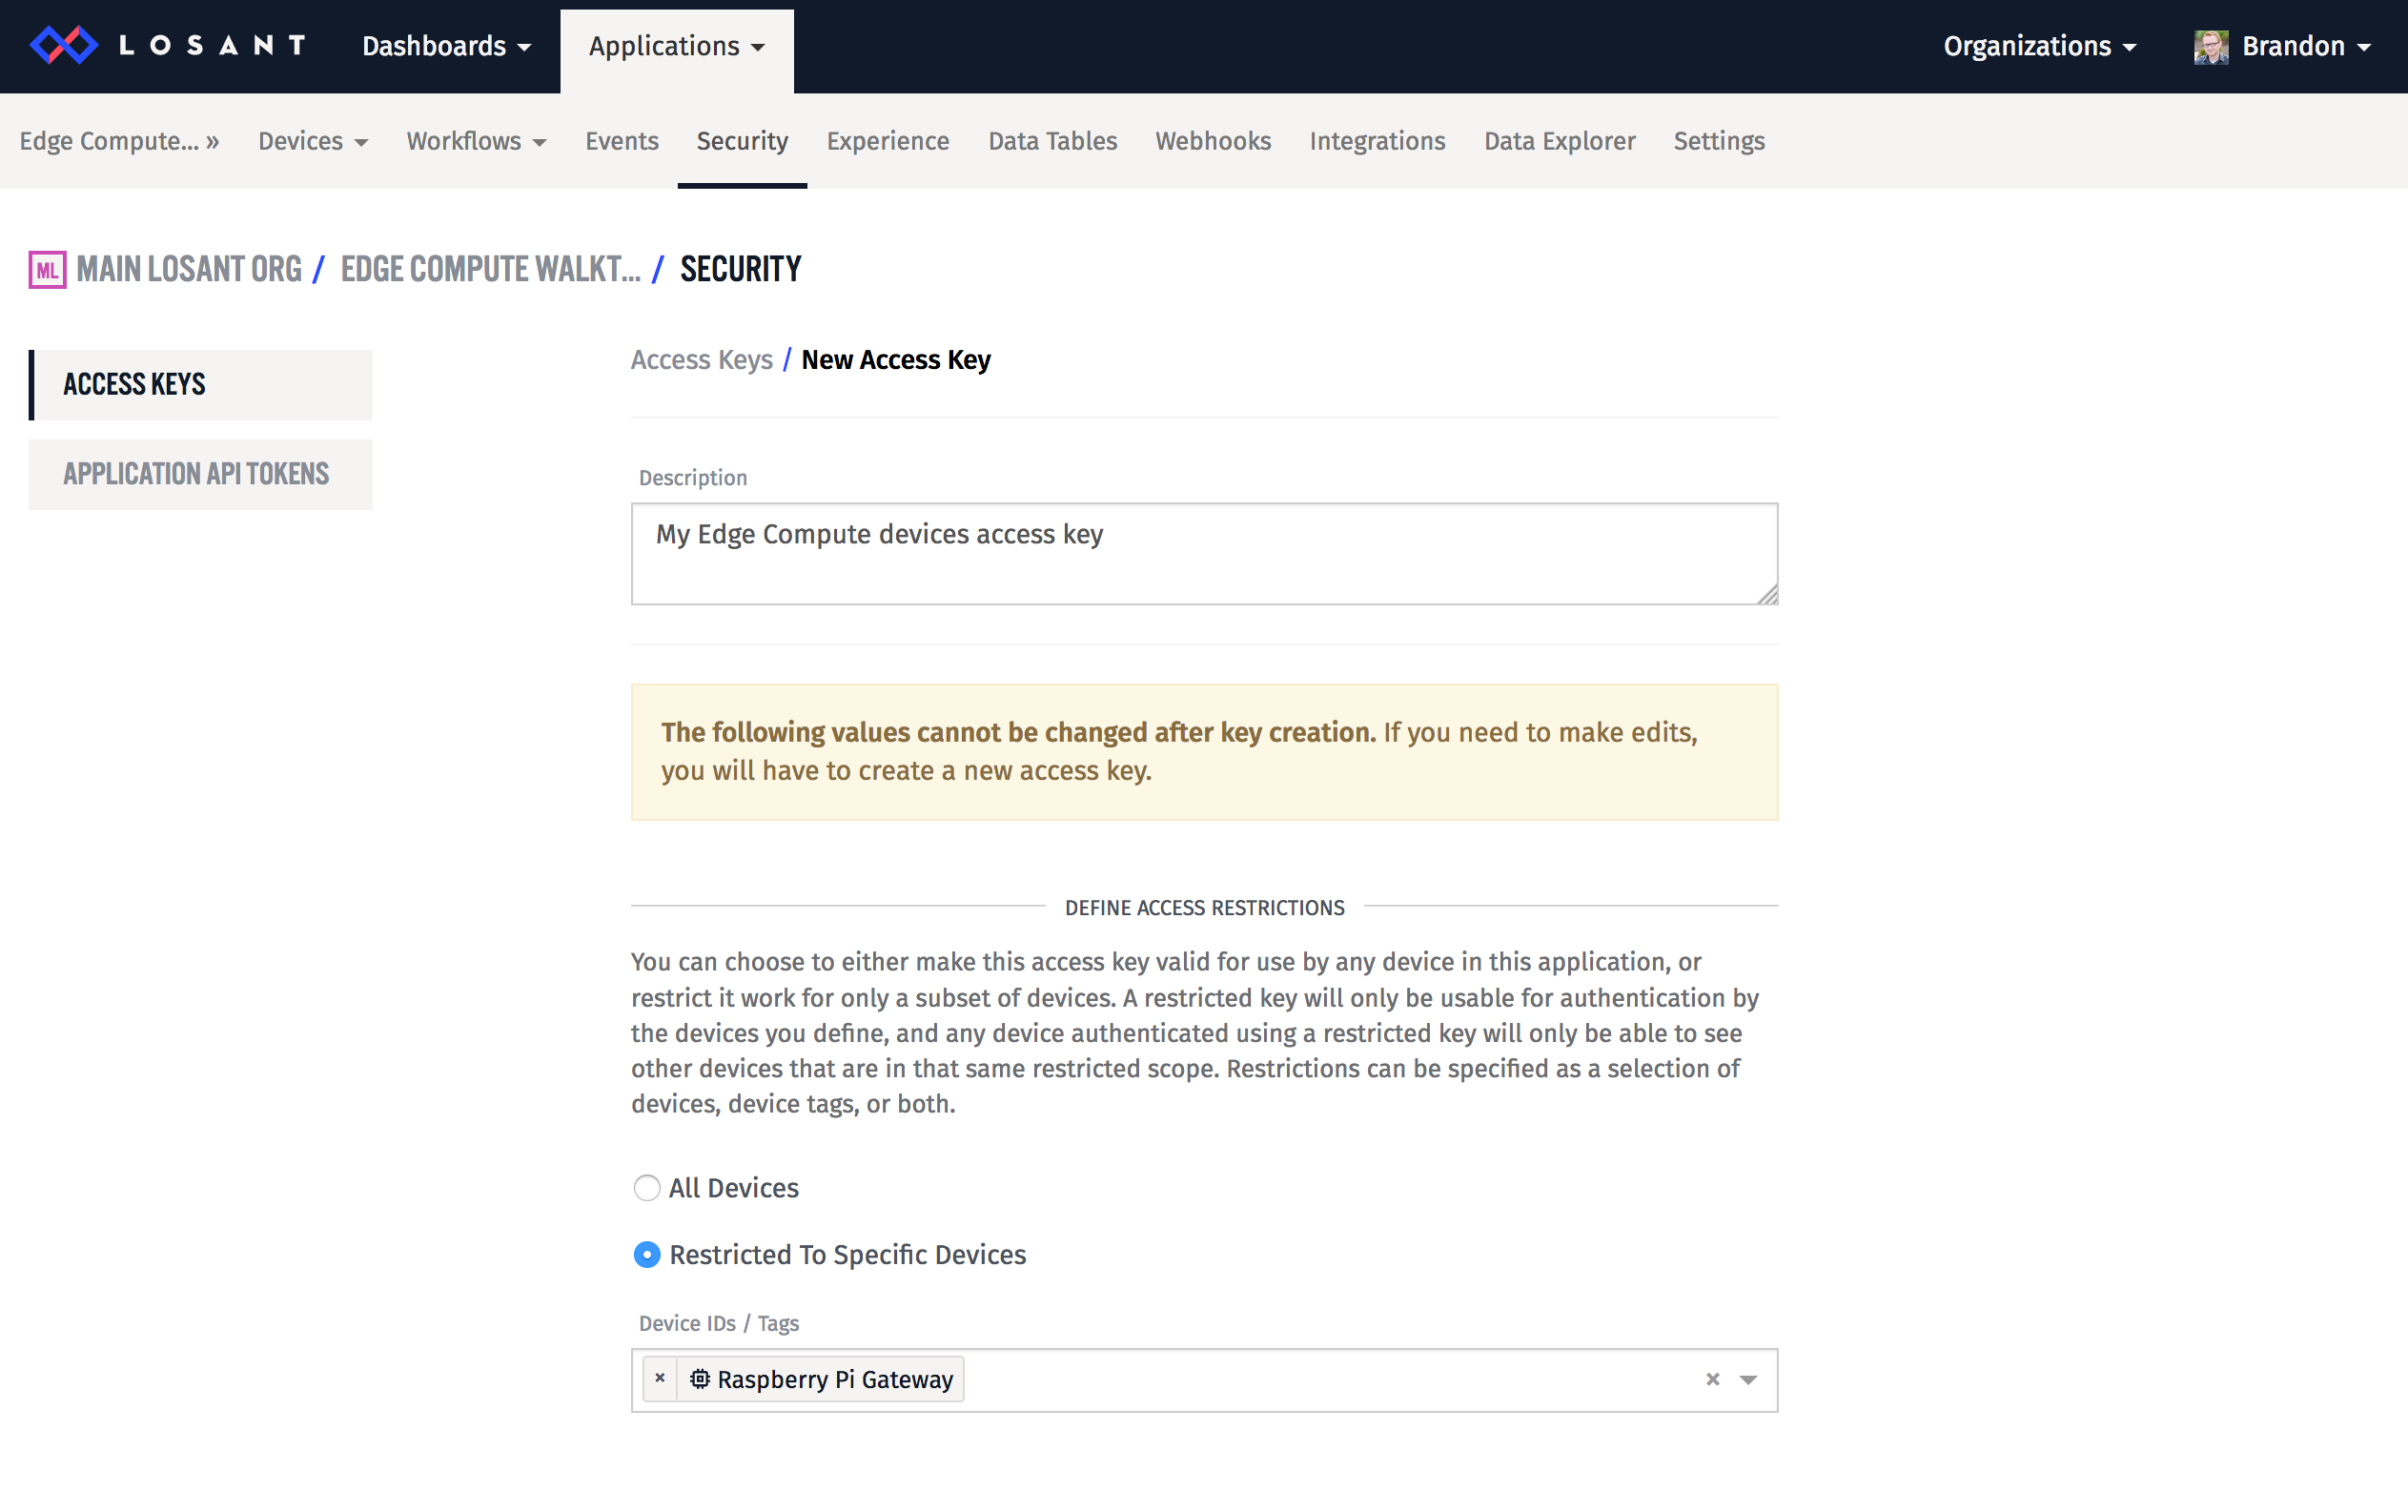
For security reasons, we generally recommend you create a separate access key and secret for each device. When creating an access key, you can choose to restrict this key to an individual device in the Define Access Restrictions section.
Once you hit Create Access Key, you’ll be presented a popup with your new key and secret:
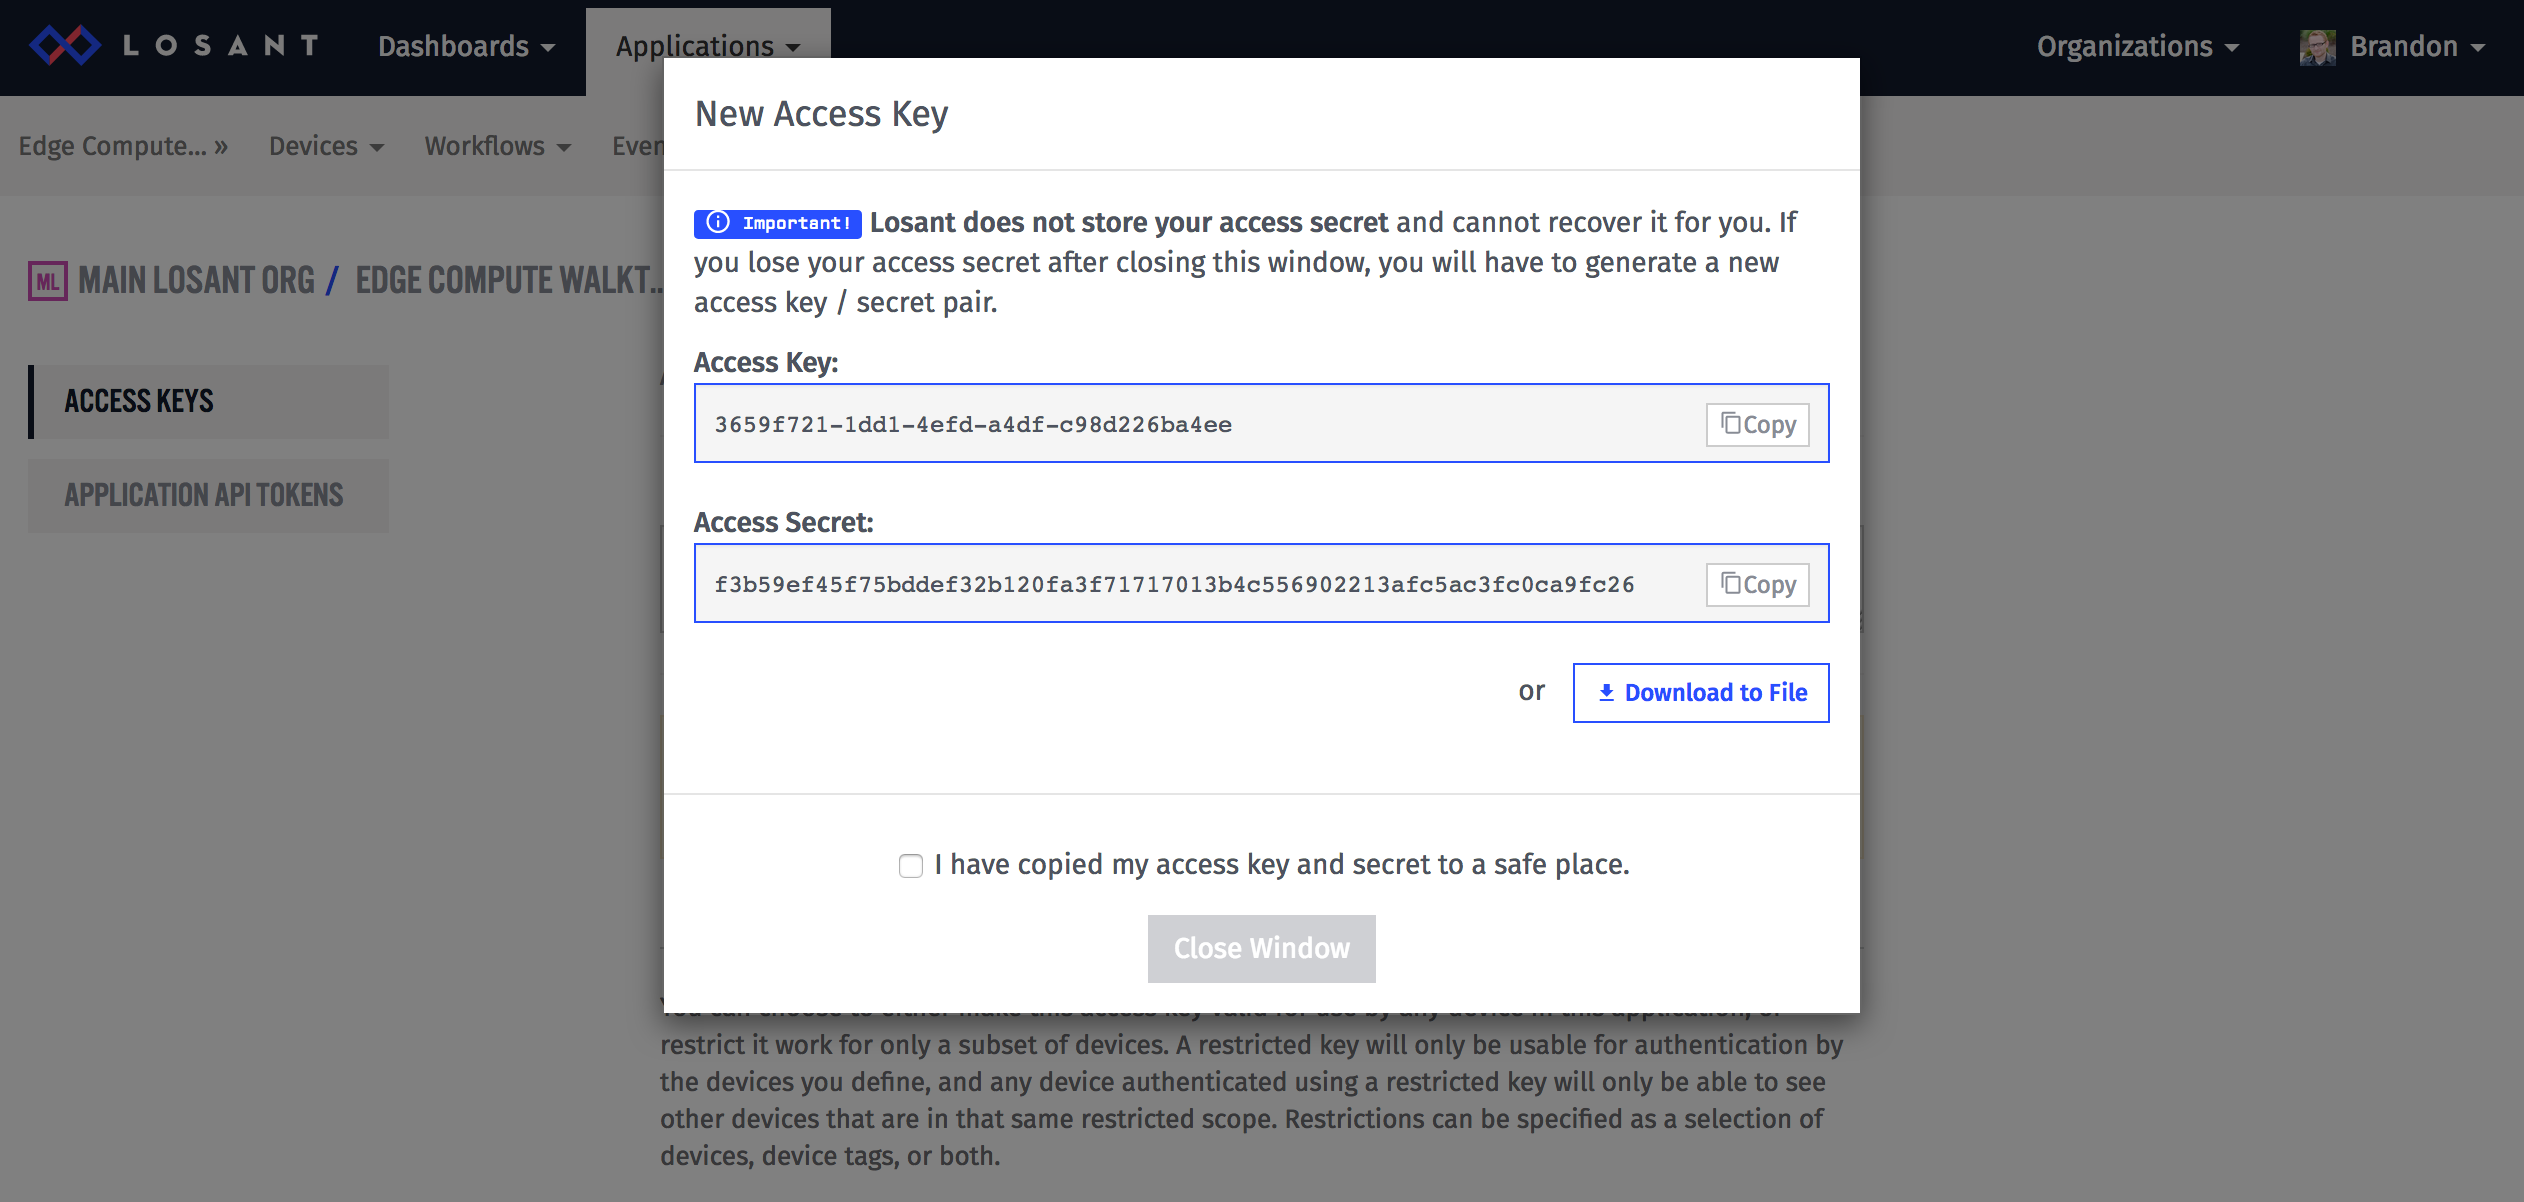
For security reasons, Losant does not store the secret, so it’s important that you keep it in a safe place. If it is ever lost, there is no way to recover it. For now, copy/paste it somewhere convenient since you’ll be using it in the next step.
Configure Resin.io Device Variables
The Losant Gateway Edge Agent can be configured using environment variables. Fortunately, resin.io makes configuring environment variables extremely easy via the Device Variables functionality. In order to get your device authenticated against Losant, you need to add variables for the device ID, access key, and access secret you created above:
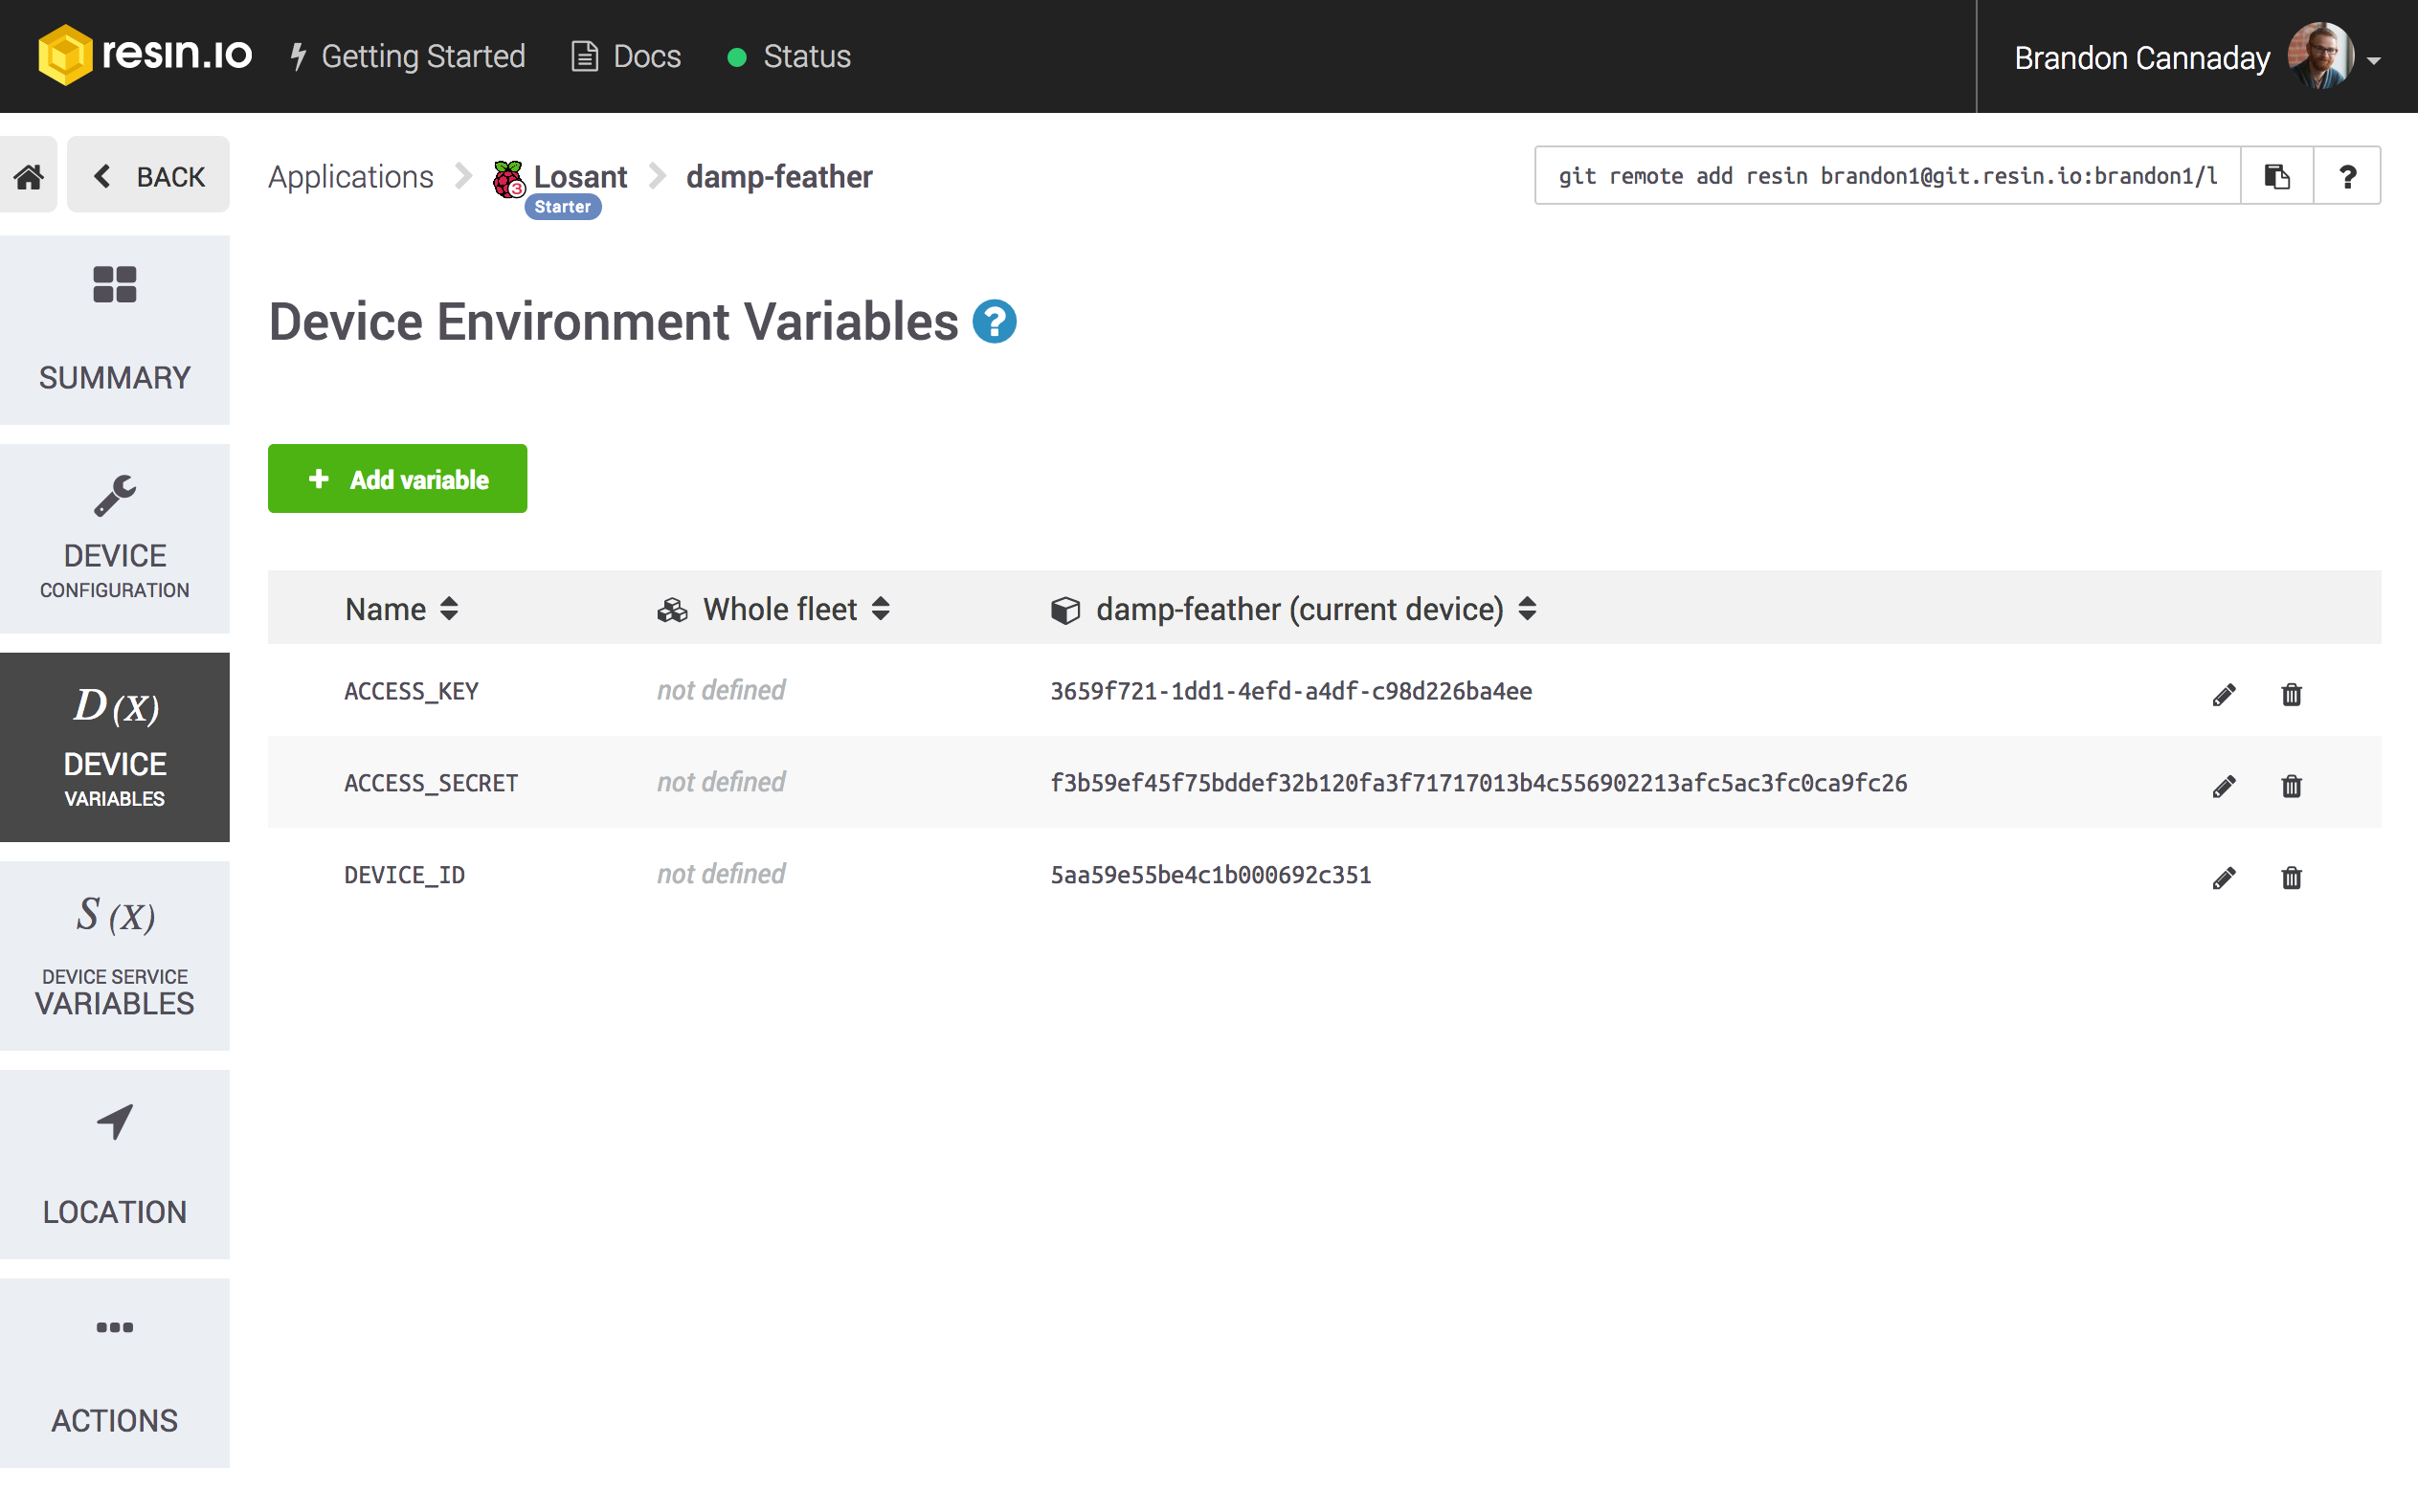
Under the Device Variables tab, add variables for DEVICE_ID, ACCESS_KEY, and ACCESS_SECRET. Set the value of each variable to the corresponding value you obtained earlier. At this point, resin.io will automatically restart the Losant Gateway Edge Agent and your device should now be successfully connected:
Build an Edge Workflow
Now that resin.io has successfully deployed Losant’s Gateway Edge Agent, you can use Losant Workflows to deploy logic to this device. Losant supports both Cloud and Edge workflows. Cloud workflows run in Losant’s cloud and are useful for alerts, notifications, and the business logic behind your application. Edge workflows run on your gateways and are useful for collecting data and doing local processing before reporting information to Losant’s cloud.
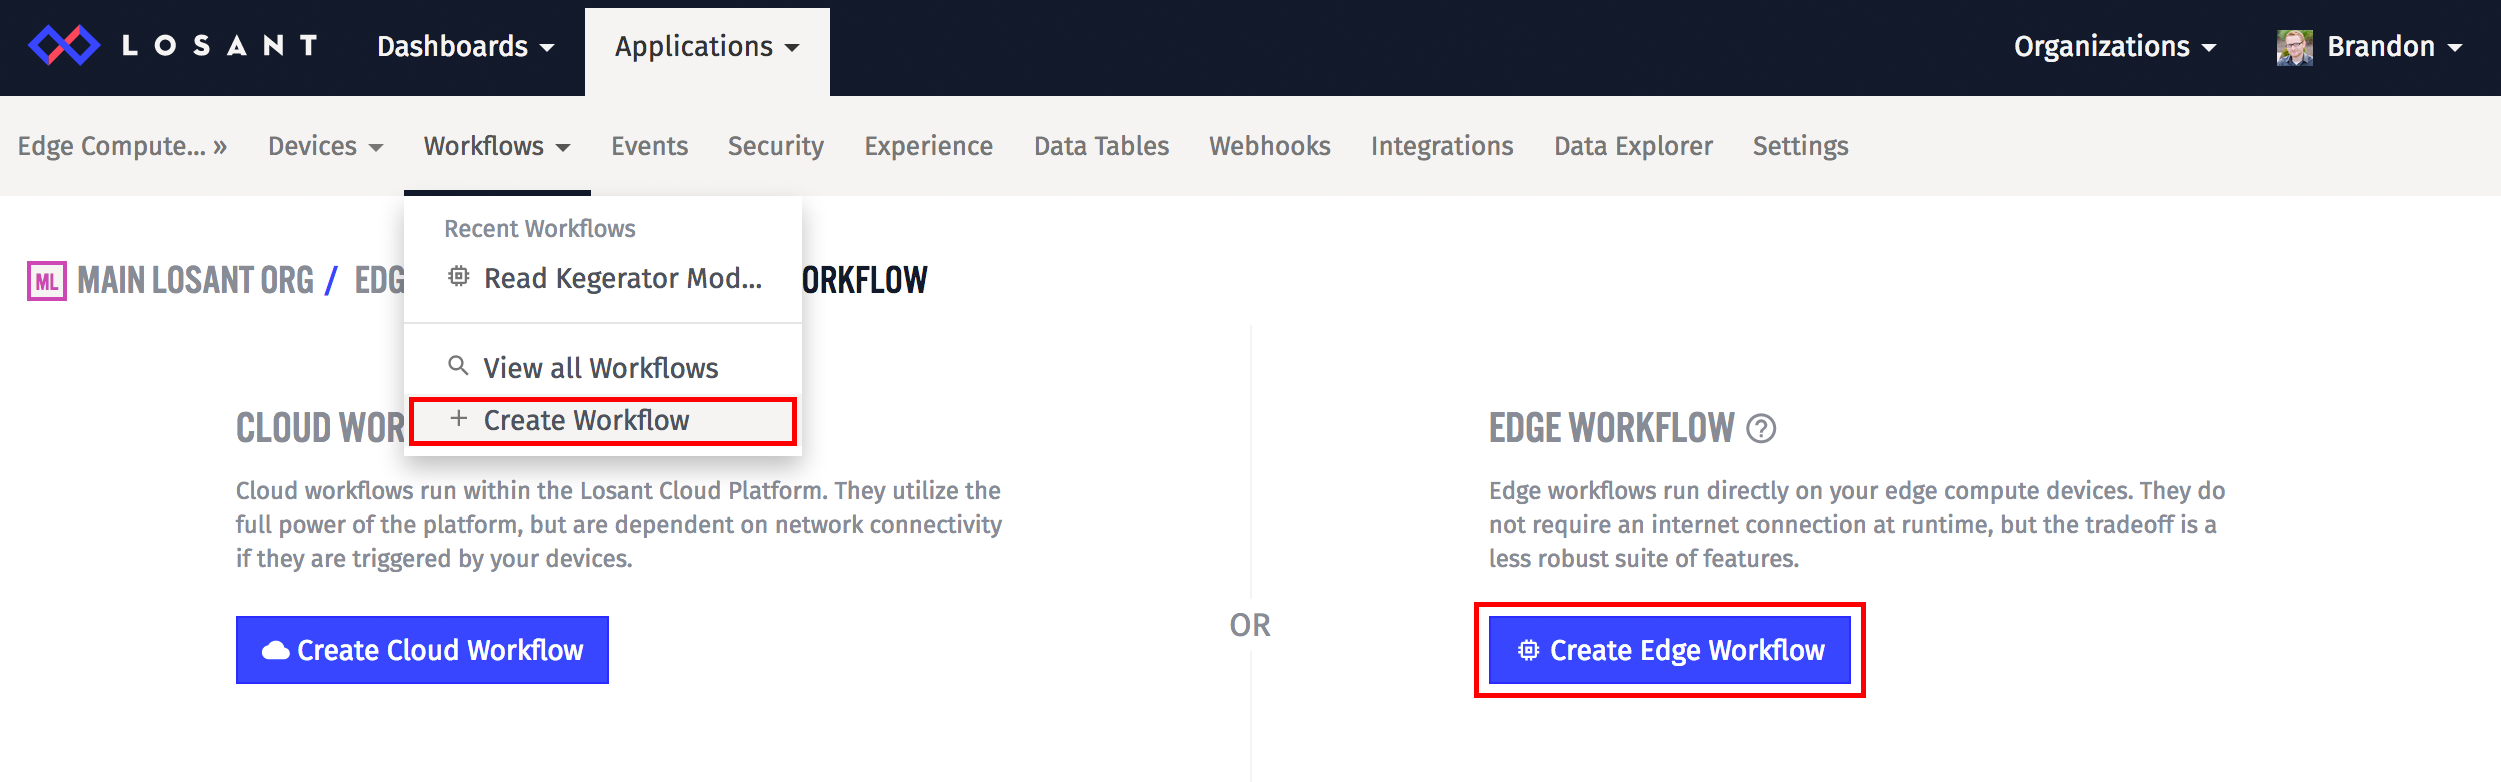
Start by creating a new Edge Workflow:
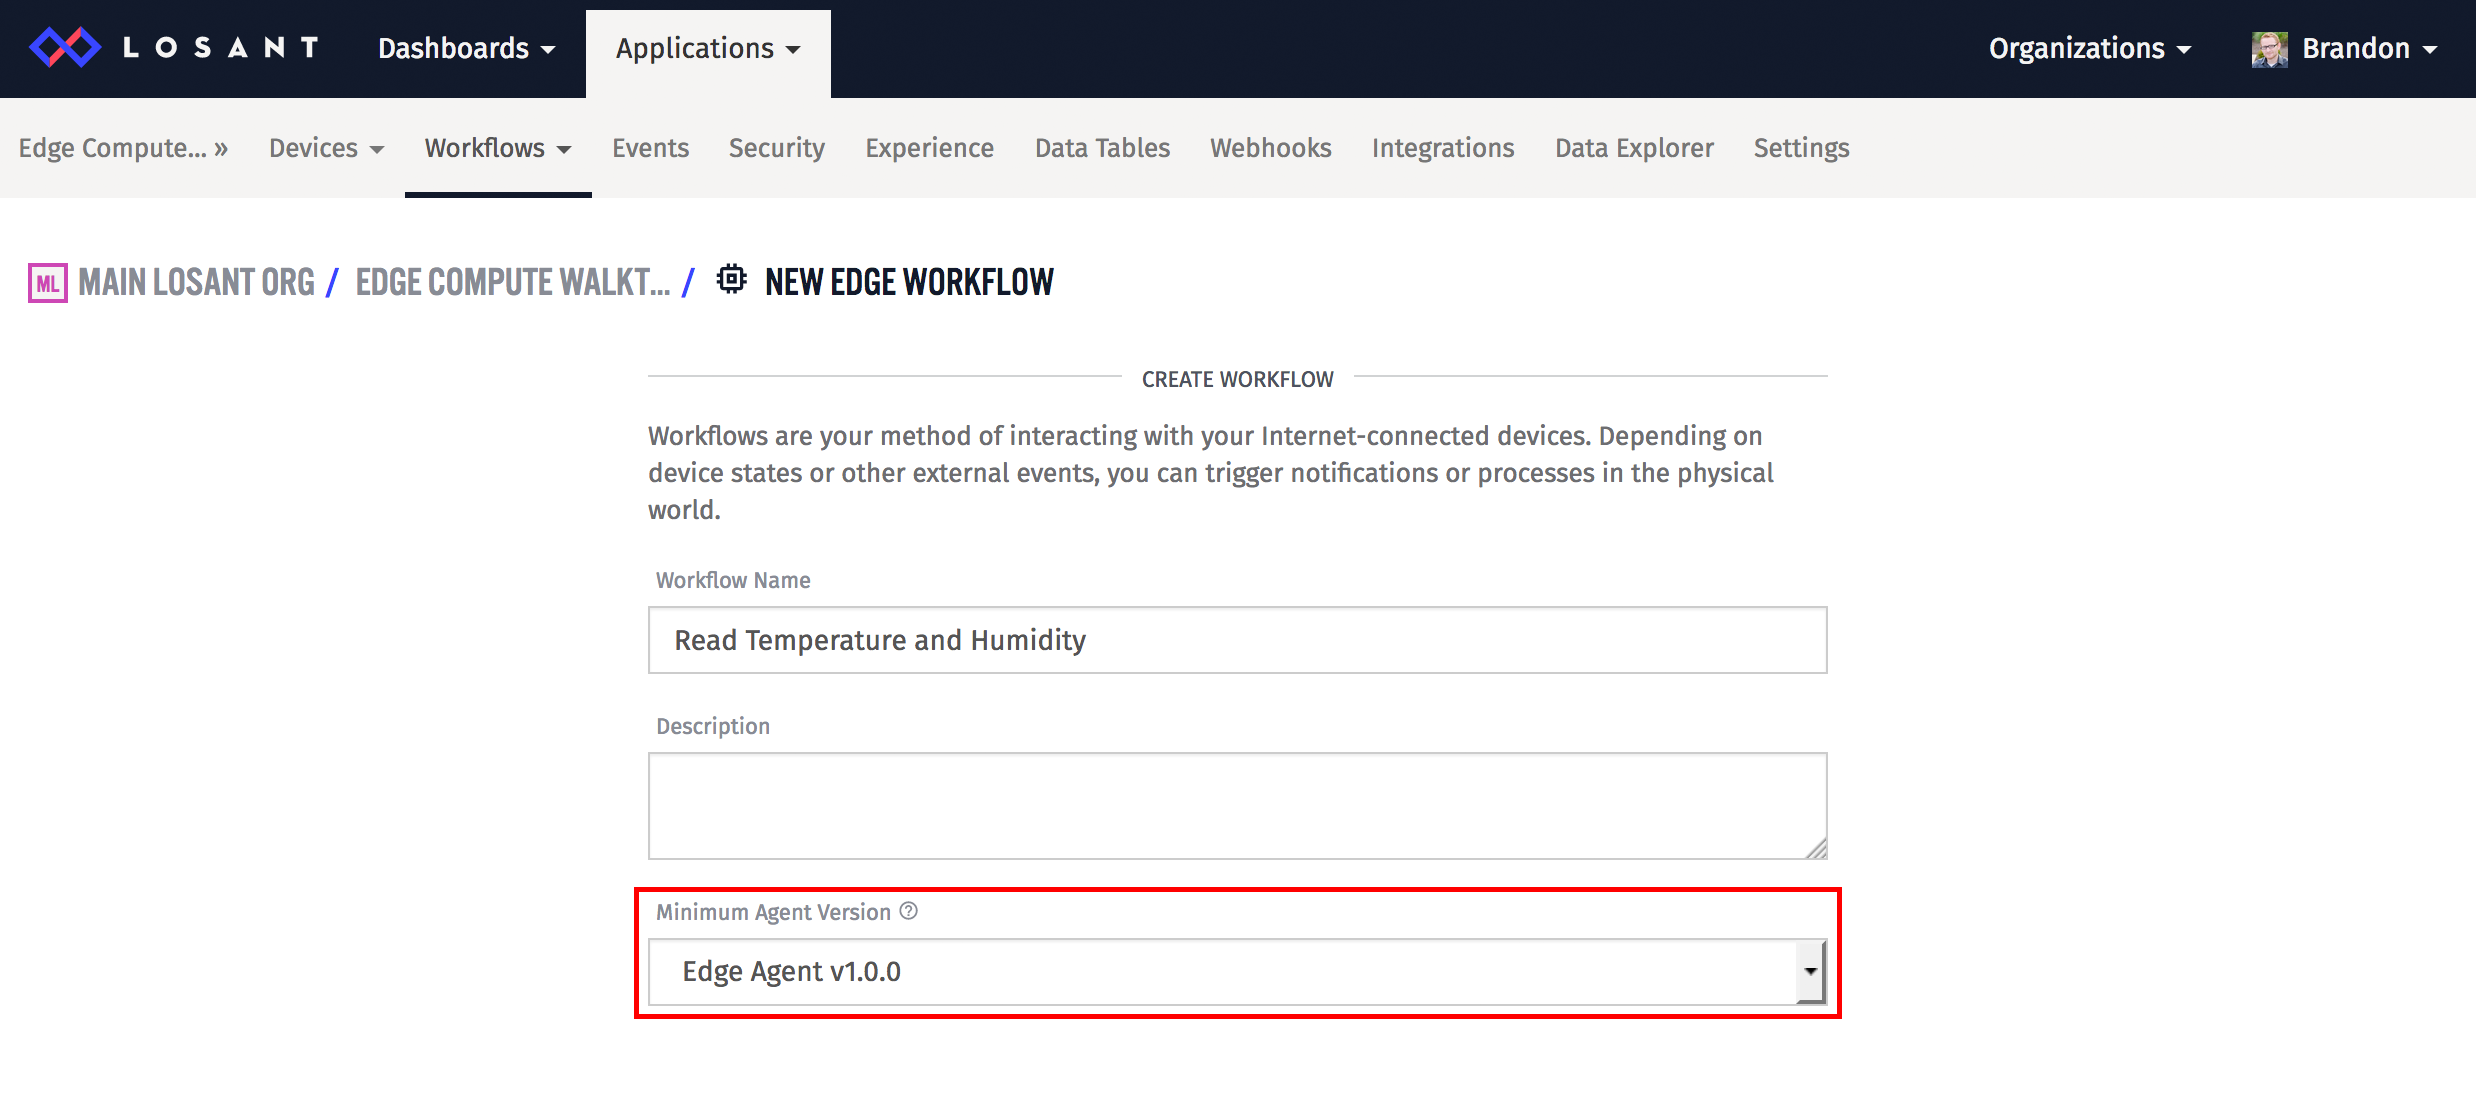
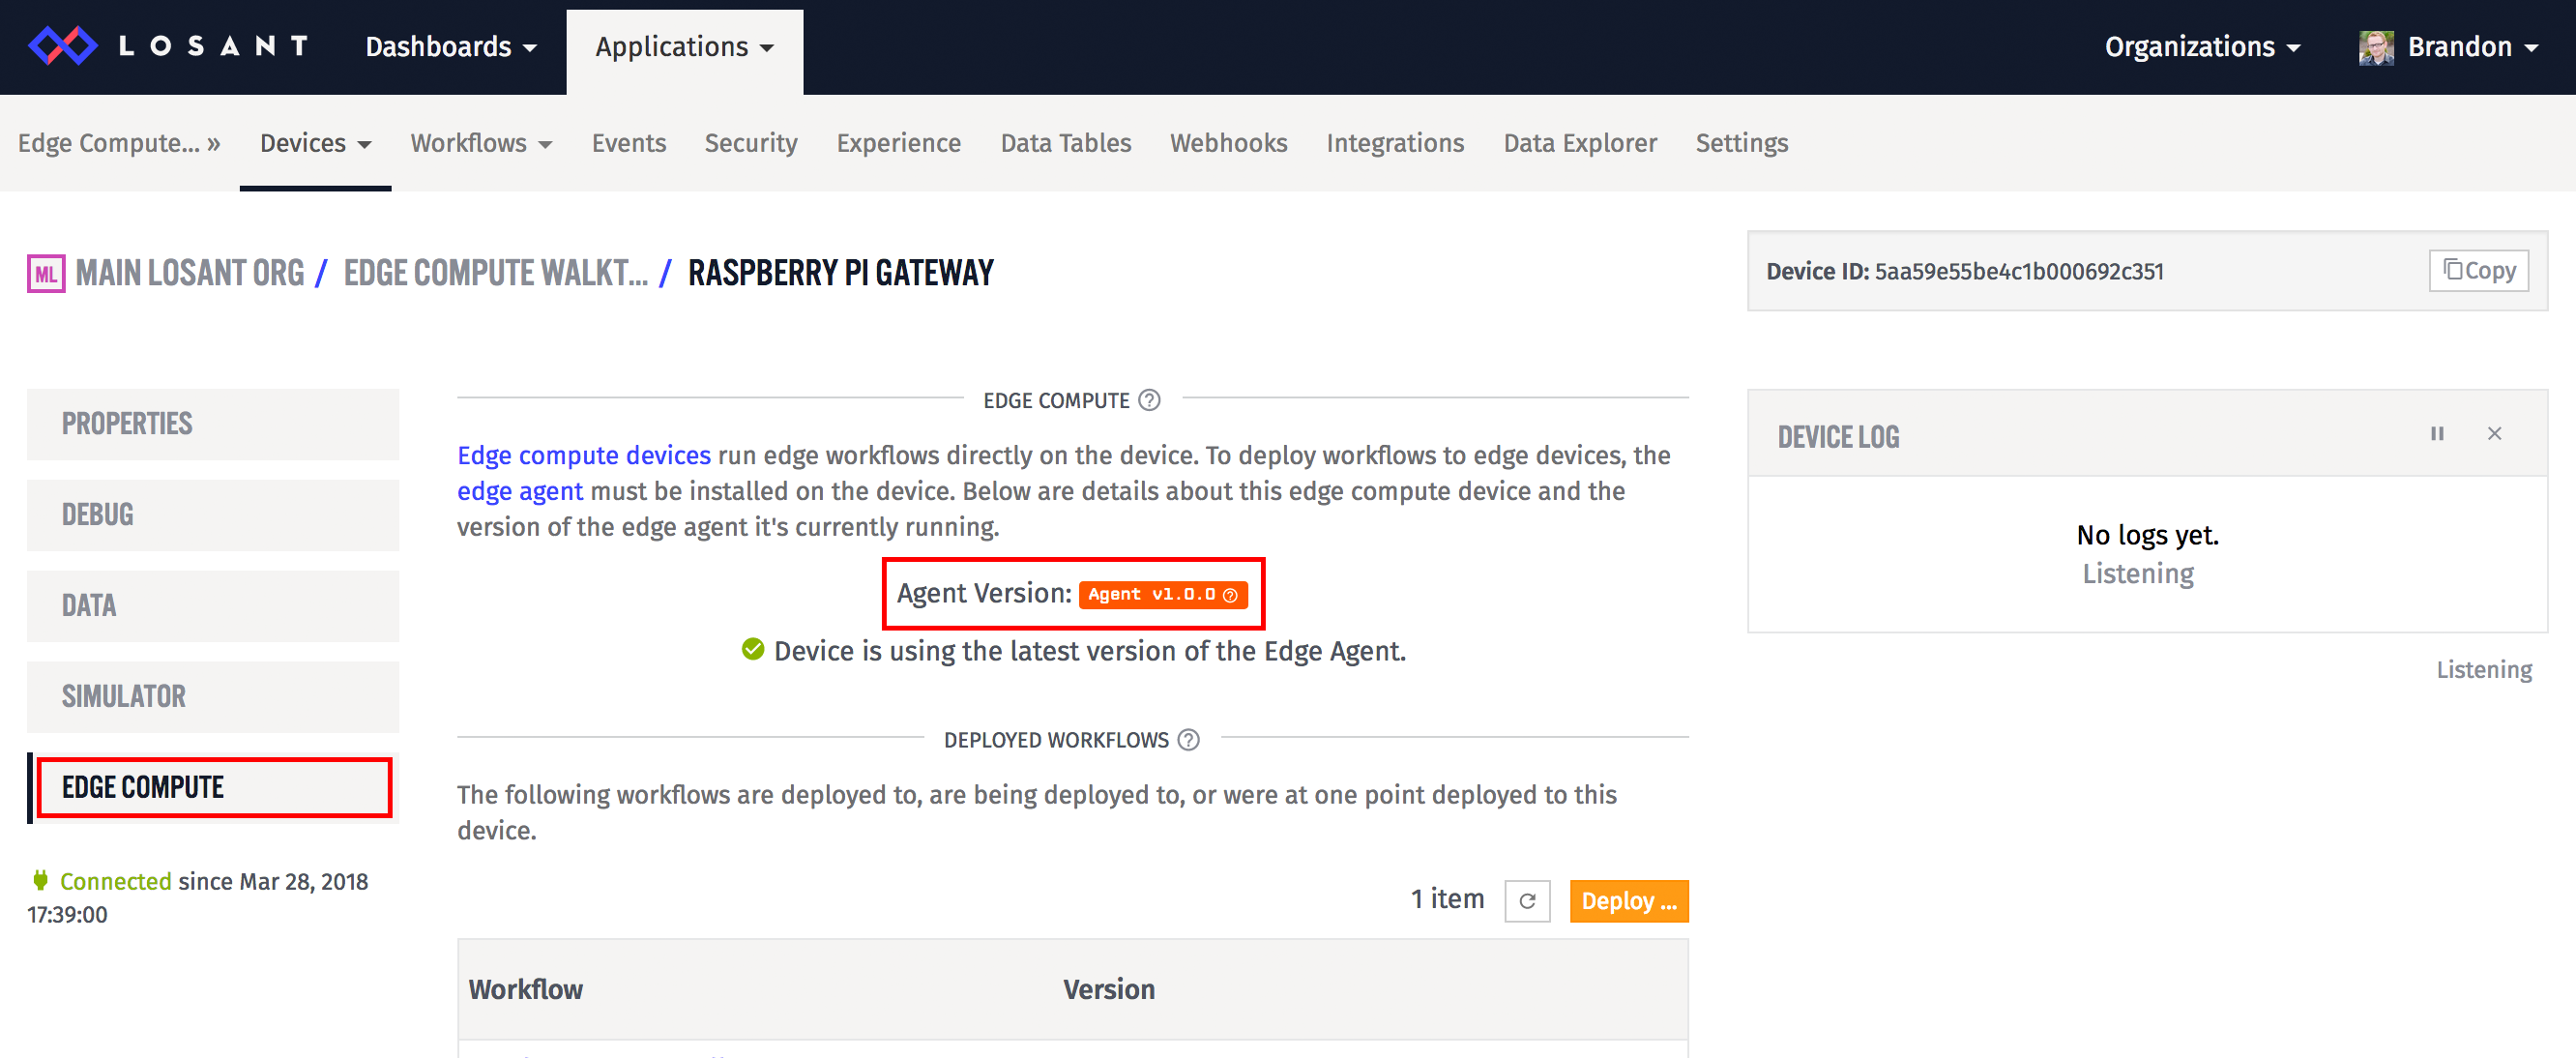
When creating an Edge Workflow, it’s important to set the Edge Agent version correctly. Losant is continually pushing updates to the agent and it’s important for the editor to know what functionality should be made available. This field will default to the latest available version, but if you’re not sure, you can see your device’s agent version by looking at the Edge Compute tab on your device’s page:
Losant Gateway Edge Agents are always backwards compatible, so any device with the selected version or greater will be supported.
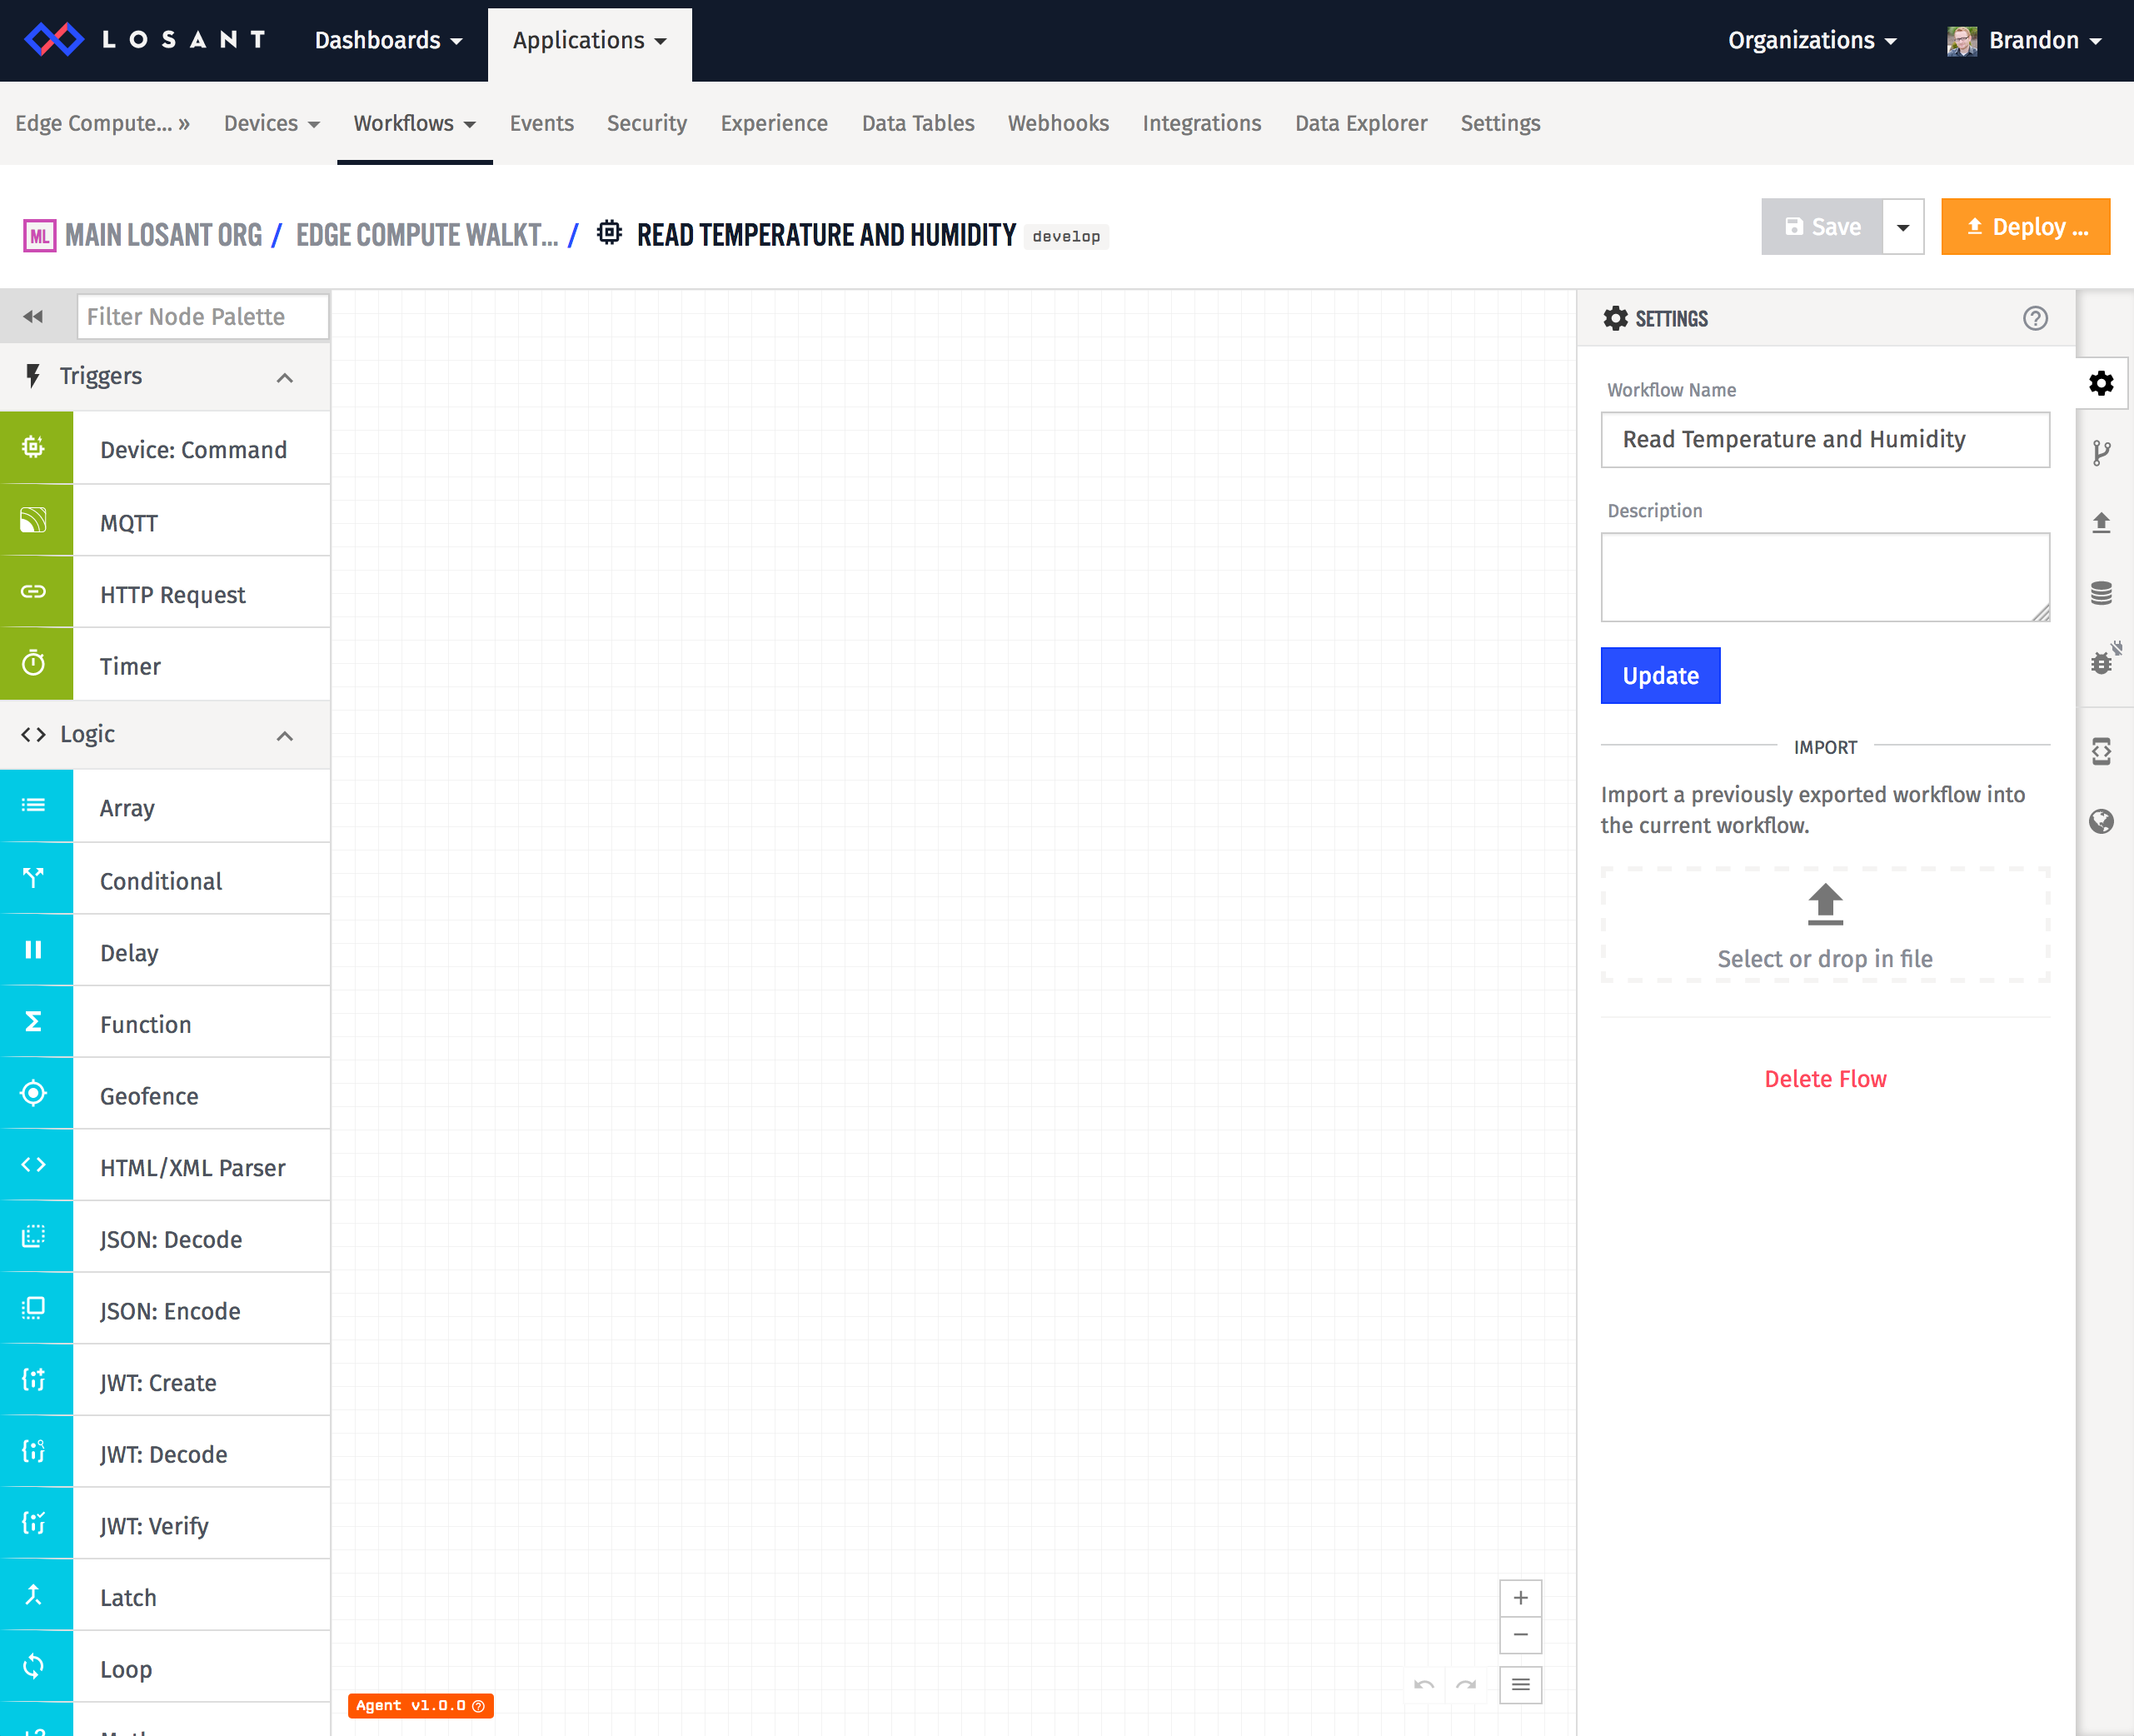
Once you create the workflow, you’ll be presented with a blank canvas:
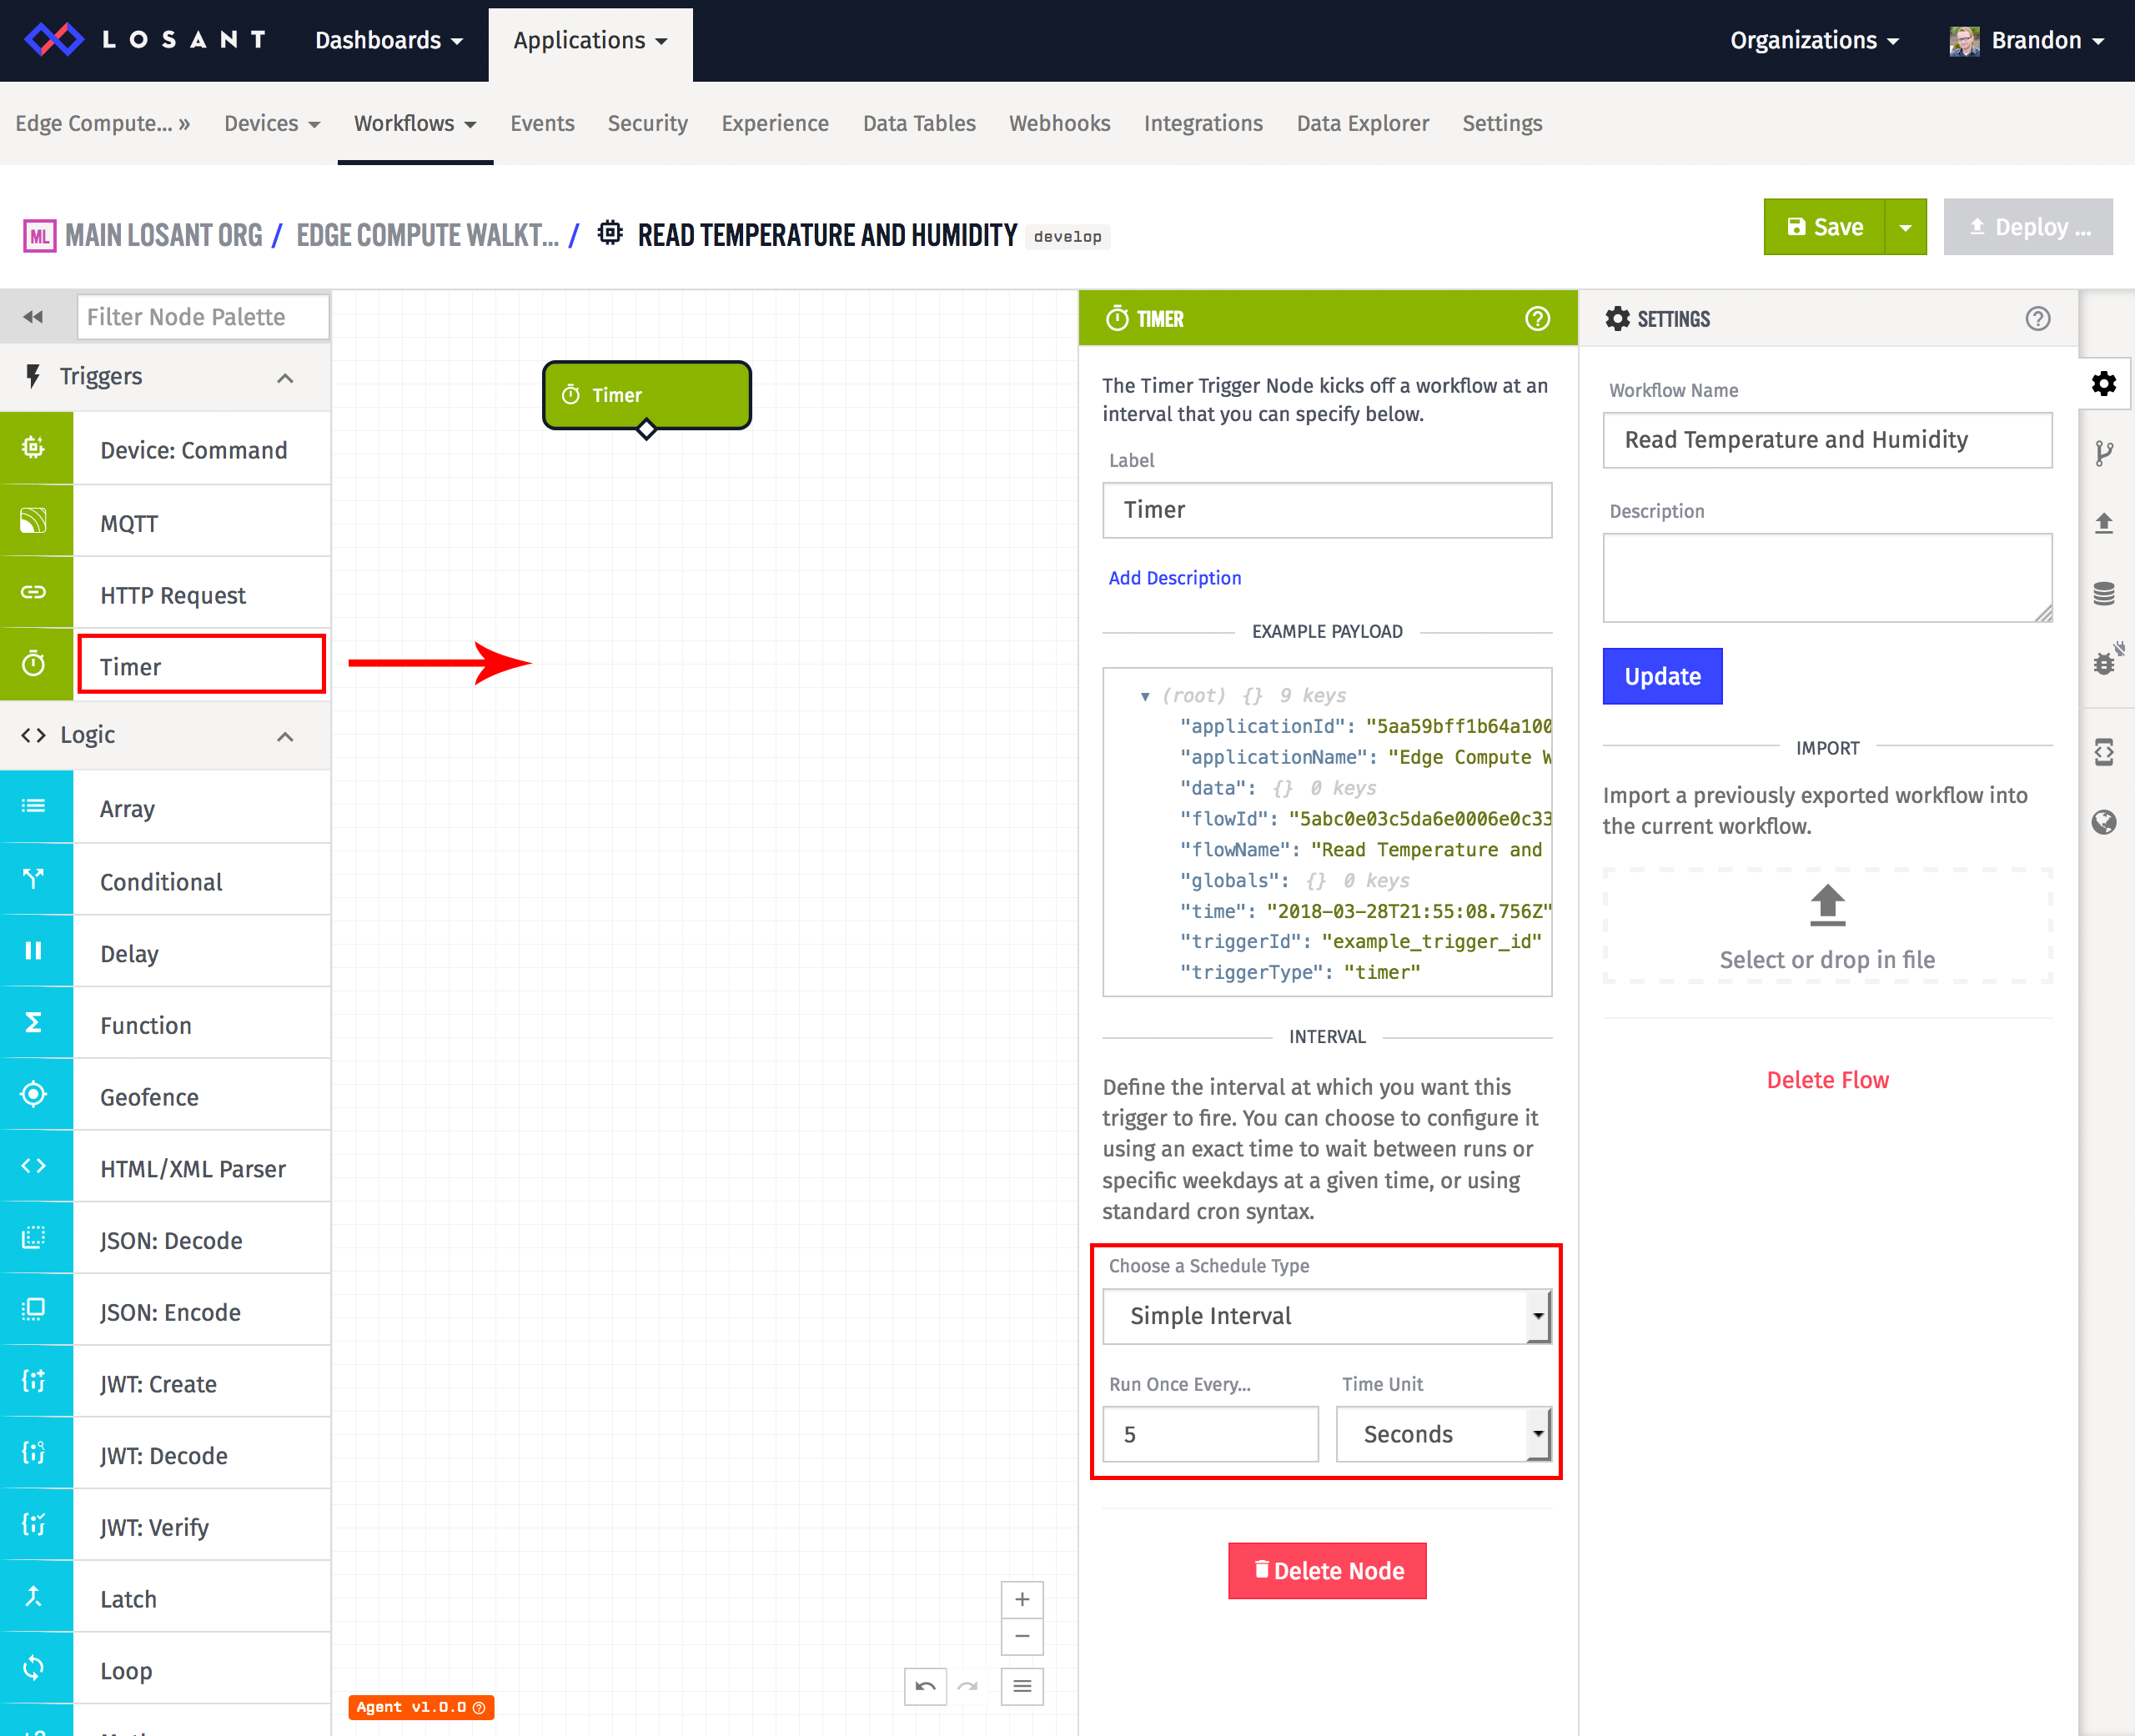
For this example, generate some random temperature and humidity data. First, drag a Timer Trigger onto the canvas and configure it to run once every five seconds:
Next, drag two Random Number Nodes to the canvas and connect them to the Timer Trigger:
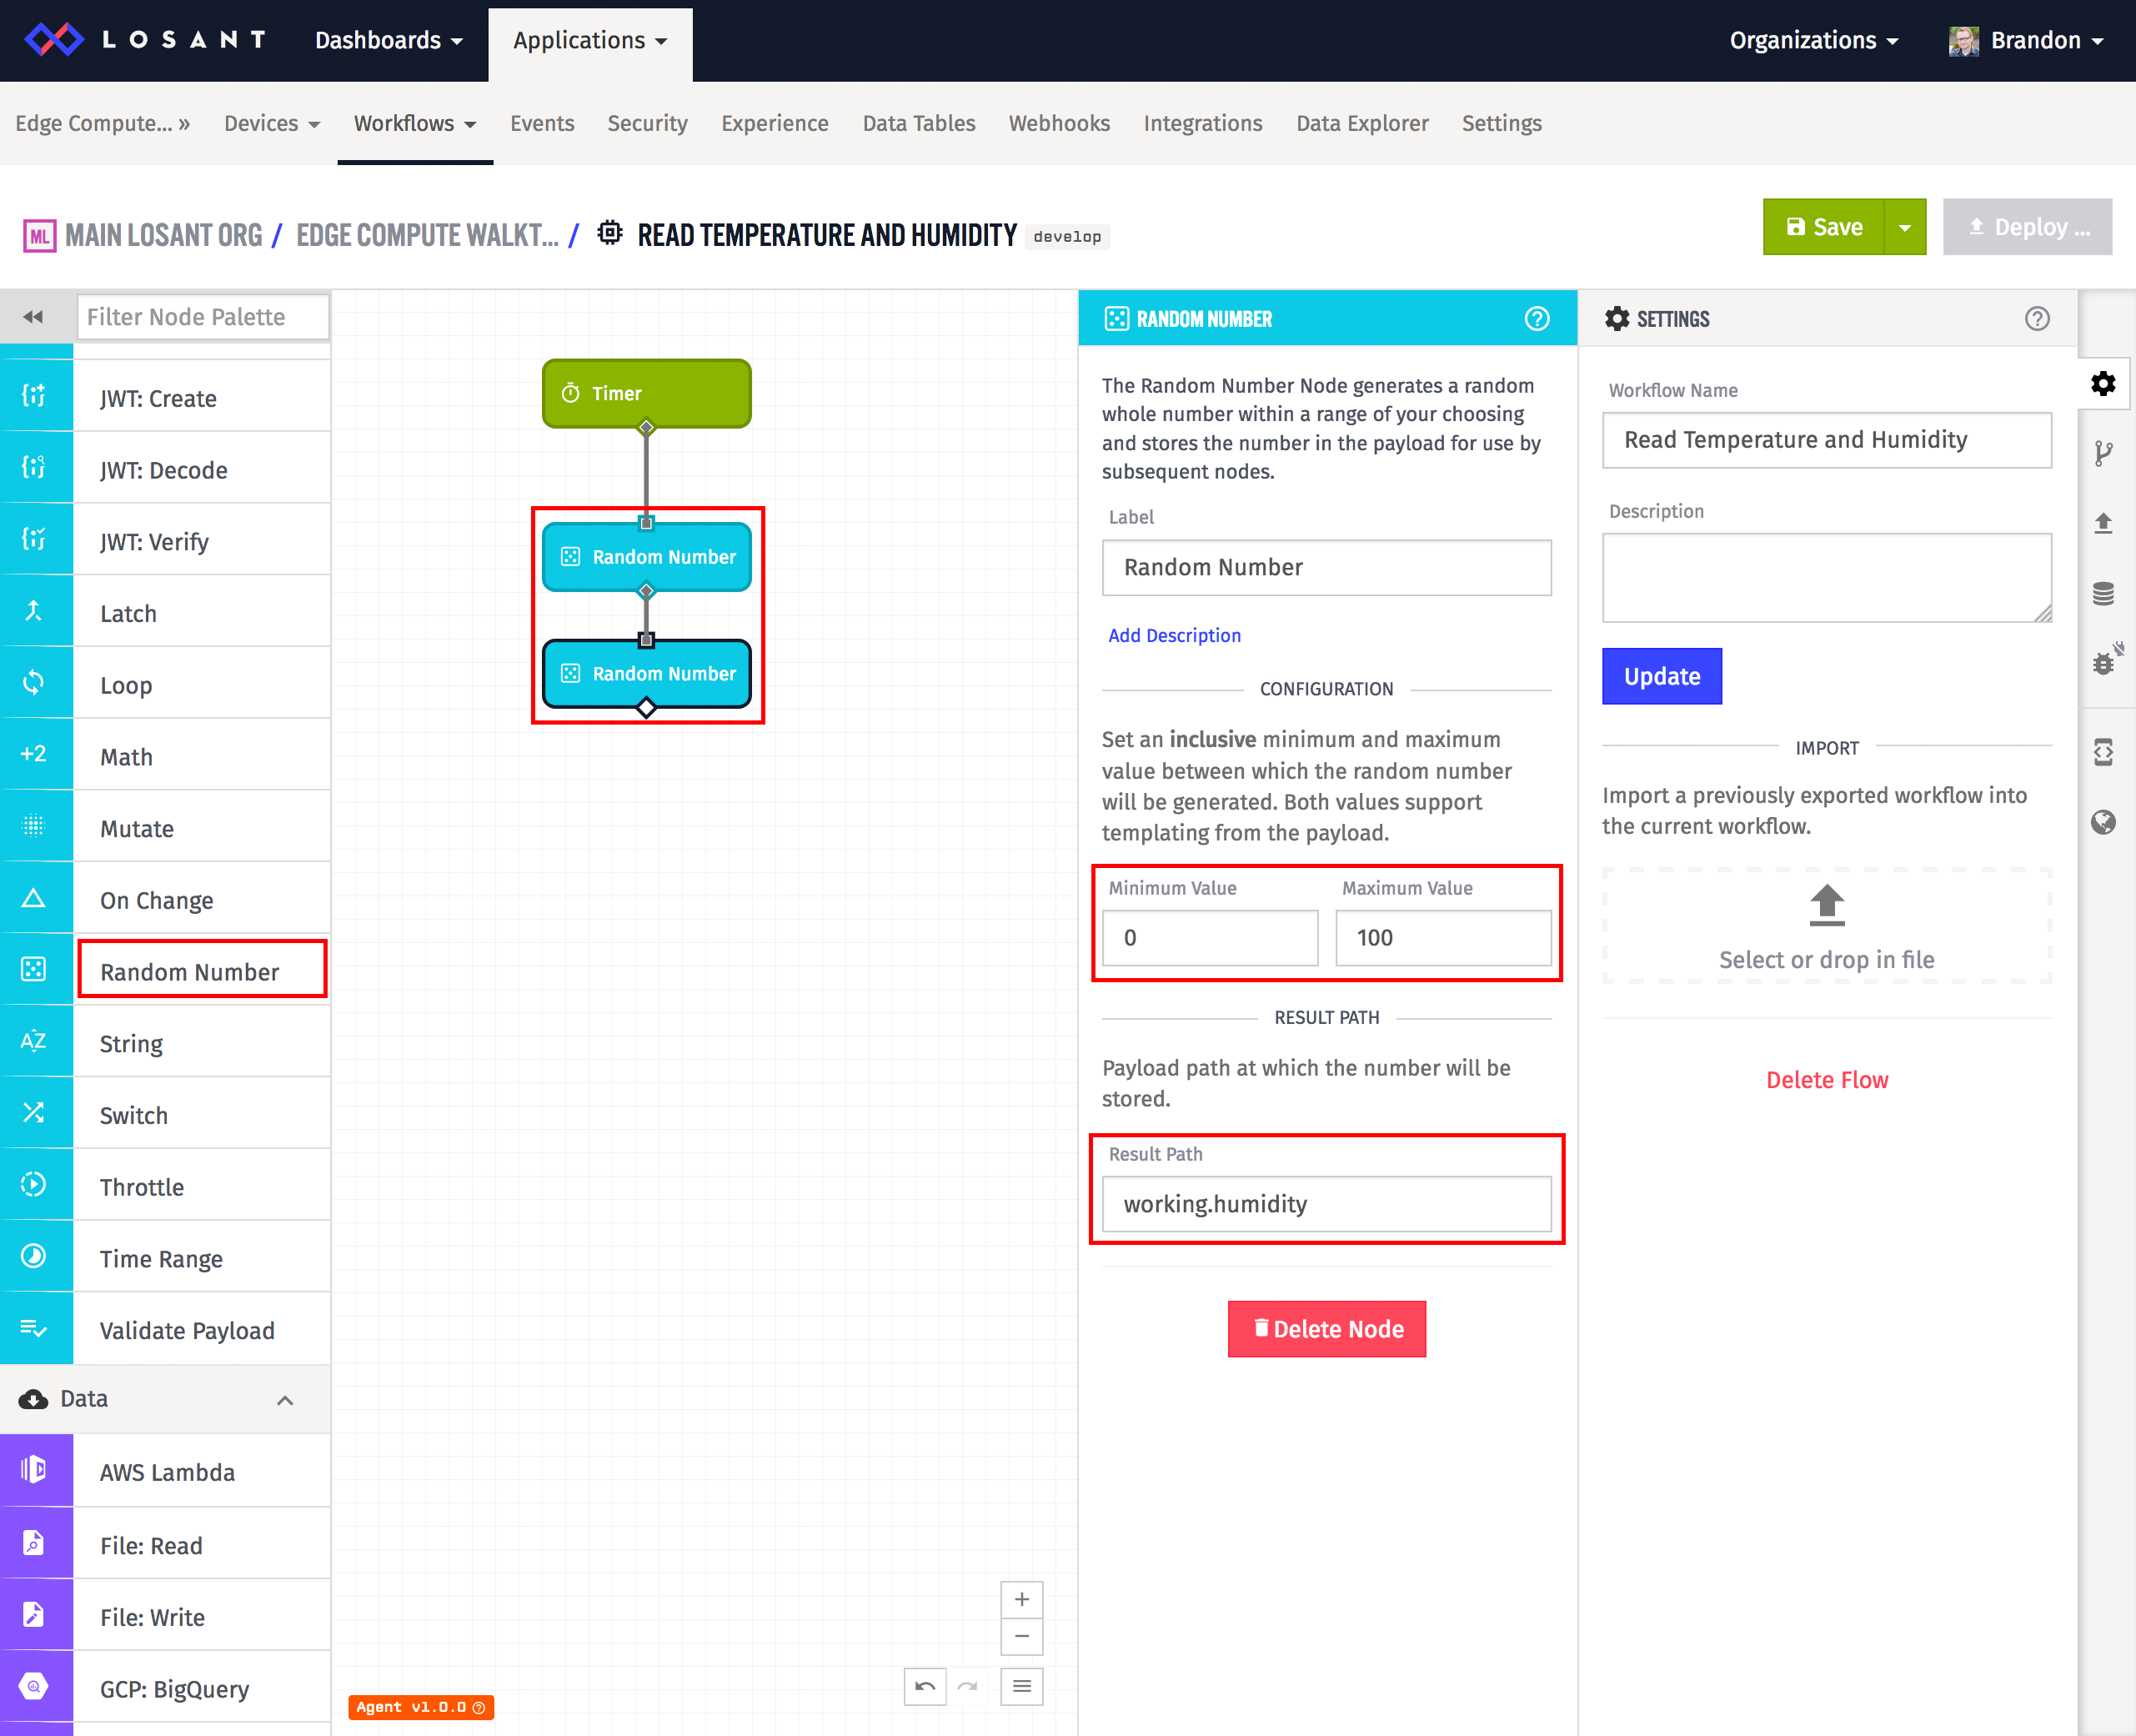
All workflows in Losant begin with a trigger, in this example a Timer Trigger, which kicks things off with a starting “payload”. As the workflow executes, nodes can add new values, change values, or make decisions based on values on this payload. For the most part, think of the payload as a JavaScript object.
These two Random Number nodes are generating a random number between 0 and 100 and placing the result back on the payload at working.temperature and working.humidity. After these nodes execute, the payload now looks something like this:
{
  "data": {
    // original data from the trigger
  },
  "working": {
    "temperature": 30,
    "humidity": 43
  }
}
Next, add a Device State Node to report these random numbers to Losant’s cloud. Also, attach a Debug Node at the end so you can debug this workflow while it’s running:
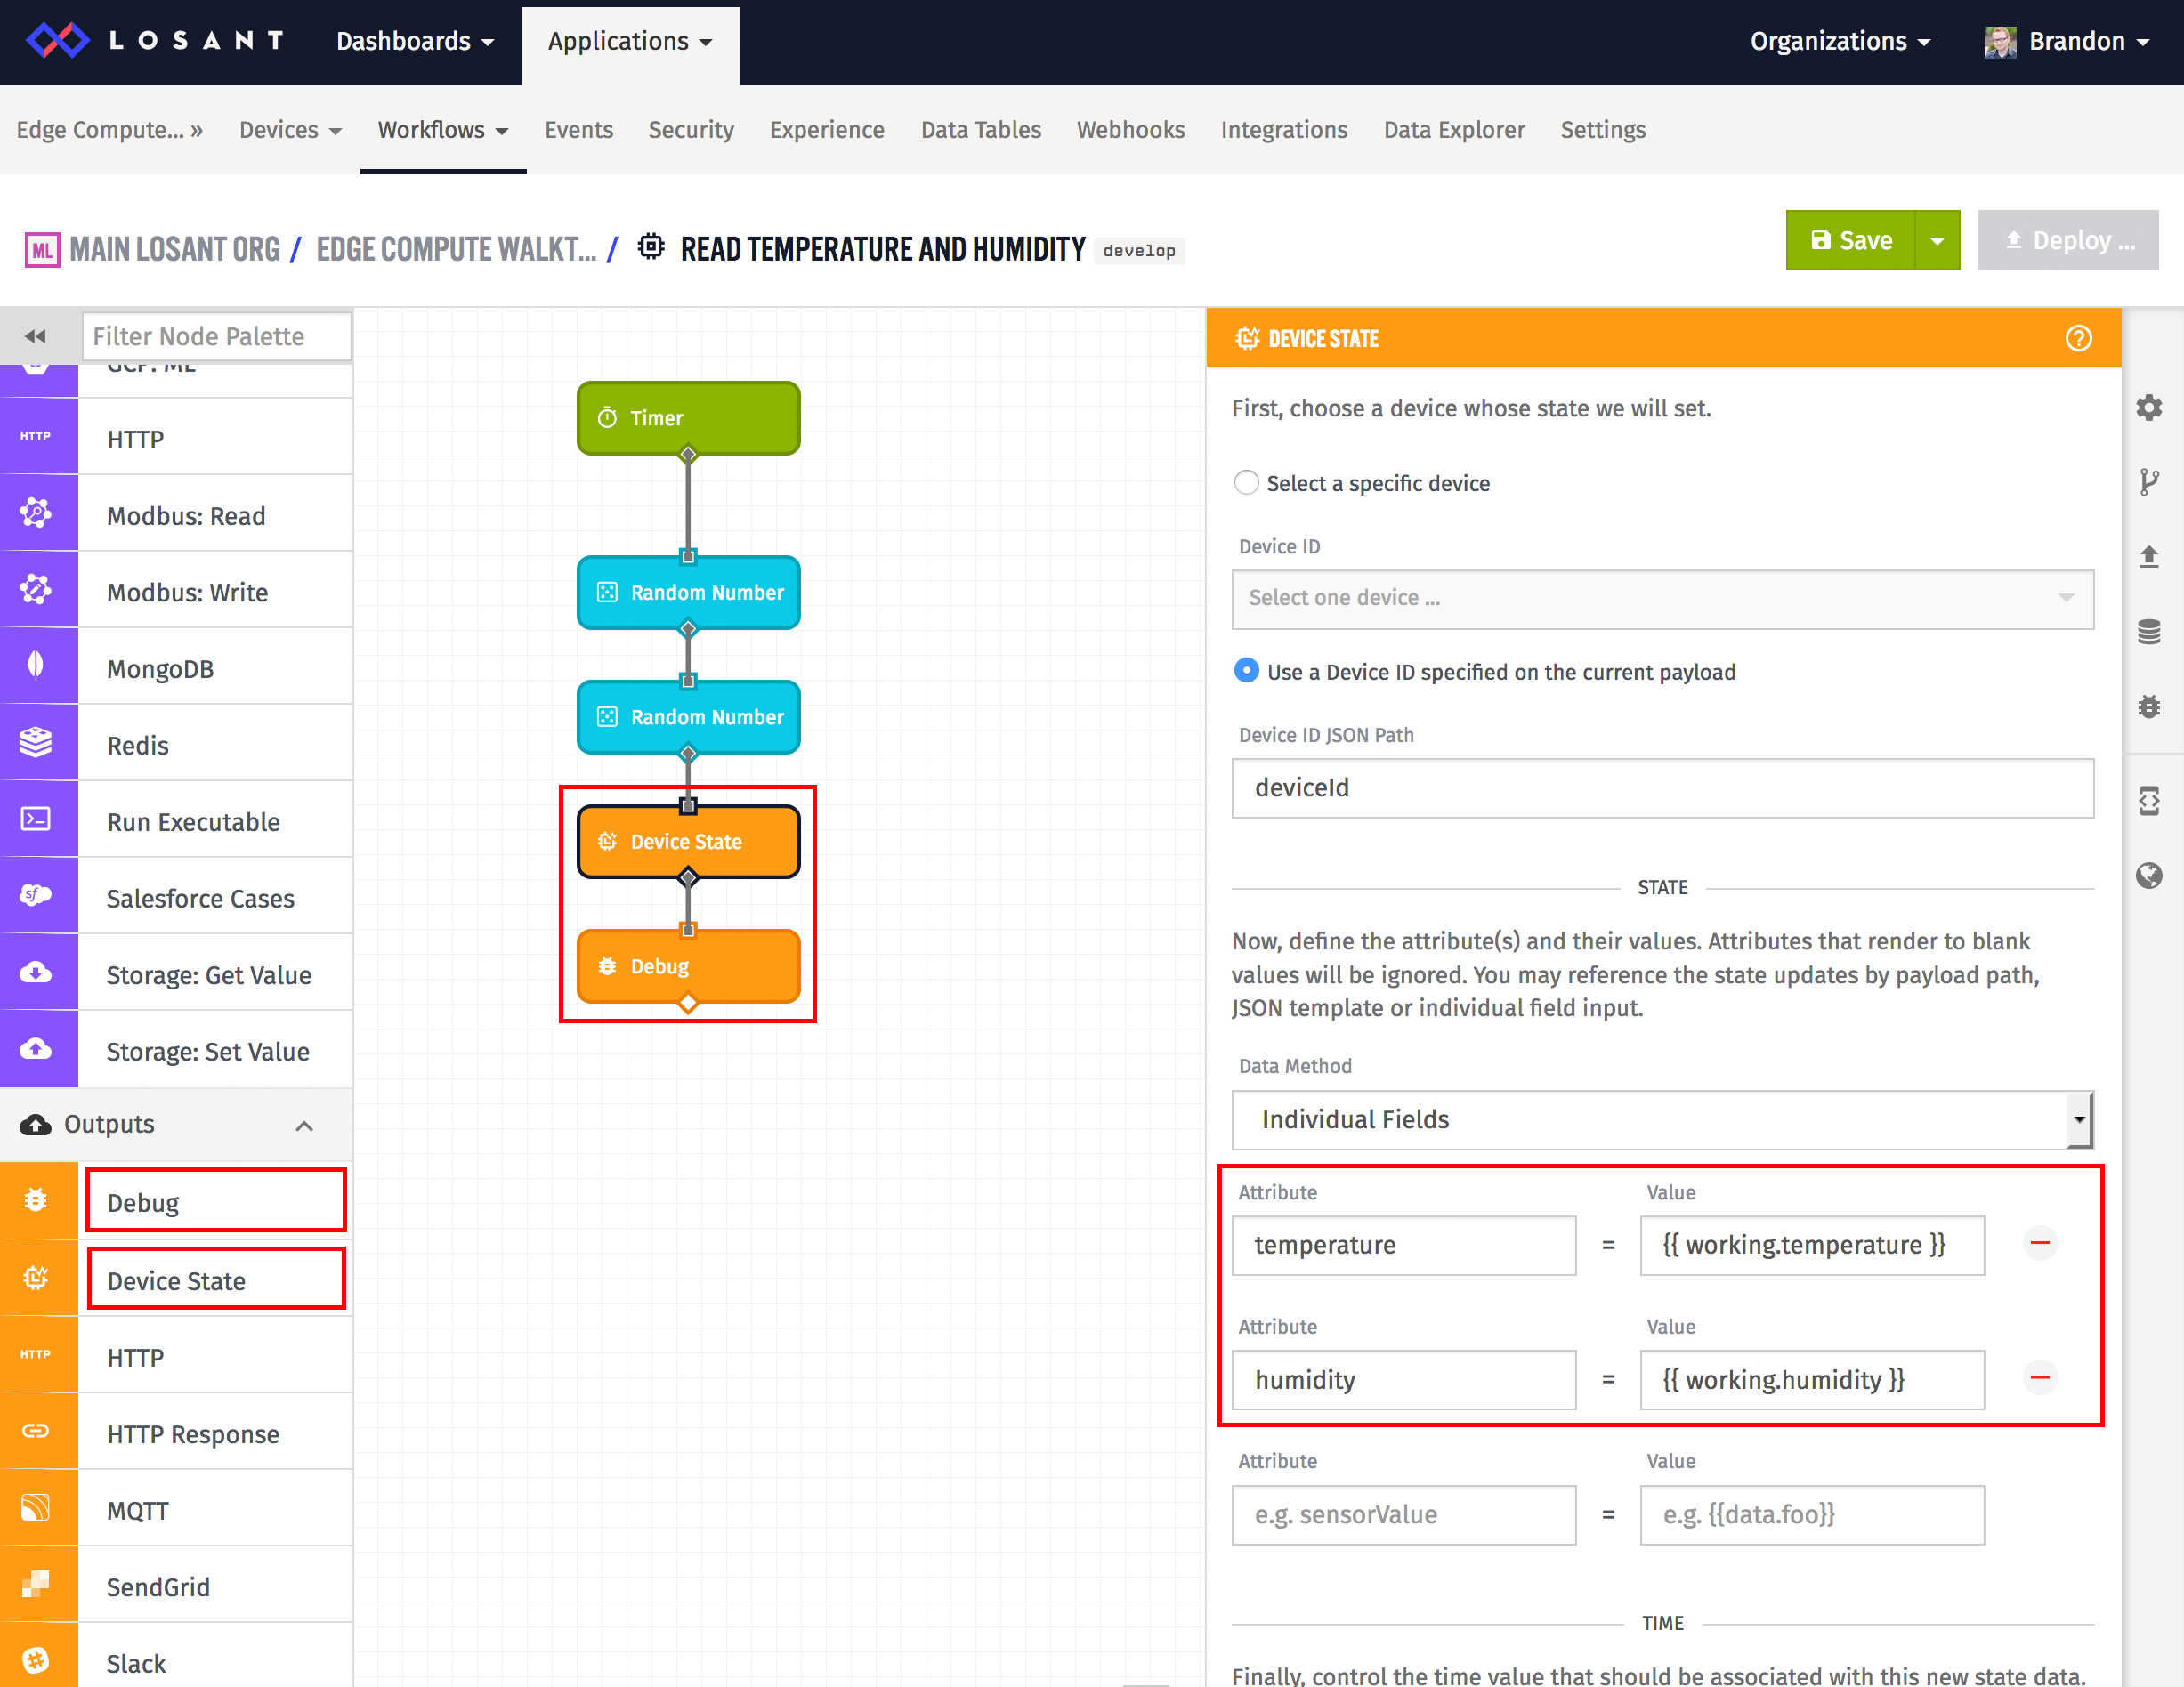
The Device State Node reports data to Losant’s cloud. By default, it’s configured to report state for whatever device is running this workflow. This means you could deploy this workflow to thousands of devices, and each one will report state for themselves.
If you recall from earlier in this guide, your Edge Compute device was configured in Losant with two attributes, temperature and humidity. As you can see from the screenshot above, those are the two attributes you're reporting. You may also recognize the payload paths you used earlier in the Random Number nodes. This time they are surrounded by double-curly braces. This is what Losant calls a template, and it’s a common way values on the payload are referenced and used.
This workflow is now done, it’s time to deploy it to your Edge Compute device.
Deploy Edge Workflow
There are two buttons on the top-right corner of the workflow editor, Save and Deploy. First, click the Save button to save your workflow changes. Next, click the Deploy button to deploy this workflow to your Edge Compute device:
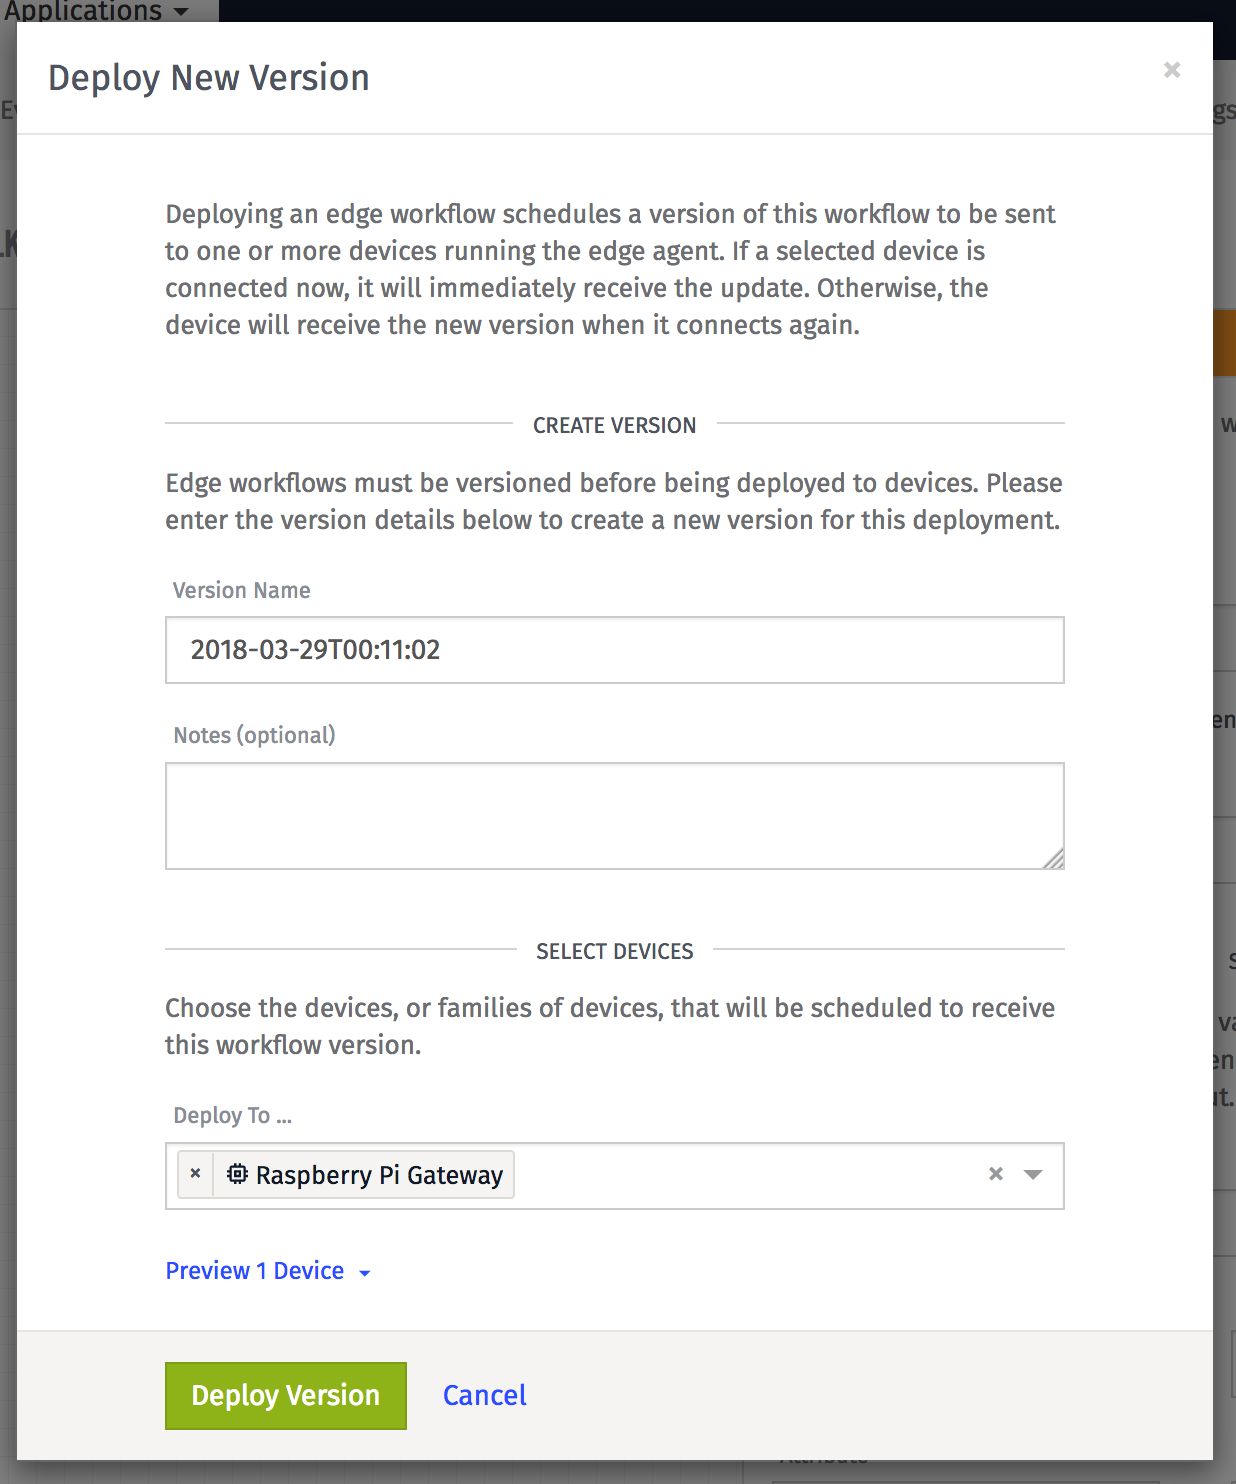
You’ll be presented with a popup to complete the deploy. Since Losant keeps track of every version of a workflow deployed to every device, the workflow must first be versioned. The version name is automatically set to a timestamp, but you can change this to anything you’d like. Next, select the device(s) to deploy this workflow to. Lastly, click the Deploy Version button to schedule this deployment.
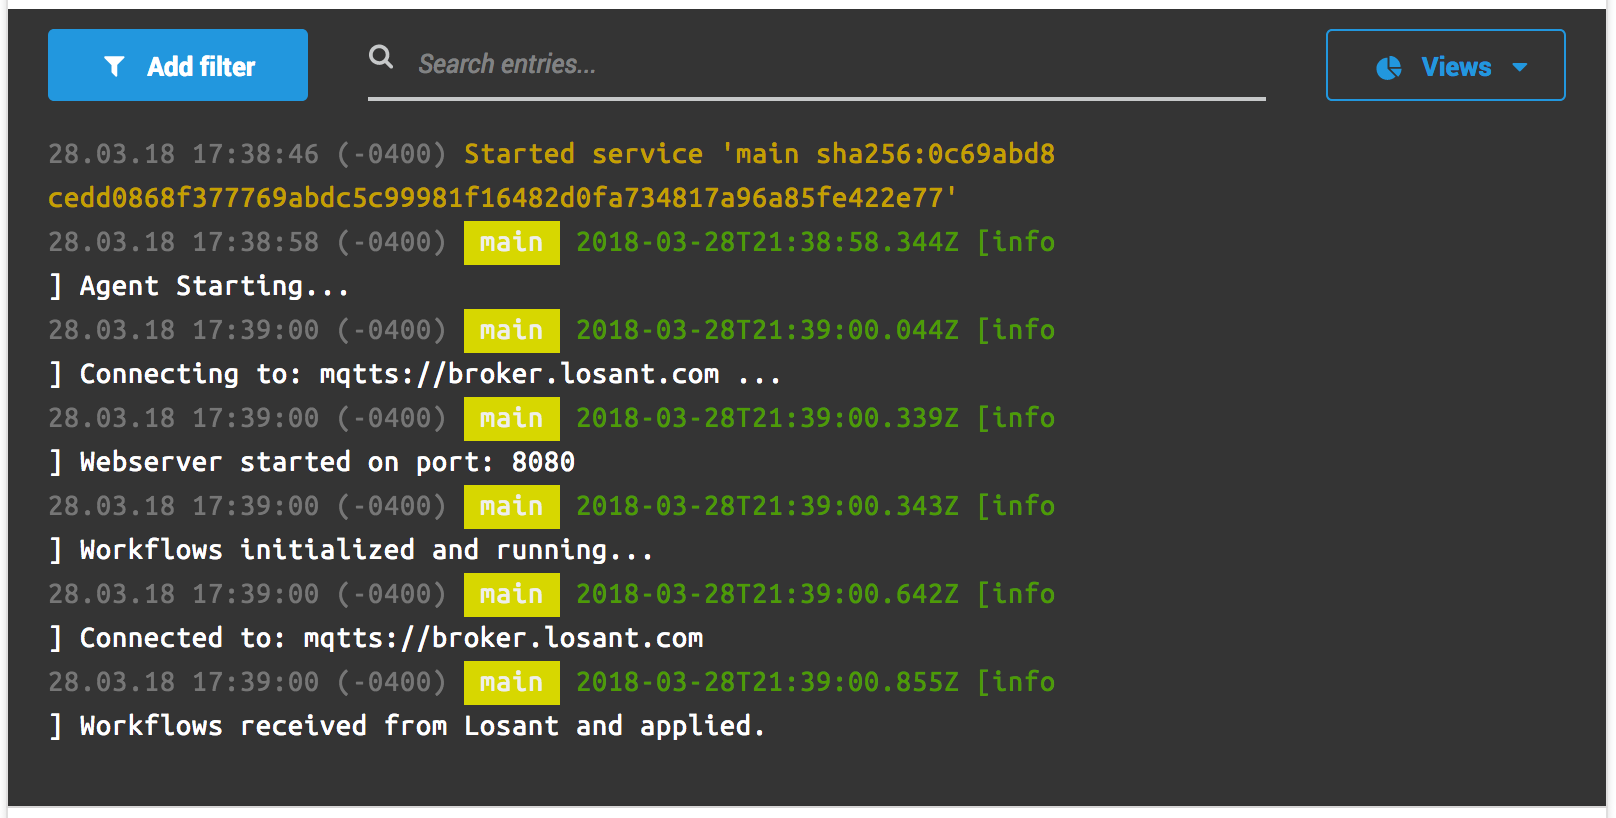
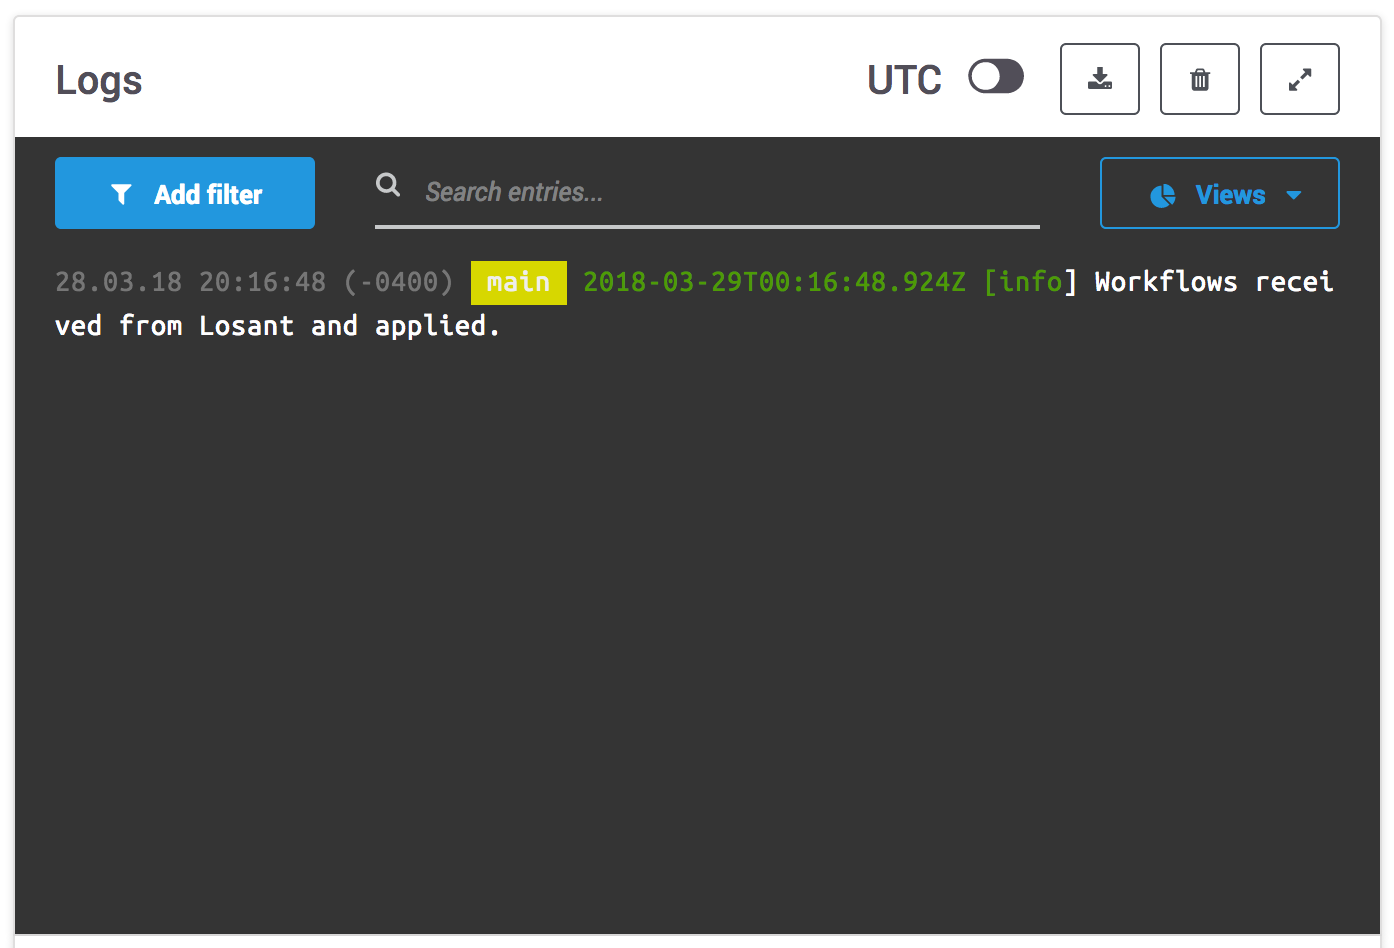
Under normal conditions and if your device is currently connected, a workflow should complete a deployment in just a few seconds. Resin.io’s device log will show when the Edge Agent has received and applied any new workflows:
Since this workflow is reporting state every 5 seconds, you can also view this data in Losant’s device log:
This example is generating and reporting random data, however in the real world you’d be getting data from any number of sources. It could be Modbus endpoints, a custom script, or even somewhere on the filesystem.
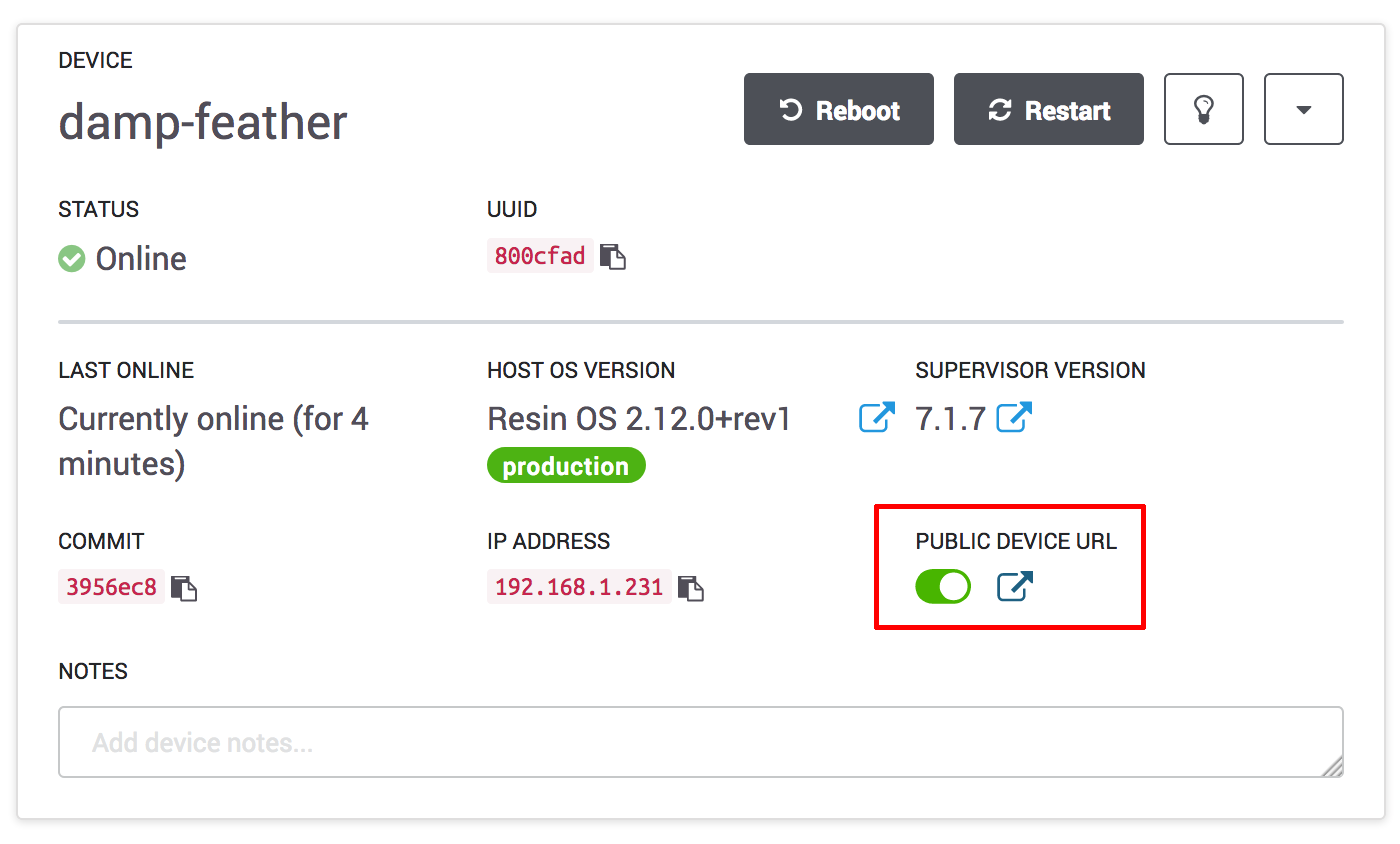
Using Resin.io’s Public Device URL
If you’ve enabled it, each device within resin.io has its own unique public URL. Since the Losant Gateway Edge Agent comes with a webserver built in, you can use this URL, combined with an Edge Workflow, to respond to requests:
Start by making a new Edge Workflow and naming it anything you’d like. This time, instead of using a Timer Trigger, start the workflow with an HTTP Request Trigger. This trigger will fire whenever any request is made to the Losant Gateway Edge Agent webserver.
Next, add an HTTP Response Node and attach it to the trigger. This node controls which data is actually sent back to the request:
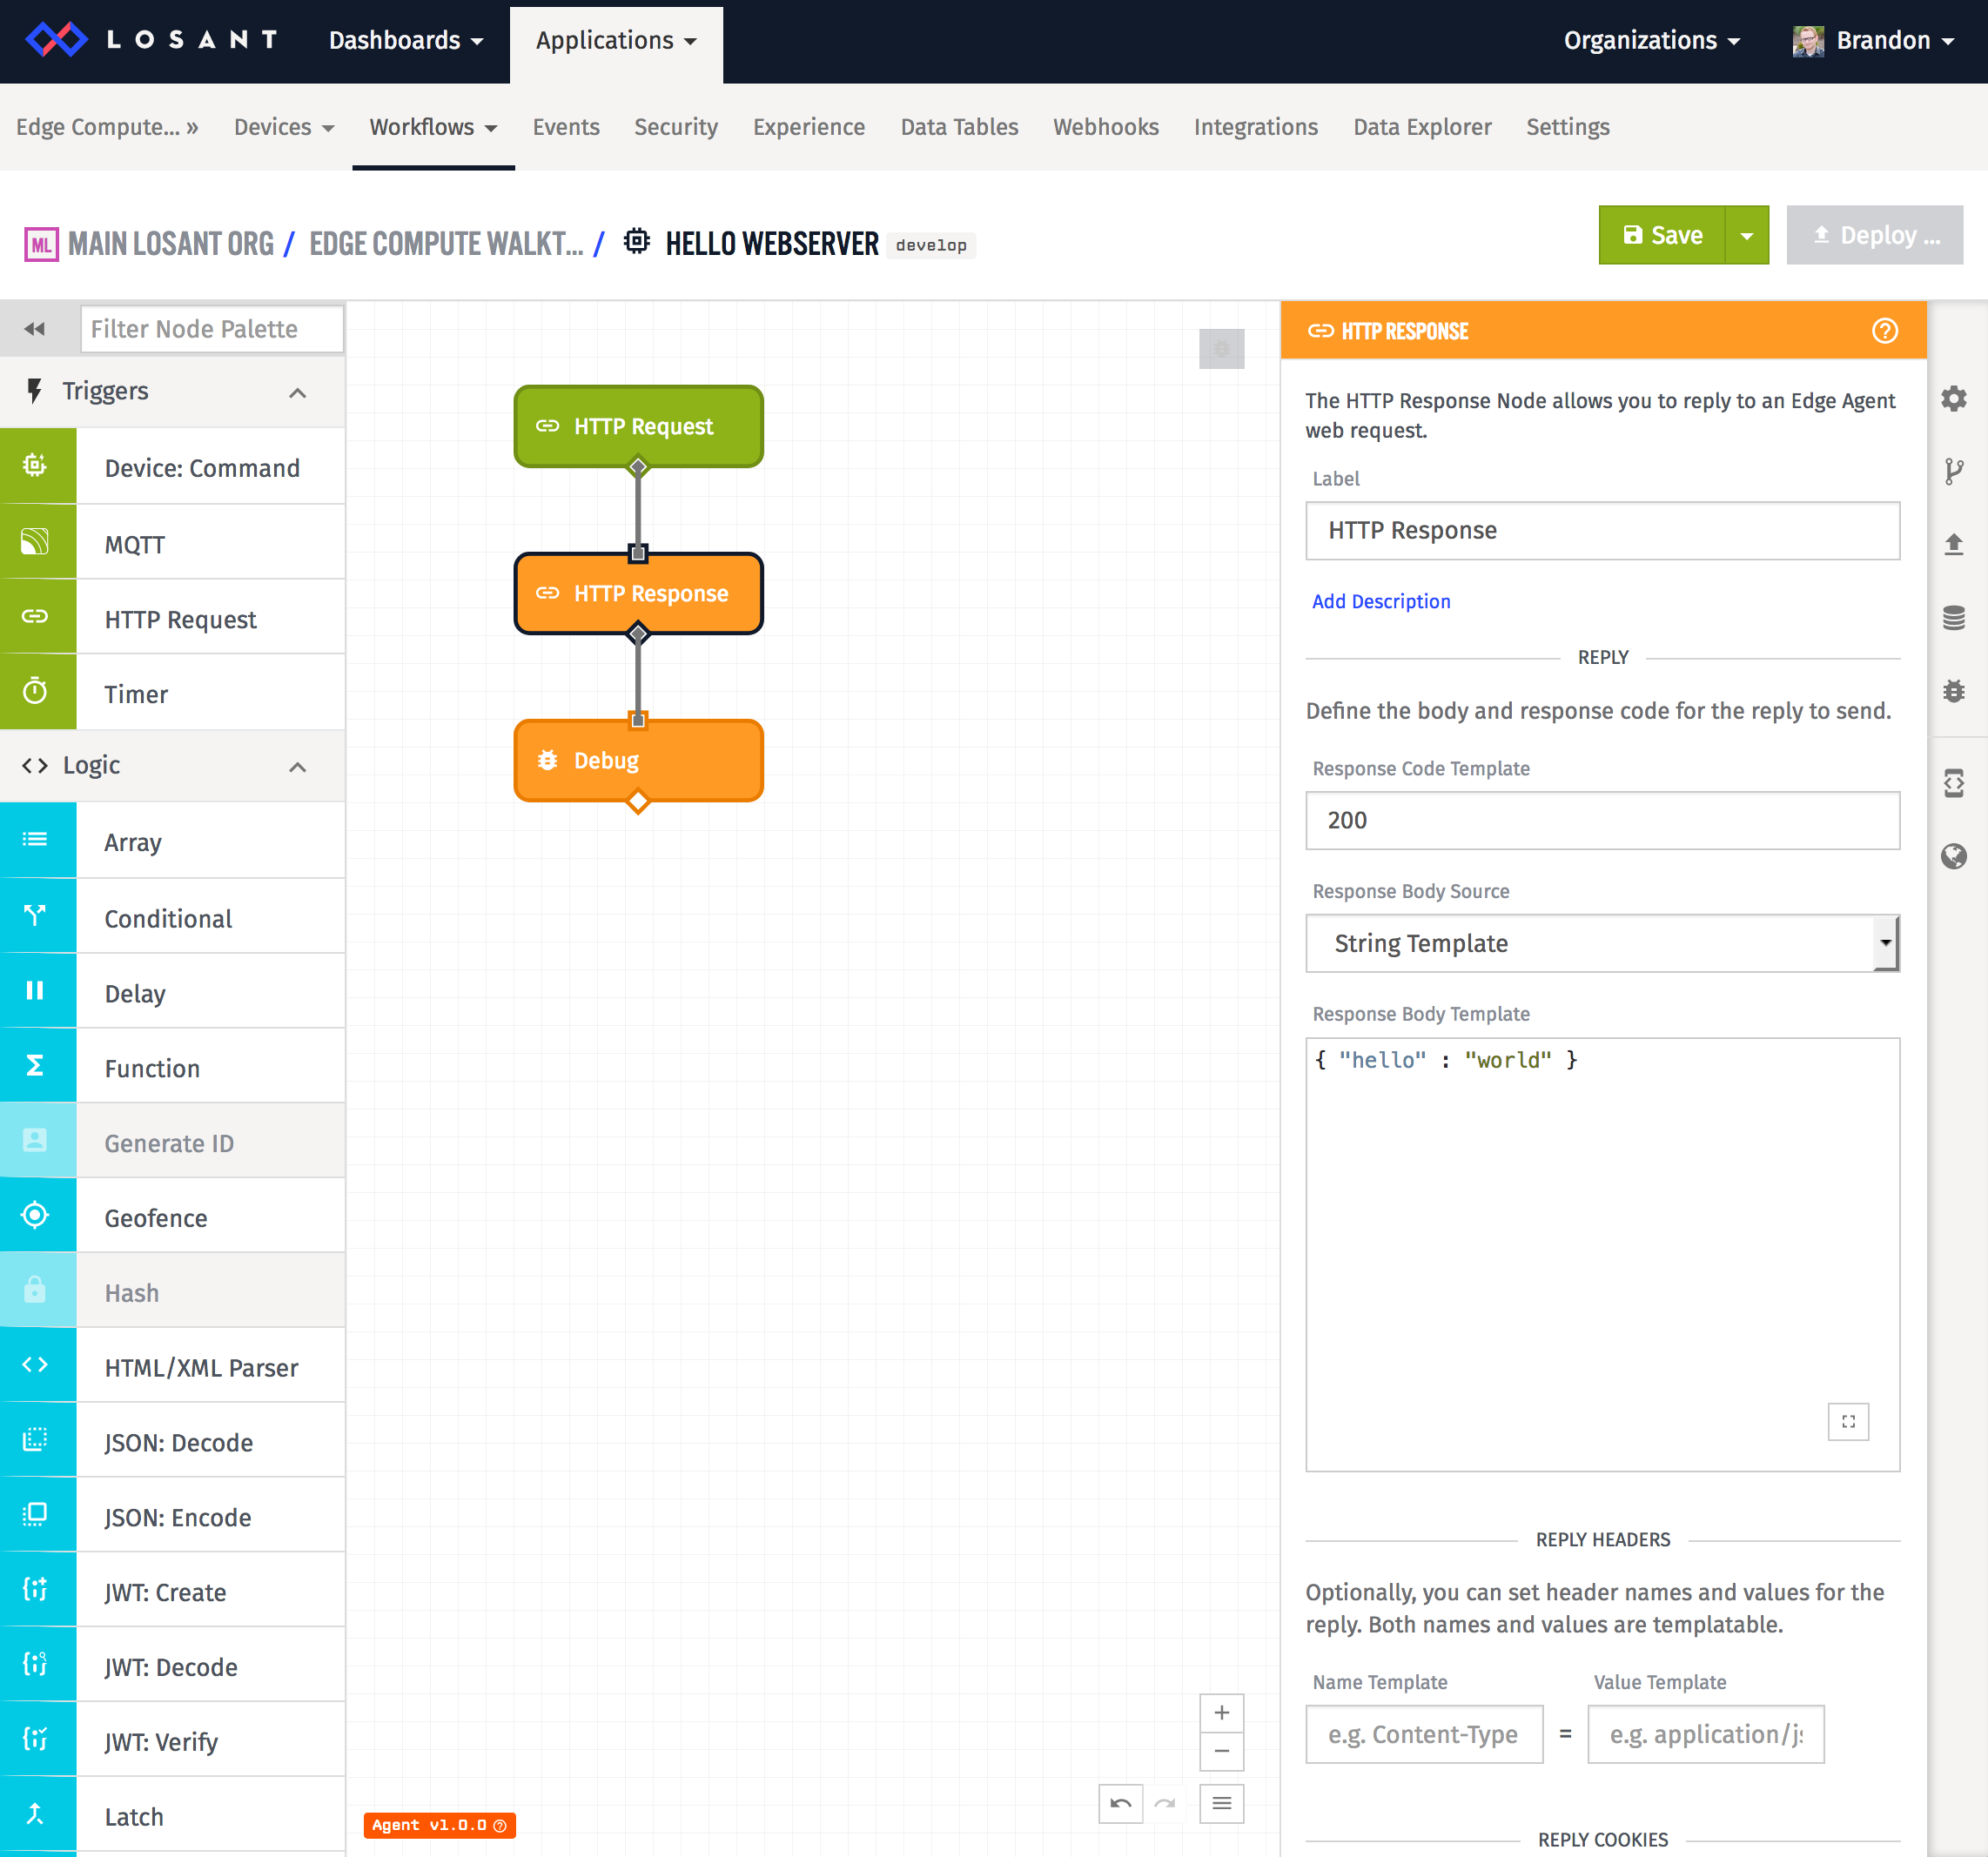
As you can see in the screenshot above, the response in this example is simply returning the JSON string { “hello” : “world” }. At this point, you can add any required nodes to build up the response you need. A common example might be to use a Run Executable Node to invoke a custom python script that performs your application-specific action. You could also use a Modbus Read Node to grab data from an industrial piece of equipment.
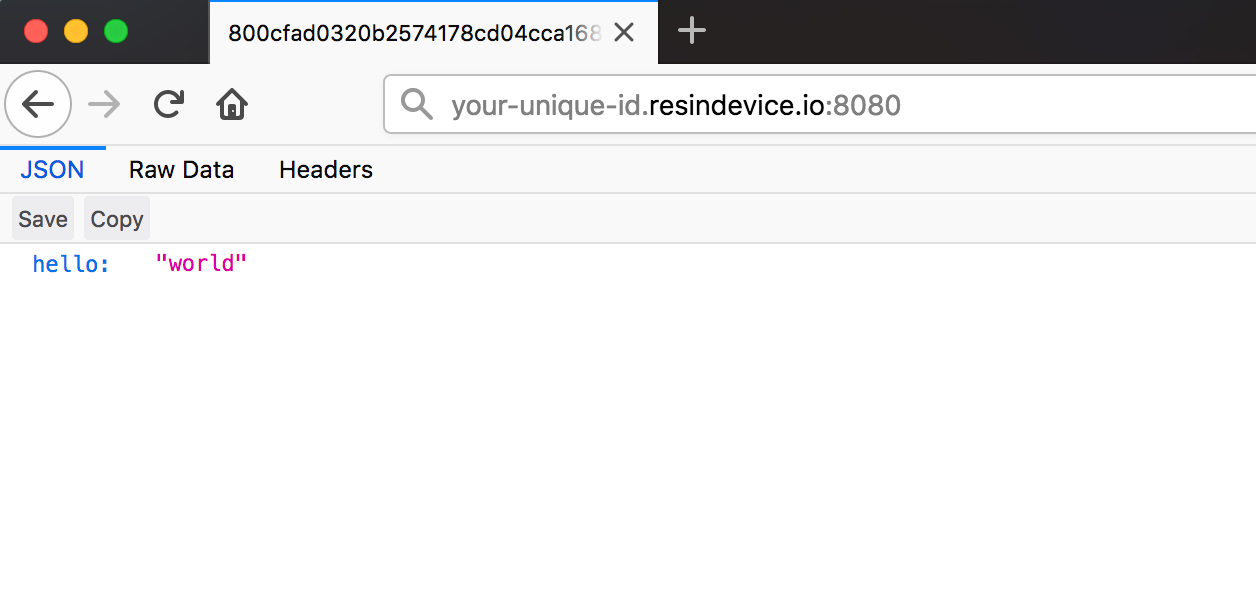
By default, resin.io’s public device URL assumes HTTPS over port 443. You can configure the Losant Gateway Edge Agent with a certificate to support HTTPS, however without any configuration changes, the edge agent listens on port 8080 over non-HTTPS. This means your URL will look something like this:
http://your-unique-id.resindevice.io:8080
At this point, you can make a request to your URL, which will trigger the workflow and respond with your data:
Build Something Awesome
At this point, you have resin.io deploying the Losant Gateway Edge Agent and have successfully deployed an Edge Workflow that’s running on your local device. One of the primary use cases for Losant Edge Compute is industrial equipment monitoring, which is why it has Modbus Read and Modbus WriteNodes built-in. To learn more about building a Modbus application, check out Losant’s Modbus Walkthrough.
Once data is being reported to Losant, you can begin building dashboards to visualize it, or cloud workflows for further processing or alerting:
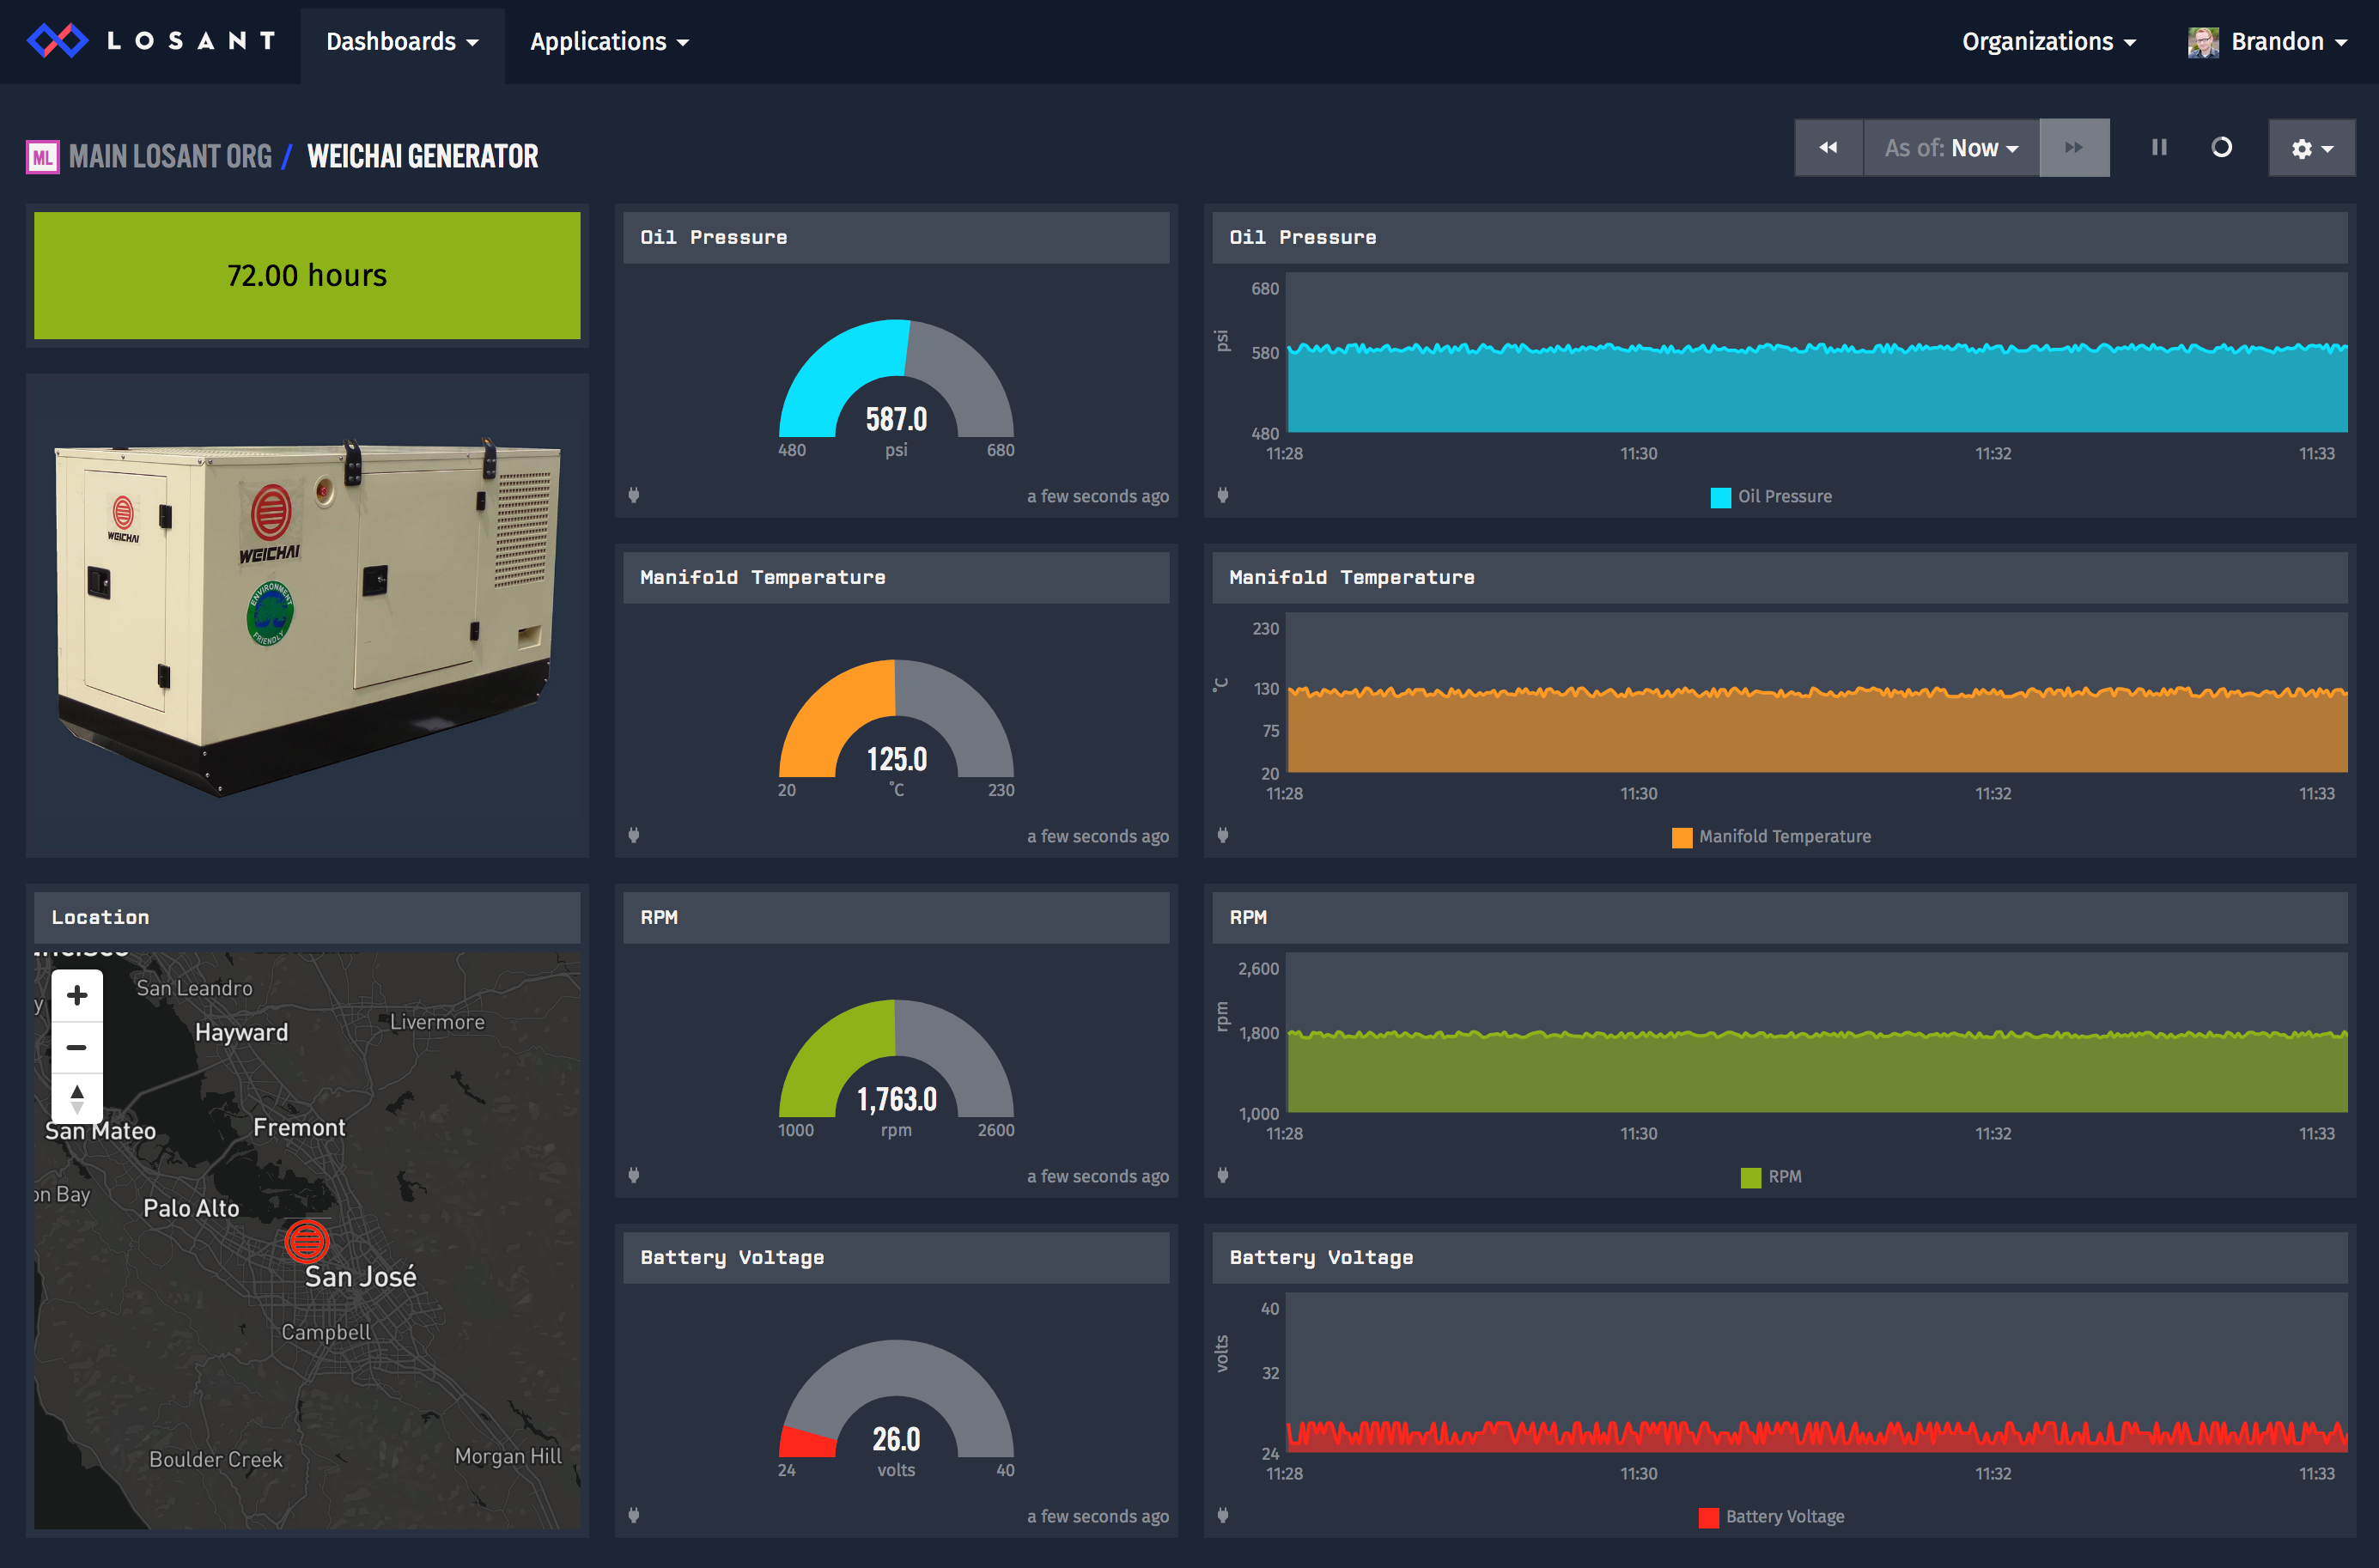
Losant also supports custom experiences to completely tailor your end-user application. The combination of resin.io and Losant provides a compelling edge deployment solution well-suited for even the most complex connection solutions and experiences.
If you use Losant and resin in an interesting way we would love to hear from you. Please post your project to forums.