
Because of its vibrant community, JavaScript has made its way into hardware with projects like Johnny-Five, Espruino and JerryScript. Earlier this year, Cesanta announced Mongoose OS, an open source Operating System for hardware that supports JavaScript.
Mongoose OS is an awesome toolchain to build reliable firmware for devices. When used with Losant, you extend the reach of your devices with powerful data processing, visualizations, dashboards, and cloud integrations.

In this article, we're going to cover some of the features of Mongoose OS, and how to get it integrated with Losant.
Mongoose OS
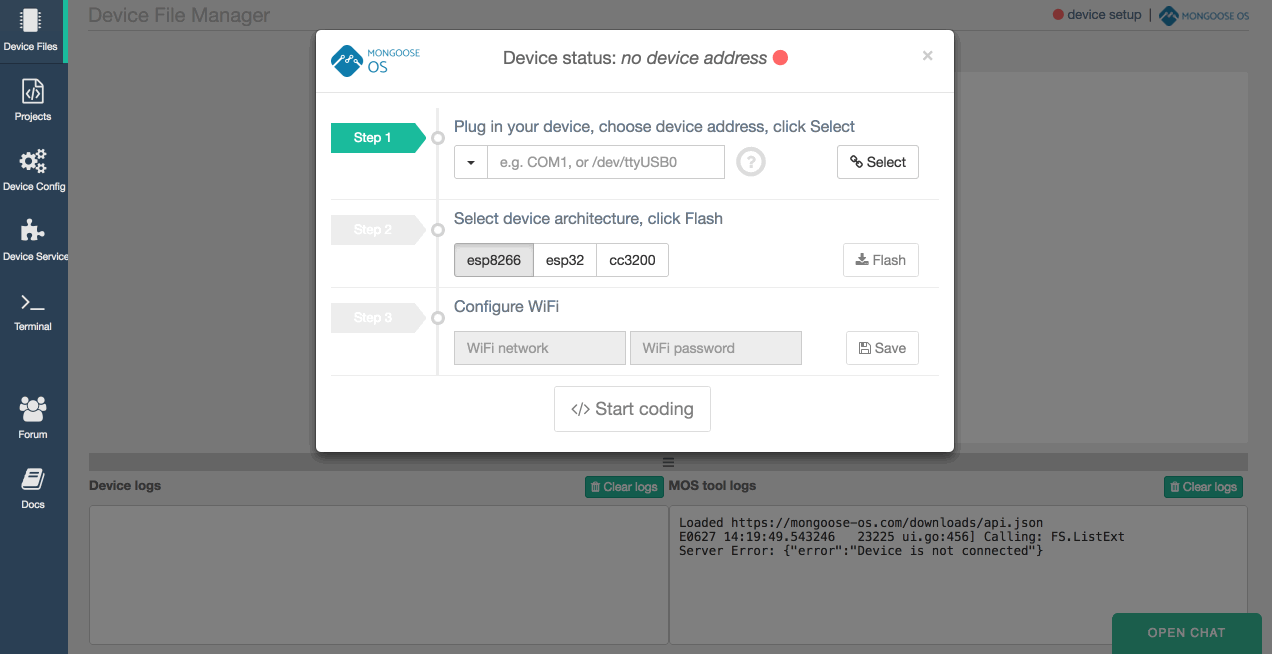
One of the best features of Mongoose OS is the web UI tool. This web interface is a full IDE and device configuration manager, and gives you the ability to build and flash firmware.
Mongoose OS also supports JavaScript. However, the Mongoose OS JavaScript, called mJS, implements only a subset of the language. The purpose of this is to keep the memory footprint of its programs low. With a tiny memory footprint, things like TLS on low memory devices, such as the ESP8266, becomes an easier task to implement.
Here is an example of a simple Mongoose OS application written in JavaScript that toggles an LED:
load('api_gpio.js'); // load is a special function in Mongoose OS
load('api_timer.js');

let led = 4;

// Blink built-in LED every second
GPIO.set_mode(led, GPIO.MODE_OUTPUT);
Timer.set(1000 /* 1 sec */ , true /* repeat */ , function() {
 print("Toggling LED");
 let value = GPIO.toggle(led);
}, null);
If you're familiar with JavaScript, this may look a little weird. Mongoose OS exposes a load function to include files—this is similar to require in Node.js. The OS also exposes other helpful objects and functions like GPIO, print, and Timer.
Lastly, Mongoose OS comes with a complete CLI tool called mos. The web UI is built around the CLI tool. The mos CLI tool gives you a terminal interface for interacting with hardware.
Getting Started
Now that you have a good understanding of Mongoose OS, let's use it with Losant.
Before beginning:
- You'll need an ESP8266 based device.
- You must have the
mostool installed. For more info, see themosinstallation instructions.
Clone the Losant App
To make things simple, we created a Mongoose App for Losant. A Mongoose OS app serves as a boilerplate template for your project. This example app is available on GitHub.
$ git clone https://github.com/Losant/losant-mqtt-mongoose-os.git
The Code
Let's take a look at the main code that's included in the Losant Mongoose boilerplate app.
First, the code is flashing the LED every second, similar to what we saw in the example code above. Next, every time you press the button it sends a message to Losant. Included in this message will be total_ram and free_ram of the ESP8266.
Building the firmware
We've download the app, updated the config, and reviewed the code. Make sure you are in the directory of the losant-mqtt-mongoose-os project.
$ cd losant-mqtt-mongoose-os
We can now build the firmware.
$ mos build --arch esp8266

Flash the device
Once the firmware is built, we can flash the device:
$ mos flash

Configure WIFI
Mongoose OS allows you to configure the WiFi from the mos tool. Here is what that looks like:
mos wifi WIFI_SSID WIFI_PASSWORD Configure Losant
Now, we can update our device to connect to Losant via MQTT. To successfully connect to Losant, we need to configure the device ID, MQTT client ID, MQTT username, and the MQTT password. We can set them all at once like so:
mos config-set device.id=LOSANT_DEVICE_ID \
mqtt.client_id=LOSANT_DEVICE_ID \
mqtt.user=LOSANT_ACCESS_KEY \
mqtt.pass=LOSANT_ACCESS_SECRET
You obtain the LOSANT_DEVICE_ID, LOSANT_ACCESS_KEY, and LOSANT_ACCESS_SECRET from Losant. If you haven't already, create an account and an application in Losant. Next, add a device to your Losant application for this project. Then, you'll be able to get an Access Key and Secret.
Stream logs
Once you flash and configure, the firmware will run, and your device will connect to Losant. Mongoose OS comes with a lot of helpful logging. You can view these in the terminal by running:
$ mos console
Open up the Web UI
As I mentioned earlier, the web UI is fantastic. Everything you can do with the terminal, you can do with the web UI. To fire it up, run:
$ mos
Testing
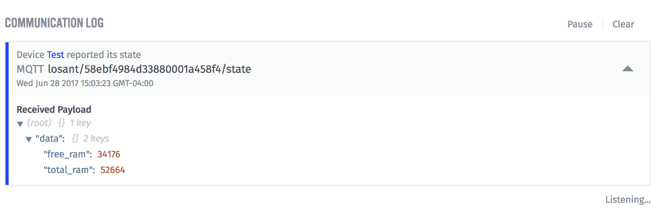
To test, you can go to the main application page in Losant. There you should see your Communication Log. If you press the button on the ESP8266, you'll see a message appear. Like so:
You've just successfully flashed your device and connected it to the cloud. You are awesome.
What's Next?
You should check out the many Projects and Tutorials in the Losant docs. Once you connect your device to Losant, you can build workflows and dashboards, and integrate your device to pretty much any cloud service. The possibilities are endless.
Here are some helpful resources: