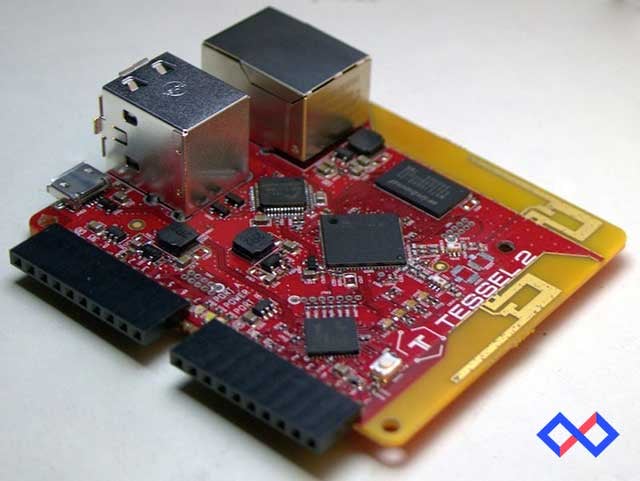
Tessel is an embedded development platform used to connect sensors and actuators to the internet. It utilizes powerful web development tools like Node.js and NPM to make hardware prototyping more accessible and less time consuming. As such, Losant’s platform is a natural fit as a cloud back end for Tessel 2 and is quick and easy to set up.
Overview
These instructions will help you get familiar with using Tessel 2 and Losant and by the end of the walkthrough, you will be able be familiar with all the high level concepts of both platforms.
Environment Setup
Tessel's command line interface is a Node.js application. You'll need to install first Node.js (v4.2.1 or later) and then the Tessel 2 CLI. Once we have the dependencies installed, we'll create a working directory for our example application.
Installing Node
The easiest way to install Node is via the Node.js web site. You can install either the LTS (long term support) version or the most recent stable version.
Installing the Tessel 2 CLI
NPM is a package manager that gets installed automatically when you install Node.js. We'll install the Tessel 2 CLI using NPM: npm install t2-cli -g. The -g just tells npm that we want this package to be installed "globally" so we can execute t2-cli from any directory on our computer.
Setting Up Our Local Workspace
First, we'll create the directory that we want to build our project in and enter that directory:
mkdir losant-tessel; cd losant-tessel;
Then, we'll initialize a default Tessel project:
t2 init
You'll notice if you run ls that the project now has a package.json (used for tracking project dependencies among other things) and an index.js file with code to run a simple blinking LED example.
Connecting to Tessel
Tessel should work out of the box but let's make sure everything is working as expected.
Listing Connected Tessels
First, power up Tessel with a micro USB cable. You should see a pulsating blue light as it boots up.
Once the blue LED turns solid, the device is ready to use. Run t2 list and make sure a USB Connection is displayed.

Now let's install the Losant SDK so our Tessel can communicate seamlessly with Losant's servers. We'll install the SDK using NPM: npm install losant-mqtt
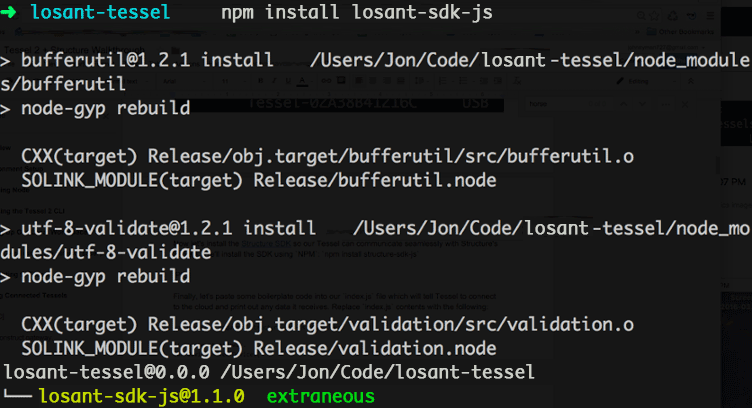
Finally, let's paste some boilerplate code into our index.js file which will tell Tessel to connect to the cloud and print out any data it receives. Replace index.js contents with the following:
You'll notice that lines 5-7 require some device and application specific identifiers. In the next section, we'll create our Losant account and these application identifiers so our device can get connected.
Setting Up Losant
In this section, you’ll register for a Losant account, create your application, and add the device for your builder kit.
Create an Account
Navigate to the Losant new account page and register for a free account.
Create an Application
Create an application for the builder kit and name it "Tessel 2 Application". Then click "Save Application".


Add a Device
The next step is to register the Tessel 2 with the platform. Click the “Add Device” button on the top right or select “Add Device” from the Devices dropdown.

Click the “Create Blank Device” button.

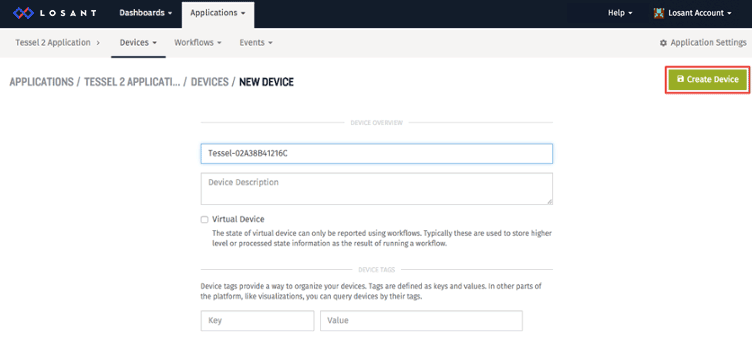
Name the device anything you want (I prefer to use the name of my Tessel from the list) and then click the “Create Device” button.
The page will update and show the device’s ID.
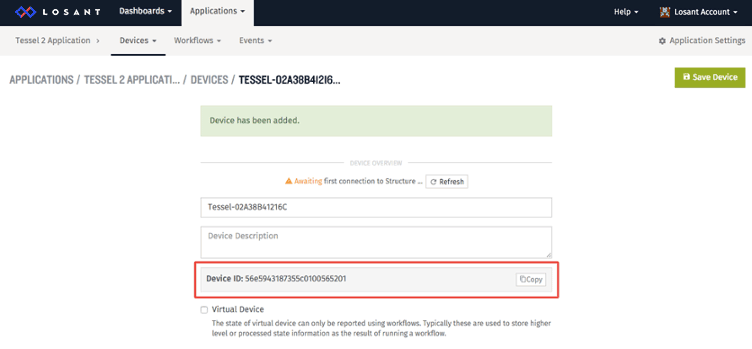
Copy this device ID and paste it into line 5 of our application code (index.js):
Now, we'll need to generate our key and secret identifiers before we can run this code successfully on Tessel.
Generate Security Tokens
One major benefit of the Losant platform is that it has encryption and authentication built-in so you don't have to worry about anyone snooping on your data or controlling your devices without permission. Our next step is to take advantage of this capability so our device can successfully and securely connect to Losant.
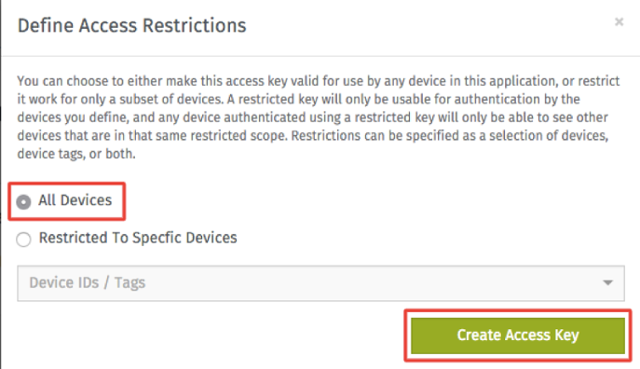
Select the “Application Settings” link on the top right. Next, select the “Access Keys” tab. Click the “Generate Key” button and then select the option to make this key valid for “All Devices”. Finally, a popup will appear with your access key and secret.

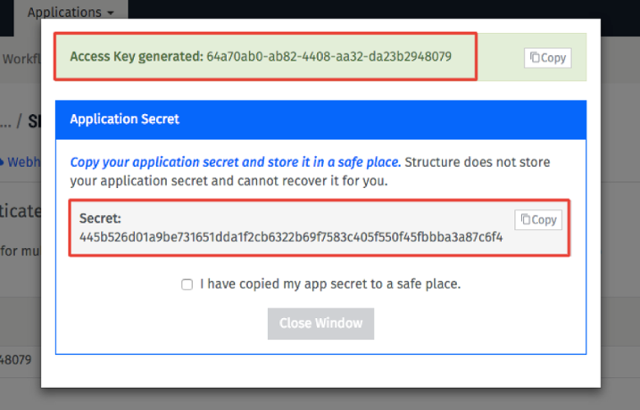
Copy the key and secret and paste them as the value to the appropriate key in index.js:
Close the popup and now we're ready to connect our Tessel to Losant!
Connecting to Losant
Now that our Tessel is ready to authenticate we can connect our Tessel to wifi and begin transmitting data between Tessel and our Losant application.
Connecting to Wifi
In order for our Tessel to contact Losant's servers, we'll need to make sure it has access to wifi. To do that just run t2 wifi -n YOUR_SSID -p YOUR_PASS (be sure to paste your network's SSID and password). If you're using a network with an encryption mode other than psk2 you can pass the -s flag along with your security type (wep and psk also supported). If your network is open, you can just run t2 wifi -n SSID. You should see a message indicating success in your terminal and a yellow LED light up up on your Tessel.
Our First Connection
To run this code on Tessel, we'll use the run command which deploys the code into RAM and begins executing it with Node (push deploys to Flash so it starts on boot): t2 run index.js. You should see a message that says 'Successfully connected to Losant!'.

Congrats! You've made a connected device. Now let's make it do something a little more exciting.
LEDs Come Alive
You may have noticed that our script has an event handler for incoming commands:
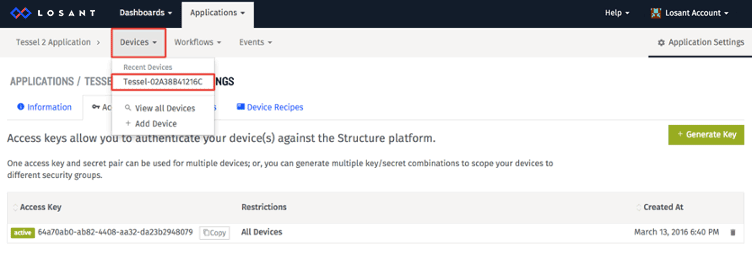
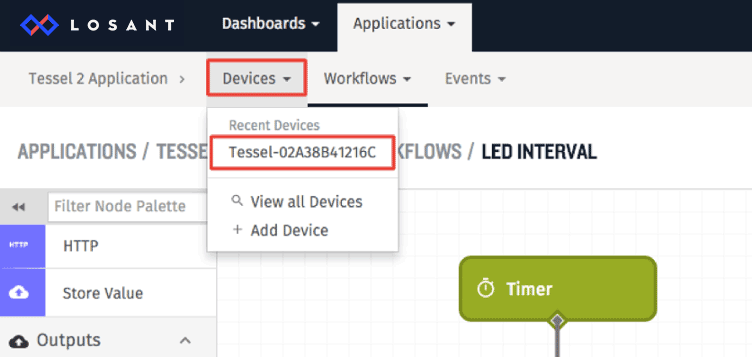
That means we can send arbitrary, structured packets to tell the device to do something. Let's do that now to ensure it's working as expected. Go to the Device page by clicking "Devices" and clicking the name of your device in the dropdown.
Then scroll down to the "Send Device Command" section. Let's send a command named "ledToggle" and give it a JSON payload with the following contents: { "ledIndex" : 0, "state" : 1}.

If you click the "Send Command" button and check out your terminal window you should see the payload printed out by your Tessel!
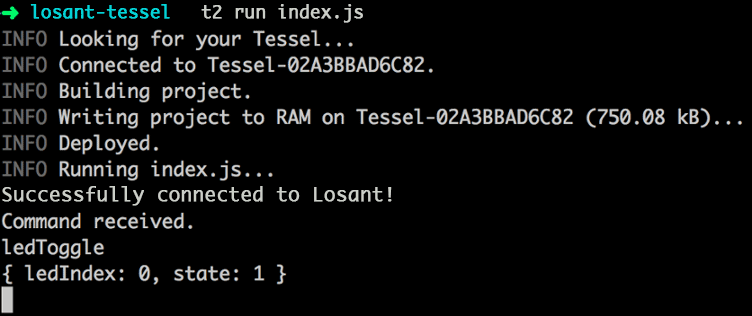
Now let's modify our Tessel code so that it can do something more interesting. Change the command event handler to the following:
Before we can run this, we'll need to ensure tessel is defined. Add the following statement to the top of the file:
You don't need to use npm to install it because this library is built-in to the device.
No we can stop our previous code ("control" + "c") and run this new code with t2 run index.js. Once you see the connection success message, go ahead and click the "Send Command" button on the Losant web application again. You should see the Red LED turn on! If you modify the payload on the Losant web application to be { "ledIndex" : 0, "state" : 0} and hit the "Send Command" button you should see the LED turn off. You can experiment with changing different LEDs on and off but be sure you don't try to index higher than 3 (otherwise your Tessel code will emit an error as there are only 4 accessible LEDs on Tessel 2)!
Losant allowed us to have immediate, remote control of our Tessel within minutes of setting it up. But what if we want to automate these procedures instead of manually clicking "Send Command" each time? That's where Workflows come in handy.
Workflows
Workflows allows us to define actions that should be executed upon certain triggers. Let's work through an example to make the utility of Workflows more concrete.
Creating a Workflow
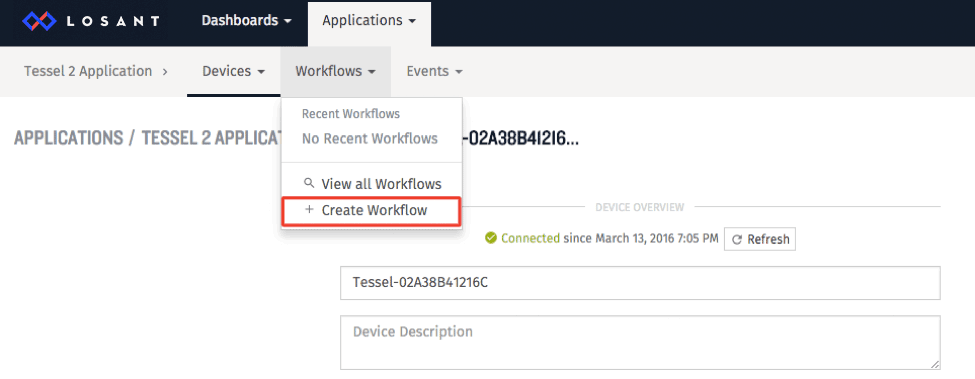
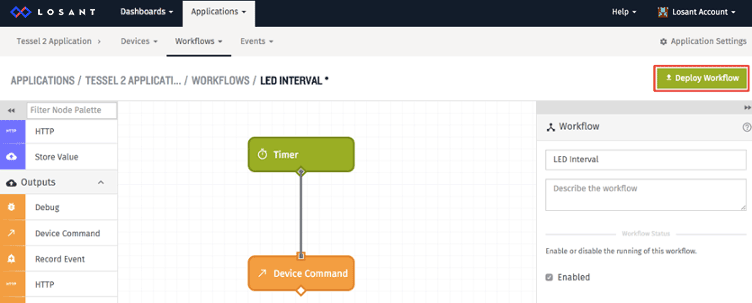
Create a new workflow and name it "LED Interval".

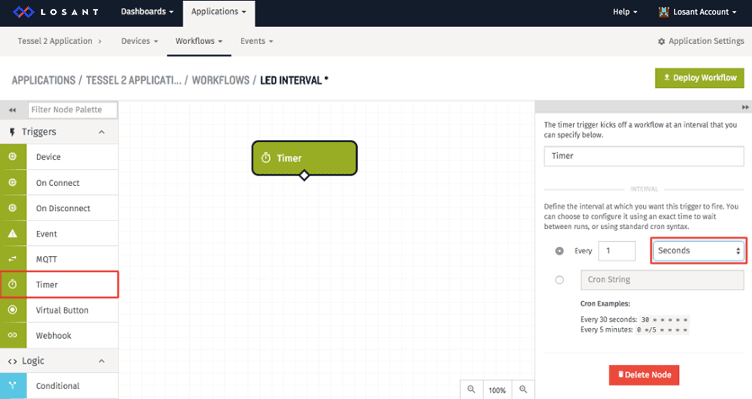
Start by dragging on a Timer node and setting the interval to one second.
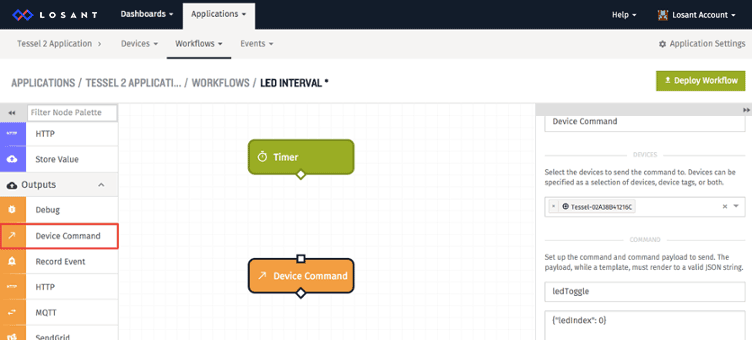
Now drag on a Device Command node and set the payload to be the same as we had before with the name as `ledToggle` and the payload as {"ledIndex": 0}.
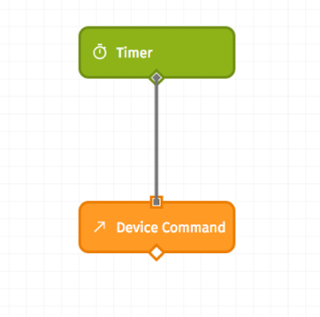
Now connect the Timer node to the Device Command node. Workflow nodes are connected by clicking on the small diamond-shaped connector on the source node and dragging it to anywhere on the destination node.
As a final step, hit the "Deploy Workflow" button. This saves and initializes your workflow on Losant.
If you look at your Tessel, you should see your first LED blinking once a second!
This is a bit of a trivial example but hopefully it gives you an idea how powerful the composability of the Losant nodes are. This example should also get you thinking about how you now have two options of where your device logic lives: either in the cloud or the device. For example, by changing the Device Command node payload to have a different ledIndex (eg. {"ledIndex": 3} you can suddenly change how your device operates without having to update code on the device itself!
Sending Data Up To Losant
Our Tessel's connection to Losant is bi-directional so we can also transfer data (like from a sensor) up to Losant. We'll explore how to do that using the Tessel Climate Module. If you don't have a Climate Module, you can use any Tessel module in virtually the same manner.
Installing the Climate Module
Plug in the Tessel Climate Module to Tessel 2's Port A (the one closest to the USB port). Be sure the electrical components are on the top and the module logo is facing the bottom.
Then run npm install climate-si7020. This will install the driver necessary to read temperature and humidity data from the module.

Paste the following code into index.js so that Tessel will start reading climate data and sending it up to Losant:
All we added was a function that runs on a 500ms interval and sends temperature data to Losant after fetching it from the module.
Creating Device Attributes
The last thing we need to do before we run this code on Tessel, is create a temperature attribute for our device. Device Attributes tell Losant exactly what kind of data to expect from our device so it more easily be used with other features like Workflows and Dashboards (which we haven't seen yet).
Click the "Devices" Tab and the name of your device in the dropdown. Then scroll down to the "Device Attributes" section and enter in the name "temperature" in the first field. Then set the Type dropdown to "Number".
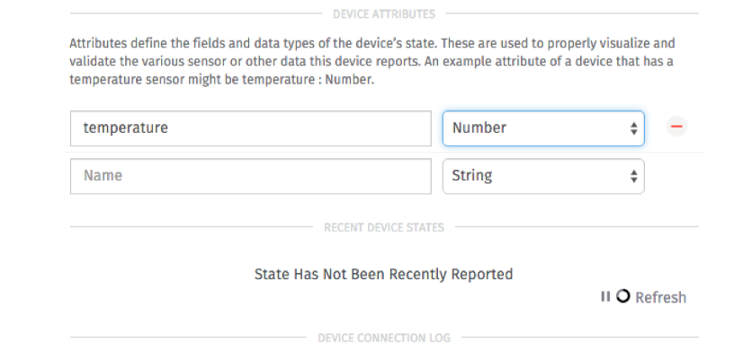
Finally, scroll back up and hit "Save Device".
Streaming Temperature Data to Losant
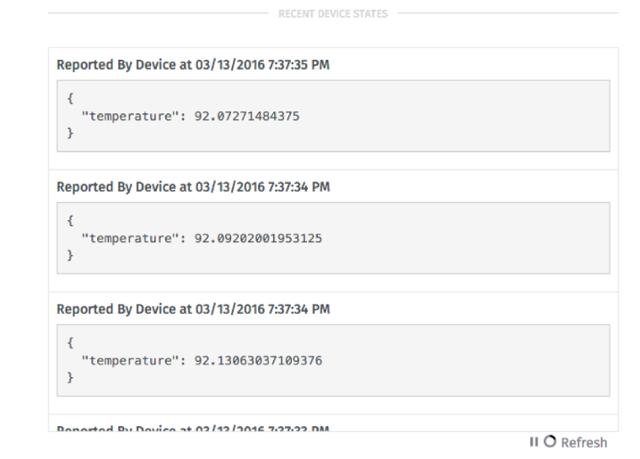
Finally, go back to your terminal and enter t2 run index.js. Once the code is deployed to Tessel, you should see temperature data coming in under the "Recent Device States" section!
Dashboards
Now we have sensor data streaming up to Losant but what can we do with it? One very useful feature is Dashboards: dashboards allow you to quickly set up a visualization of arbitrary data. Let's create a time series graph for our temperature data.
Creating a Dashboard
Click on the "Dashboards" tab and the "Create Dashboard" button.

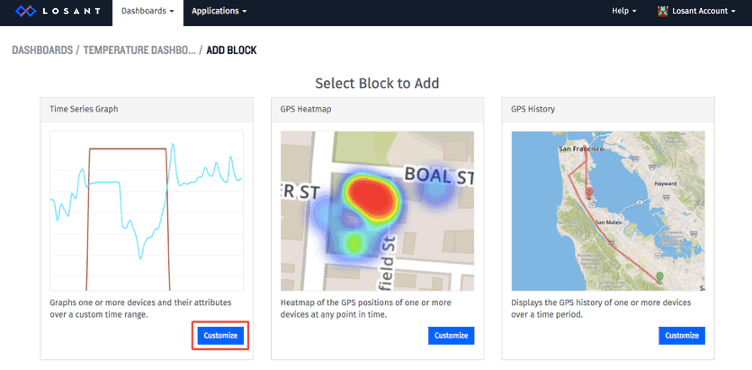
Name the Dashboard "Temperature Dashboard," click “Save Dashboard” and hit the "Customize" button under "Time Series Graph."

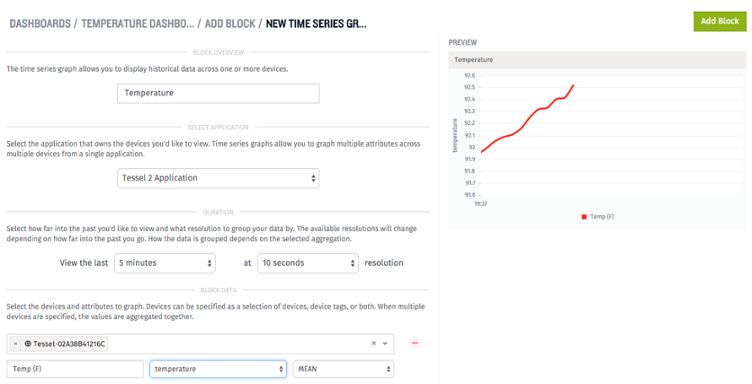
Set the name of the block to "Temperature". Choose "Tessel 2 Application" from the Application drop down. Set the scale to view the last 5 minutes at 10 second resolution. In the "block data" section, choose your device, Set the label to "Temp (F)" and choose the **temperature** attribute. Finally click “Add Block" and you should see a time series graph based on the temperature detected by your Climate Module!
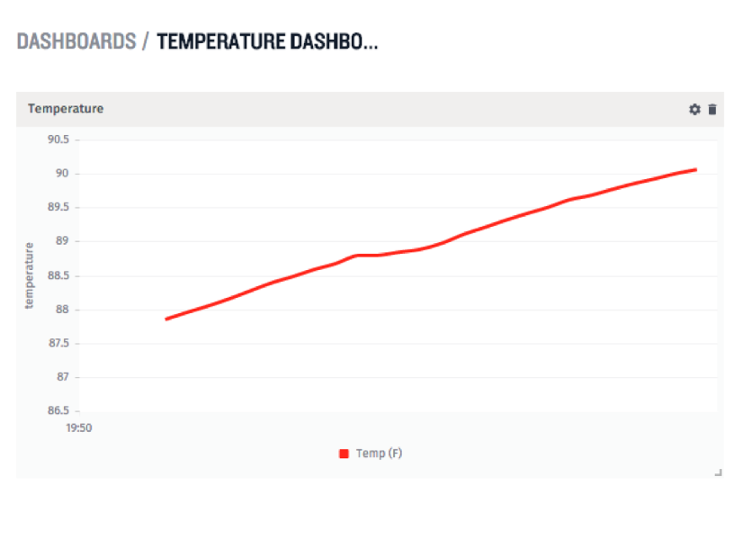
That concludes this walk through of using Tessel 2 with Losant App to make real-time sensor data more dynamic and useful for IoT applications. You now have the power to prototype an implementation quickly with the confidence that you can take it to scale with Tessel and Losant.
Jon McKay, Co-Founder of The Tessel Project was kind enough to participate in Losant's early platform access group and is the origin for many of the enhancements now available in the platform. The new Tessel 2 works nicely with Losant and we're glad to have Jon share a simple tutorial to get you started using the two platforms together.

