
When people begin building complex solutions on top of Losant, the concept of self-registration often comes up. Self-registration provides a way for your devices to securely register themselves and obtain the security tokens required to connect.
The primary benefit of self-registration is to eliminate the need for any master token or credentials. This means your devices are not susceptible to the same kind of attack that recently caused major internet outages. Self-registration also allows you to flash the same firmware to all devices, which reduces the complexity of your software.
Depending on the specifics of your solution and type of device you're using, there are many different ways to accomplish device self-registration. This article will outline an approach that has been proven in production and can be easily adapted to your specific requirements.
Update: November 5th, 2020
With the release of the Losant Template Library, the functionality outlined in this article is now provided as out-of-the-box templates. Using these templates can greatly reduce the time it takes to implement on-demand device registration and on-demand device provisioning. If you're not already a Losant user, you can sign up for free. Once registered, you can access these templates using the following links:
Registration Endpoint
With the recent release of Experience Endpoints, building custom API-driven behavior within Losant is now extremely easy. We're going to use one of these endpoints to allow our devices to register themselves.
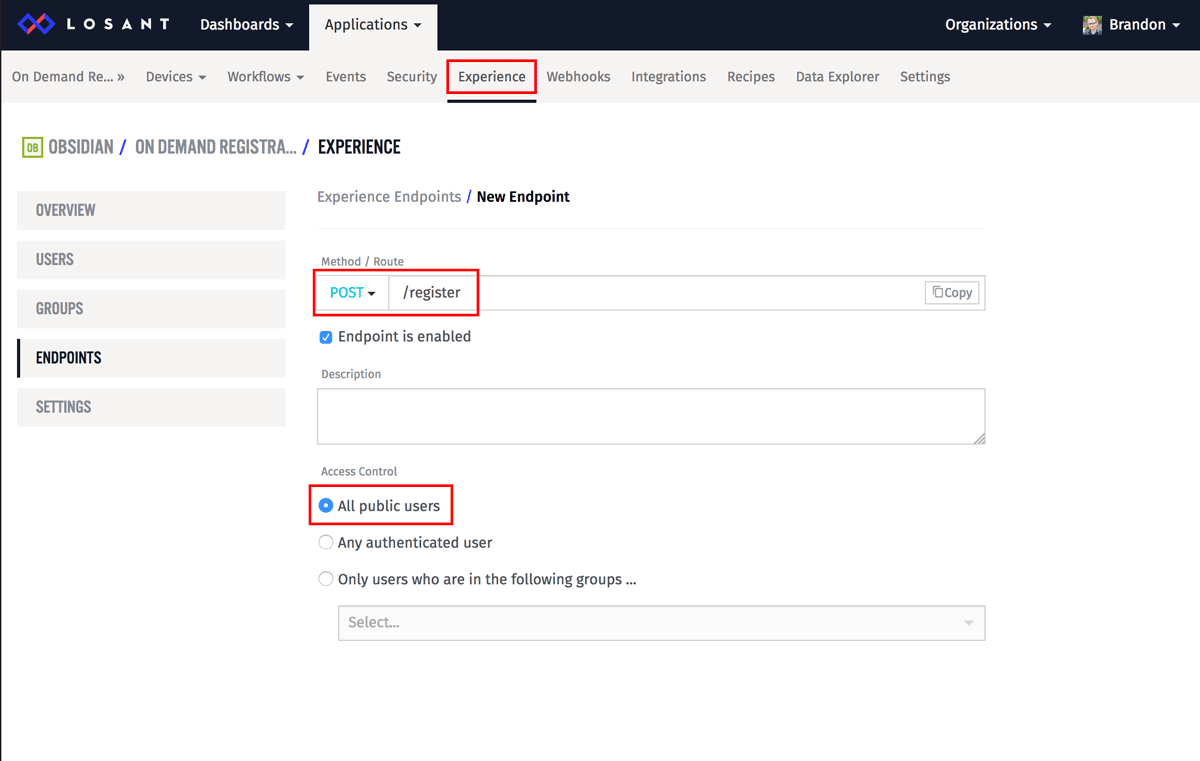
In your Losant application, start by creating a new endpoint. Make the method POST and make the route /register. Also, set the Access Control to "All public users."
This article allows your devices to register themselves, but they won't be tied to any Experience User. If you want the devices tied to a user, please check out the Experience Walkthrough for an example of how a user could register a device.
This endpoint is publicly available, which means anyone will be able to request it. As we'll see in the following steps, in order for the endpoint to perform any action, a valid serial number or manufacturer identifier is required. This means your devices need to have some baked-in identifier that can be verified by this endpoint. A Bluetooth ID, MAC address, or any custom identifier will work. The only requirements are that it's unique among your devices and difficult to guess.
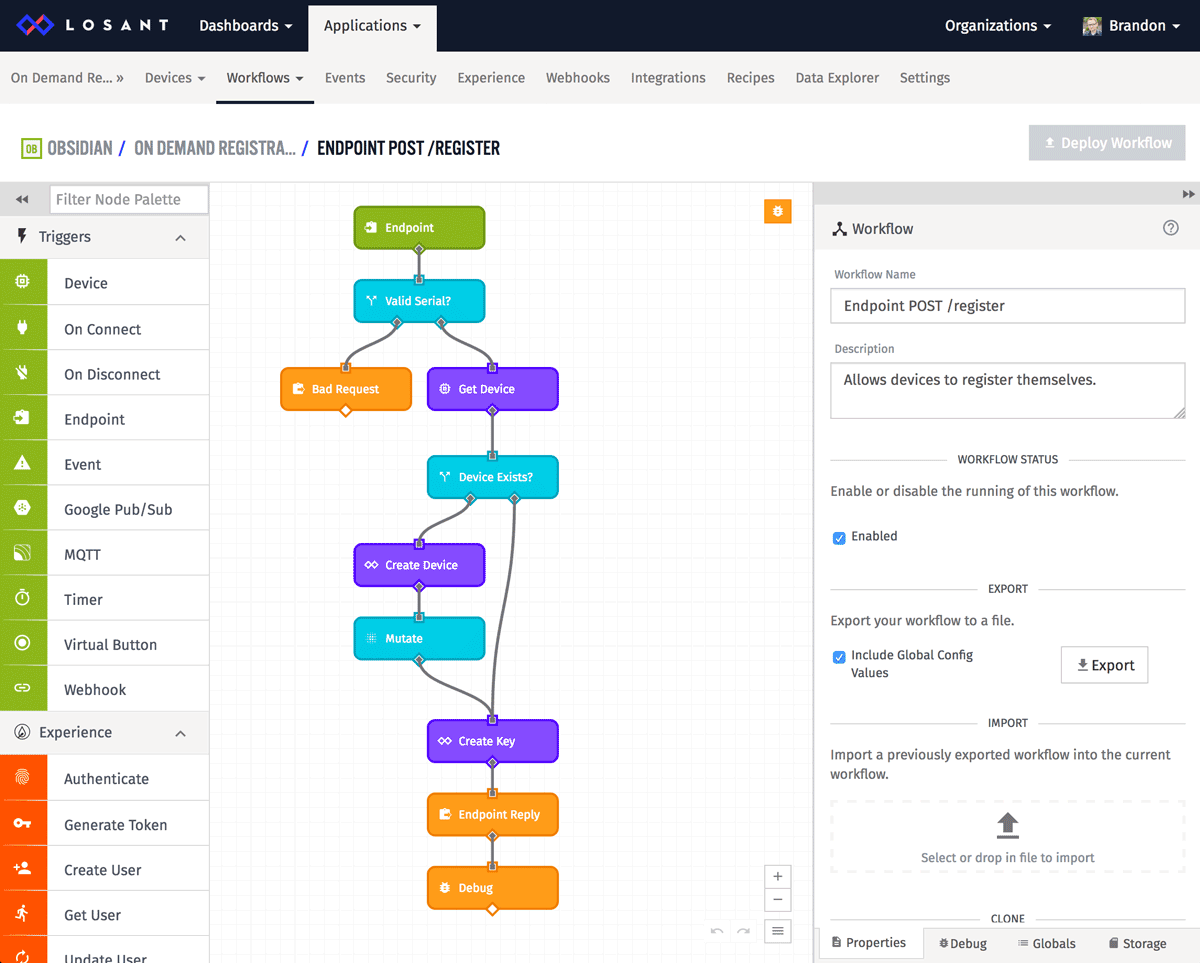
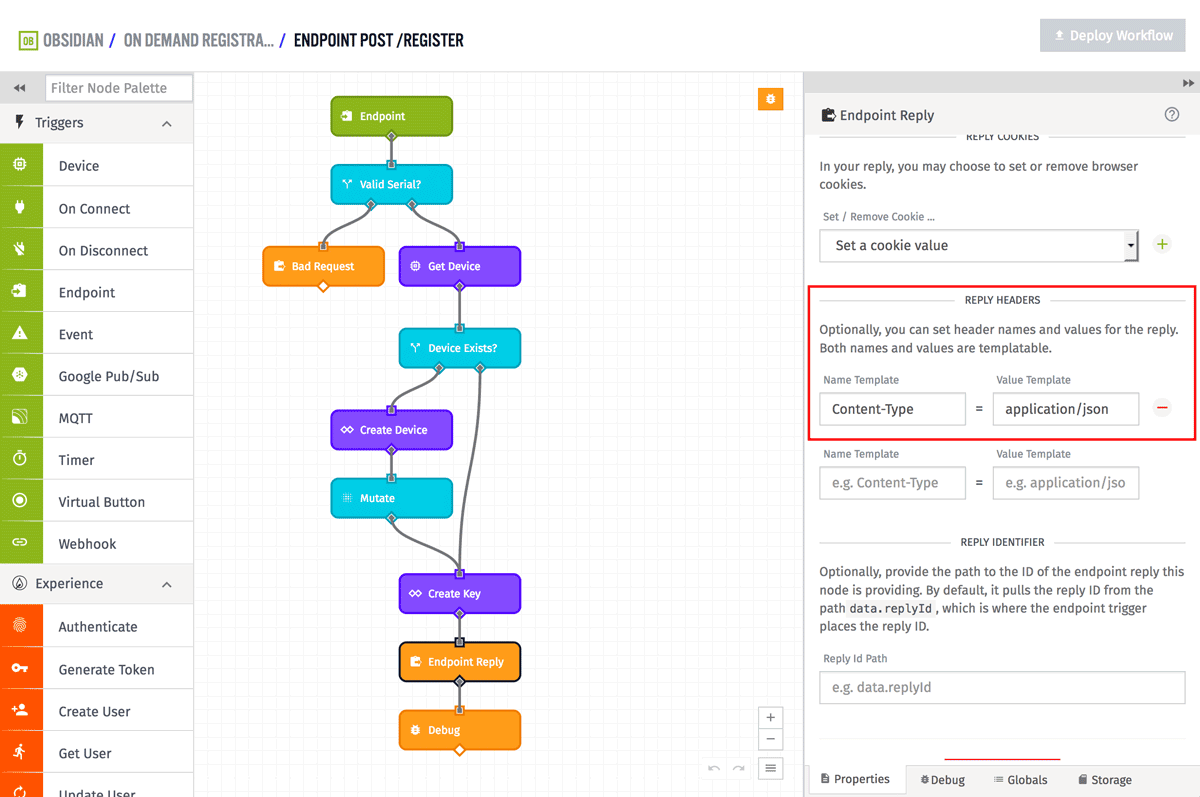
Let's now build the workflow that implements the self-registration. I'll start with a screenshot showing the entire thing, then I'll dig into it piece-by-piece.
You can download this workflow file here. Once downloaded you can import it into your own version.
The high-level process of this workflow is the following:
- Triggered whenever the /register endpoint is hit.
- Validates the device serial number.
- Creates the device if it does not already exist.
- Generates an access key/secret.
- Replies with the device ID, access key, and access secret.
Digging in deeper, the Endpoint Trigger is pretty self-explanatory. It just needs to be configured to trigger from your /register endpoint. This endpoint expects the body of the request to be in the following format:
{ "serial" : "device-serial-number" }
The next node is a Conditional Node. It's simply verifying that the serial number was provided.
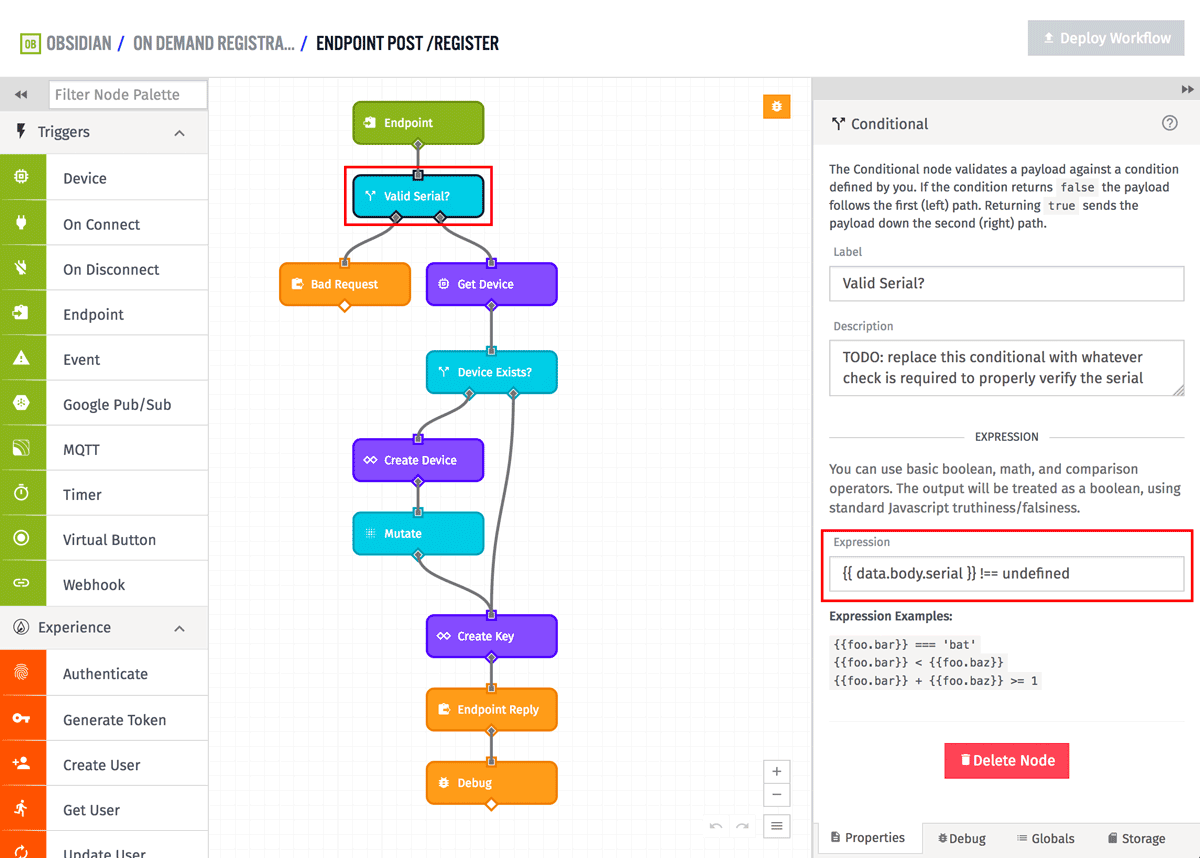
This should be replaced with whatever nodes are required for you to properly verify that the incoming serial is valid. You could store all valid IDs in a Mongo or Redis database, or maybe you have an API that already exists that you could request using the HTTP Node.
If the incoming serial number is not valid, the workflow replies with a 400 (Bad Request). You could change this to a 401 (Unauthorized) if you prefer.
The next two nodes are checking whether or not a device has already been created with this serial number. It first uses a Get Device Node to query all devices with a "serial" tag that matches the incoming value. The result of the Get Device Node is stored on the payload at "data.device".
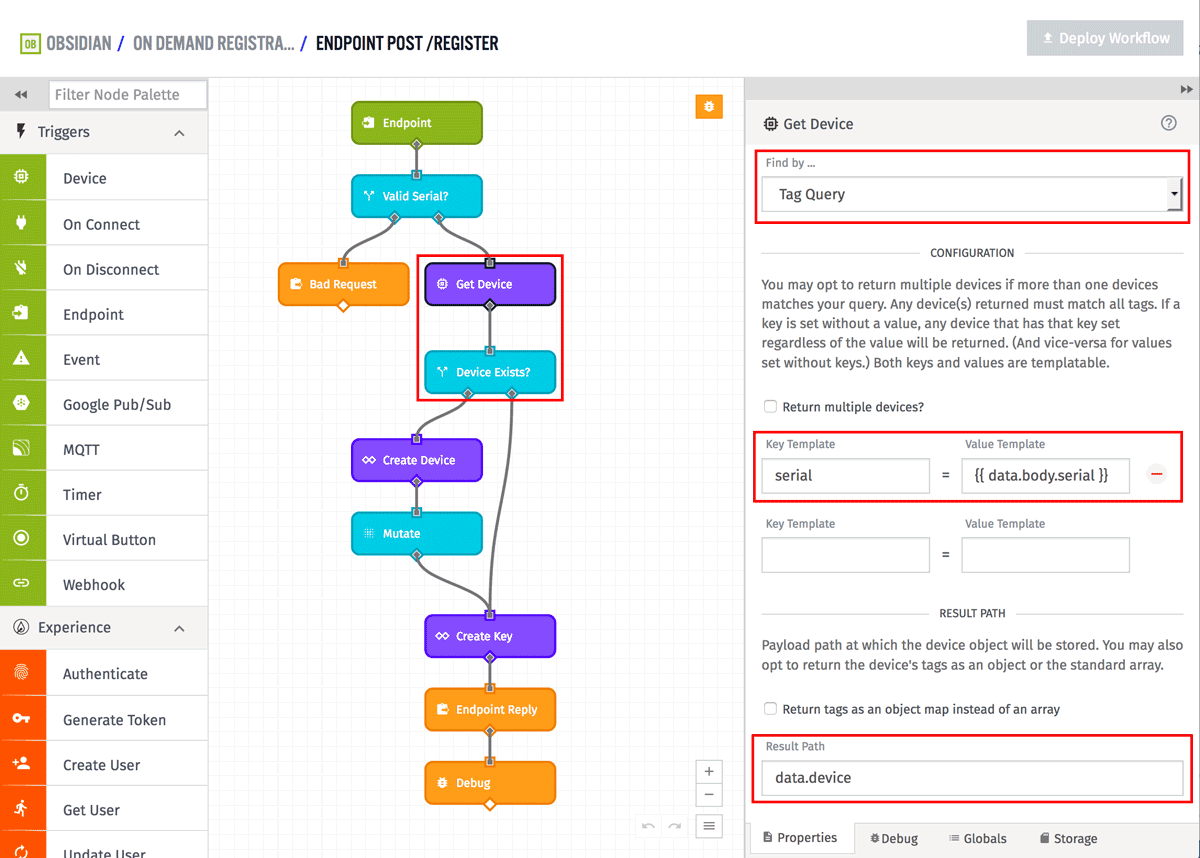
If the Get Device Node does not find a result, it returns null. The following Conditional Node is checking that a device was found by making sure "data.device" exists.
If the device already exists, this workflow will take the right branch and generate some keys. If the device doesn't exist, it will take the left branch to create one. Let's look at the nodes that create the device.
The first node is a Losant API node. The Losant API node can be used for nearly any operation against Losant's API. In this case, we're using it to create a device.
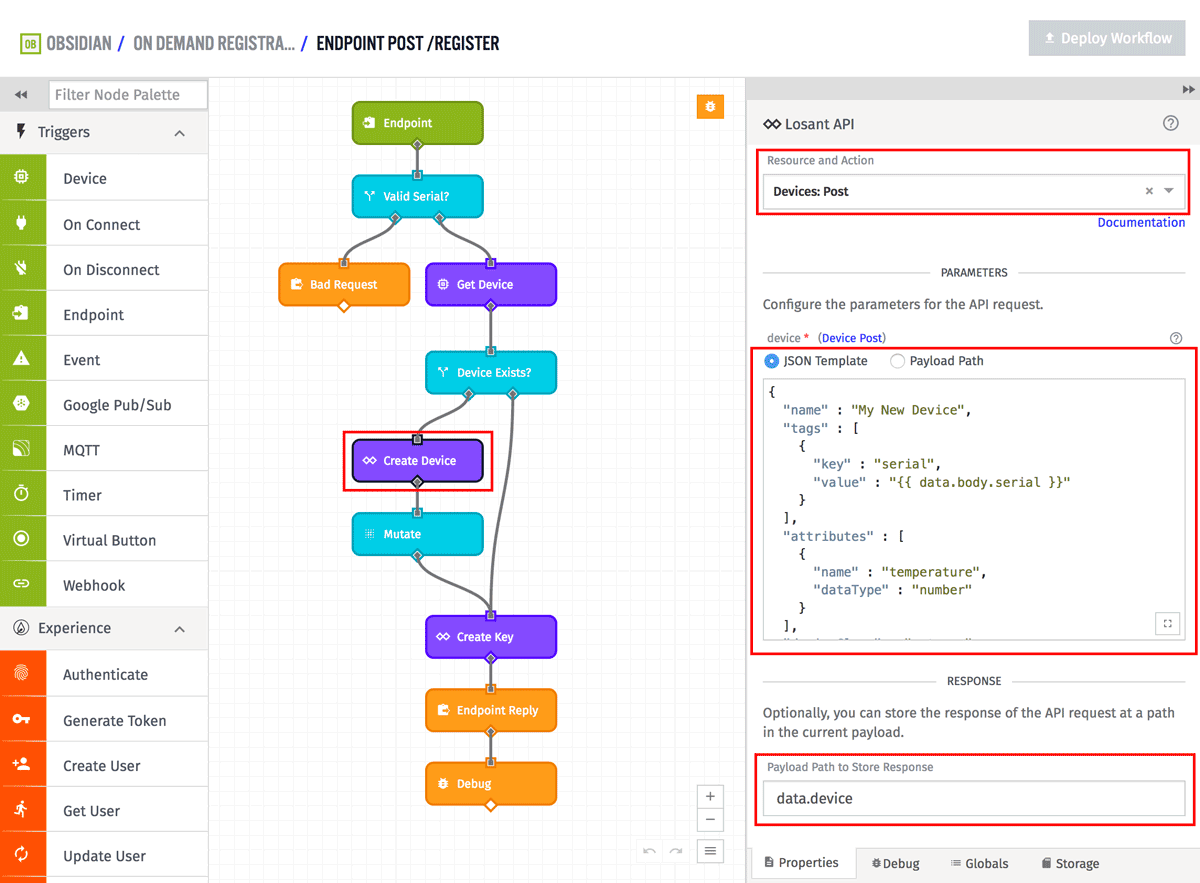
The Resource and Action should be set to Devices: Post. The only parameter to this action are the details of the device to create. This includes a name, tags, and attributes. For this example I added the serial tag and also added an example attribute for temperature. You may have different attributes or additional tags. You just need to make sure the serial tag matches the field used by the Get Device Node we saw earlier.
{
  "name" : "My New Device",
  "tags" : [
    {
      "key" : "serial",
      "value" : "{{ data.body.serial }}"
    }
  ],
  "attributes" : [
    {
      "name" : "temperature",
      "dataType" : "number"
    }
  ]
}
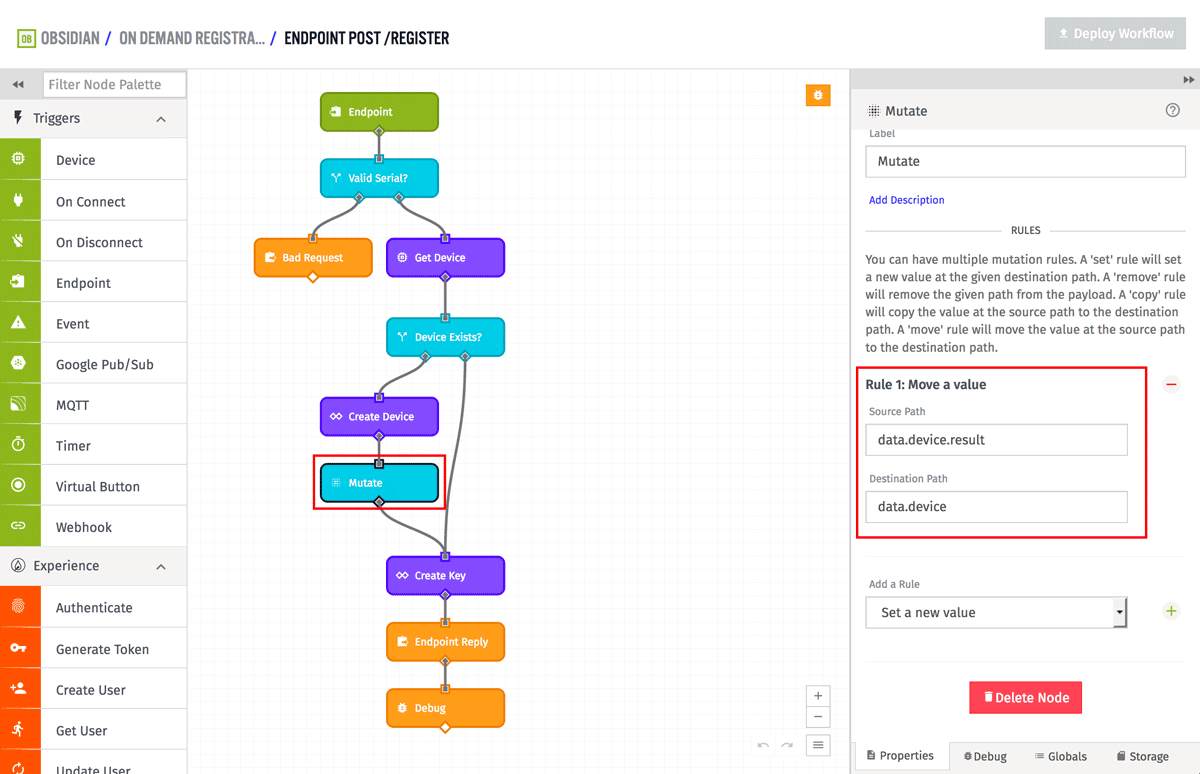
The following Mutate Node is there to make the output of the Losant API node match the output for the Get Device node. Making them match allows the rest of the workflow to work the same no matter which path was taken.
At this point, it's time to create the actual Access Key and Secret that the device can use in order to connect to Losant. This is done using another Losant API node.
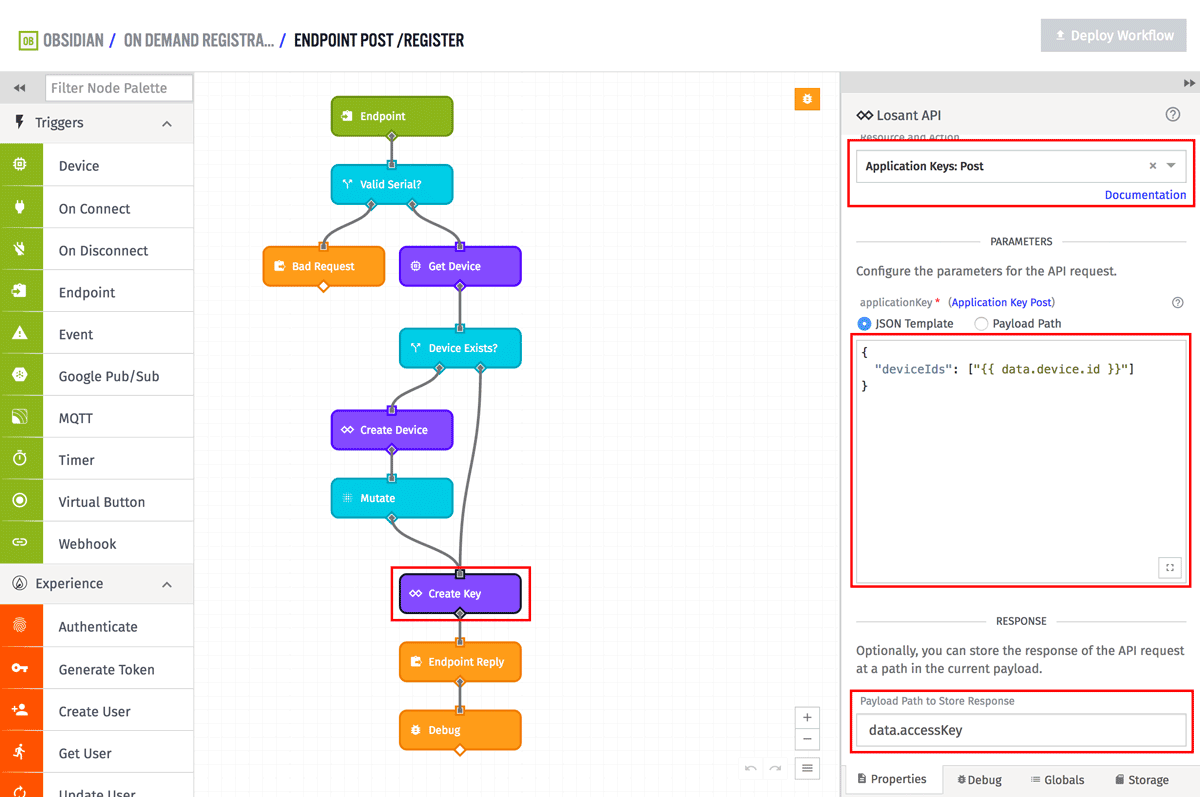
Set the Resource and Action to "Application Keys: POST". The body of this request includes the device IDs we'd like associated with the key. In this case, it's the device we just created.
{
  "deviceIds": ["{{ data.device.id }}"]
}
The last step for this node is to save the result of the API request, which will include the access key and secret, back on the payload at "data.accessKey".
Now that we have the device ID, access key, and access secret, we can now reply to the endpoint and return those values back to the device.
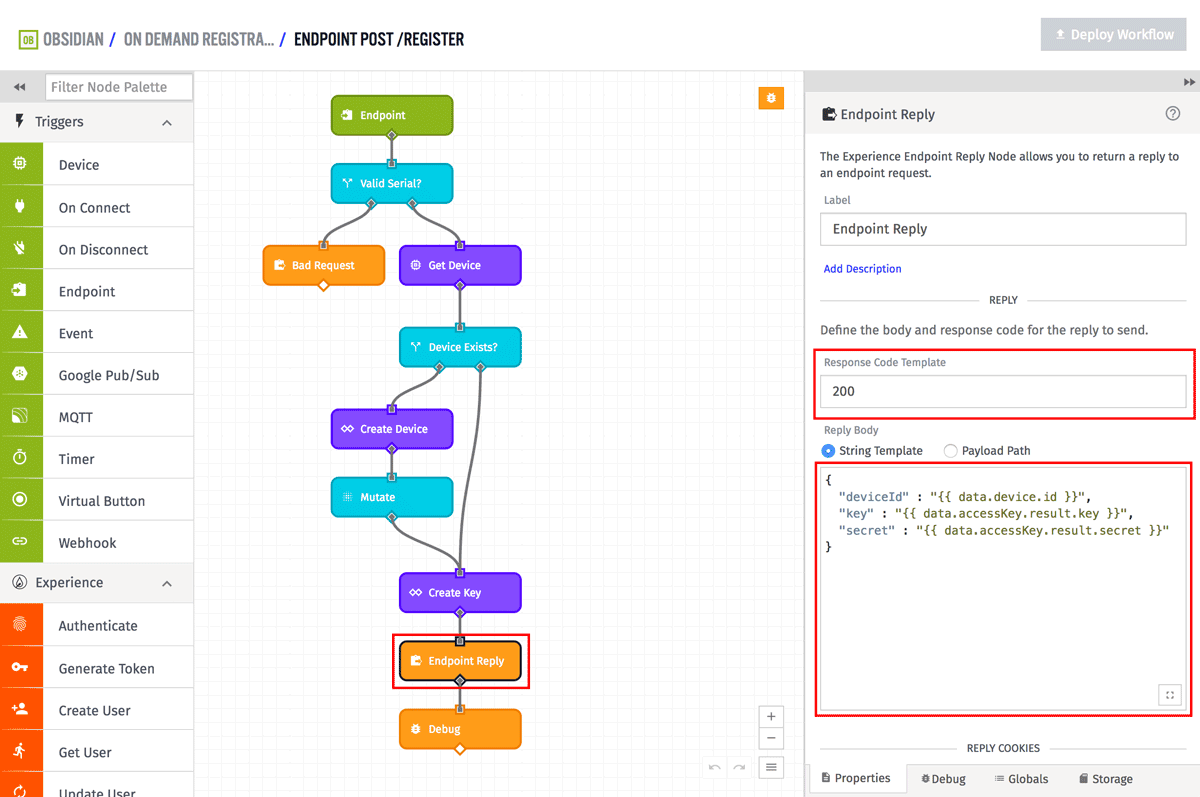
The actual format of the reply is up to you and how your device accepts data. In this example, I used JSON. The Response Code is set to 200 (OK) and the body is set to the following:
{
  "deviceId" : "{{ data.device.id }}",
  "key" : "{{ data.accessKey.result.key }}",
  "secret" : "{{ data.accessKey.result.secret }}"
}
Since I used JSON, I also added a "Content-Type" header and set the value to "application/json".
This workflow is now complete. You can test this endpoint by hitting "https://your-application-slug.onlosant.com/register" and viewing the JSON response.
Device Firmware
Now that we have an endpoint to request, let's look at some example Node.js firmware that makes use of it.
This code first checks to see if we've already requested and saved the credentials to a file. If we don't already have credentials, it uses the request module to make a request to our newly implemented register endpoint to get them. It then saves them to a file and uses the Losant MQTT client to connect using our newly obtained credentials.
As you can see, this firmware has no baked-in credentials and every instance of this device can use the same code. The only thing you'll need to change is how the serial number is obtained. As we mentioned earlier, using a unique ID of a hardware component, like Bluetooth or MAC address is often a good solution. If someone were to hack this device, they'd get an access key and secret that only provides access to for this single device, keeping everyone else's data secure.
What's Next
Getting your devices connected to the network is only the first step. It's now time to build something amazing. Check out our ever-growing list of Tutorials and Projects for further inspiration and knowledge.