
Microsoft Bot Framework is a relatively new service that normalizes the communication between chat providers, which ultimately makes it much easier to build and deploy bots. When combined with Losant's visual workflow engine, you can build complex bots without having to write any code. In this tutorial, we're going to demonstrate how to use Microsoft Bot Framework and the Losant IoT Platform to quickly build a bot for Slack.
The bot we're going to build in this tutorial will be a weather bot. We're going to use the data collected in the Losant Walkthrough. If you've already done the walkthrough, then this will be a good addition to that application. Regardless of the underlying data, the lessons from this tutorial will apply to any kind of Slackbot you might want to build.

Create Losant Webhook
There are a few ways to implement bots using Microsoft Bot Framework. This tutorial will use their API. The first thing Bot Framework needs is a URL that it can invoke whenever a user enters a message. This webhook will in turn invoke a Losant workflow that will generate the reply.
If you don't already have a Losant account, sign up for free, and then create a new application.
Inside your application, click the Webhooks main menu and create a new Webhook.

The only field you need to fill out is the name. All other fields can be left as their default values. Once you click the "Create Webhook" button, the screen will update and you'll be presented with your webhook URL.

Copy this URL somewhere convenient. It'll be used in the following steps.
Register Bot With MS Bot Framework
After logging in to Microsoft Bot Framework, you'll be shown a list of your bots. If you don't have any, the list will be blank. Click the "Create a bot" button to create a new one.

The next page will instruct you to download the Bot Builder SDK. Since we're using Losant to develop this bot, the SDK will not be needed. You can skip that step and click the "Register" button to continue.

The next form is where you'll configure the various details of your bot.

- Set the display name, bot handle, and description to anything you'd like. The handle must be unique, so if someone else already took it, you'll have to pick something else.
- Set the messaging endpoint to the Losant Webhook URL you obtained earlier.
- Click the "Create Microsoft App ID and password" button and follow those instructions to create an app ID that you'll paste into the text field.
All other fields on this form can be left blank for the purposes of this tutorial. After you click the "Register" button, you'll be presented with your new bot.
Add Slack Channel
The real value of Microsoft Bot Framework is that you can write your bot logic once and deploy it into many different chat applications. By default, Skype and Web Chat have automatically been added. Since this tutorial is covering how to create a Slackbot, click the Slack logo under the channels to add Slack. Feel free to explore different chat applications on your own. The bot we create should easily support most of them.

After clicking the Slack logo above, you'll be presented with a step-by-step guide to configure Slack with the required details.

For this tutorial you'll need to complete every step except the two marked as optional. Essentially through this process you're adding a bot to Slack and pointing it to Microsoft Bot Framework. Every time a message is sent to the Slack bot, it's forwarded to Bot Framework, normalized, and then forwarded to your Losant Webhook. At the time I did these steps, the screenshots in Bot Framework's guide were a little out-of-date compared to Slack's interface, but they're still fairly easy to figure out.
Create the Bot Logic
After configuring the Slack channel, we now have everything in place to begin actually creating our bot's logic. Losant Webhooks work by triggering a Workflow. This is where all of our logic to generate a reply will live. The workflow can then send a message back to Bot Framework to reply to the user.
Create a new Workflow by clicking "Create Workflow" under the main Workflows application menu.

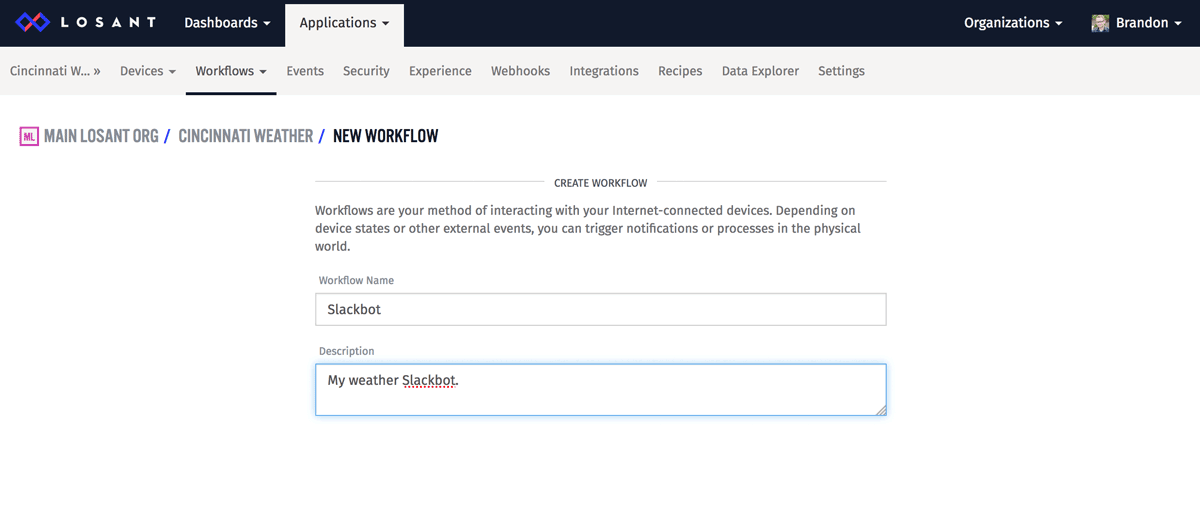
Set the name and description to anything you'd like. After clicking the "Create Workflow" button at the bottom, you'll be presented with a blank workflow canvas.

You can download and import the finished workflow if you'd like. The rest of this tutorial will provide a detailed overview of how to build it.
The first step is to simply use a Debug node to display the payload that Bot Framework is sending our webhook. This is done by first adding a Webhook Trigger and then adding a Debug node and connecting it to the output of the trigger.

On the Webhook Node, make sure the webhook you created earlier is selected as the one that will trigger this workflow. There is no configuration required for the Debug node. After the nodes are added, click the "Deploy Workflow" button on the top-right.
You can now open Slack and send any message to your bot. If everything is configured correctly, you'll see a message appear in the debug panel.

Bot Framework sends a lot of information, but the important part is the text that the user sent. This will be on the payload at data.body.text. Debug output is extremely useful when building workflows since most nodes operate on data at various paths on the payload.
In order to reply back to the user, we have to make a request to Microsoft Bot Framework's API. This request requires an OAuth token. To get the token, we have to make a separate API request. The token we get also expires, so we want to automatically renew it every once in a while. Fortunately this is easily done with a few additional nodes in this workflow.

First, add a Timer Trigger and a Virtual Button Trigger. Set the Timer's interval to every 30 minutes. The token we receive expires every hour, so requesting a new one every 30 minutes will ensure we never have an expired token. The Virtual Button will allow us to trigger this workflow manually without having to wait 30 minutes for the Timer to trigger.
Next, add an HTTP Node and connect it to the Timer Trigger and the Virtual Button. This is the node that will be making a request to Bot Framework in order to get a token. Set the following configuration options:
- Set the
Request MethodtoPOST. - Set the
URL Templateto:
https://login.microsoftonline.com/botframework.com/oauth2/v2.0/token
- Set the
Body Templateto:grant_type=client_credentials&client_id=YOUR_APP_ID&client_secret=YOUR_APP_PASSWORD&scope=https%3A%2F%2Fapi.botframework.com%2F.default
YOUR_APP_IDandYOUR_APP_PASSWORDcan be obtained by going into your bot's settings and clicking the "Manage Microsoft App ID and password" button.
- Set a
Content-Typeheader toapplication/x-www-form-urlencoded. - Set the
Payload Path to Store Responseto "data.tokenResponse".
Next, add a Store Value Node so that the token we obtain can be used by other parts of this workflow.
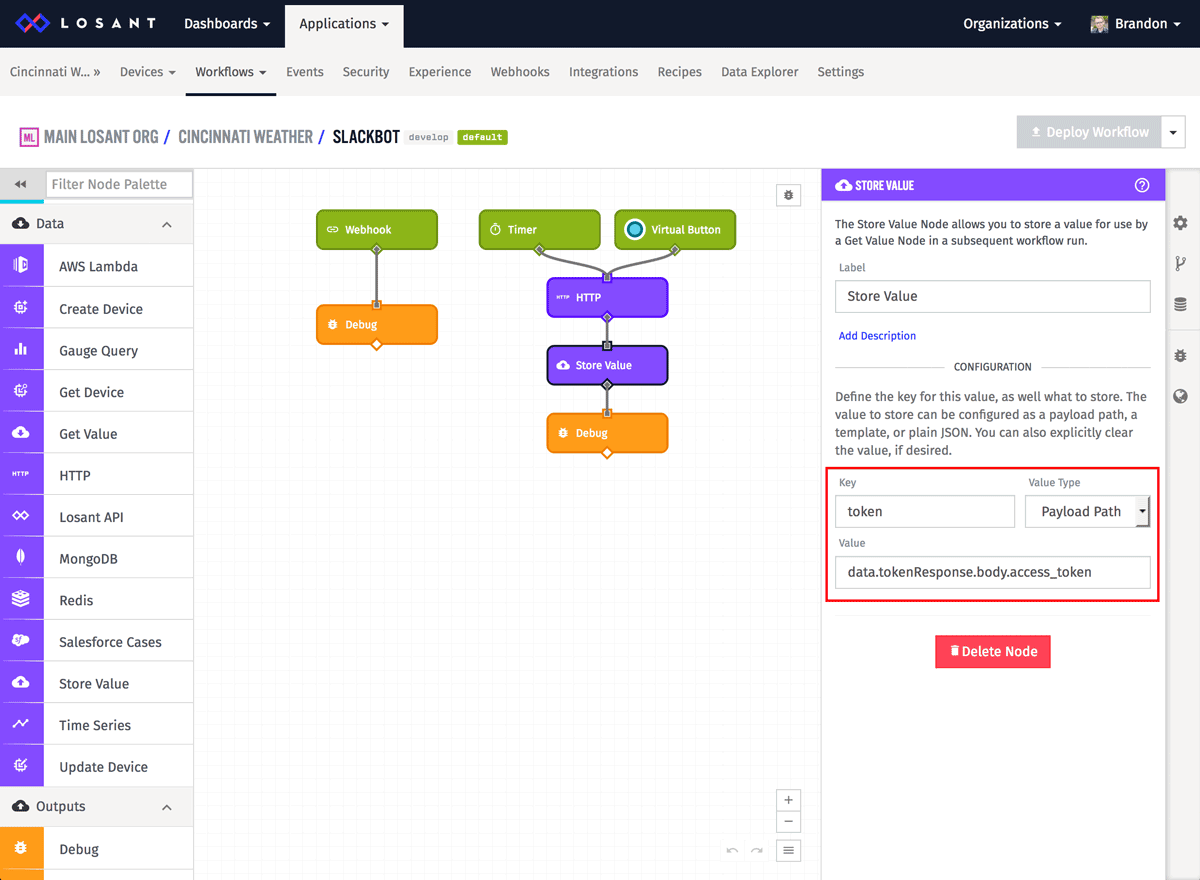
- Set the
Keyto "token". - Set the
Value TypetoPayload Path. - Set the
Valueto "data.tokenResponse.body.access_token".
At this point we now have our workflow grabbing an access token every 30 minutes from Microsoft Bot Framework. The next step is to use this token to authenticate against the Bot Framework API in order to send replies.
The first reply we'll send is a simple welcome message. Usually this will only be displayed if the user sends something we don't understand, but for now, we'll just reply to every message with it.
We'll do this by adding some nodes underneath the Webhook Trigger we added earlier.
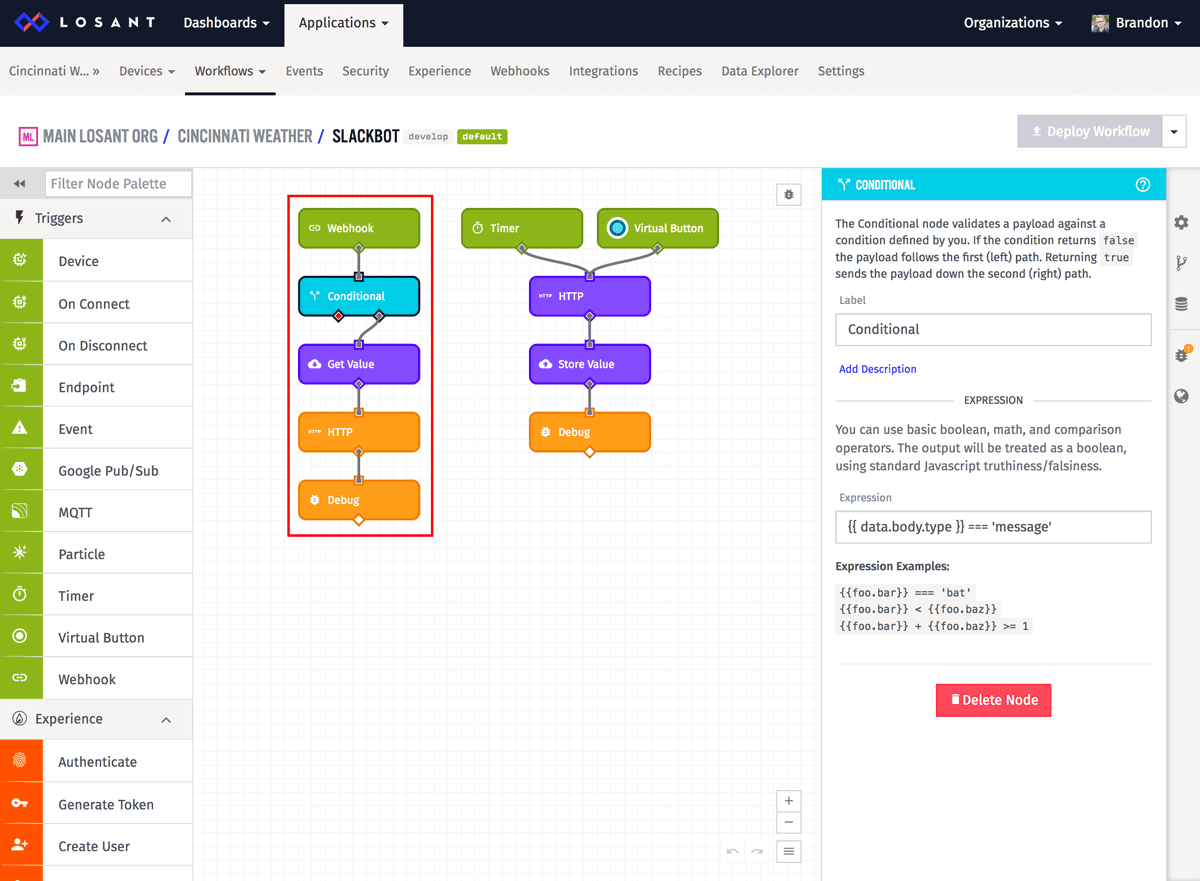
The first node is a Conditional Node. This is needed because Bot Framework will send us all kinds of events, like when the user started typing, that we don't need to worry about right now. The only thing we care about is when the user sent us a message. We can do this by checking the type property.
{{ data.body.type }} === 'message'
Next, we need to get the access token we obtained earlier. This token is automatically being renewed and stored by our Timer, so we just need to grab it using a Get Value node.
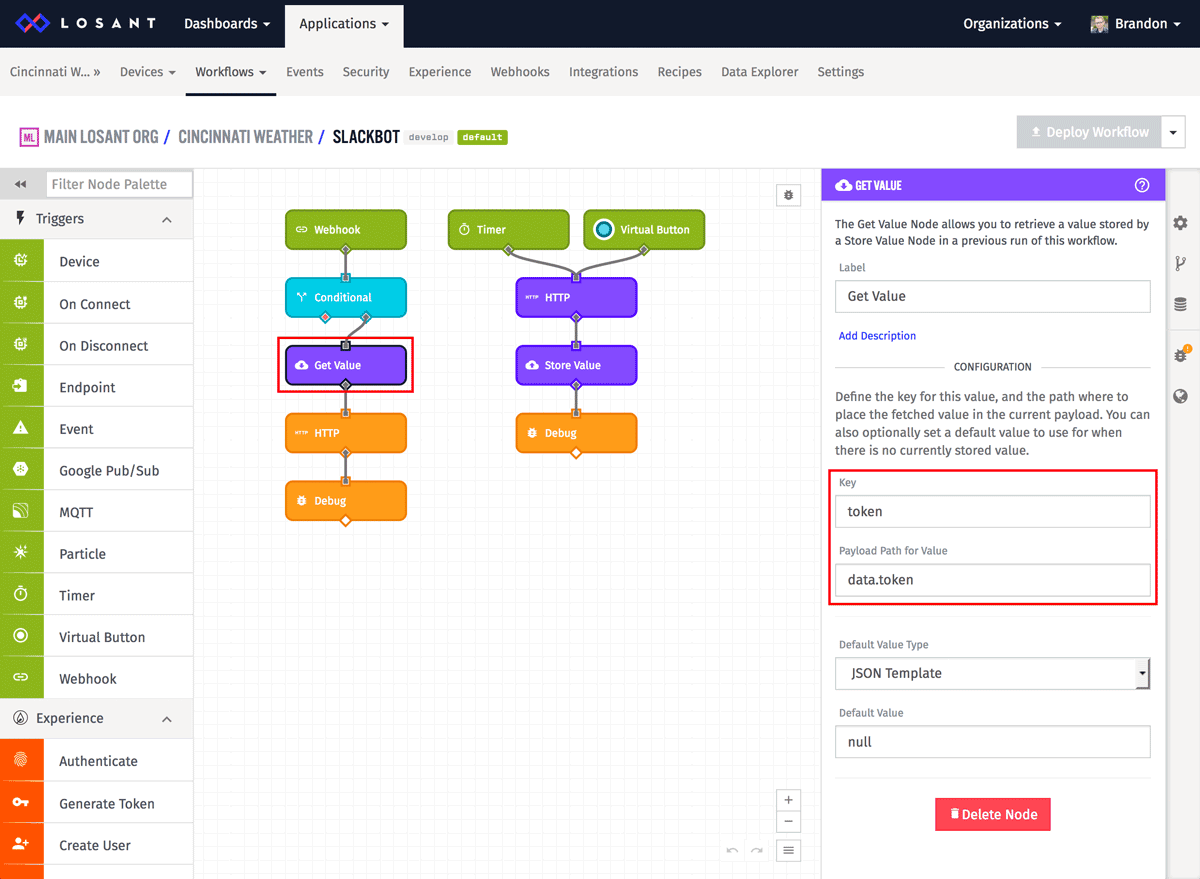
Set the Key to "token" and put the value on the payload at "data.token".
The next node is the HTTP request back to Bot Framework that will allow us to reply to the message that came in. This is where that access token is needed.
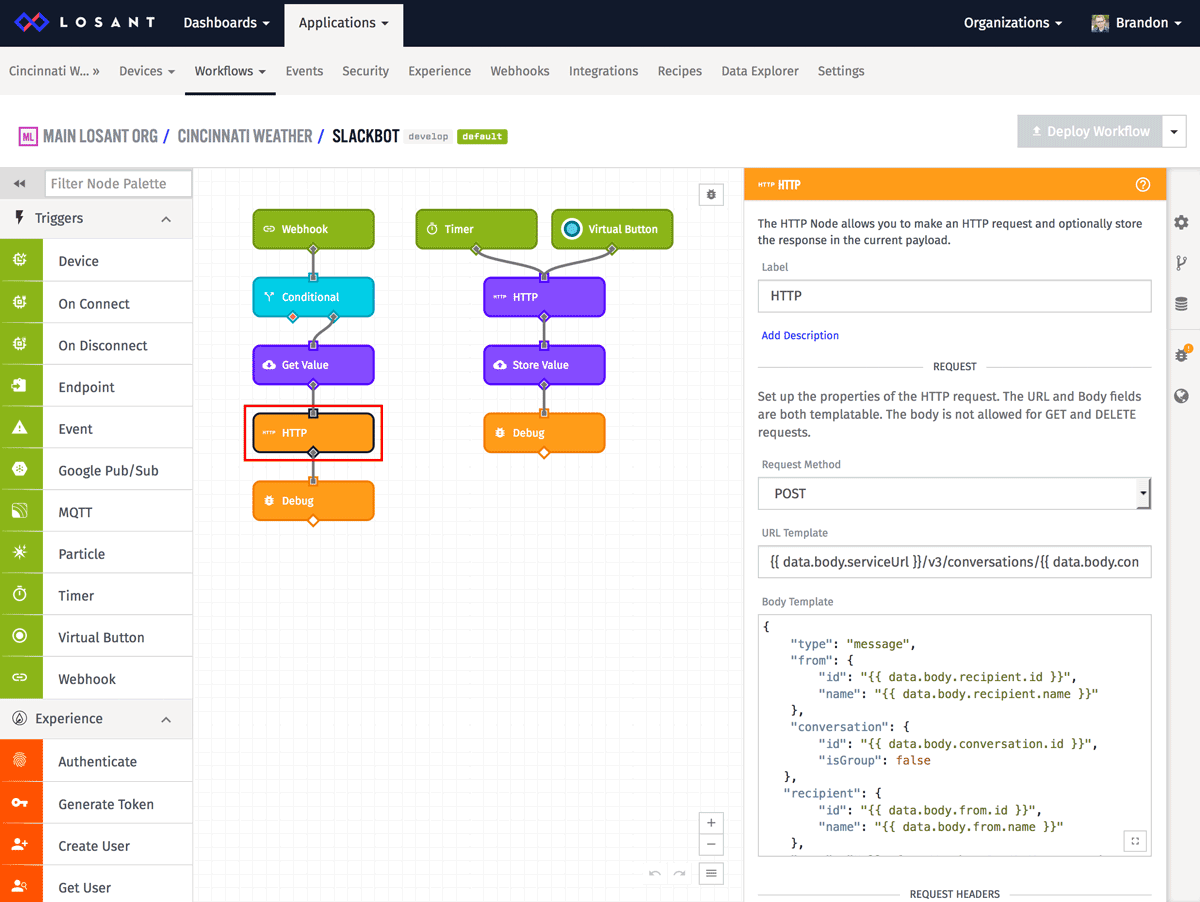
To craft a reply, we need to send a message back to Bot Framework that also includes what conversation we're in and who the recipient is. Fortunately, all of these were provided in the original message they sent us.
- Set the Request Method to POST.
- Set the URL Template to:
{{ data.body.serviceUrl }}/v3/conversations/{{ data.body.conversation.id }}/activities/{{ data.body.id }} - Set the Body Template to:
{
    "type": "message",
    "from": {
        "id": "{{ data.body.recipient.id }}",
        "name": "{{ data.body.recipient.name }}"
    },
    "conversation": {
        "id": "{{ data.body.conversation.id }}",
        "isGroup": false
   },
   "recipient": {
        "id": "{{ data.body.from.id }}",
        "name": "{{ data.body.from.name }}"
    },
    "text": "Hello from Weather Bot!\nYou can ask one of the following:\n1. temperature?\n2. average temperature?\n3. high temperature?\n4. low temperature?",
    "replyToId": "{{ data.body.id }}"
} - Add an
Authorizationheader with the value of "Bearer {{ data.token }}". - Add a
Content-Typeheader with the value ofapplication/json. - Set the Payload Path to Store Response to "data.response".
There's a lot going on here, and you can learn more details by checking out Bot Framework's API documentation. The most important detail is the text property within the body. This is the actual message you'll be sending back to the user. In this example, we're telling the user what questions are understood by this bot.
You can now deploy this workflow and send any message to your bot. No matter what you send, this bot will reply with the above message. Let's now add the ability to reply with the current temperature if the user asks for it.
As I mentioned earlier, this tutorial is an extension to our weather station walkthrough, which means we already have access to weather data that's being stored on one of our devices. The following steps will be using that data, however the lessons learned will apply to any type of bot you'd like to make.
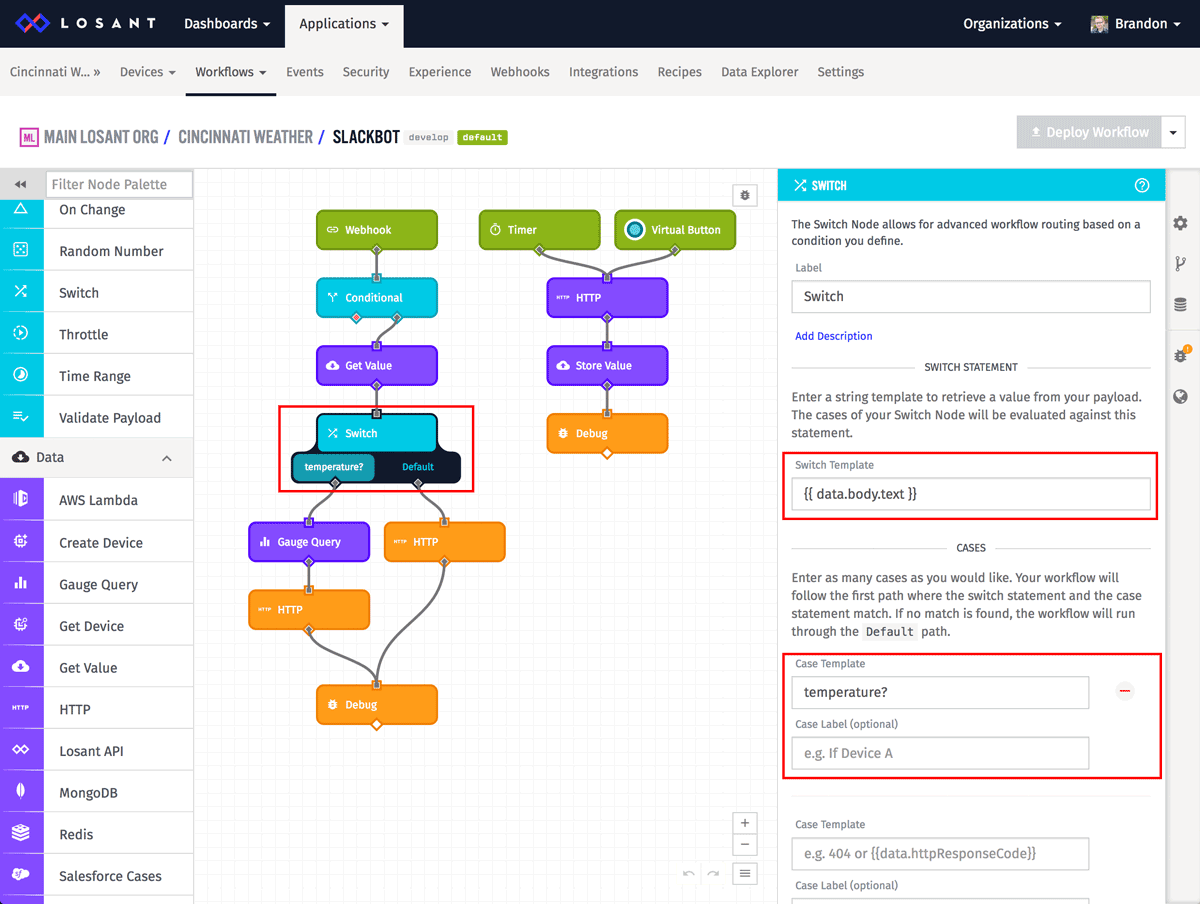
In order to reply differently based on what the user asked, we're going to use a Switch Node. The Switch Node lets us take different paths based on the value of some input. In this case, it will be based on what the user has sent to our bot.
Set the Switch Template to "{{ data.body.text }}" and add one case for "temperature?". In this example, the user must send us the exact message in order for this bot to understand it. You can use a Function Node or other Conditional Nodes to make much more complex matching rules if needed.
Connect the Default route of the Switch Node to the HTTP Node we created earlier. This means if the user sends something that doesn't match any case in our Switch Node we will reply with the generic welcome message.
The "temperature?" case should be connected to a Gauge Query Node, which will allow us to query device data in order to respond with the current temperature.
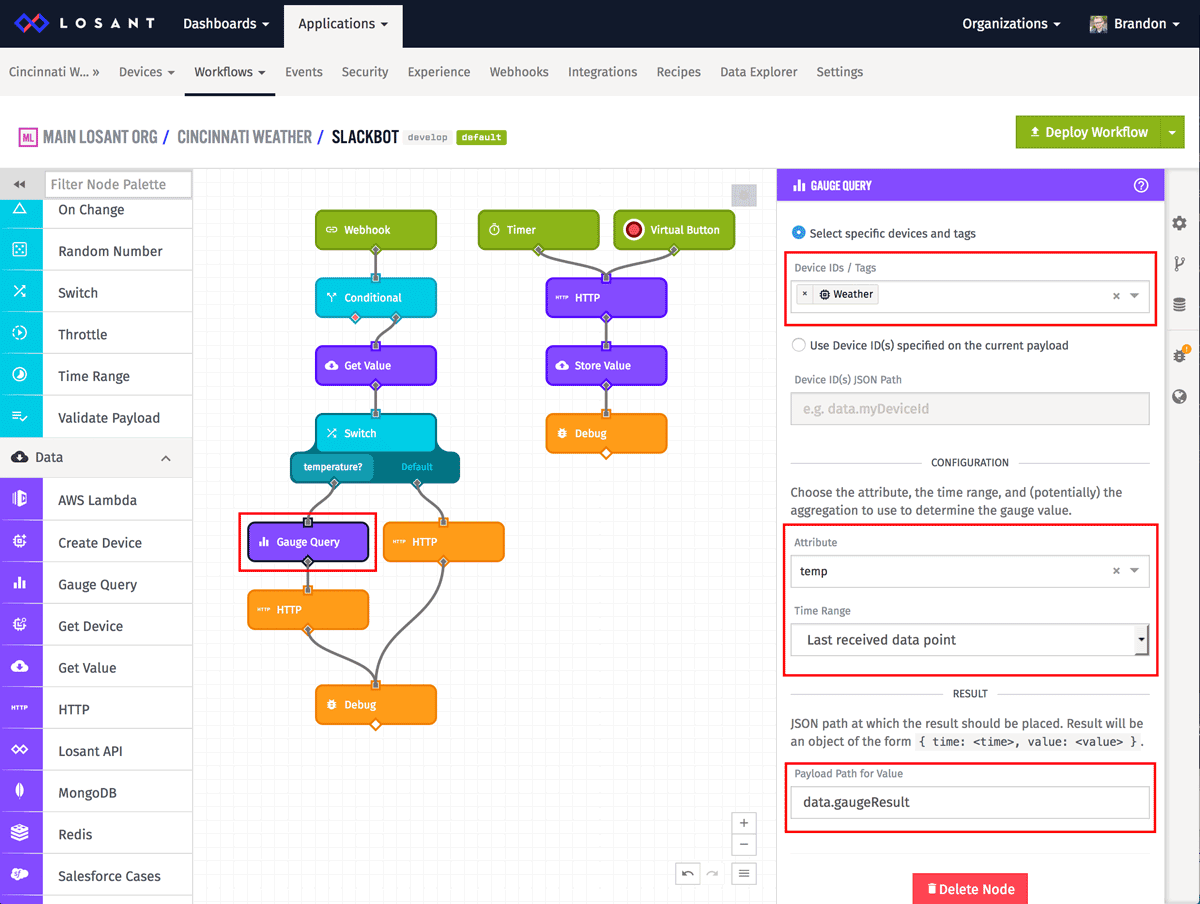
- Set the
Device IDs / Tagsto your weather device. If you followed the walkthrough, this device will be collecting weather data that we can access. - Set the
Attributeto "temp". - Set the
Time RangetoLast received data point. - Set the
Payload Path for Valueto "data.gaugeResult".
This node queries Losant's built-in data storage for the last reported temperature for our device. It then puts the result of that query back on the payload at "data.gaugeResult", which will allow us to access it from the next node.
The last node required to reply with the current temperature is another HTTP Node.
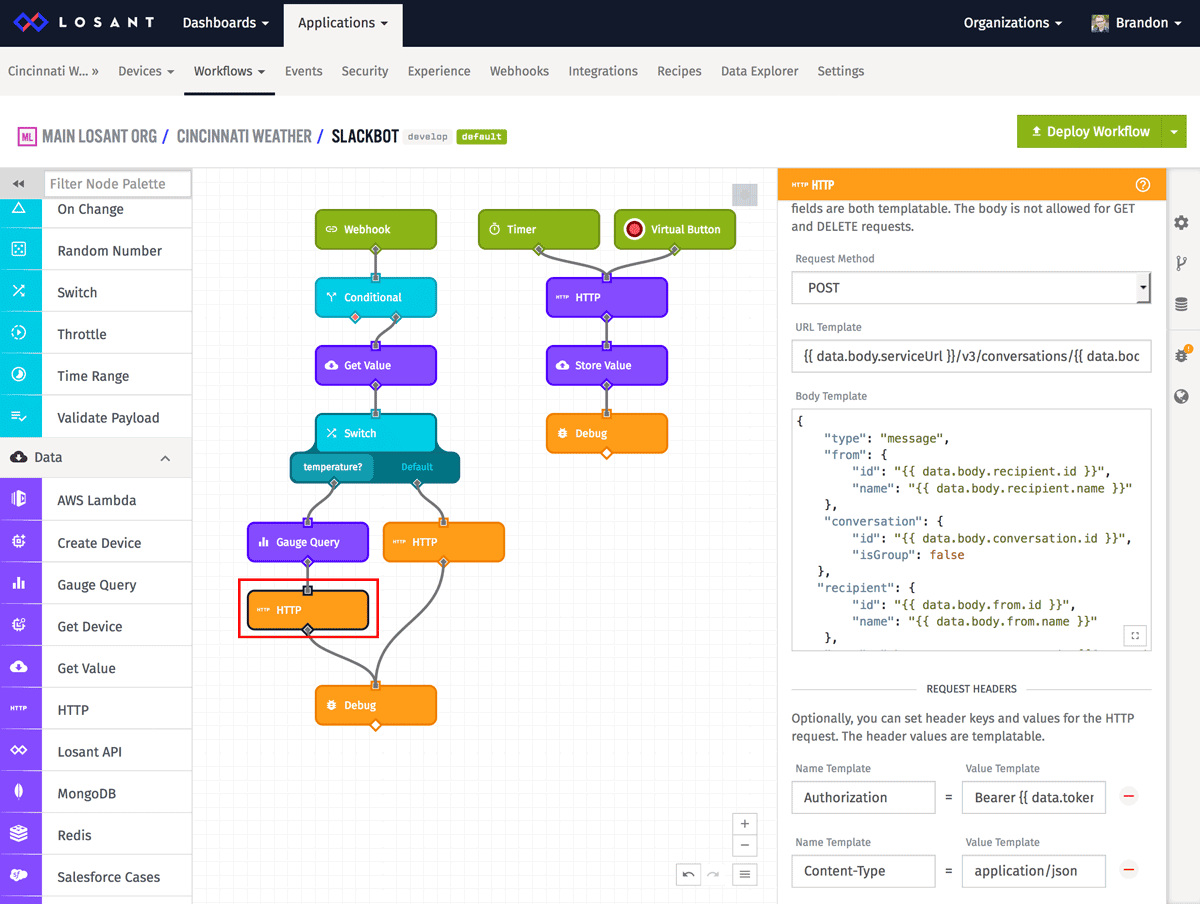
- Set the Request Method to POST.
- Set the URL Template to:
{{ data.body.serviceUrl }}/v3/conversations/{{ data.body.conversation.id }}/activities/{{ data.body.id }} - Set the Body Template to:
{
    "type": "message",
    "from": {
        "id": "{{ data.body.recipient.id }}",
        "name": "{{ data.body.recipient.name }}"
    },
    "conversation": {
        "id": "{{ data.body.conversation.id }}",
        "isGroup": false
   },
   "recipient": {
        "id": "{{ data.body.from.id }}",
        "name": "{{ data.body.from.name }}"
    },
    "text": "The current temperature is {{format data.gaugeResult.value '.2f'}} ˚F",
    "replyToId": "{{ data.body.id }}"
} - Add an
Authorizationheader with the value of "Bearer {{ data.token }}". - Add a
Content-Typeheader with the value ofapplication/json. - Set the Payload Path to Store Response to "data.response".
As you can see, everything is identical to the previous HTTP node we added, except that we've changed the text field.
The current temperature is {{format data.gaugeResult.value '.2f'}} ˚F
In the previous Gauge Query node, we put the result of the query on "data.gaugeQuery". We can now access that result and send it back to the user. We've added the format Handlebars helper in order to make the number more user-friendly.
You can now deploy this workflow and send "temperature?" to your bot. It will then reply with the current temperature.
I'll leave the other supported messages as an exercise for you. As a hint, they involve more cases in the Switch Node and different Gauge Query Nodes to access the minimum, maximum, and average temperatures over the last 24 hours.
You can also download and import the finished workflow if you'd like.
Build Something Awesome
This completes our tutorial on how to build a Slackbot with no code using Microsoft Bot Framework and the Losant IoT Platform. If you've built an awesome bot using the lessons learned above, please let us know in the forums or a comment below!