
Amazon opening up Alexa with the ability to add custom skills was one of the biggest advancements to the voice ecosystem we've ever seen. Developers have swarmed to this new input device and have steadily been adding voice support to a variety of existing industries and technology.
The development barrier, however, is still quite high when adding a new Alexa skill. Amazon offers two ways for Alexa to interface with your custom logic. It's either implemented as an AWS Lambda function or you're required to host your own web server. Both options require a lot of bootstrapping and code in order to implement even the simplest of Alexa skills.
Losant's visual workflow engine makes this a lot easier. Skills can be created without any code or having to host your own server.
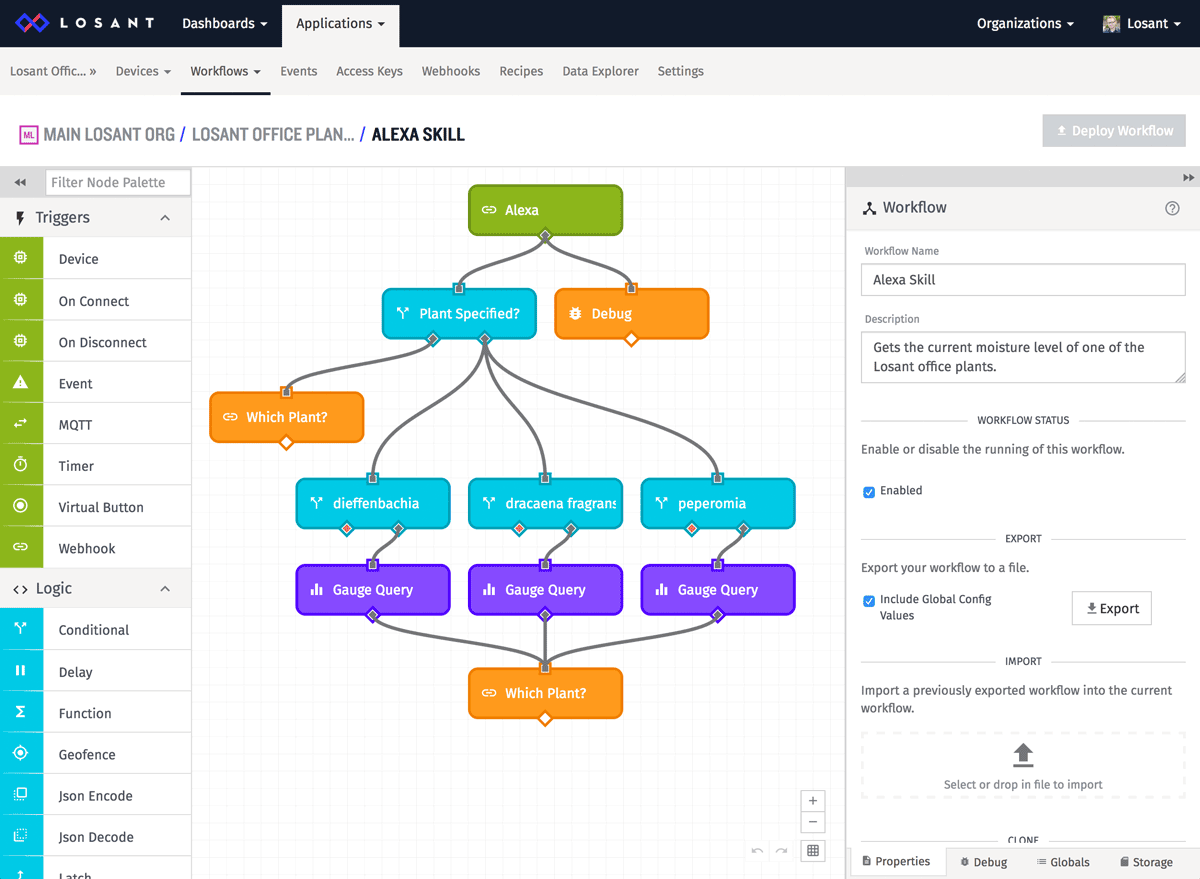
This guide will walk through how to build the above workflow, which is an interactive Alexa skill that lets me ask for the current moisture level of our office plants. If you don't provide a specific plant name, Alexa will prompt you for the plant you'd like to know about. Here it is in action:
Our plants are being measured by our moisture sensors. You can view the current and historical moisture data by checking out the public dashboard.
You may not have office plants or even sensor data, but that's ok. Losant workflows are powerful enough to build an Alexa skill to do almost anything.
Create Losant Webhook
As I mentioned earlier, an Alexa skill can be implemented with a web server. Alexa will send details about what the user said to your server and how you reply determines what Alexa will say back. With Losant's webhook support, you can accept these messages from Alexa without you having to set up a server yourself.
If you haven't already, sign up for Losant and create an application. You can name it anything you want.
Next, create a new webhook from the main "Webhooks" menu.
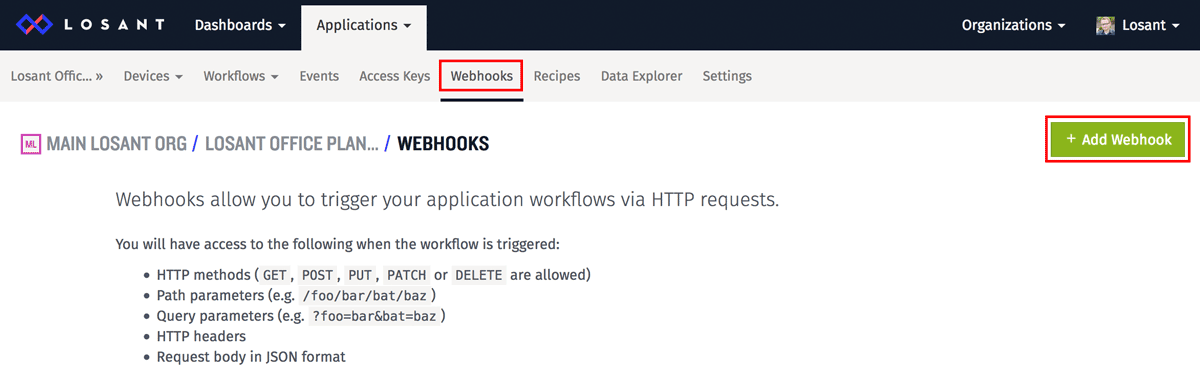

- Set the name to anything you want.
- Leave the verification settings as their defaults.
- Check the "Wait for reply from workflow" option.
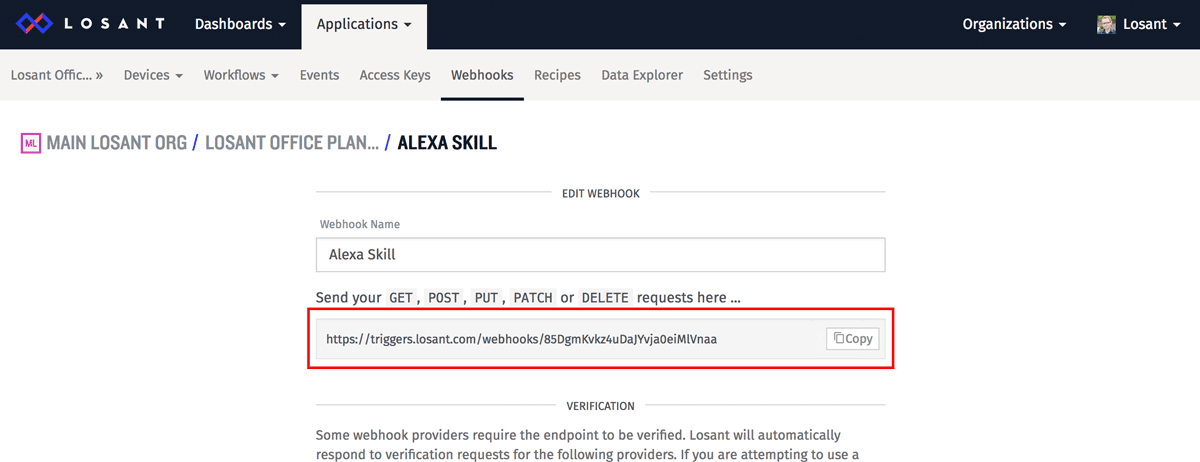
After you click "Create Webhook", you'll be shown its URL. This is what we can give to Alexa when it invokes our custom skill. Copy/paste this somewhere convenient since we'll need it in the next section.
Set Up Alexa
If you're using an Echo or a similar device, follow all of the provided instructions to getting it connected to your Amazon account and joined to your WiFi network. Next, sign in your Alexa Amazon Developer Portal.
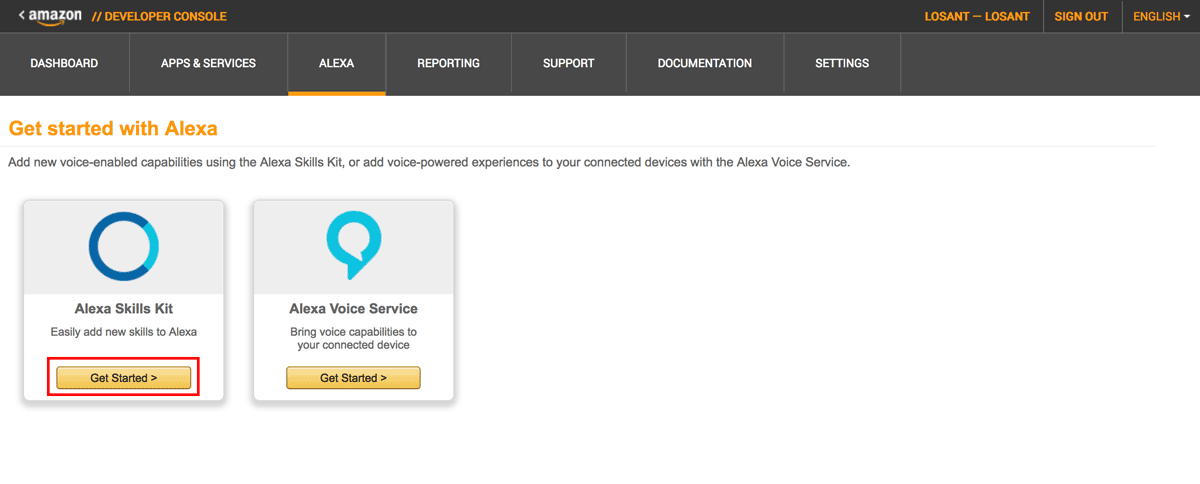
We'll use the Alexa Skills Kit to add a new skill. Click the "Get Started" button to begin.
Next, click the "Add a New Skill" button to create a new Alexa skill.

You'll now be presented with a few steps to complete in order to fully set up your new Alexa skill. Let's go through each one.
Skill Information
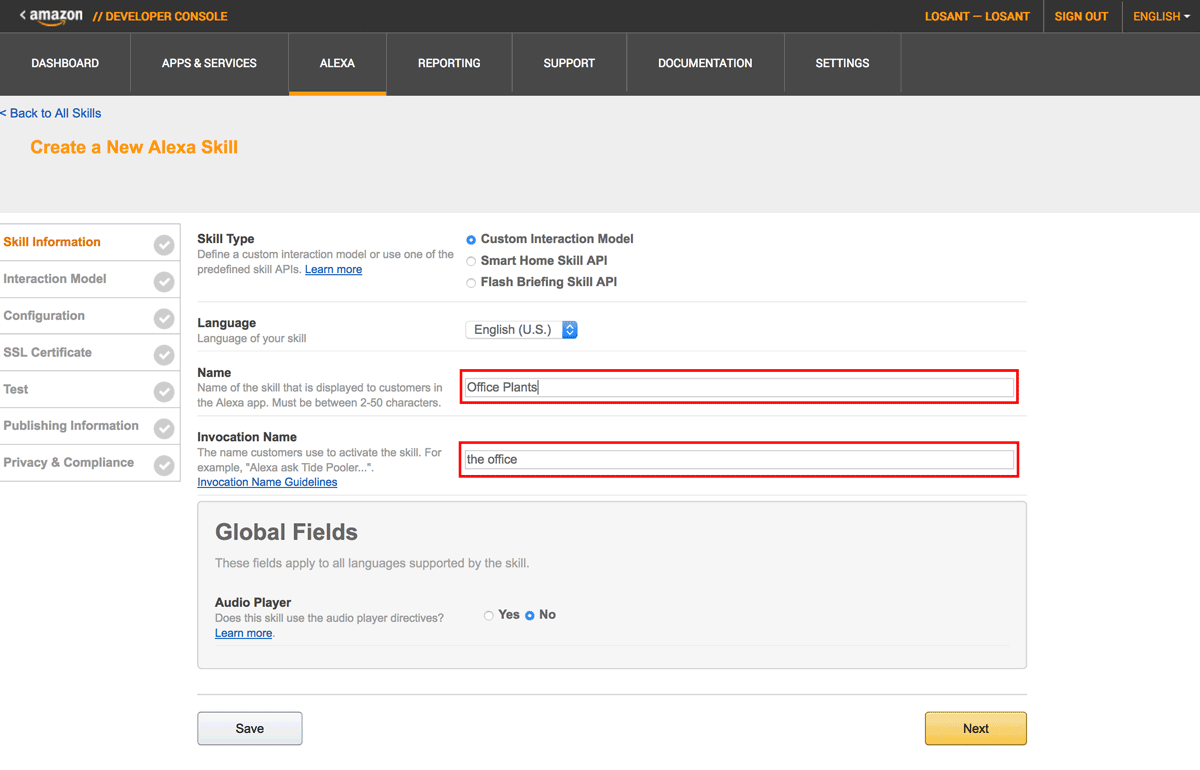
On the first step, you need to set the "Name" and "Invocation Name". The "Name" can be anything you want. The "Invocation Name" is pretty important. This is what your users will say in order to invoke your custom skill.
Alexa, ask [invocation name] [utterance].
In the above example, I set the invocation name to "the office" so my users would invoke Alexa by saying something like this:
Alexa, ask [the office] [about the plants].
Interaction Model
The next step is to define the interaction model. This is also the most difficult part of building an Alexa Skill for developers new to the process.
It's important to understand that the actual words you speak to Alexa are not sent to your custom skill. Alexa converts the words into something easier for machines to understand. Amazon calls these "Intents". This step defines how spoken phrases are converted to these Intents.
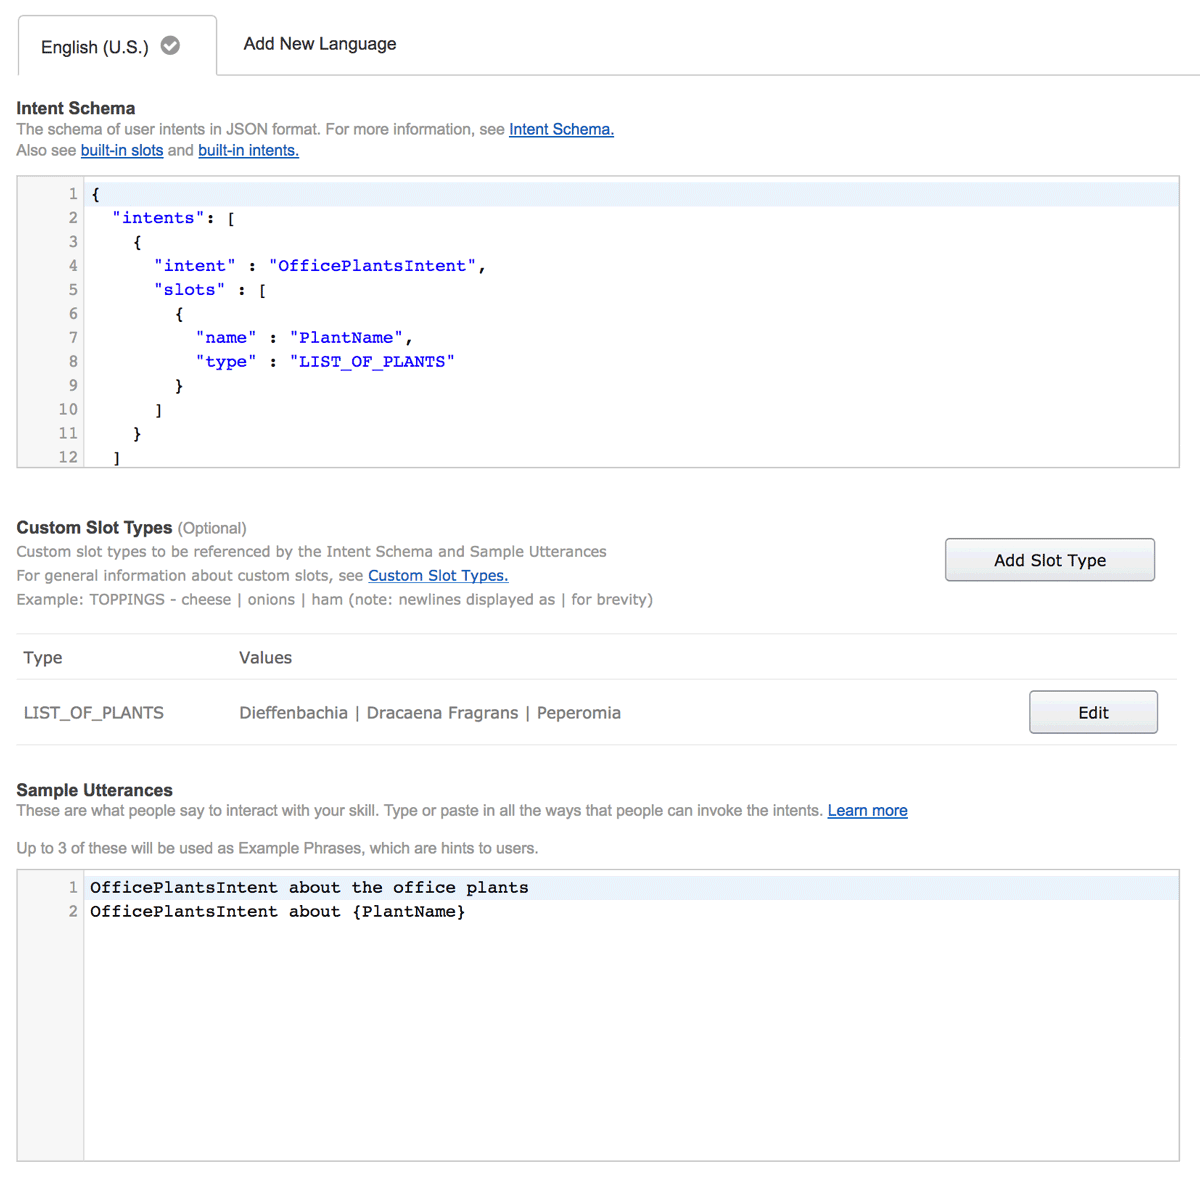
This step is particularly challenging because Intents, Slots, and Utterances are interdependent, making it hard to know where to start. I think it's easiest to start at the bottom and first define the utterances.
OfficePlantsIntent about the plants
OfficePlantsIntent about {PlantName}
These are all the possible phrases that Alexa is listening for when your users says something. For example, my users could say "Alexa, ask the office about the plants" or they could say "Alexa, ask the office about peperomia".
Alexa maps each utterance to an Intent. In this example, I named the intent "OfficePlantsIntent", which we'll define later. By mapping utterances to intents, Alexa provides a way for you to specify all the various ways users may be asking for the same thing. Skills can be made up of many intents, depending on the information users will be requesting. Since my users can only ask about the plants, I only have one intent.
You may have noticed the {PlantName} placeholder in the utterance. Amazon calls these "Slots". A slot provides a way for a user to request information about a specific item. In my example, the slot is one of three plants: Dieffenbachia, Dracaena Fragrans, or Peperomia. In order for Alexa to know which item a user was talking about, we have to first define all available items by adding a custom slot type.
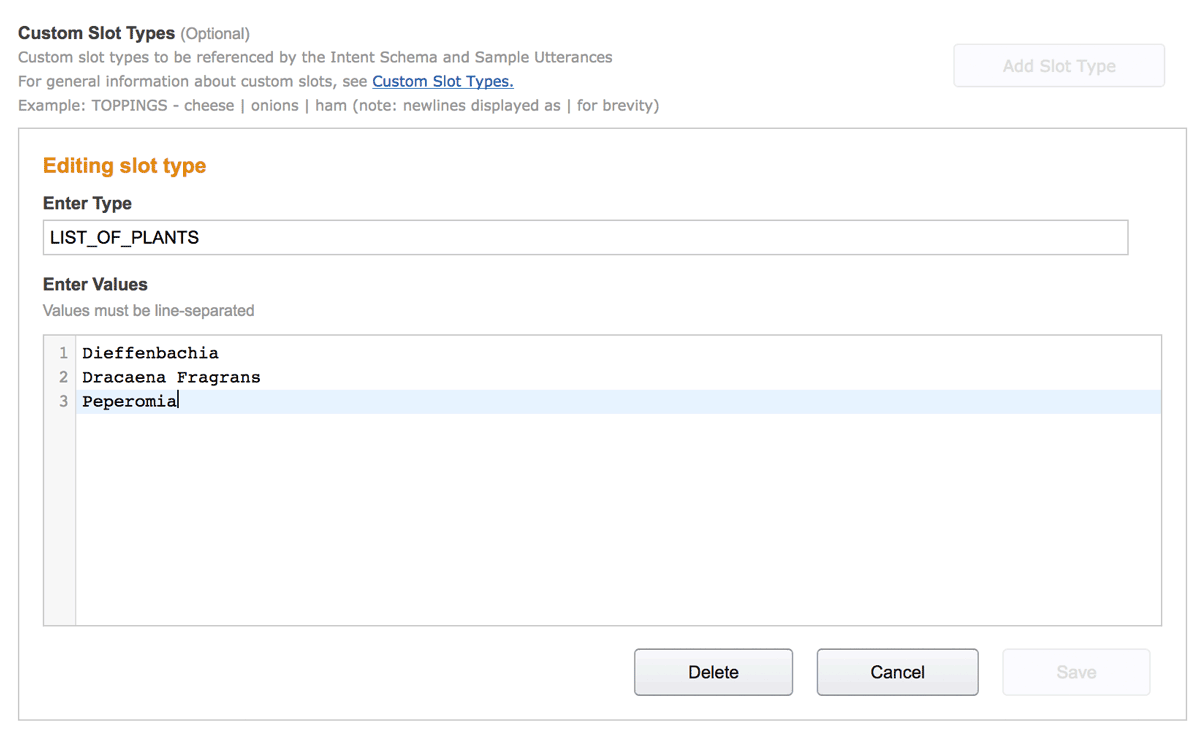
First, give the slot a name. In my example, the name is "LIST_OF_PLANTS". Next, provide all possible values. Each value must be on a separate line.
The last step is to define the intent schema. This is where we actually define the "OfficePlantsIntent" used earlier.
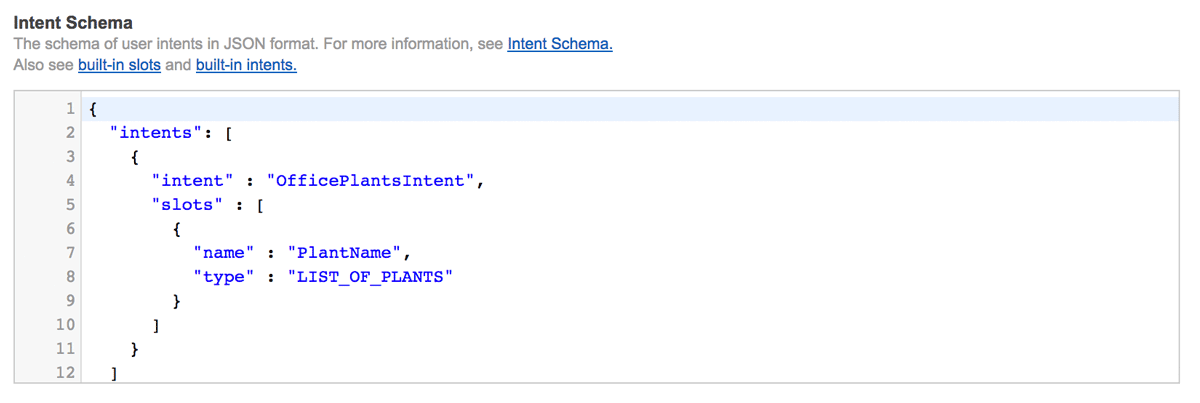
Here is the schema for this example:
{
  "intents": [
    {
      "intent" : "OfficePlantsIntent",
      "slots" : [
        {
          "name" : "PlantName",
          "type" : "LIST_OF_PLANTS"
        }
      ]
    }
  ]
}
Now you can start to see how everything comes together. The schema starts with an array of intents. This example has one. Each intent can then have an array of slots. Again, my example just has one. The name of the slot should match the placeholder used in the utterance (PlantName). The type should match the type specified in the custom slot (LIST_OF_PLANTS).
With this configuration, Alexa now has all of the needed information to convert what the user has said into something easy for a machine to respond to. If the user asks about a specific plant, Alexa will tell us that the user invoked the "OfficePlantsIntent" and will pass us one of the values from the custom slot. If the user asked about the plants without specifically mentioning one, we'll get the intent with no slot value.
Fortunately this was by far the most complicated step. Things are easier from this point on.
Click "Next" to go to the next step.
Configuration
This step tells Alexa how to invoke your custom skill when a user has invoked it.
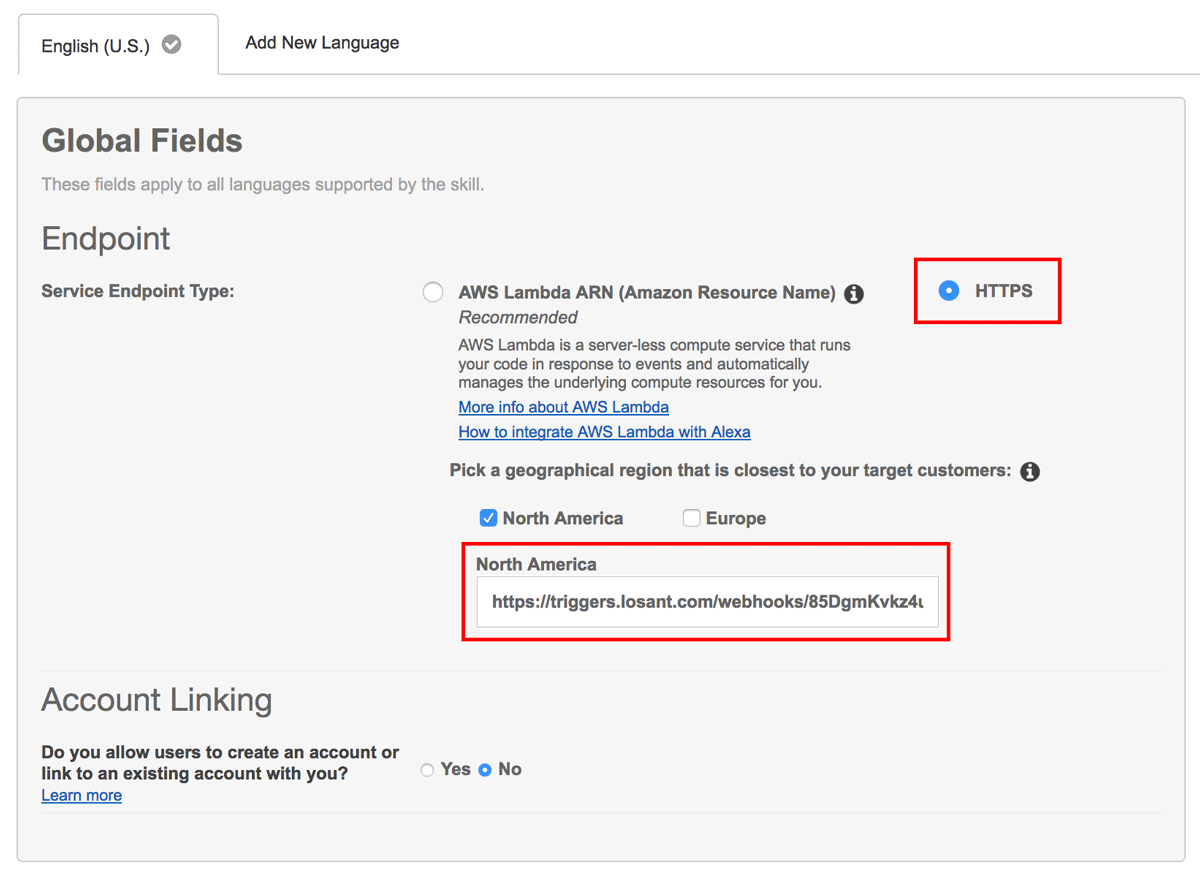
- Set the "Service Endpoint Type" to "HTTPS".
- Set the geographical region to "North America".
- Enter the webhook you created earlier in the textbox.
- Leave "Account Linking" set to "No".
Click "Next" to go to the next step.
SSL Certificate
Alexa requires the web server to implement TLS encryption. Fortunately Losant handles all of this for you.
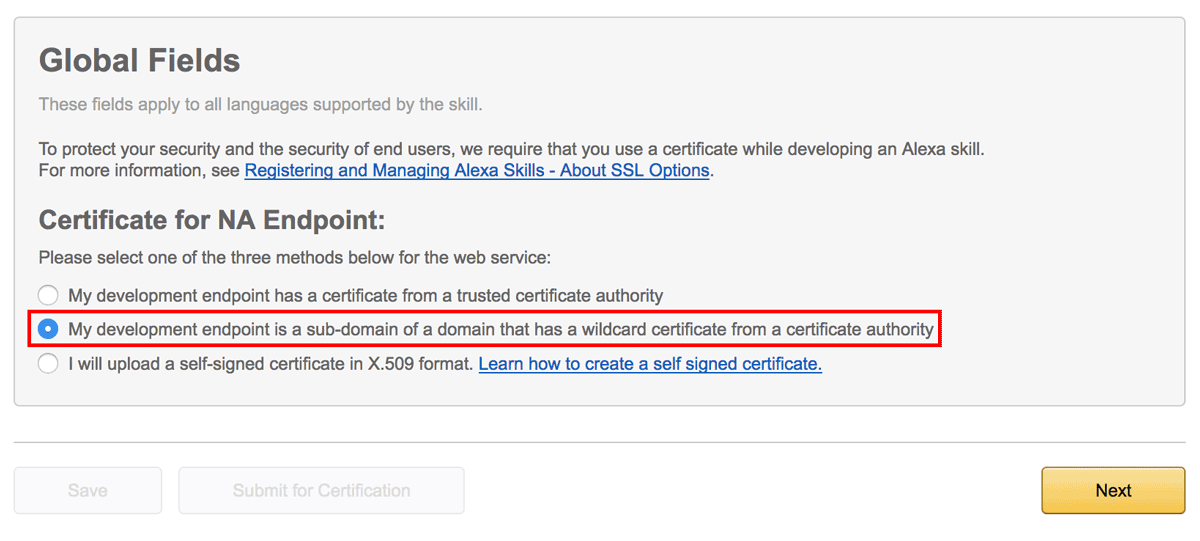
Select the option for "My development endpoint is a sub-domain of a domain that has a wildcard certificate from a certificate authority".
Click "Next" to go to the next step.
At this point, the skill configuration is done. This step is a convenient tester we can use to invoke our skill and test the response. Leave this open in your browser, we'll use it shortly. We can now return to Losant and build the skill workflow.
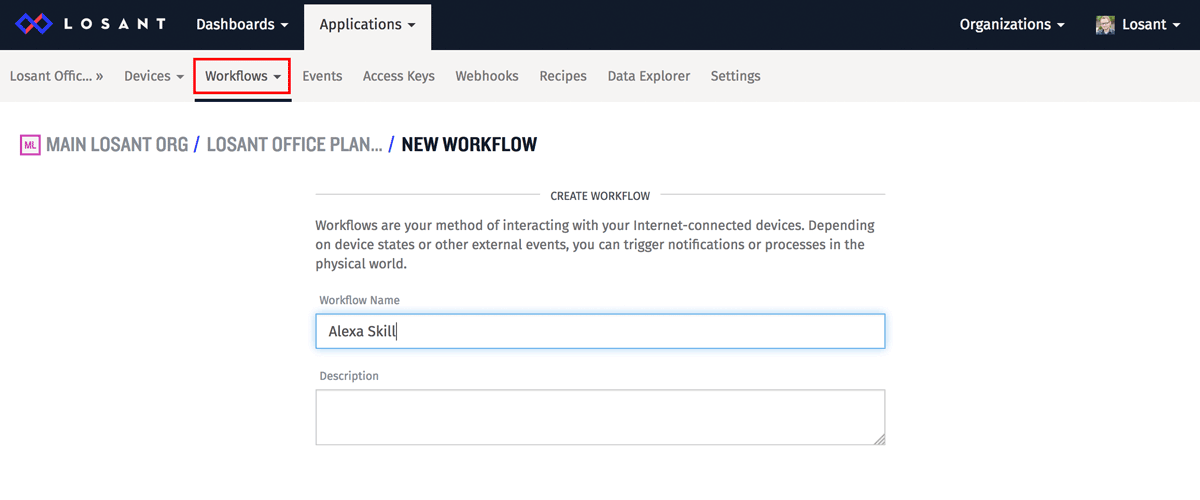
Build the Skill Workflow
First, create a workflow and name it anything you want.
The first thing we'll do is a simple "Hello World" example, so we can test that all the pieces are working together.
First, drag a webhook trigger on the canvas and make sure the webhook you created is selected in its configuration panel.
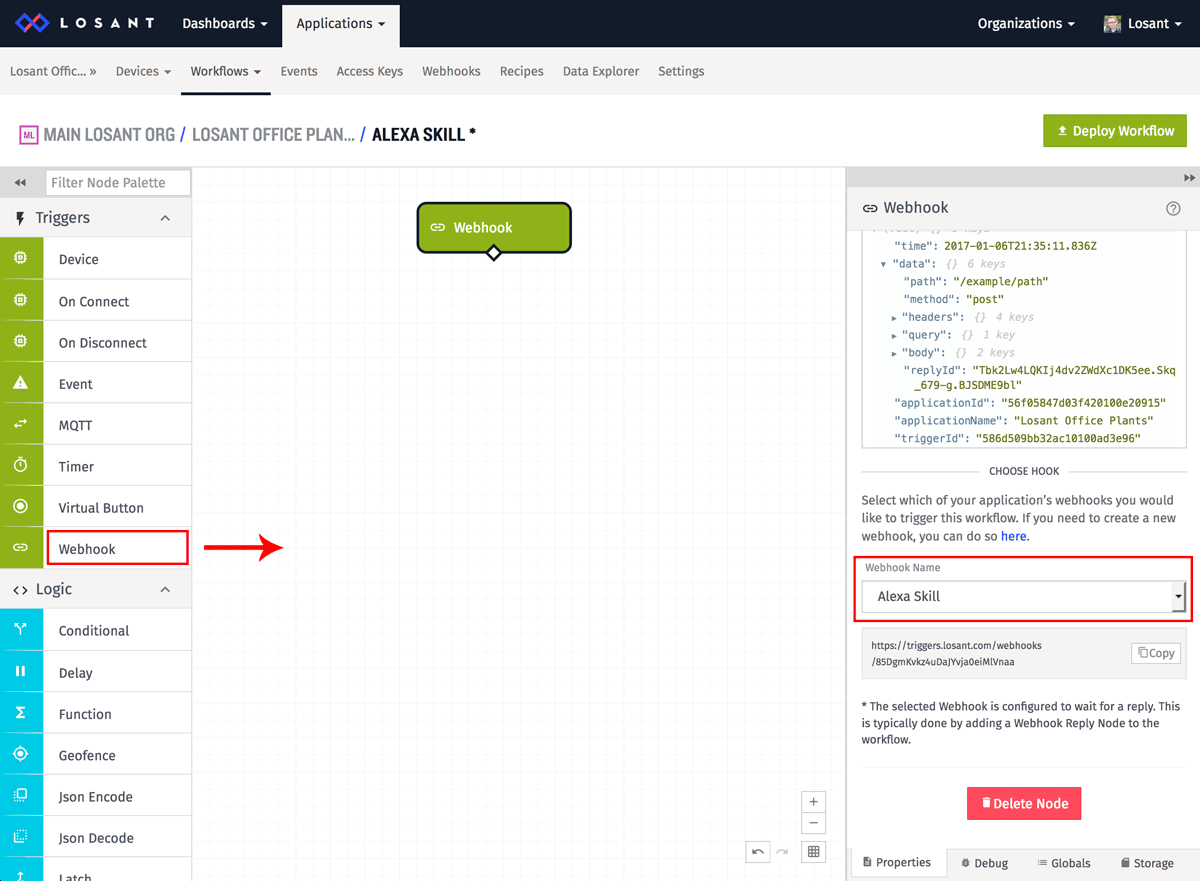
This workflow will now run whenever your webhook is requested. Next, drag a debug node onto the canvas and connect it to the webhook node.
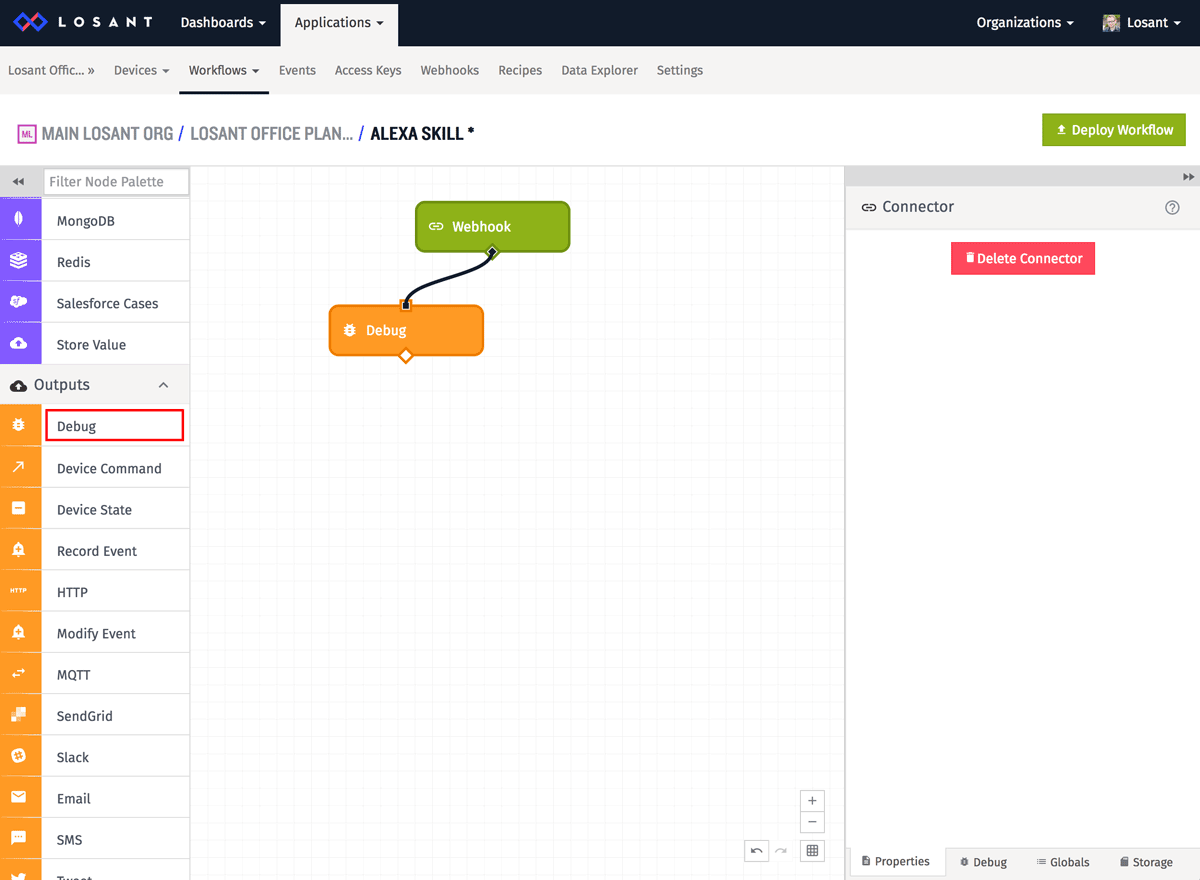
All workflows start with a payload and the debug node simply logs the payload at that moment in time. The payload flows through each node where you can change it, make decisions on it, and many other things. When using a webhook trigger, the payload will contain any information sent with the request.
Next, add a webhook reply node. This is the node that controls what we'll send back to Alexa.
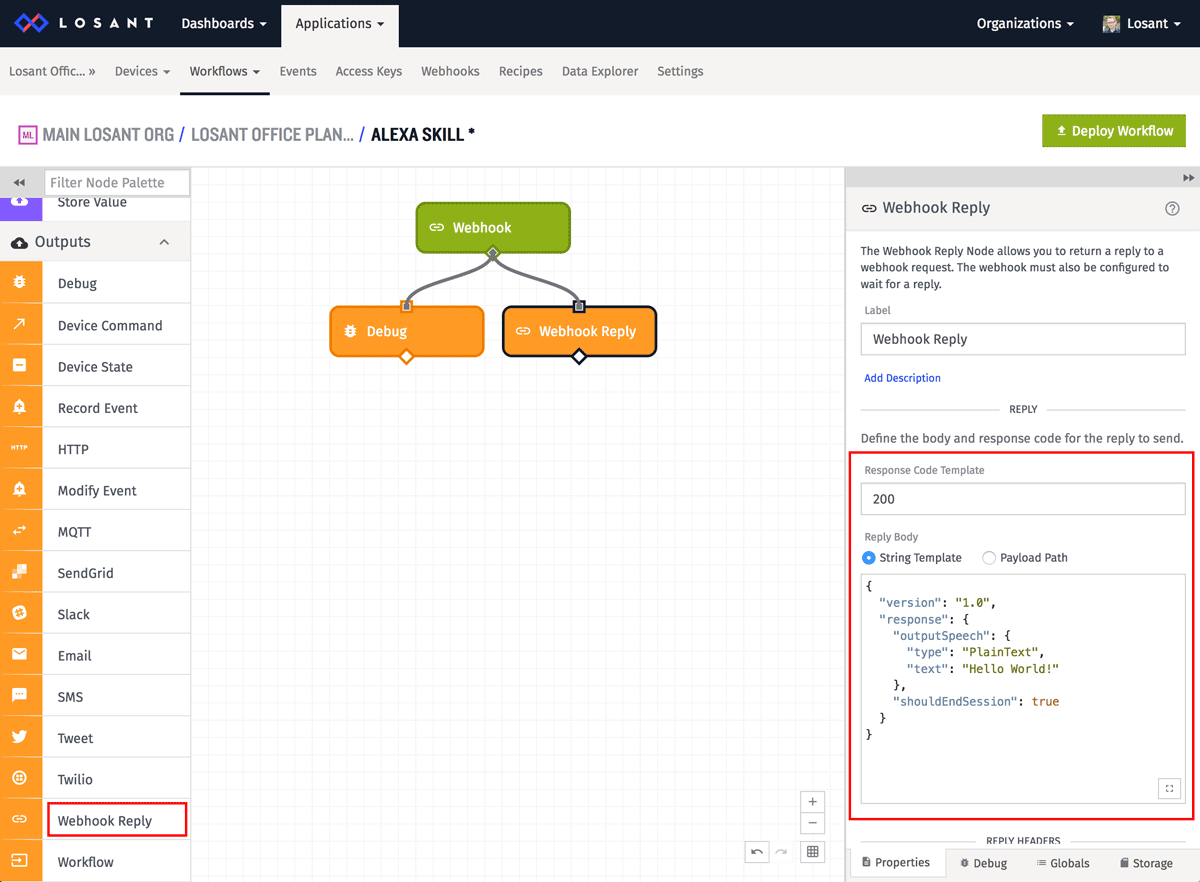
- Set the Response Code to "200".
- Set the Reply Body to the following:
{
  "version": "1.0",
  "response": {
    "outputSpeech": {
      "type": "PlainText",
      "text": "Hello World!"
    },
    "shouldEndSession": true
  }
}
This is the simplest response we can send. No matter what you ask your custom skill, Alexa will always respond with "Hello World!". Refer to the Alexa's JSON interface reference for all of the ways you can respond.
Deploy this workflow using the "Deploy Workflow" button. At this point, you technically have a fully functional Alexa skill. Return to the Alexa developer portal and test it out.
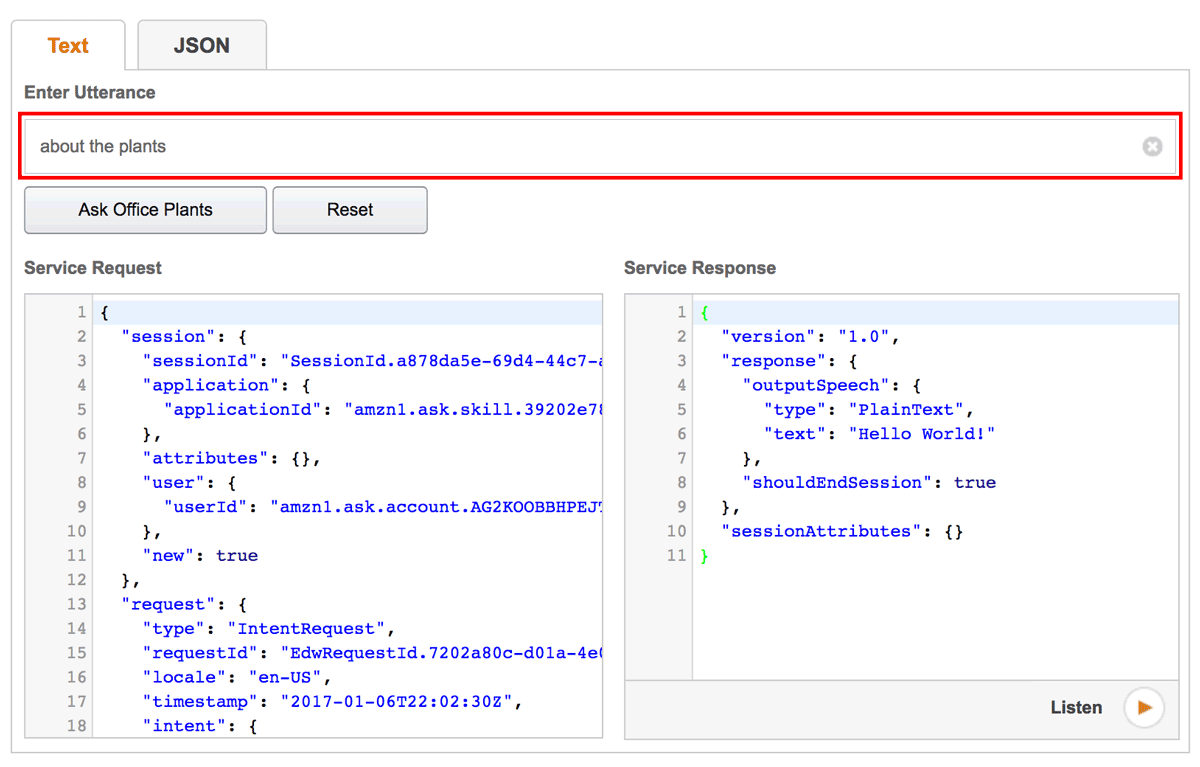
Remember the utterances you defined earlier? Type one of those in the text field and click the "Ask Office Plants" button. This will send a request to the Losant webhook, run the workflow, and show you the response. As you can see, we've successfully replied with "Hello World!".
At this point, you can also test Alexa by talking to your device. If you say "Alexa, ask the office about the plants", it will say "Hello World" back to you.
Return to Losant and view the debug output.
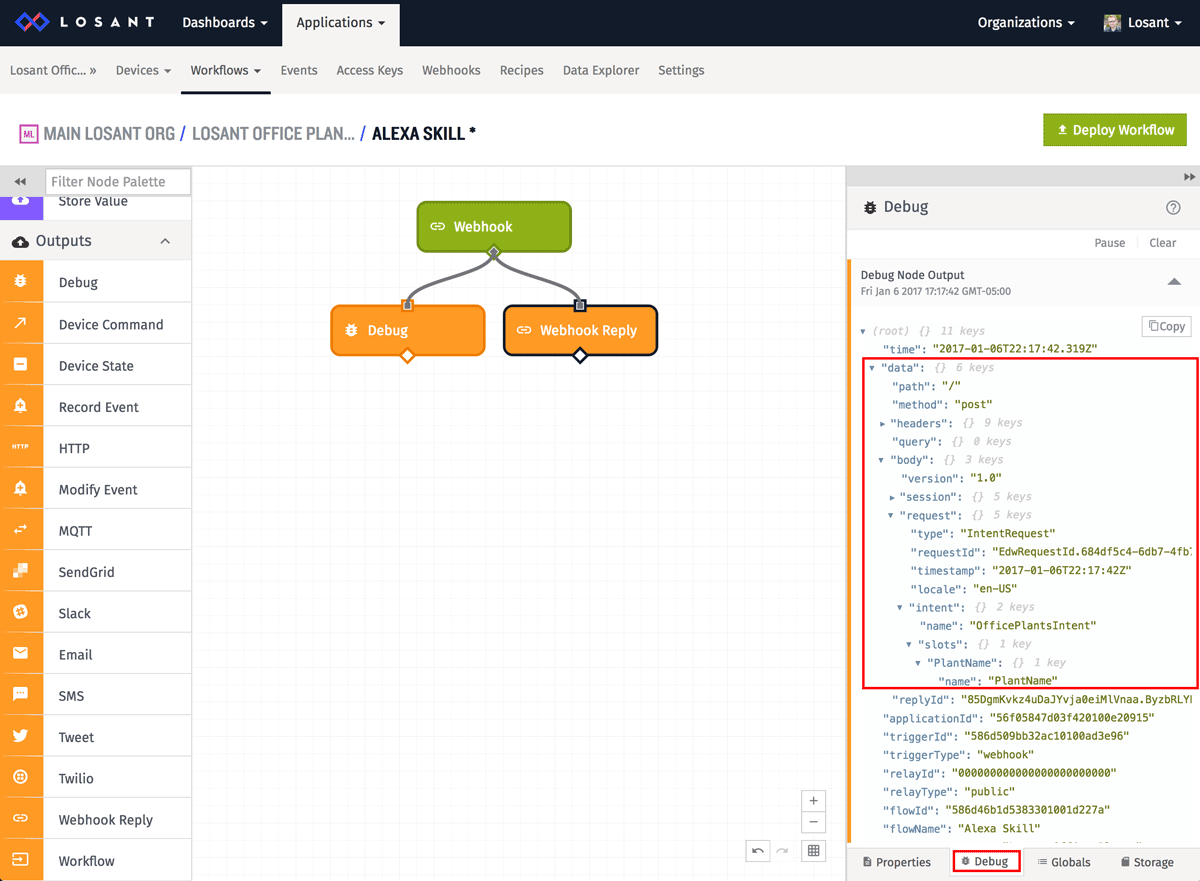
The data.body field on the payload contains everything that Alexa sent to this webhook. We'll now use this information to determine how we should reply.
The first thing we need to do is determine if the user asked about a specific plant. If they didn't, we need to prompt them. If you remember from earlier, specific items are sent as slots. We can check the payload to see if Alexa sent us a specific slot value.

The image on the left does not contain a slot value, so the user didn't ask about a specific plant. The image on the right contains the slot value of "peperomia", which means the user did ask about that specific plant.
Add a conditional node to the workflow to check that a slot value exists.
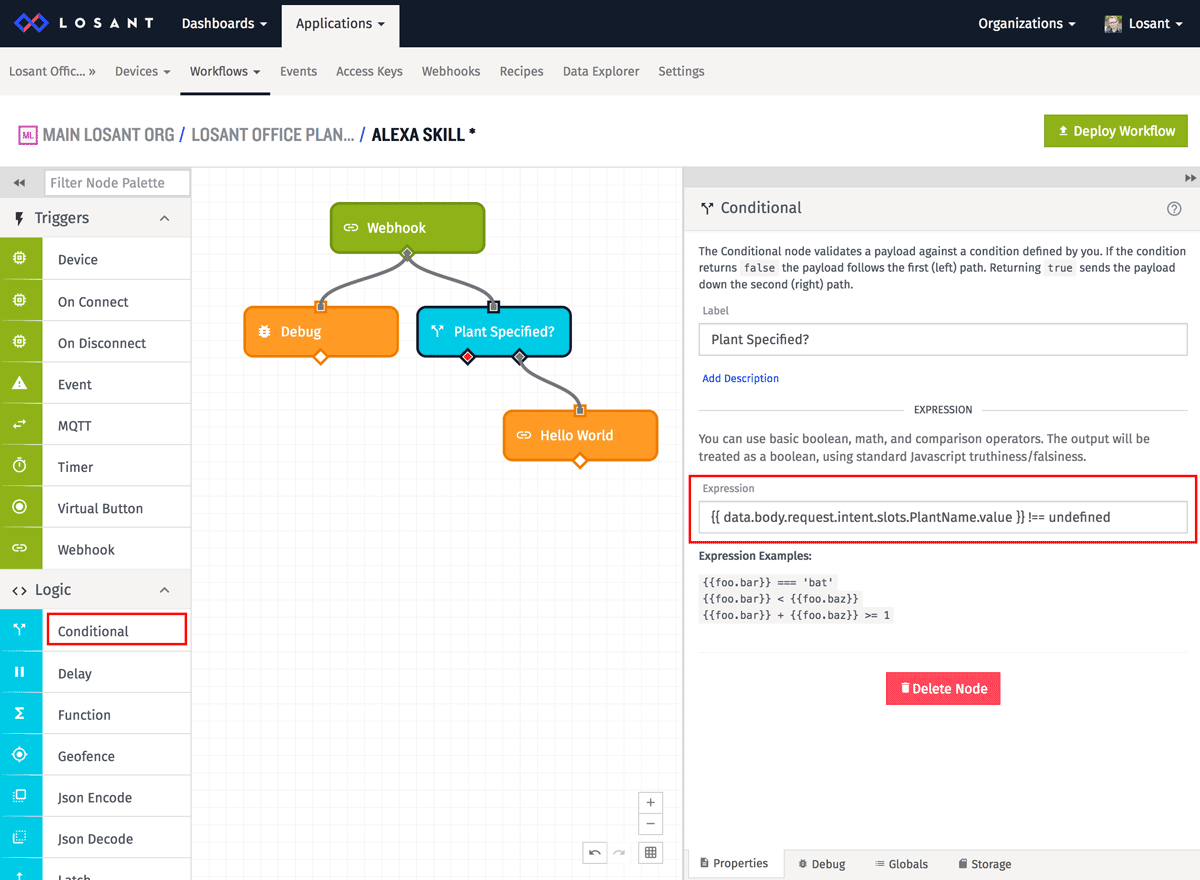
Enter the following into the expression:
{{ data.body.request.intent.slots.PlantName.value }} !== undefined
Anything in double curly braces is what Losant calls a template. Templates are implemented using Handlebars and are commonly used to access values on the payload. This expression will return true if the PlantName slot has any value. If not, it will return false.
I also moved the original "Hello World" webhook reply node to the true (green) connector of the conditional node.
Next, add a webhook reply that will prompt the user for a plant name if they didn't specify one.
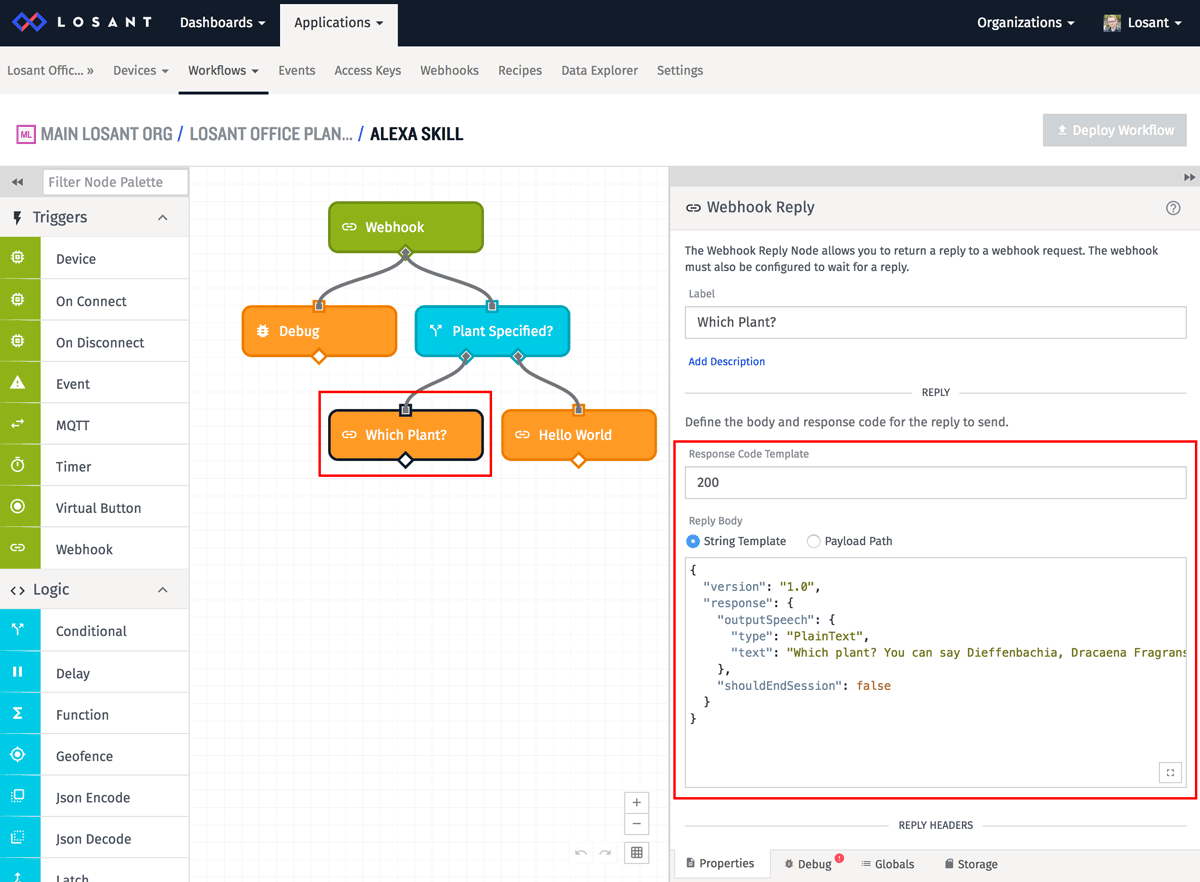
- Set the Response Code to "200".
- Set the Reply Body to the following:
{
  "version": "1.0",
  "response": {
    "outputSpeech": {
      "type": "PlainText",
      "text": "Which plant? You can say Dieffenbachia, Dracaena Fragrans, or Peperomia."
    },
    "shouldEndSession": false
  }
}
In this example, Alexa will ask for a plant name and then provide you the options. It's important to set shoudEndSession to false, so Alexa knows to keep the conversation open while the user is answering.
You can now deploy and test this workflow. If you ask about a specific plant, Alexa will say "Hello World!". If you don't ask about a specific plant, Alexa will ask you for one.
Now let's get the current moisture level of our plants and reply with those when asked. First, remove the "Hello World" webhook reply and add three conditional nodes to check for each specific plant.

Set the expression of each node to check for one of the plants.
{{ data.body.request.intent.slots.PlantName.value }} === 'dieffenbachia'
or
{{ data.body.request.intent.slots.PlantName.value }} === 'dracaena fragrans'
or
{{ data.body.request.intent.slots.PlantName.value }} === 'peperomia'
Now add a gauge query node under each conditional to get the most recent moisture level that was reported by our sensors.
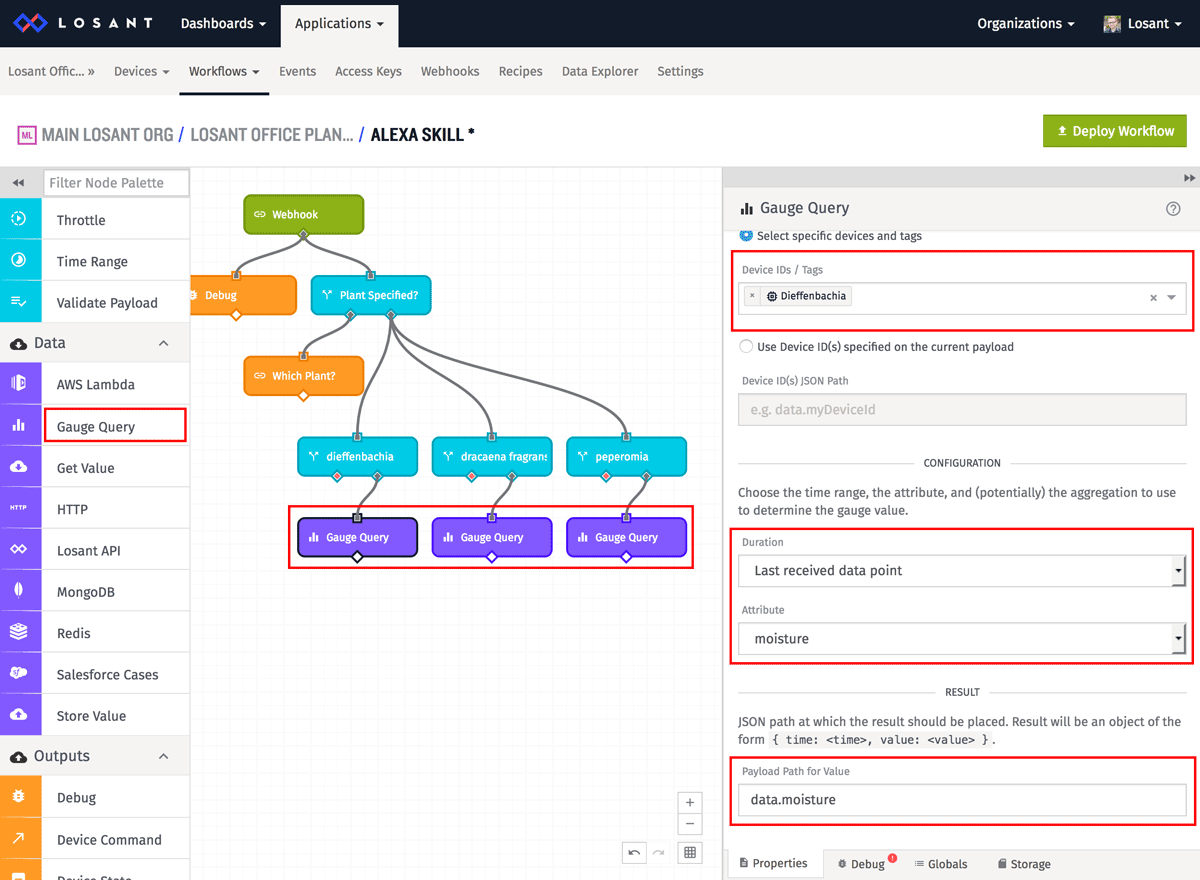
- Set the device of each gauge query to the device that has the moisture level for the plant being requested.
- Set Duration to "Last received data point".
- Set Attribute to "moisture".
- Set Payload Path for Value to "data.moisture".
These nodes are querying Losant for the current moisture level of each of our plants. It then stores the result back on the payload at "data.moisture".
Lastly, add a final webhook reply to send the moisture value back to Alexa.
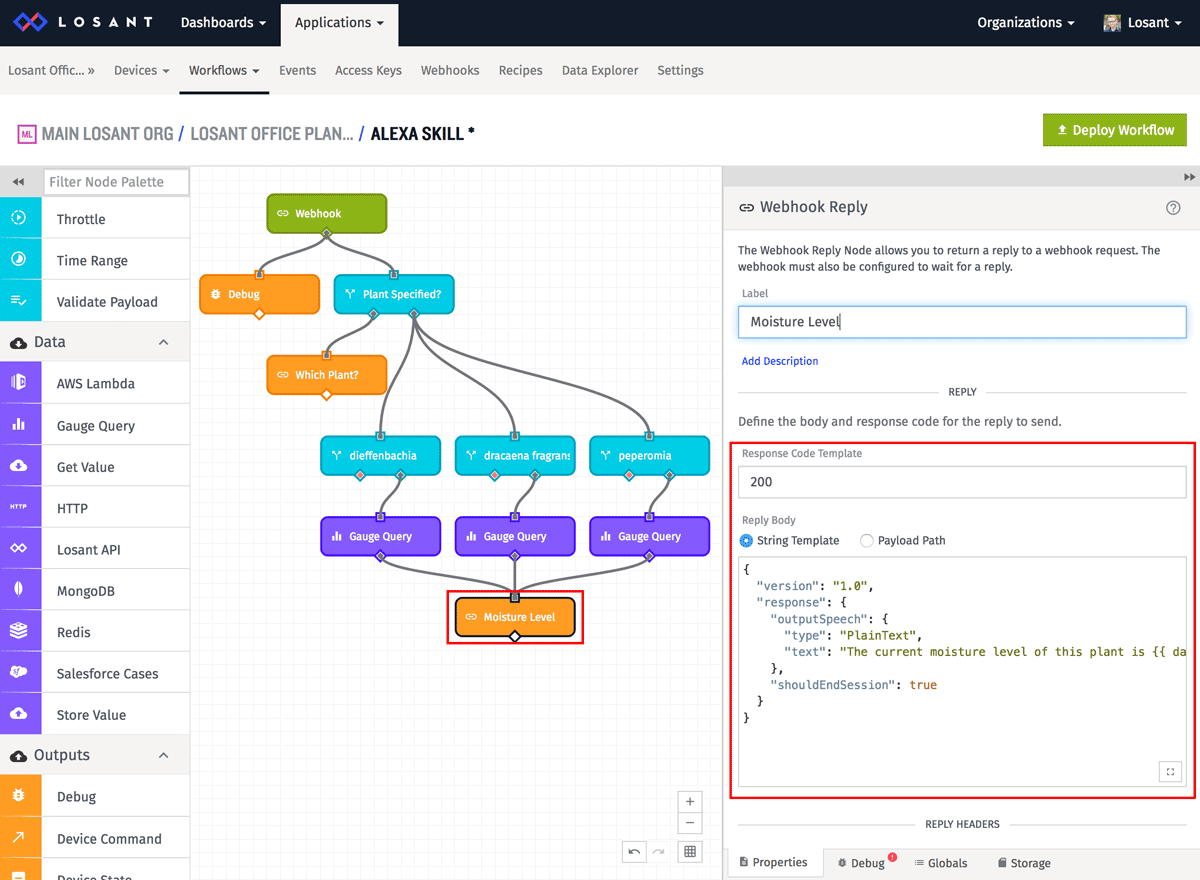
Now that we have the moisture level, we can reply with it using this reply body:
{
  "version": "1.0",
  "response": {
    "outputSpeech": {
      "type": "PlainText",
      "text": "The current moisture level of this plant is {{ data.moisture.value }}."
    },
    "shouldEndSession": true
  }
}
You can now deploy this workflow and the Alexa skill is complete! Once you're ready to offer your skill to other users, you can follow the remaining steps in the developer portal to get it published.
Edit 2/23/2017
The verification process that Amazon requires when using a custom web server for an Alexa skill is quite complicated. Unfortunately it's not currently possible to implement in a Losant workflow. This article will work for personal Alexa skills, however if you do want to publish the skill to others, a Lambda function is the recommended approach. We'll be implementing the Amazon verification requirements as part of our built-in webhook verification options in a future update.
Losant workflows are very powerful and with the knowledge learned from this tutorial, you can now create a skill that does pretty much anything you want. If you do build something awesome, let us know in the forums.