
Particle is a maker of inexpensive IoT hardware. They also have a web-based IDE, which makes it easy to connect your device to the internet. We've built an official Particle Integration to make it easy to connect a Particle device to our platform to build real-time connected solutions.
This is a quick reference on how to connect Particle with the Losant IoT Platform.
Prerequisites:
- Set up a Particle account, register a Particle device, and have knowledge of flashing a Particle device. For details, check out this site.
- Have a Losant account. If you do not have one, you can create an account here.
Let’s get started. Here's some sample code that I'll be using for this post:
How To Trigger a Workflow From Particle
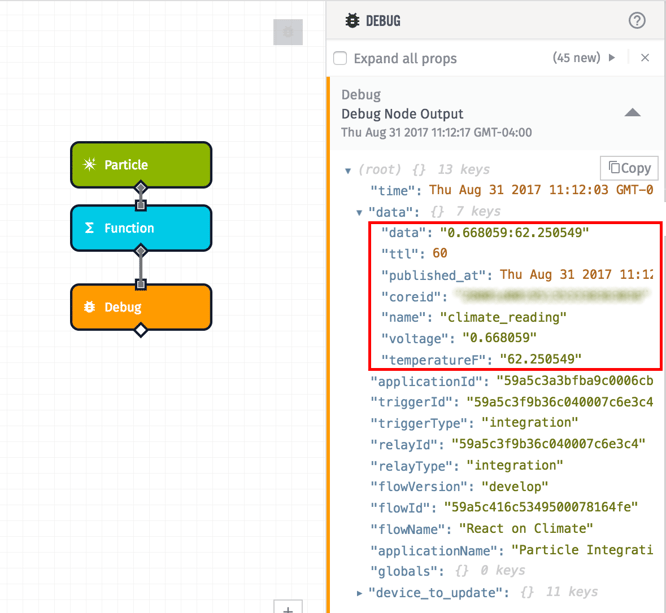
Look at line 19. You’ll see the Particle.publish method being called. This triggers a Particle Event named “climate_reading” with the voltage and temperature. To save resources, notice that we are sending twopieces of data in one call with a “:” as a delimiter. Next, we’ll create an integration in Losant that can listen for these events to trigger a workflow. In that workflow, we’ll parse the data.
Let’s create an integration next. Integrations are connections to external MQTT brokers, Pub/Sub messaging suppliers, or other third-party web services. These connections can then be used to trigger workflows and output messages from your application. In this case, we are using the Particle integration to trigger a workflow every time the “climate_reading” event is published.
Click on “Integrations” in main application menu, then click on “Add Integration”.
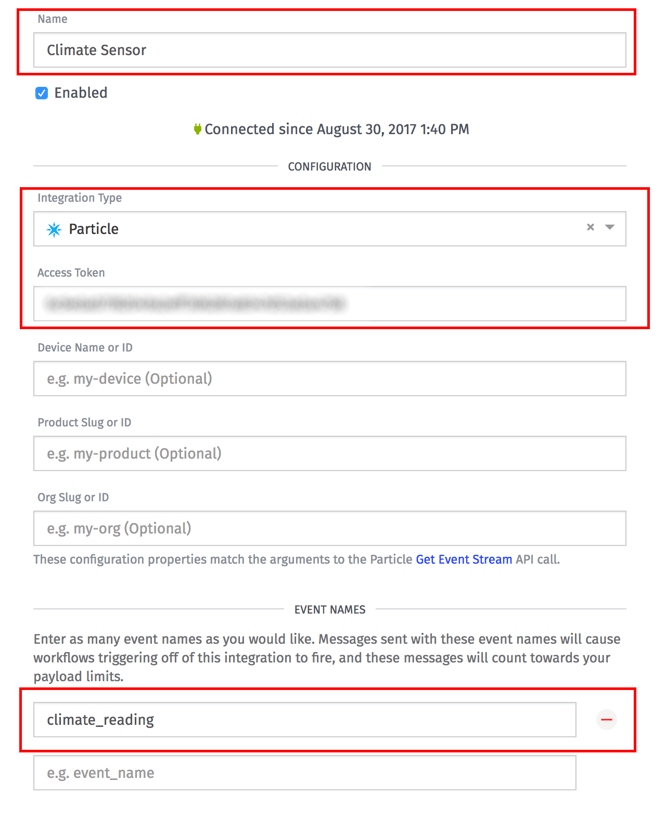
Set the following details on your integration:
- Give your integration a name like “Climate Sensor”.
- Select “Particle” from the “Integration Type”.
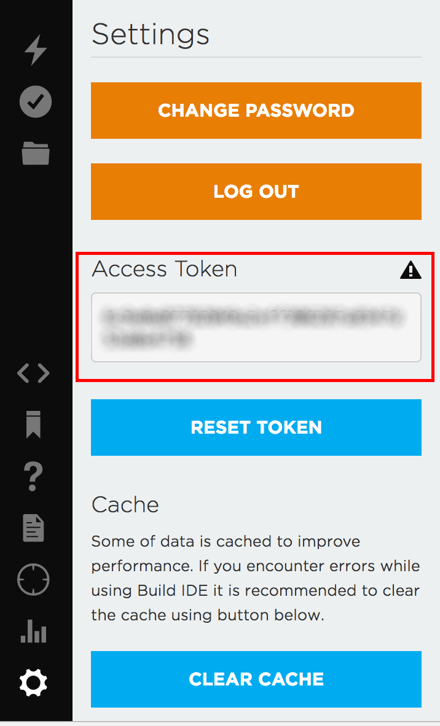
- Set Access Token from Particle.
- Set the Event Name to “climate_reading”. This will trigger the workflow when the “climate_reading” event is triggered from a Particle device.
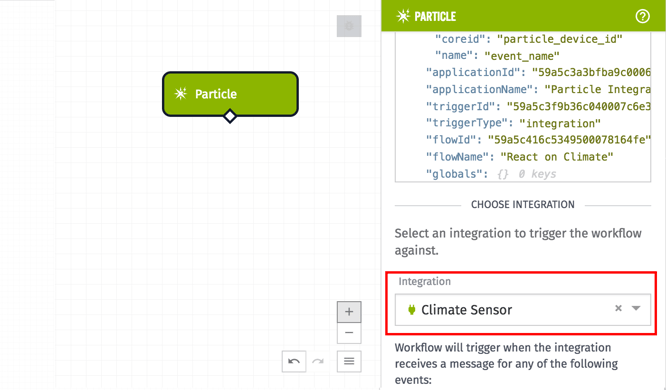
Let’s create a workflow inside Losant. Now, we will drag the Particle node onto the canvas. Select the Integration that you just created.
Then, connect a Function node to the Particle node. In the Function node, add this code:
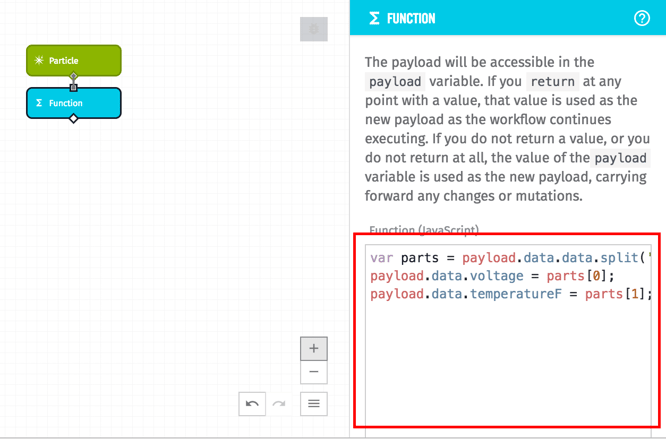
That code parses the data in the Particle event and adds it back onto the payload.
Next, drag a Debug node to the canvas and connect it to the Function node. Then, deploy your workflow. If your Particle device is running, you should be able to see the data coming into the Debug panel.
How To Store Device State
If you want to store the device state, you’ll need to create a device in Losant to track the state of your Particle board.
In the main application menu, click on “Devices” -> “Add Device”, then click on “Create Blank Device”.
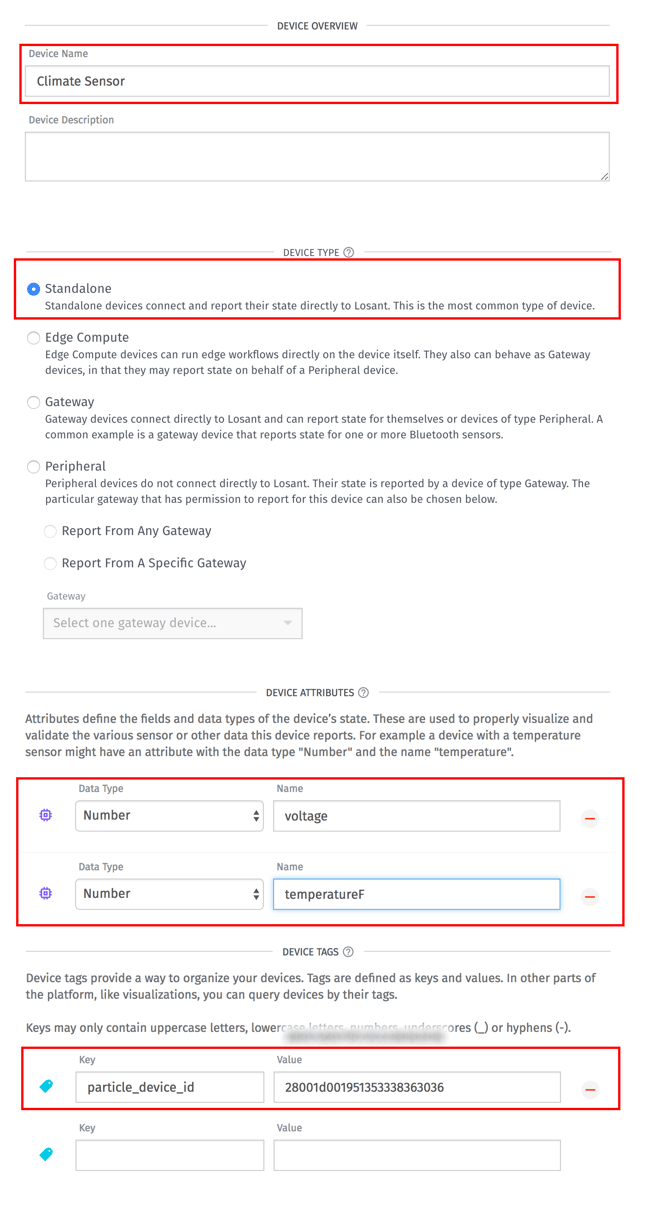
Set the following details on your device:
- Give your device a name.
- Select “Standalone”.
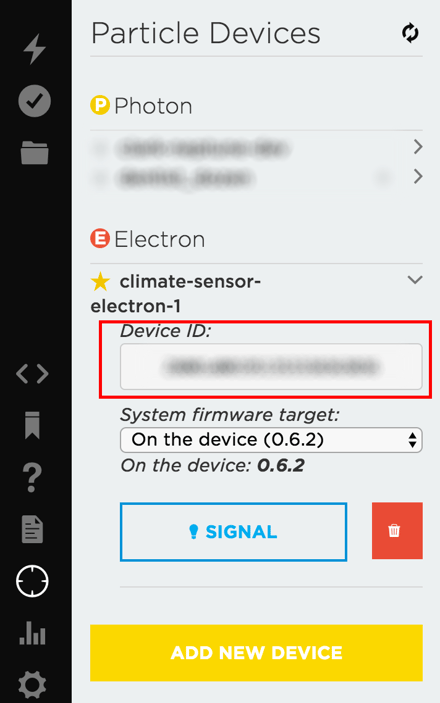
- Go to the Device Tags section. Add in the “particle_device_id” for key. For the value, enter in the Particle Device ID.
- Click Create Device.
Notice in step 3, we are tagging the device with the “particle_device_id”. This is useful because we’ll use that tag to get the device and update its state.
Now, go back to the workflow that you previously created. Drag the Device: Get node, and connect it to the Function node.
Set the following details on your Device: Get node...
- Find by...: Tag Query
- Key Template: particle_device_id
- Value template: {{ data.coreid }}
- Result Path: device_to_update
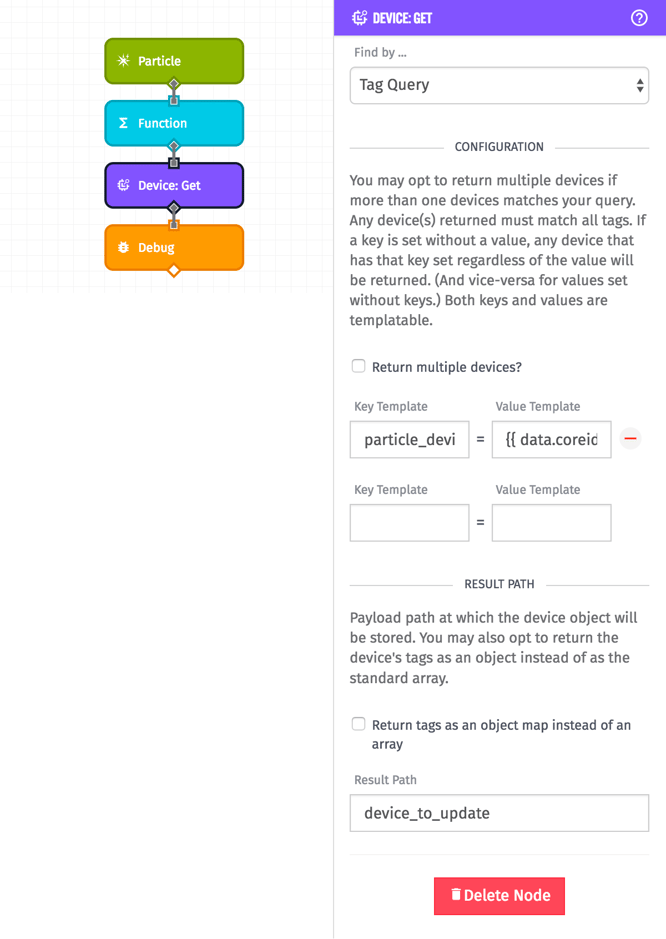
This will allow you to look up the device by the Particle Device ID, which comes from the payload.
Drag and connect the Device State node to the Device: Get node. Set these details on your Device State node:
- Select “Use a Device ID specified on the current payload”
- Device ID JSON Path: “device_to_update.id”
- Data Method: “Individual Fields”
- Attribute: “voltage”, Value: “{{ data.voltage }}”
- Attribute: “temperatureF”, Value: “{{ data.temperatureF }}”
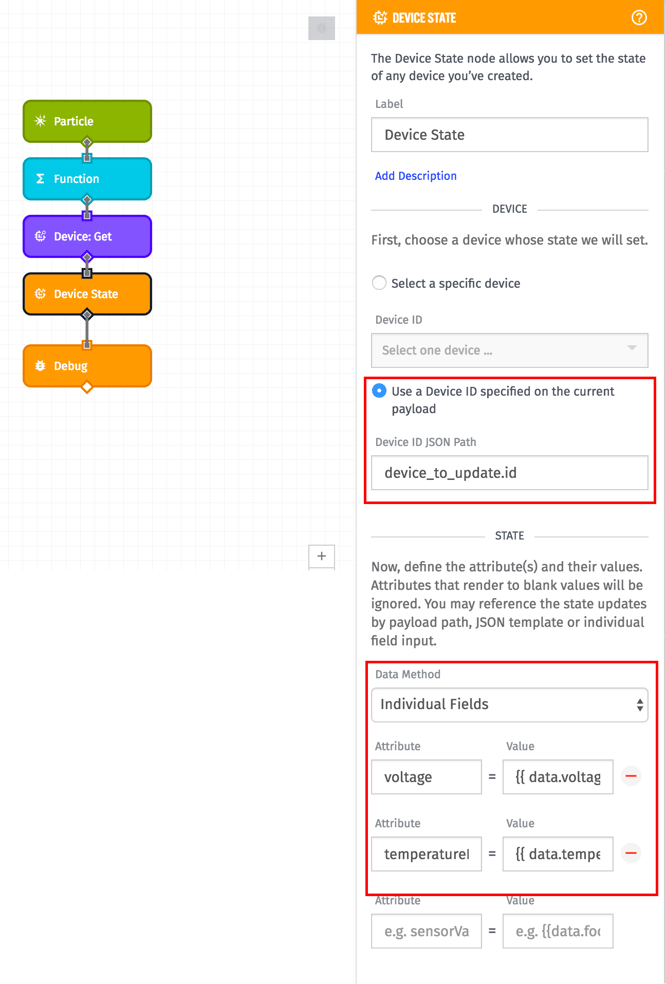
This will update the state of your device. To test if your configuration is working, click on "Devices" -> "Climate Sensor" in the main application bar, then click on “Debug”. You should see a list of your most recent states under “Recent Device States”.
How To Call a Function on the Particle Board
Let’s look at the code on your Particle device. If you look at line 9, you’ll notice Particle.function("ledToggle",ledToggle); That line of code registers a function on the Particle board that listens for the ledToggle command that can be called from Losant. To do this, Drag the Particle Call node and connect it to the Device State node. Set these details:
- Integration: Particle Door Sensor
- Function Name: ledToggle
- Device Name or ID: (Your Particle Device ID)
- Argument Method: String Template
- Argument Template: on
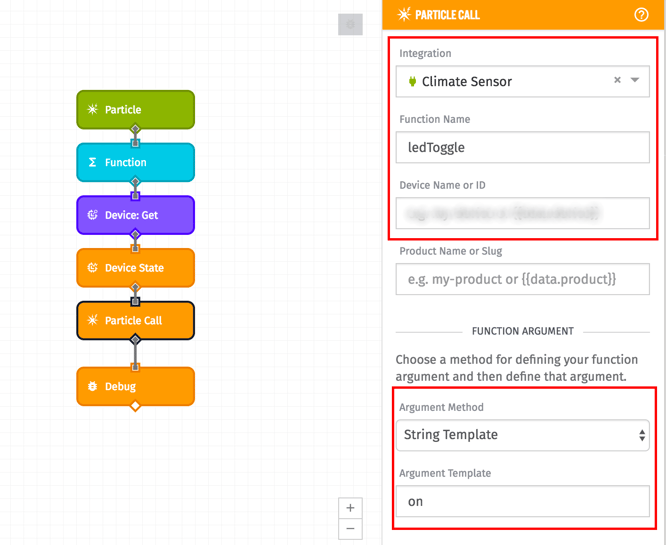
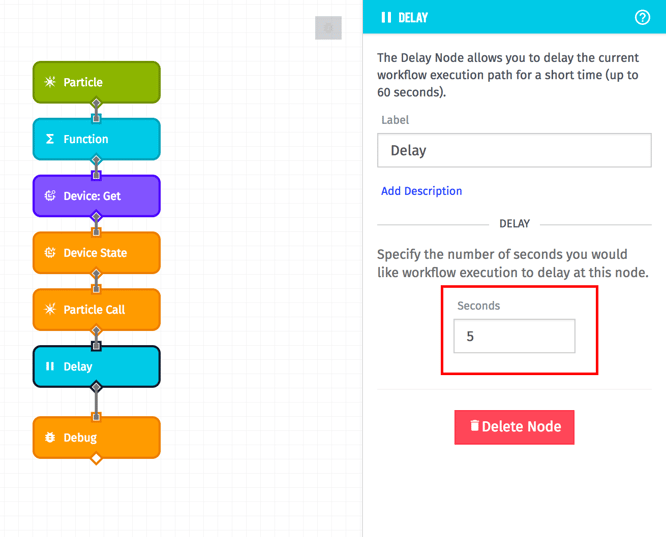
This will turn the LED on after the text message is sent. Next, we’ll make the LED turn off after 5 seconds. Drag the Delay node to canvas and connect it to the Particle Call Node. Set seconds to “5”.
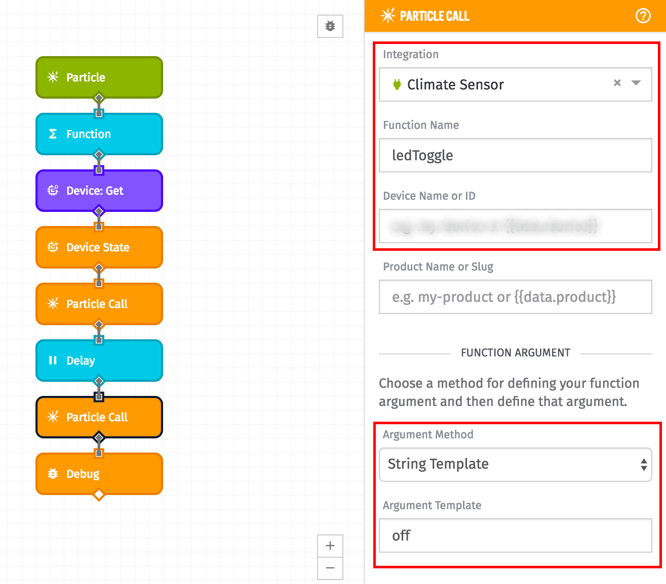
Then, connect another Particle Call node to the Delay node. Set these parameters:
- Integration: Particle Door Sensor
- Function Name: ledToggle
- Device Name or ID: (Your Particle Device ID)
- Argument Method: String Template
- Argument Template: off
Now you can deploy your code and test again.
Setting Up a Dashboard
To visualize the data, you can set up a dashboard. In the main platform navigation, go to “Dashboards” -> “Create Dashboard”.
First, we’ll add a Time Series Graph to view when the door was opened and closed. Locate the Time Series Graph block, and click “Customize”.
Set these options:
- Block Header Text: Climate Sensor (You can give this any meaningful name)
- Select the application you just created
- Data Type: Historical
- Duration (You can adjust this for your needs)
- Time Range: 5 minutes
- One Point Every: 1 second
- Block Data:
- Device IDs: Climate Sensor
- Attribute: temperatureF
- Series Label: Temperature F
- Aggregation: Mean
- Y Axis Label: Degrees
- Y Axis Min: 50
- Y Axis Max: 90
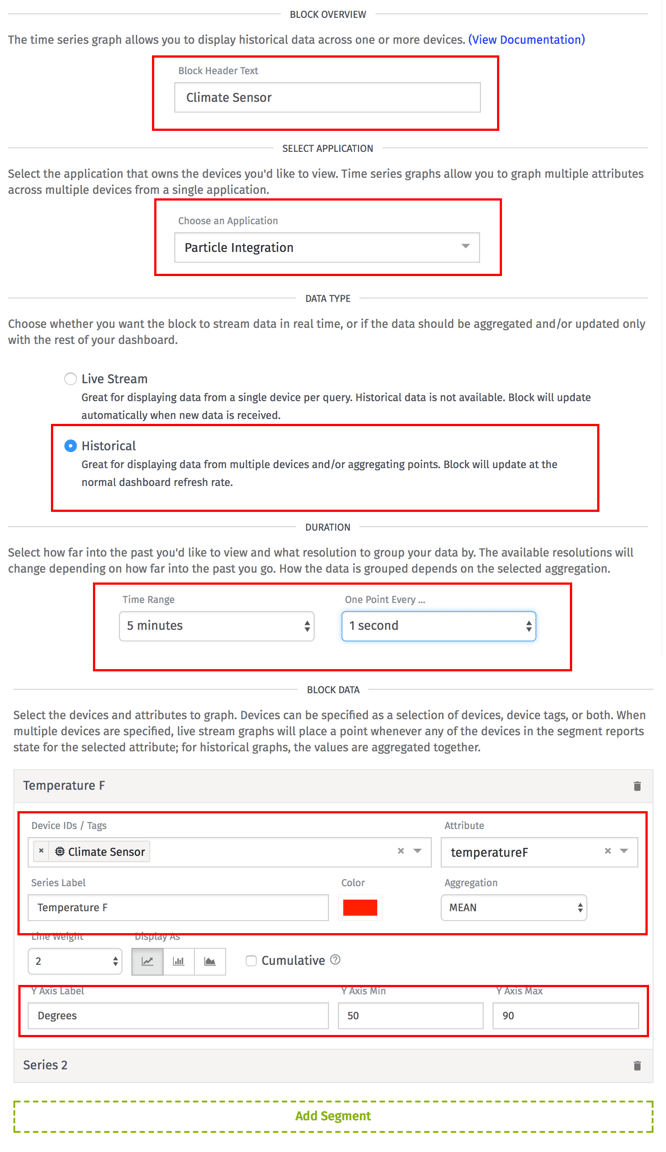
If you want to chart the voltage, you can click “Add Segment” and follow the same steps for the voltage attribute.
Click Add Block
Next, we’ll add a Data Table block to view the logs. Click “Add Block” under the gear icon in the top right. Look for the “Data Table” block and click “Customize”.
Set these options:
- Choose an Application: Particle Integration (or what you named your application)
- Duration: 24 hours
- Device IDs: Climate Sensor (or what you named your device)
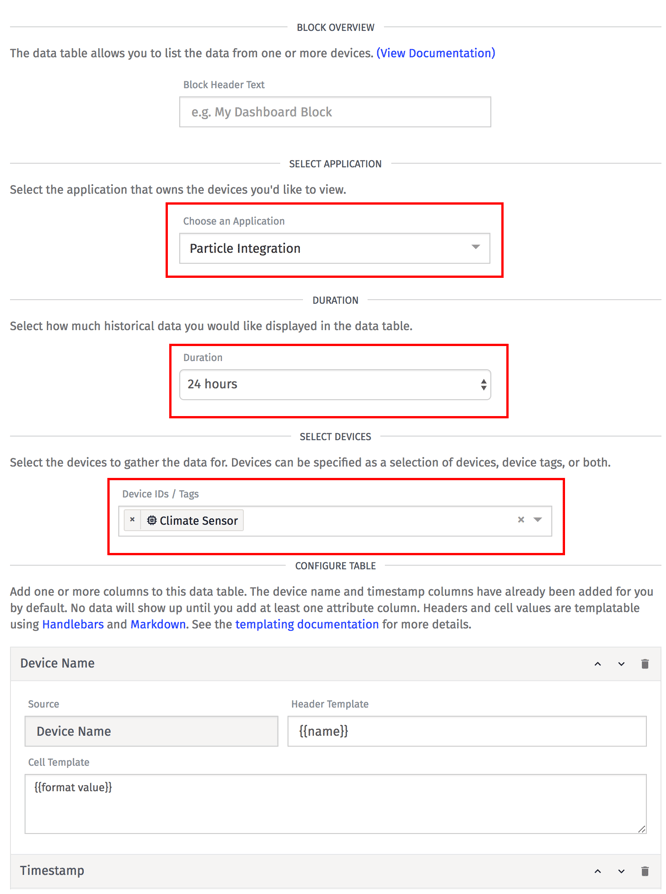
Go to the Configure Table, scroll down and click “Add Column” -> “Attribute”. Set the Source to “temperatureF”. Repeat those steps to add the “voltage” attribute, and click “Add Block”. Now, you’re set with a dashboard.
Build Your Application
These are all the essential building blocks to integrating a Particle application with the Losant IoT Platform. If you build something interesting, post it on our forums. If you have any questions/comments, please post them below.