
Losant Experiences provides all of the required tools to build and publish completely custom, branded, and multi-tenant user interfaces on top of your IoT devices and data. In most cases, these interfaces involve retrieving information from your Losant Application and presenting it in valuable ways to your users. There are times, however, that you may want your users to send data in the other direction: from their computer to your Losant Application. One way to accomplish this is by allowing your users to upload files.
This article provides step-by-step instructions for how an Experience User can securely upload a CSV file and store its contents in a Data Table. Even though this article is using CSV files as the example, the same concepts will apply to many different file types.
Uploading Equipment Maintenance Intervals
The use case that I'll be covering in this article allows system administrators to upload new maintenance interval data that the underlying Losant Application is checking against when creating automated maintenance alerts. The maintenance interval data is stored in a Losant Data Table, and this experience allows users to upload new intervals as a CSV file.
All of the code and workflows from this article are open source and can be found in the Kanarra Technologies Example Application GitHub repository. Below is a screenshot of the Experience Page this article will cover:
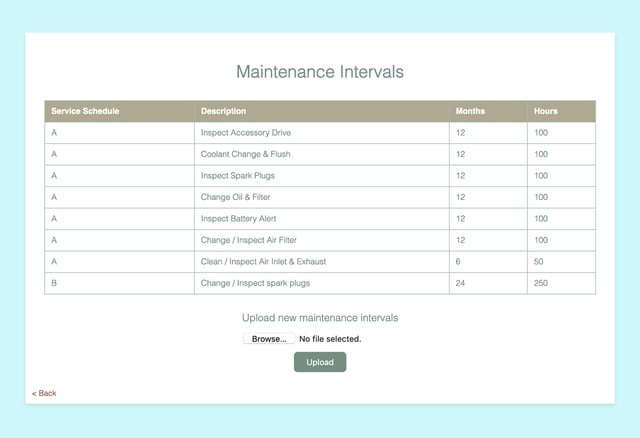
Most of this page is implemented with basic Losant Experiences functionality. The Experience Endpoint, which is GET /maintenance-intervals, is triggering an Experience Workflow, which is using a Table: Get Rows Node to query the existing maintenance interval data. It's then rendered to the screen using Experience Views. What this article is going to cover is the upload form at the bottom of this page, which allows an admin user to upload a new CSV file to replace the data in this data table.
First, let's look at the HTML code for the upload form.
Losant Experience Views are built using standard HTML and Handlebars for templating, so uploading a file can be done by sending form data from the browser to one of your endpoints. This means we'll be using the regular file input element, which is on line 10 above. This element does all of the work of reading and submitting the contents of whatever CSV file the user selected.
The fourth line in the above snippet controls where and how that data is sent back to your experience.
<form action="/maintenance-intervals" method="POST" enctype="multipart/form-data">
This is saying we'd like to POST the contents of this form, which includes the contents of the file, to the /maintenance-intervals endpoint. We'd also like the data encoded as multipart/form-data, which Losant has built-in support for. In order to receive this data, we'll need an Experience Endpoint created for POST /maintenance-intervals and an Experience Workflow that's triggered by that endpoint. Let's take a look at the workflow.
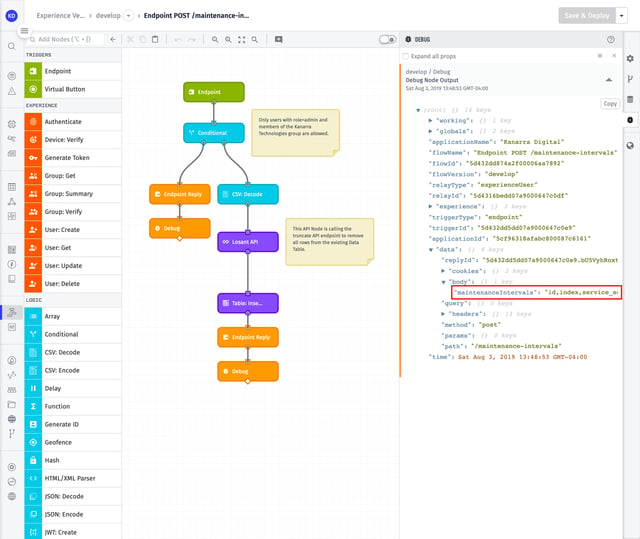
The Endpoint Trigger automatically parses the POST data and adds it to the payload at data.body. Since the input element's name attribute was set to "maintenanceIntervals", you can see the contents of the uploaded file on your payload at body.data.maintenanceIntervals, which is highlighted red in the screenshot above.
Now that we have the contents of the file, the rest of the workflow is performing some authorization and then replacing the contents of the maintenance intervals data table with the uploaded data.
You may have noticed the set of {{#eq}} template helpers in the code snippet above. That's to prevent the form from being displayed to any user that's not an admin and not in the Kanarra Technologies Experience Group. This only prevents the form from being displayed, it does not prevent potentially malicious users from directly POSTing data to the endpoint. Because of this, the first thing this workflow does is use a Conditional Node to make sure the user uploading this data has access to do so. The expression looks like this:
{{experience.user.userTags.role}} === 'admin' && {{experience.user.experienceGroups.[0].name}} === 'Kanarra Technologies'
When authenticated users make any requests to Experience Endpoints, Losant automatically puts the details about that user on the payload at experience.user. We can then check that user's tags and group membership to make sure he or she is allowed to make this request.
If the user is authorized to perform this action, this workflow then uses a CSV: Decode Node to parse the raw CSV data into a JSON structure that can more easily be used to populate a data table. At the time of writing, there wasn't a node that can easily delete all contents of an existing data table, so I used the Losant API Node to call the Data Table Rows: Truncate API endpoint, which does quickly delete all rows in a data table. I then used the Table: Insert Rows Node to repopulate the data table with the data that was uploaded.
Once the import is complete, the Endpoint Reply Node is redirecting the user back to /maintenance-intervals so they can view the changes.
With these concepts, you can now add secure file uploading capability to your IoT experiences. If you have questions or have implemented file uploads in an interesting way, please let us know in the Losant Forums.