
When it comes to choosing a platform vendor to help realize your IoT vision, it's easy to think of Losant and Google Cloud IoT Core as competitive options. The reality, however, is that Losant and the major cloud vendors, like Google Cloud, offer complementary capabilities when it comes to building cloud-based IoT solutions. Losant's Visual Workflow Engine offers one of the most intuitive ways to orchestrate the large catalog of services provided by the cloud vendors. When this is combined with Losant's unique set of capabilities for delivering multi-tenant and fully-branded IoT experiences, you get a powerful technology foundation to quickly get solutions to market.
This article provides step-by-step instructions for users of Google Cloud IoT Core that would like to send device telemetry data into Losant for further application enablement.
Note: This article assumes you already have data being sent into Google Cloud IoT Core. Here is a resource to get you started if you haven't: Google Cloud IoT Core Quickstart.
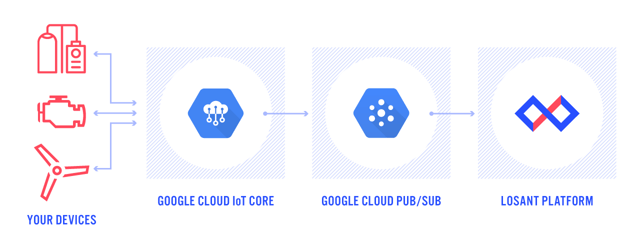
Telemetry data usually represents sensors, like temperature or voltage, that are periodically being published by your devices to the cloud. When it comes to telemetry data, IoT Core acts like a protocol bridge between IoT Core's MQTT Broker and Google Cloud Pub/Sub. This means IoT Core automatically publishes all telemetry data to one or more Pub/Sub topics where it can be picked up and utilized by other parts of your application. Losant has a built-in Pub/Sub Integration, which makes it very easy to retrieve this information.
Configure Google Cloud Pub/Sub Topics
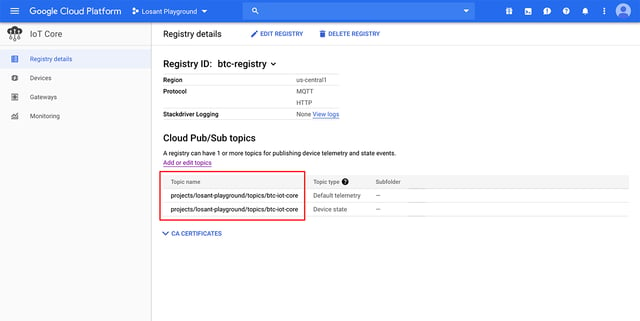
If you've gone through IoT Core's Quickstart or have a Registry created, you likely already have Pub/Sub topics configured for telemetry data. These are what Losant will subscribe to in order to receive your device's data.
Create Google Cloud Service Account
In order for Losant, or any other service, to subscribe to your Pub/Sub topics, you'll need to create a Service Account that can be used for authentication. Using the main navigation menu within Google Cloud, navigate to IAM & admin > Service accounts.

You can name the service account anything you want, but the Role must be Pub/Sub Editor or higher. This is because Losant needs the ability to create a new subscription to your Pub/Sub topics.

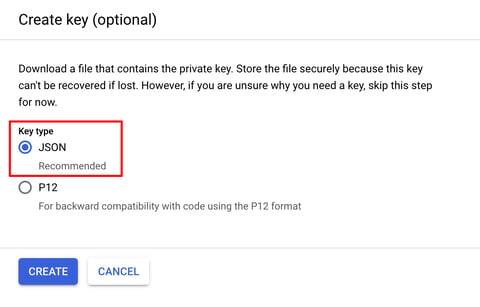
The last thing you'll need to do is create and download a private key, in JSON format, for this Service Account.
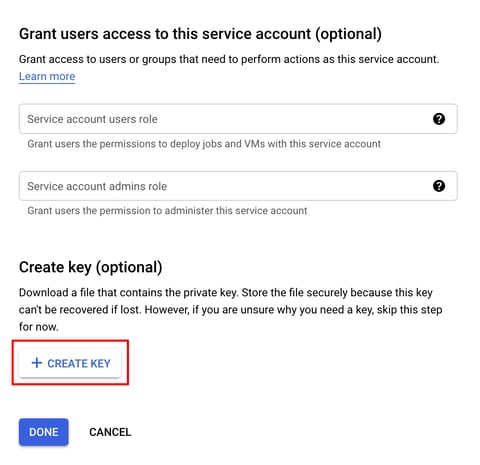
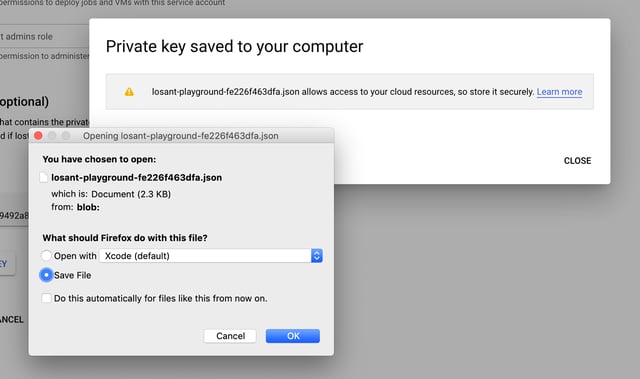
At this point, the Service Account is successfully created. Make sure you download the key file somewhere safe and secure. You'll never be able to get this file again from Google Cloud. We'll be using the contents of this file later in this tutorial to authenticate as this Service Account in order to subscribe to your Pub/Sub topics.
Create the Losant Integration
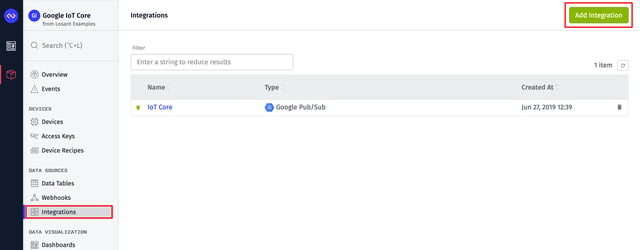
Once you've got the Service Account and private key created, you can now use those to configure a Losant Google Cloud Pub/Sub Integration. On your Losant Application's main menu, click on Integrations, then click the Add Integration button.
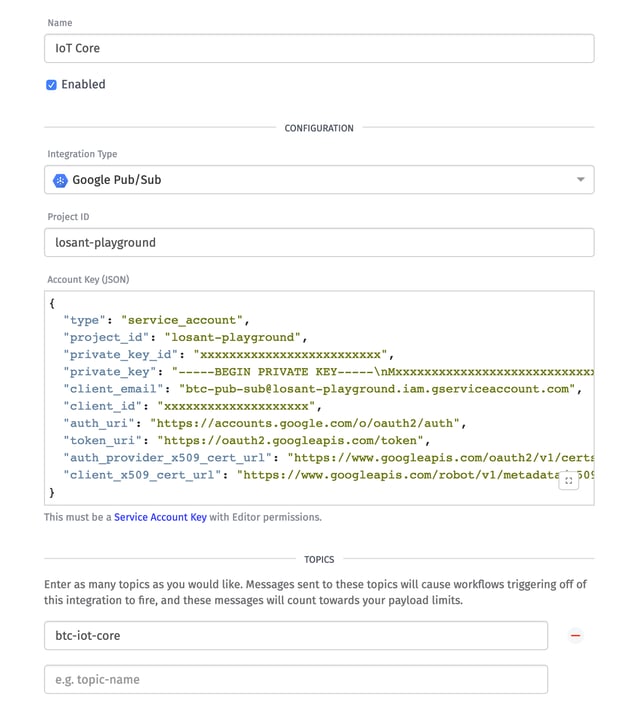
- You can name the Integration anything you'd like.
- Choose Google Pub/Sub from the Integration Type dropdown.
- Enter your Google Cloud project ID in the Project ID text field.
- Paste the entire contents of the private key JSON file you downloaded in the previous step.
- Add the name of each topic you'd like to subscribe to. You can find these in your IoT Core Registry settings. The Registry settings will display the topic with a full path, but Losant only requires the name. For example: /projects/your-project-id/
your-topic-name.
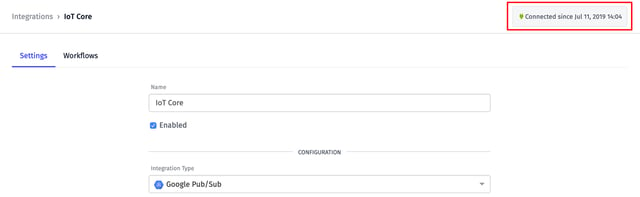
Once everything is entered, click the Create Integration button to complete the process. Once you see a "Connected" message in the top right corner of the page, you'll know everything is configured correctly.
Create Losant Workflow To Handle Telemetry Data
All Integrations in Losant work by invoking a Workflow with whatever data was received over the Integration. You then have the ability to do whatever you'd like with that data. In this example, I'm going to record the data as Device State.
The first thing you need to do is create an Application Workflow and add a GCP Pub/Sub Trigger. For now, also add a Debug Node so you can see the raw data coming from your Google IoT Core devices.
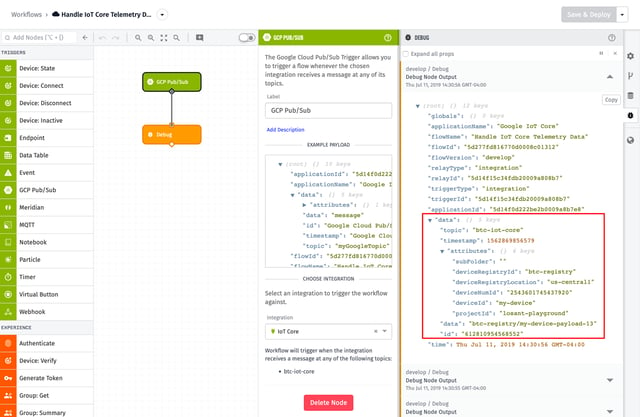
After you Save and Deploy the workflow and publish some data with your device, you'll see the resulting data in the Debug Panel. The data above is coming from the Google Cloud IoT Core NodeJS MQTT Example application. This application publishes a string once per second that looks like the following:
Publishing message: btc-registry/my-device-payload-1
Publishing message: btc-registry/my-device-payload-2
Publishing message: btc-registry/my-device-payload-3
Publishing message: btc-registry/my-device-payload-4
Publishing message: btc-registry/my-device-payload-5
Publishing message: btc-registry/my-device-payload-6
For this example, I'm going to take the number at the very end of the string (1, 2, 3, 4, etc.) and record that as a number Attribute on a Losant Device. Before we can do that, however, we need to find the right Losant Device. You can have thousands or millions of devices reporting telemetry data into this workflow. Losant supports Device Tags, which will allow us to tag our devices with the IoT Core identifier that we can use to look up the correct device whenever a message is received.
IoT Core uniquely identifies devices using the following format:
projects/<project-id>/locations/<registry-location>/registries/<registry-id>/devices/<device-id>
Fortunately, IoT Core provides all of this information in the message we receive, so the unique ID of the device in my screenshot above is:
projects/losant-playground/locations/us-central1/registries/btc-registry/devices/my-device
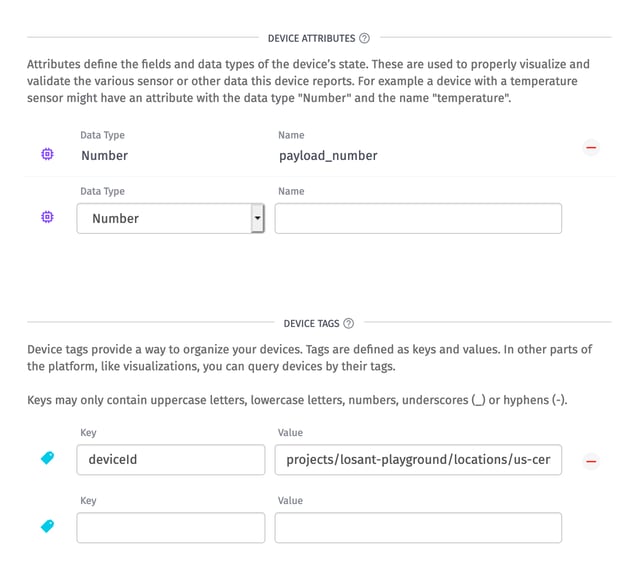
Now I can create a Losant Device and specify this ID as a tag.
Back in the workflow, we can add a Device: Get Node to find the correct device now that we have the tags defined.
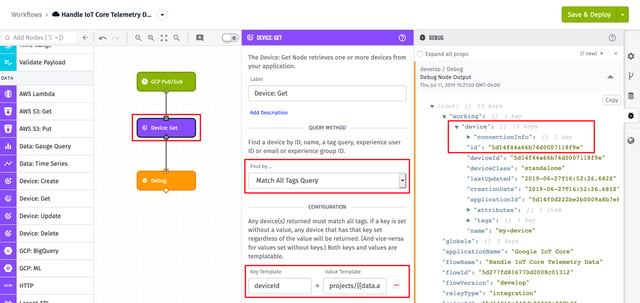
The Device: Get Node provides a way to query Losant Devices using a variety of filters. In this example, we need to query devices by a specific tag key and value. The key is deviceId, which you can see in the device configuration above, and the value is the unique device ID built from the fields provided through the Pub/Sub message. The unique ID is created using the template below:
projects/{{data.attributes.projectId}}/locations/{{data.attributes.deviceRegistryLocation}}/registries/{{data.attributes.deviceRegistryId}}/devices/{{data.attributes.deviceId}}
Now that we have a device, we can record our data to it. It's also a good idea to add a Conditional Node to ensure that you actually found a matching device. If you registered a new device with IoT Core, but that device doesn't exist in Losant yet, this query won't find a match. If the Device: Get Node didn't find a device it will return null. This means the expression in the Conditional Node is {{working.device}} !== null.
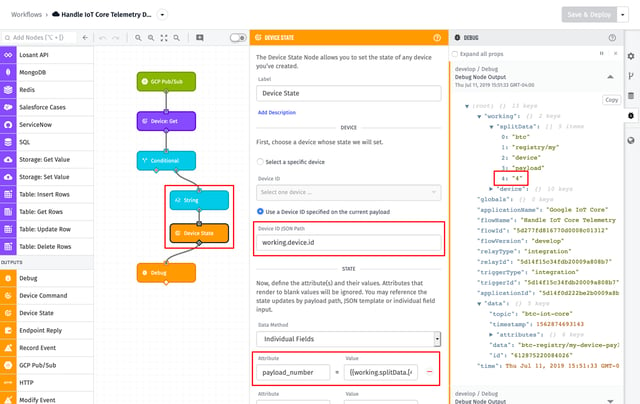
After the Condition Node, I added a String Node to split the incoming data by "-". I then use a Device State Node to record the last entry in the resulting split array, which is the number at the end of the string being published by my device to IoT Core. Your device could be reporting data in any number of formats, so this is where you'd add any required nodes to parse the incoming data.
The Device State Node is configured to use the ID of the device we found in the Device: Get Node. Since I put the result of that node at working.device, the ID is available at working.device.id. I'm then reporting the value to the payload_number attribute on that device. You can access the number in the split array using the following template:
{{working.splitData.[4]}}
We are now successfully receiving telemetry data from Google Cloud IoT Core and recording it into a Losant Device.
The last thing we'll do is automatically create Losant Devices whenever a message is received from a device that doesn't already exist. This will allow you to provision new devices in IoT Core and have them show up in Losant without having to manually create each one. This is done by adding a Device: Create Node to the false (left) branch of the Conditional Node.
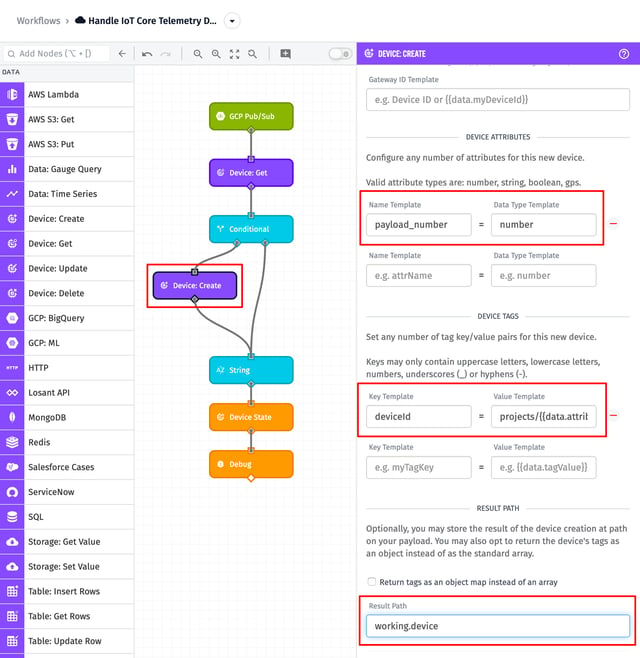
So now whenever this workflow encounters a device ID it doesn't know, it will be created. The important thing to notice is that we are adding the deviceId tag and setting it to IoT Core's unique device ID. This should be the exact same template used in the Device: Get Node. This ensures the next time a message comes in for this device, it will be found.
Build Something Awesome
Now that you have telemetry data coming from your Google Cloud IoT Core devices, you can use all of Losant's functionality, like Dashboards and Experiences, to build fully custom and branded IoT applications for your customers.
If you use Losant and Google Cloud IoT Core in interesting ways, we would love to hear from you. Please post your project to Losant Forums.