
Node-RED is an excellent, open-source workflow tool that runs on a local computer. With its ecosystem of contributed nodes, it's an easy way to connect and orchestrate a wide variety of common devices and sensors within your local network. Node-RED can also act as a simple-to-use gateway between your local peripherals and Losant, which brings a host of additional functionality to your connected solution, like data storage, dashboarding, and cloud-based workflows.
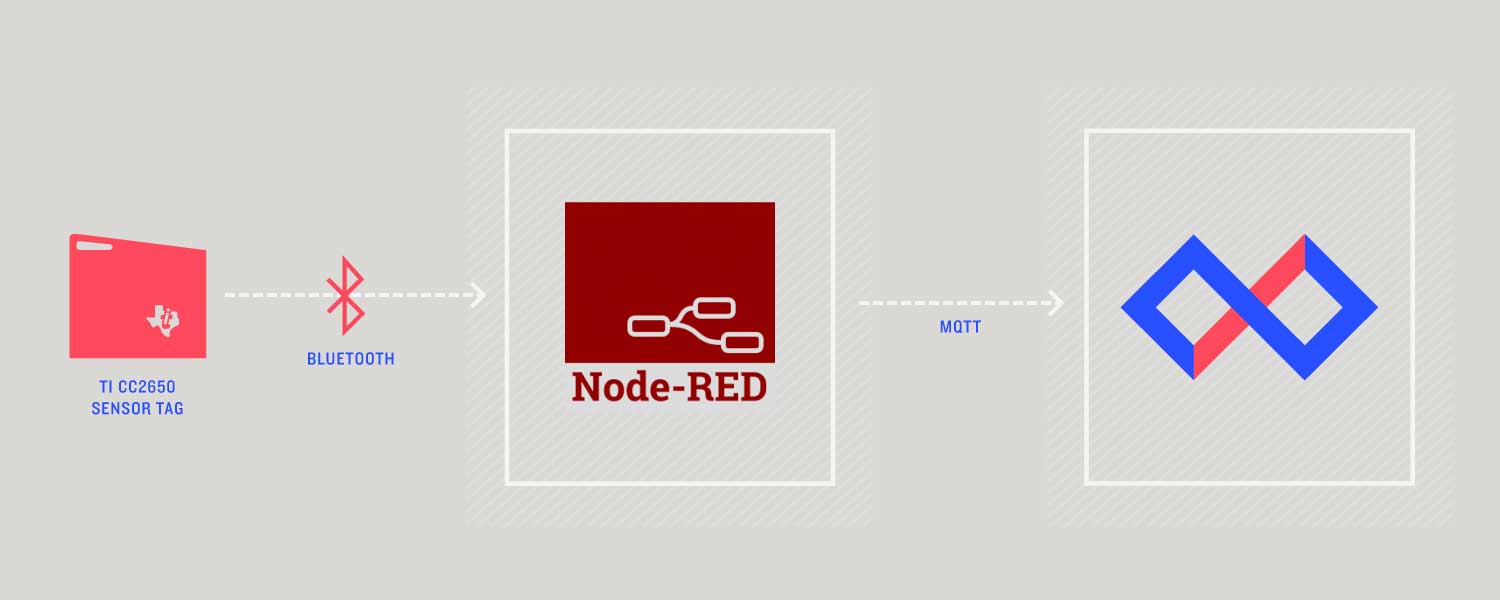
For this guide, we're going to use Node-RED as a gateway for a Texas Instruments CC2650 SensorTag. The SensorTag can only communicate via Bluetooth, which means it can't connect directly to Losant; it needs a gateway.
How to Install Node-RED
Node-RED is written in Node.js and can easily be installed using npm. If you don't already have Node.js installed, go to their downloads page and follow the instructions for your environment.
Open a terminal and use npm to install Node-RED:
$ npm install -g node-red
Once installed, you can run Node-RED from the command line:
$ node-red
It should then log an IP address and port that you can use to access it. Simply open that address using any standard browser.
8 Sep 09:54:42 - [info] Server now running at http://127.0.0.1:1880/
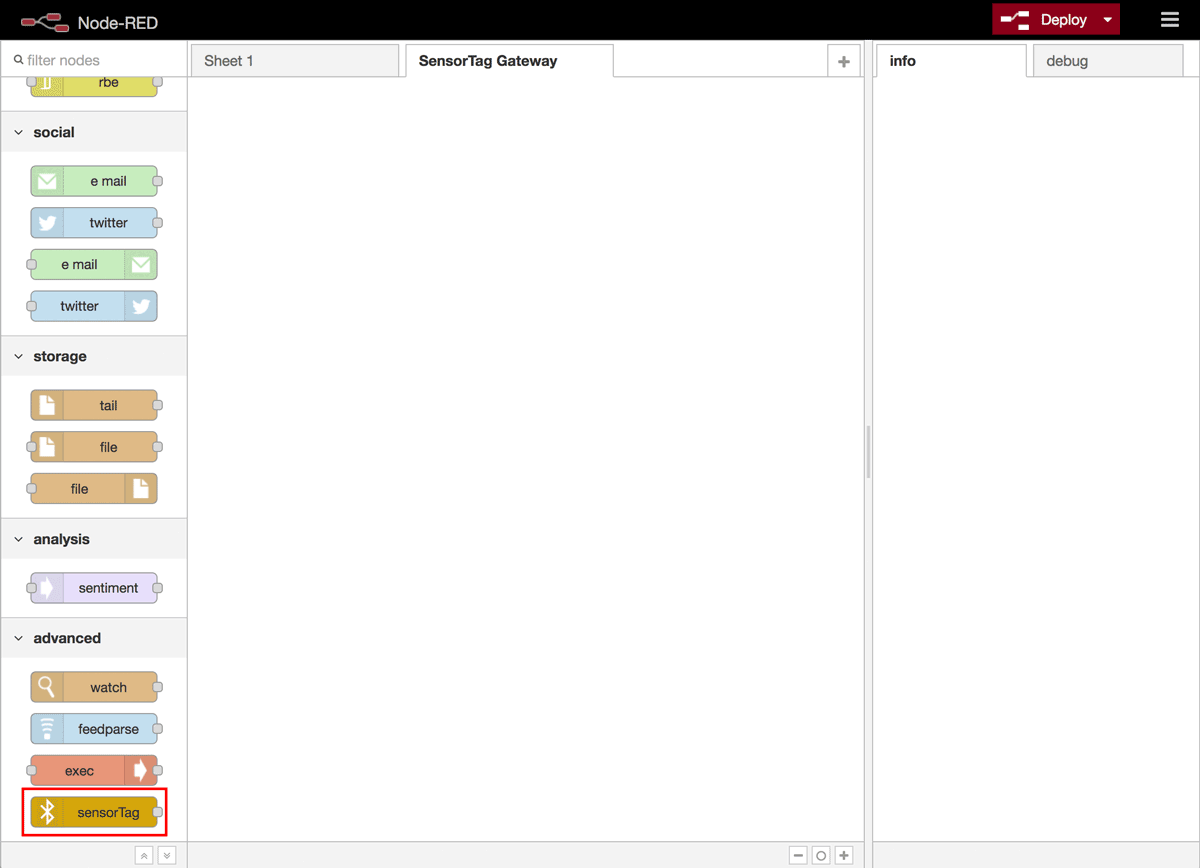
How To Install SensorTag Node-RED Node
Fortunately there's already a node we can use to connect and read the SensorTag's sensor data. First, if you're already running Node-RED, stop it by hitting control-C on the terminal. Next, use npm to install the module in your $HOME/.node-red directory.
$ cd $HOME/.node-red
$ npm install node-red-node-sensortag
Now if you run Node-RED again, you'll see the SensorTag node in the Advanced section.
How To Build the Flow
The next step is to build the Node-RED flow that will act as the gateway. This flow will read sensor data from the SensorTag, combine the attributes into a single payload, and then send that payload as a device state to Losant.
First, drag the SensorTag node onto the canvas and then double-click it to bring up the configuration.

For this tutorial, there are no required changes to the config, but this is the easiest way to see what sensor data this node will report.
The next step is the most complicated. The SensorTag node reports a payload for each individual sensor once per second. This isn't the most ideal way to send this data over the internet, because we'd be sending six messages per second, which is bit much. We need to use a function node to wait for all sensors to report, combine them into a single payload, and then send them upstream to Losant.
Drag a function node onto the canvas, double-click it, and paste the following code into its editor. I'll explain the code in detail below.
The SensorTag node is emitting individual payloads with different topics (e.g. sensorTag/temperature). When we see one, we are saving the values emitted into a payload using the function context, which allows us to store information between workflow runs. Once we've received all of the values we need, we then allow the workflow to continue by returning the new payload. The payload we're creating looks something like the following, which is in a format that Losant understands.
{
  "data": {
    "accelerometerX": -0.97,
    "accelerometerY": -0.05,
    "accelerometerZ": -0.08,
    "gyroscropeX": 5.61,
    "gyroscropeY": -0.17,
    "gyroscropeZ": 0.34,
    "magnetometerX": -29.08,
    "magnetometerY": 96.39,
    "magnetometerZ": -19.94,
    "humidity": 40.7,
    "temperatureObject": 20.6,
    "temperatureAmbient": 27.3,
    "pressure": 995
  }
}
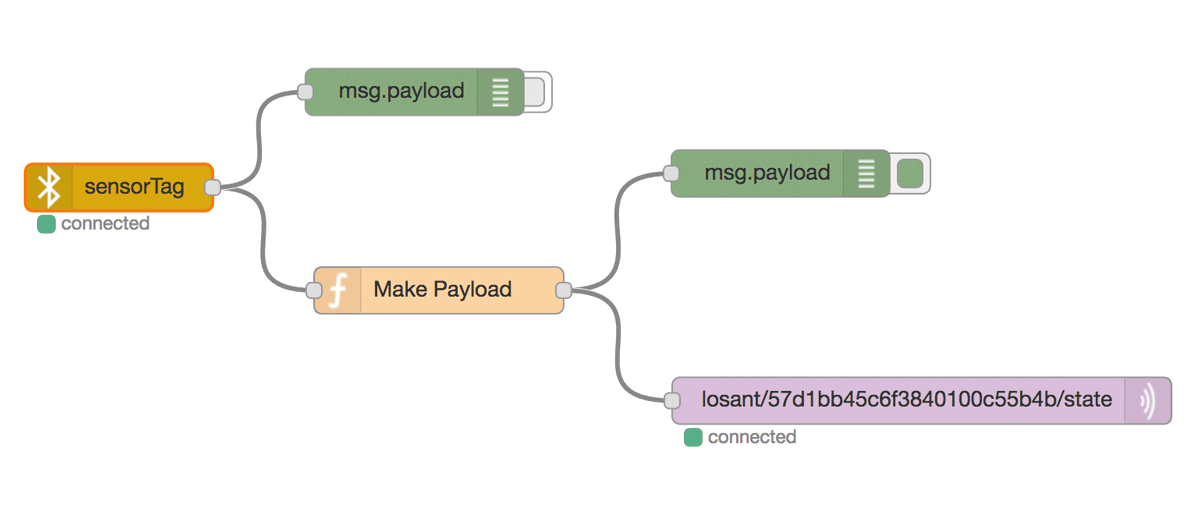
Next, drag a debug node and connect it to the function node. Your workflow should now look something like the following image.
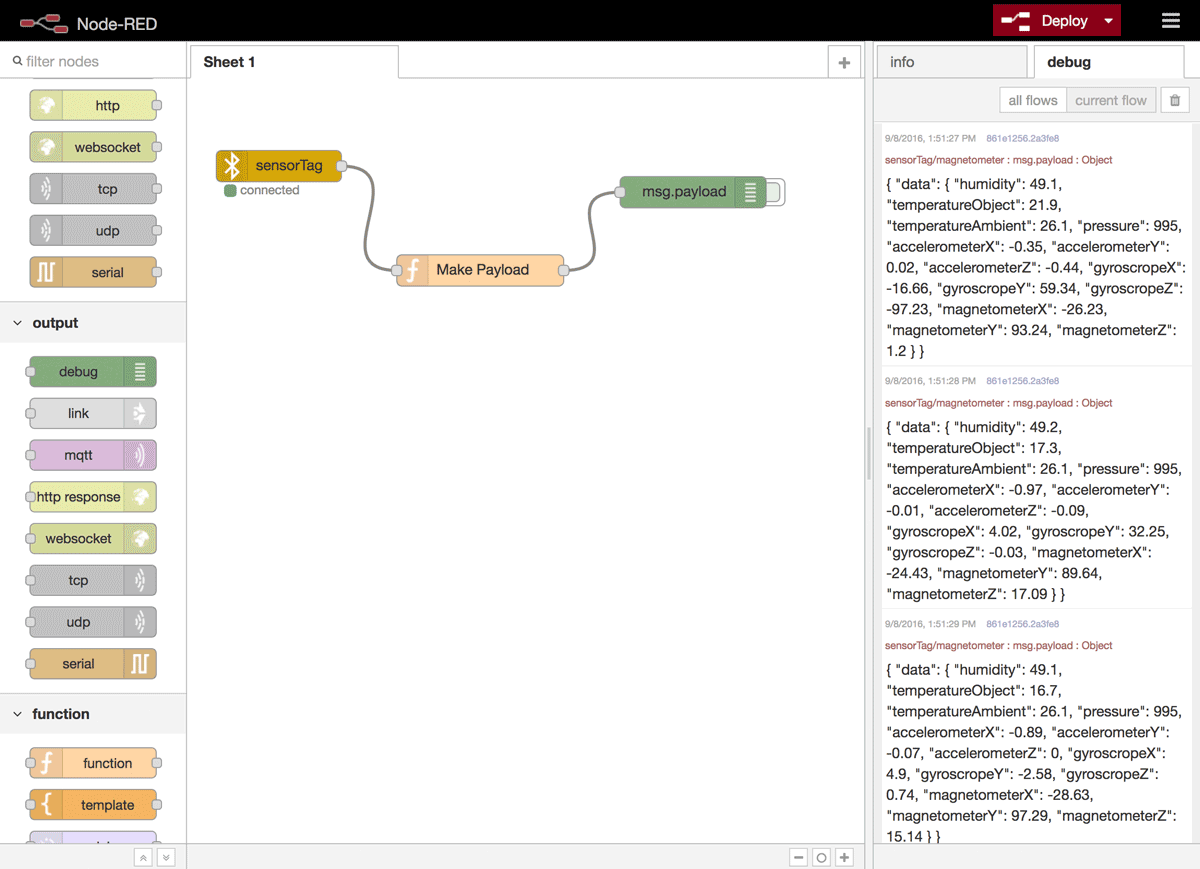
Once you deploy this workflow, you should see the SensorTag node connect to your device and messages appearing in your debug tab.
Losant Setup
Now that we have the device streaming data into Node-RED and it being compiled into something Losant can understand, it's time to configure Losant to handle this data. If you haven't already, sign up for a Losant account. Once signed up, create an application and name it anything you'd like.
Losant has the concept of gateways and peripherals, which we'll be using to represent this system. The gateway will be thought of as the computer running Node-RED. The peripheral will be the SensorTag itself. Gateways can connect directly to Losant and report state on behalf of their peripherals. This means you could keep expanding this solution with more and more Bluetooth devices, but still only need a single connection between your computer and the Cloud.
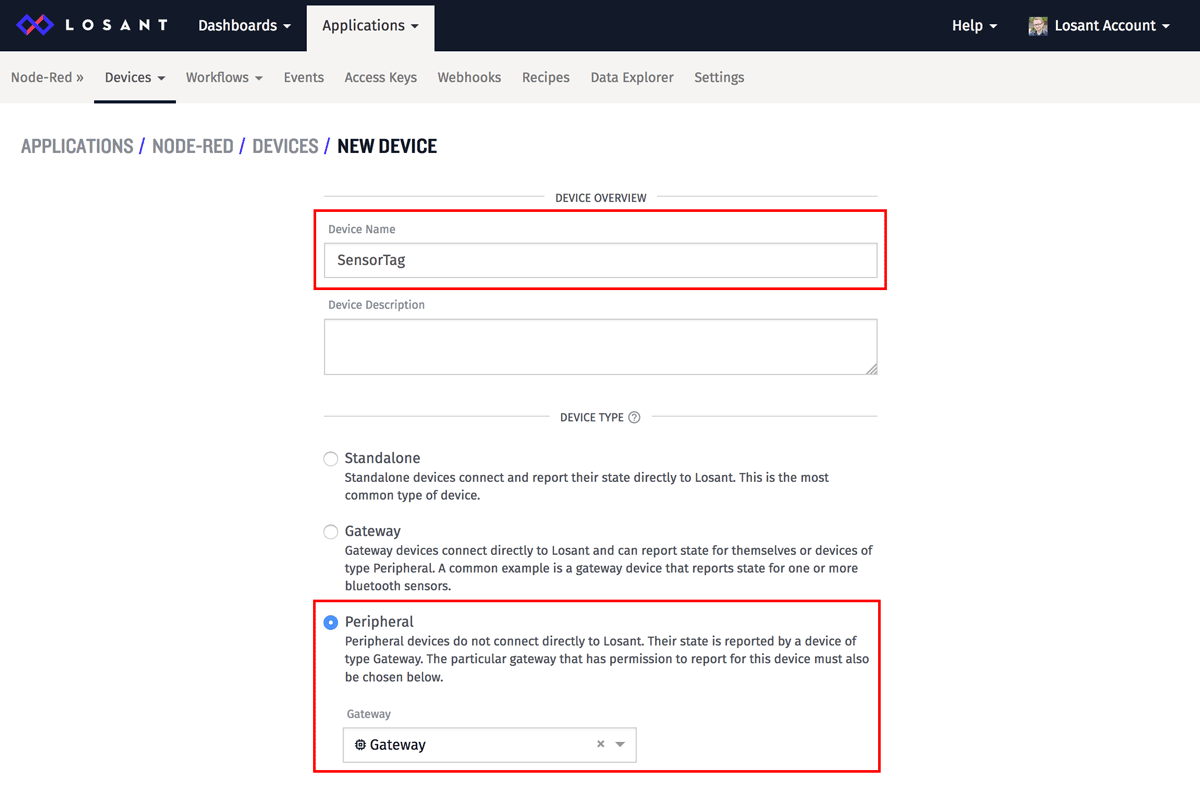
First, create the gateway by choosing "Devices -> Add Device" from the top menu and then choose "Create Blank Device" on the following screen. You can name the device anything you'd like and set the device type to "Gateway".
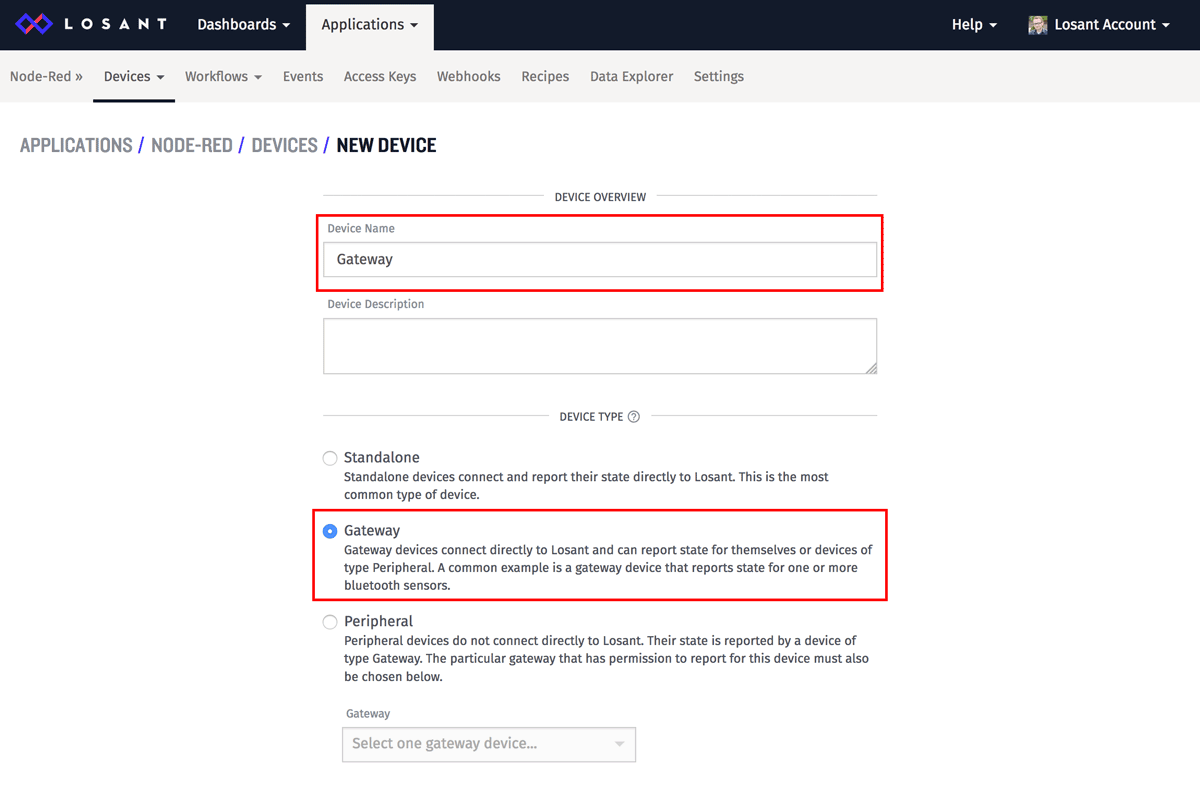
There's no other configuration required for the gateway. Once you click "Create Device" at the bottom, the display will change to show you your device ID. You'll want to copy/paste this somewhere convenient since you'll need it shortly.
Next, let's create the peripheral device to represent the SensorTag. Choose "Device -> Add Device" and create another blank device. You can name this device anything you want and make sure the device type is set to "Peripheral". You'll also have to select the gateway you just created from the dropdown to associate this peripheral with your gateway.
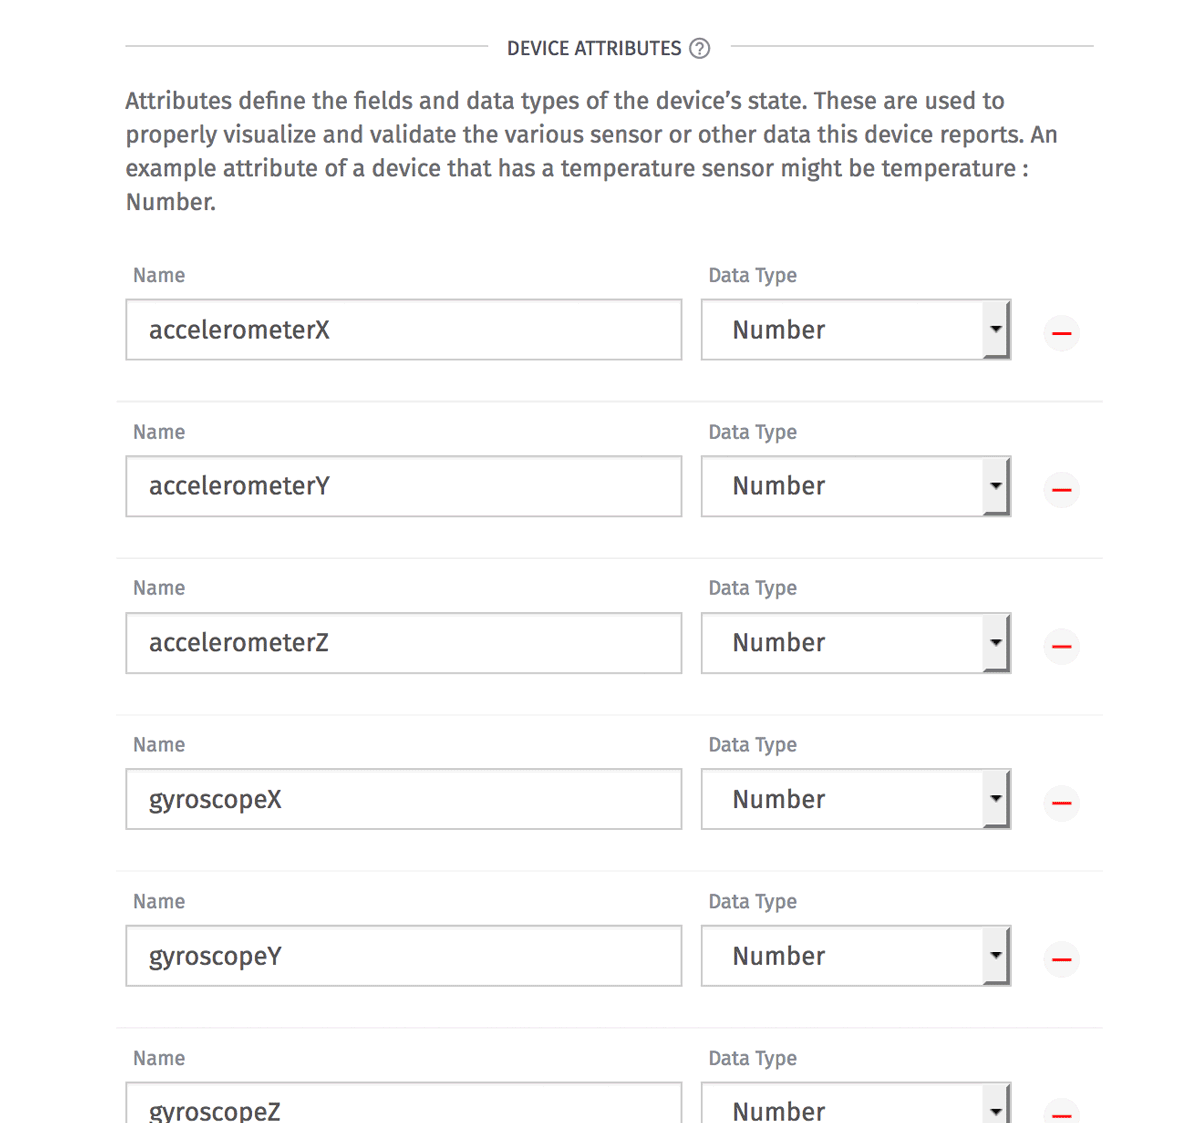
Next, we need to configure attributes for this peripheral that match the values in the payload we're creating in Node-RED. Here's an example payload again just for reference:
{
  "data": {
    "accelerometerX": -0.97,
    "accelerometerY": -0.05,
    "accelerometerZ": -0.08,
    "gyroscopeX": 5.61,
    "gyroscopeY": -0.17,
    "gyroscopeZ": 0.34,
    "magnetometerX": -29.08,
    "magnetometerY": 96.39,
    "magnetometerZ": -19.94,
    "humidity": 40.7,
    "temperatureObject": 20.6,
    "temperatureAmbient": 27.3,
    "pressure": 995
  }
}
Create an attribute for each of those fields (i.e. accelerometerX, accelerometerY, etc) and set their data types as Number.
Once you have all attributes created, click "Create Device" at the bottom and then copy/paste the device ID somewhere convenient for later use.
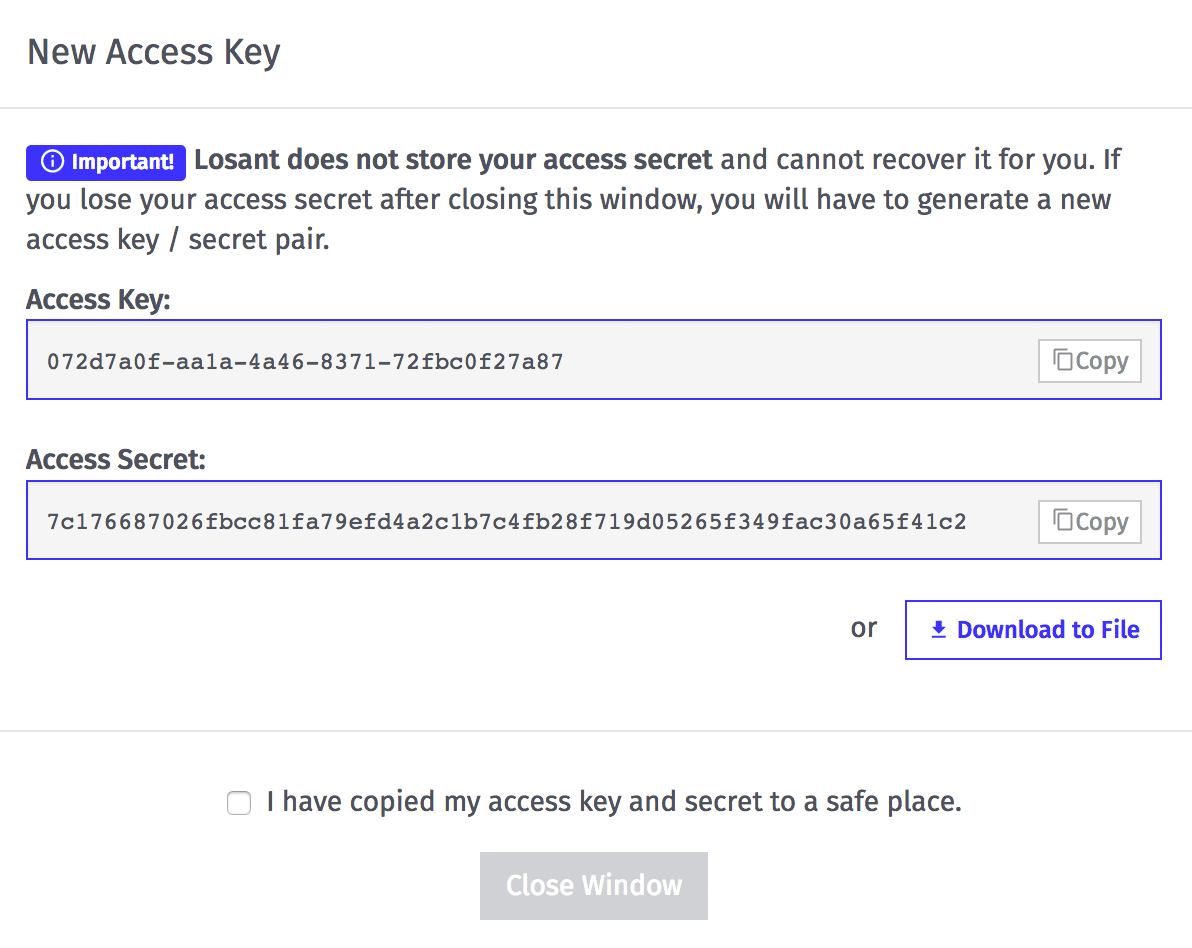
The last thing we need to do is create an Access Key so the gateway can properly authenticate with Losant when it connects. Select "Security" from the application menu bar, choose "Device Access Keys" in the left navigation, and then click the "Add Access Key" button on the top-right. Leave "All Devices" selected and click "Create Access Key" at the bottom. This will display a popup containing your key. Copy/paste the key and secret somewhere convenient.
Losant is now properly set up and we're ready to return to Node-RED and start reporting sensor data to our newly created devices.
How To Connect Node-RED to Losant
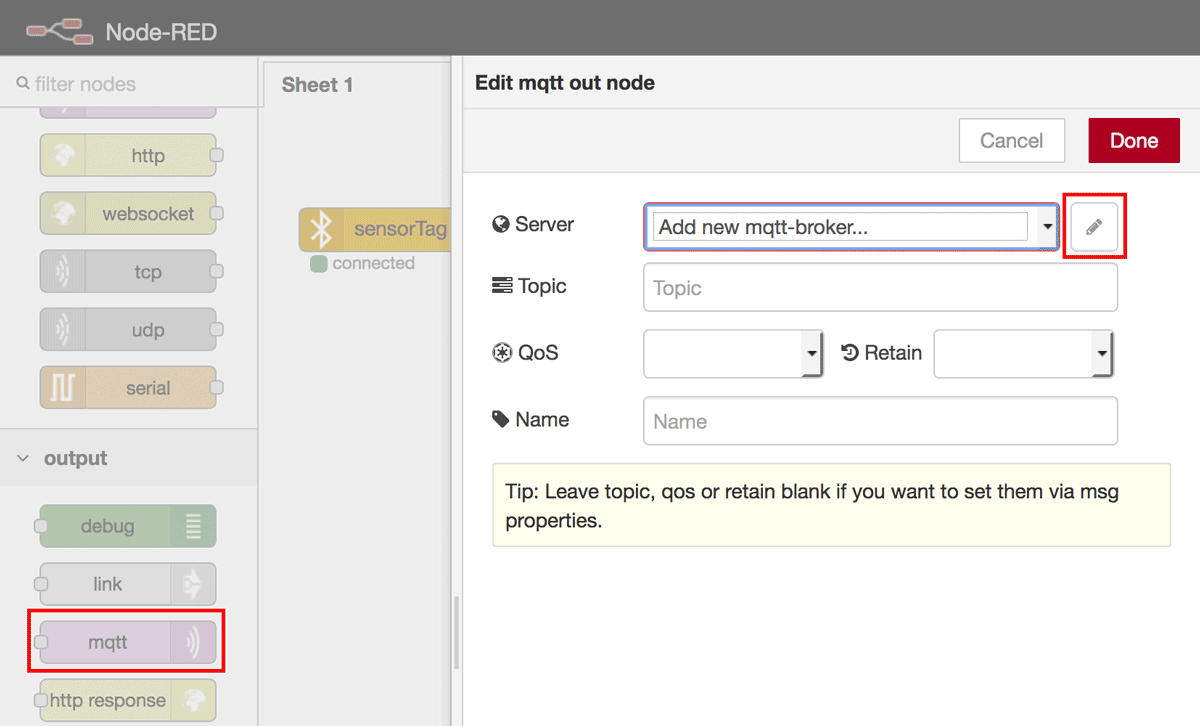
We're going to use Node-RED's built in MQTT node to open a connection to Losant. Drag an MQTT node onto the canvas and double-click it to bring up its properties. Then click the pencil icon to add a new MQTT broker.
On the Connection tab, set the Server to "broker.losant.com" and set the Client ID to your gateway's device ID. The will cause this MQTT client to connect as your gateway.
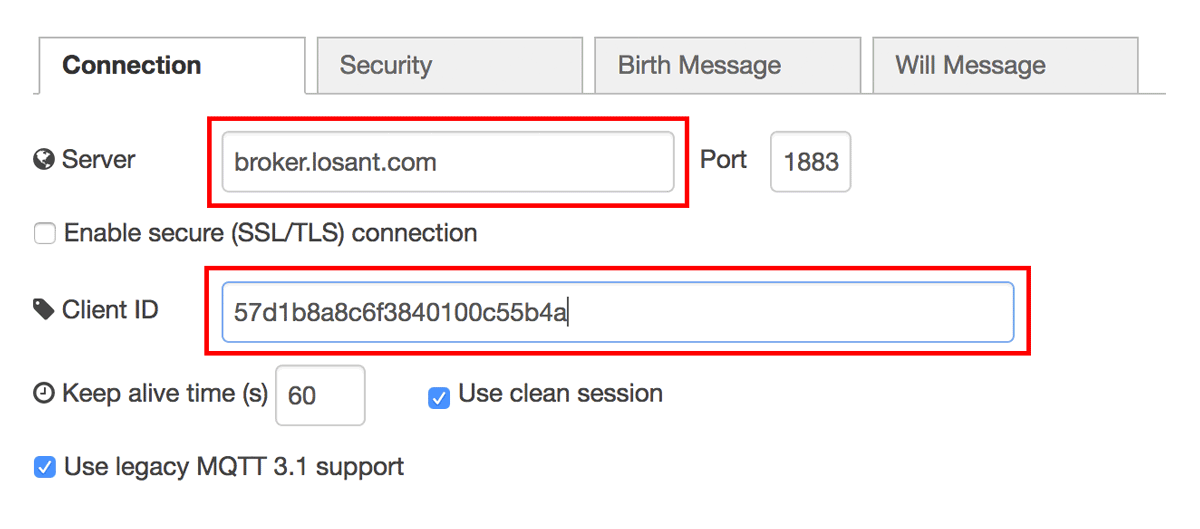
On the security tab, set the Username to your Access Key and set the Password to your Access Secret.
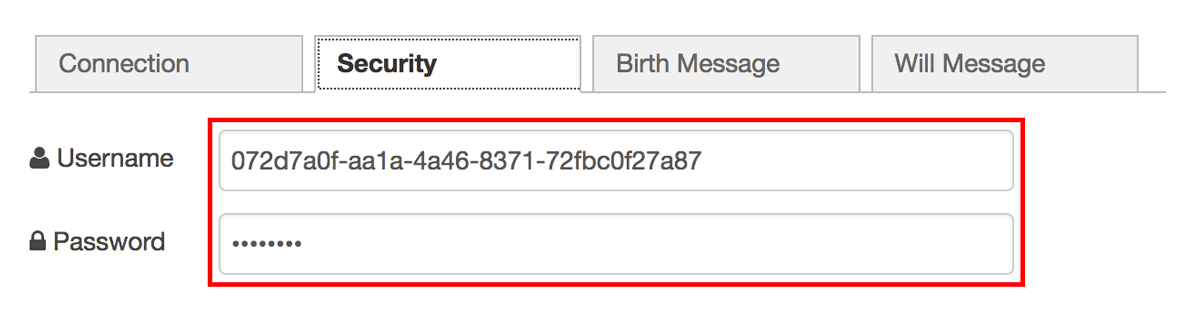
Click the "Add" button to save this broker config and return to the MQTT node's configuration. The last step is to specify the topic that this node should publish to. Set the topic to "losant/your-peripheral-id/state".
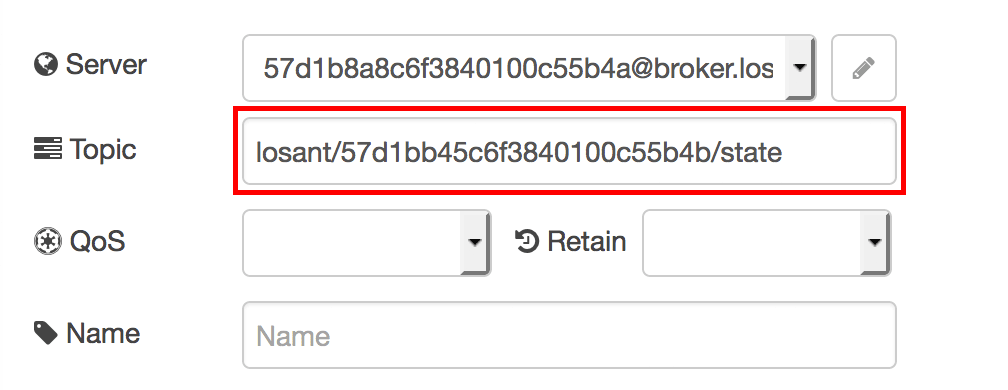
What's happening here is that the gateway is connecting to Losant and reporting to the peripheral's state topic. Refer to our MQTT documentation for more details.
You can now save this node and connect it to the function node. The finished workflow should look something like this:
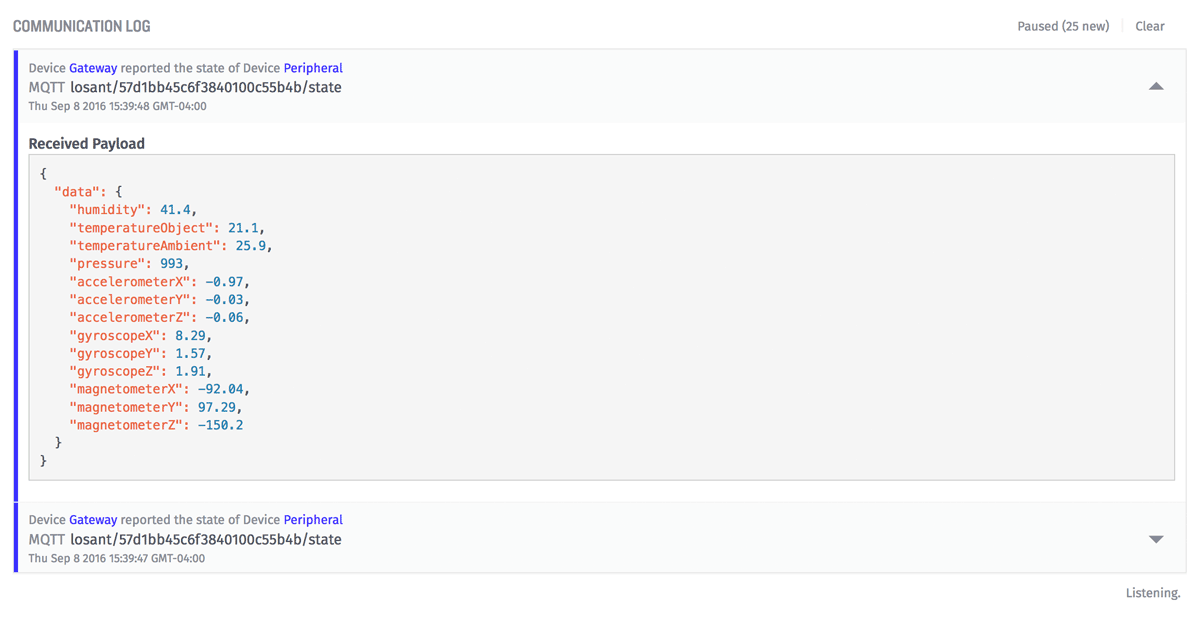
Once you deploy the workflow again, your device's state will begin reporting to Losant. You can see and debug any issues using your application's communication log.
Build Something Awesome
At this point you have a device in Losant being populated with data. Combining Node-RED running in an edge device with Losant running in the Cloud provides a powerful combination when building connected solutions. You can build a dashboard, trigger reactions using our workflows, or anything you can imagine.