
PubNub, the real time application messaging and cloud infrastructure service, recently announced their new BLOCKS feature. BLOCKS allows for scalable, serverless cloud computation (i.e. mutation) of payloads moving through its Data Stream Network. Those messages can then be sent to other PubNub event handlers, published to channels for use by subscribers, or in our case, pushed to third-party APIs such as Losant.
As we did previously with the AWS IoT Button, we will push data from a cloud computing service to the Losant platform using a webhook. We'll then trigger a workflow from that webhook and set the state of a device.
For an extra challenge, we will also use PubNub's BLOCKS to send a separate message to Losant using our REST API – first by authenticating the request as our device, and then setting that device's state.
Set Up Losant Application
First, let's do the necessary setup on the Losant side before we send data to our platform.
- Log in to your Losant account. Don't have one? It's free and easy to register.
- Create a new application. You can name yours anything you'd like (mine is called "PubNub Blocks Tutorial").
- Create a new webhook. Name it anything you'd like (such as "PubNub Webhook"). This webhook will be the URL to which we send data from PubNub.
- Create a new device. Again, the name doesn't matter (though "PubNub Subscriber" is an excellent choice). What does matter is that the
Device Typeis "Standalone", and that it has three attributes:- randNum should be of the type
Number - randNumInverted should also be a
Number - source should be a
String
- randNum should be of the type
- Create an access key. The key should be restricted to the device created above. Make sure to download the key and secret file, or to copy both values to a safe place as we'll need them in later steps.
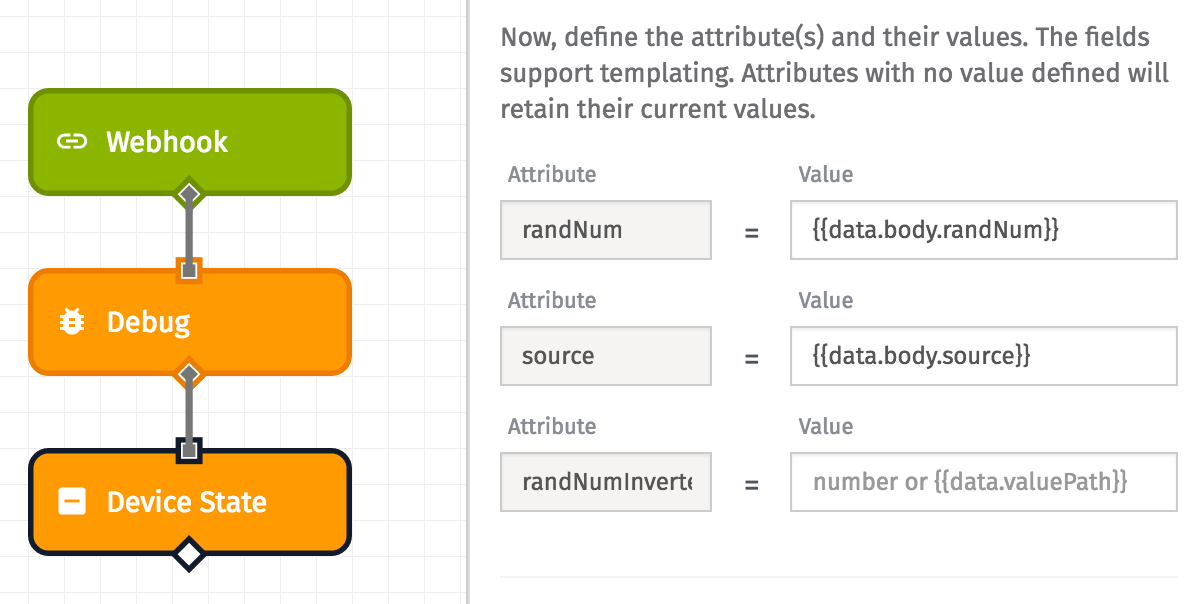
- Finally, create a workflow and name it "PubNub Workflow" (or, of course, whatever you'd like). The workflow needs only three nodes, connected linearly in this order:
- Webhook Trigger: Select the webhook you created earlier.
- Debug: This node is optional, but it will allow us to see raw messages coming from the webhook.
- Device State: Select the device created previously. Set two of your three attributes as follows:
- randNum should be set to
- source should be set to
Once these steps are complete, it's time to switch over to PubNub.
Set Up PubNub BLOCKS and Event Handlers
PubNub has a fantastic getting started tutorial for working with BLOCKS. While I recommend going through it in its entirety, for our purposes we will only follow the "Creating an App" and "Creating the Block" sections before breaking off on our own.
Once you have completed PubNub's steps to create an app and a block, you'll need to create three separate Event Handlers to complete our tutorial.
Random Number Event Handler
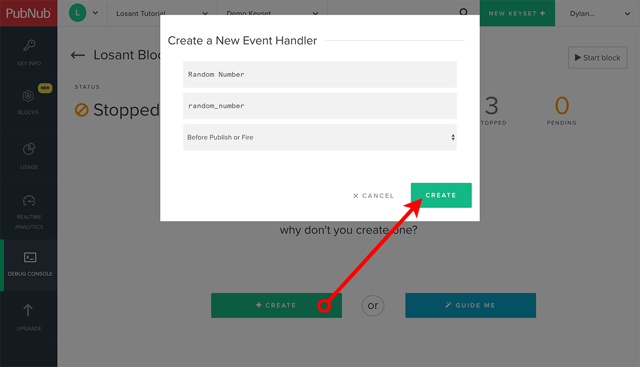
After creating the BLOCK, you'll see a call to action to create your first Event Handler. Click the "Create" button, and in the modal that appears ...
- Enter "Random Number" for
Event Handler name. - Enter "random_number" for
Channel name. - Choose "Before Publish or Fire" for
Select an event type. - Click "Create" in the modal's footer.
- On the next screen, you'll see an example function in a text editor. Replace all of that text with this code. If you want to know more about what is happening in the function, there are inline comments explaining our process.
- Save the Event Handler by clicking the disk button in the left column.
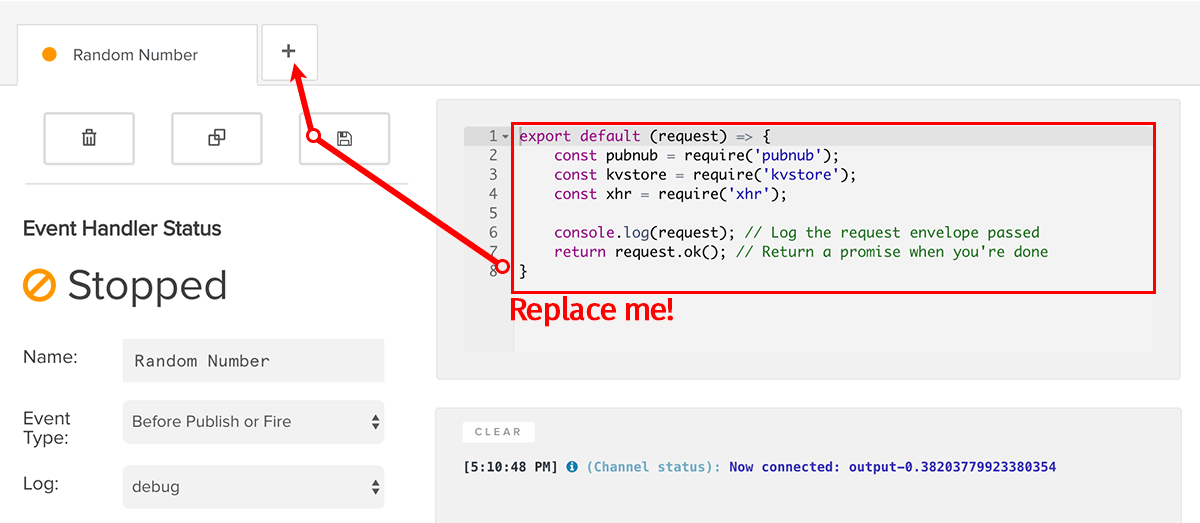 Replace the example function with the code provided; save the Event Handler; then add a new Event Handler.
Webhook Event Handler
Click the "+" tab button to the right of your "Random Number" event handler tab (as shown in the picture above). This will open another modal for creating an event handler ...
- Enter "Losant Webhook" for
Event Handler name. - Enter "losant_webhook" for
Channel name. - Choose "After Publish or Fire" for
Select an event type. - Click "Create" in the modal's footer.
- Replace this event handler's example function with this code.
- Save the Event Handler.
Losant REST API Event Handler
Start setting up the third and final Event Handler by once again clicking the "+" tab button, and in the modal ...
- Enter "Losant REST" for
Event Handler name. - Enter "losant_rest" for
Channel name. - Choose "After Publish or Fire" for
Select an event type. - Click "Create" in the modal's footer.
- Replace this event handler's example function with this code.
- Save the Event Handler.
Test It Out!
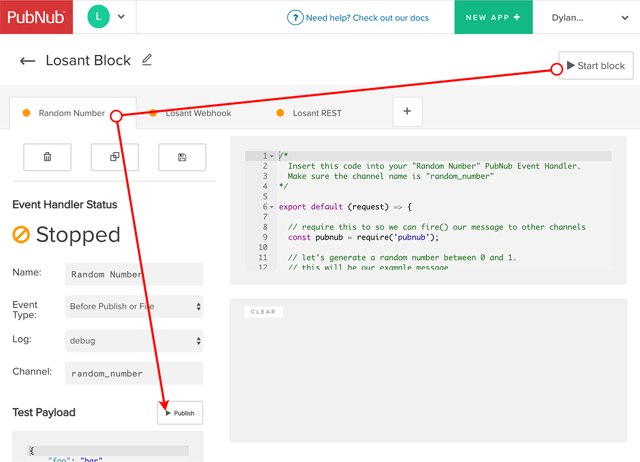
Click the "Start block" button in the top right corner, and you will see the block and all three Event Handlers come to life in the console. Then, switch back to the "Random Number" tab and click the "Publish" button in the "Test Payload" section. (Leave the payload set to its default value.)
In the "Random Number" tab, you should see that both Promises succeeded; and under the "Losant Webhook" and "Losant REST" tabs, you should see successful responses from Losant.
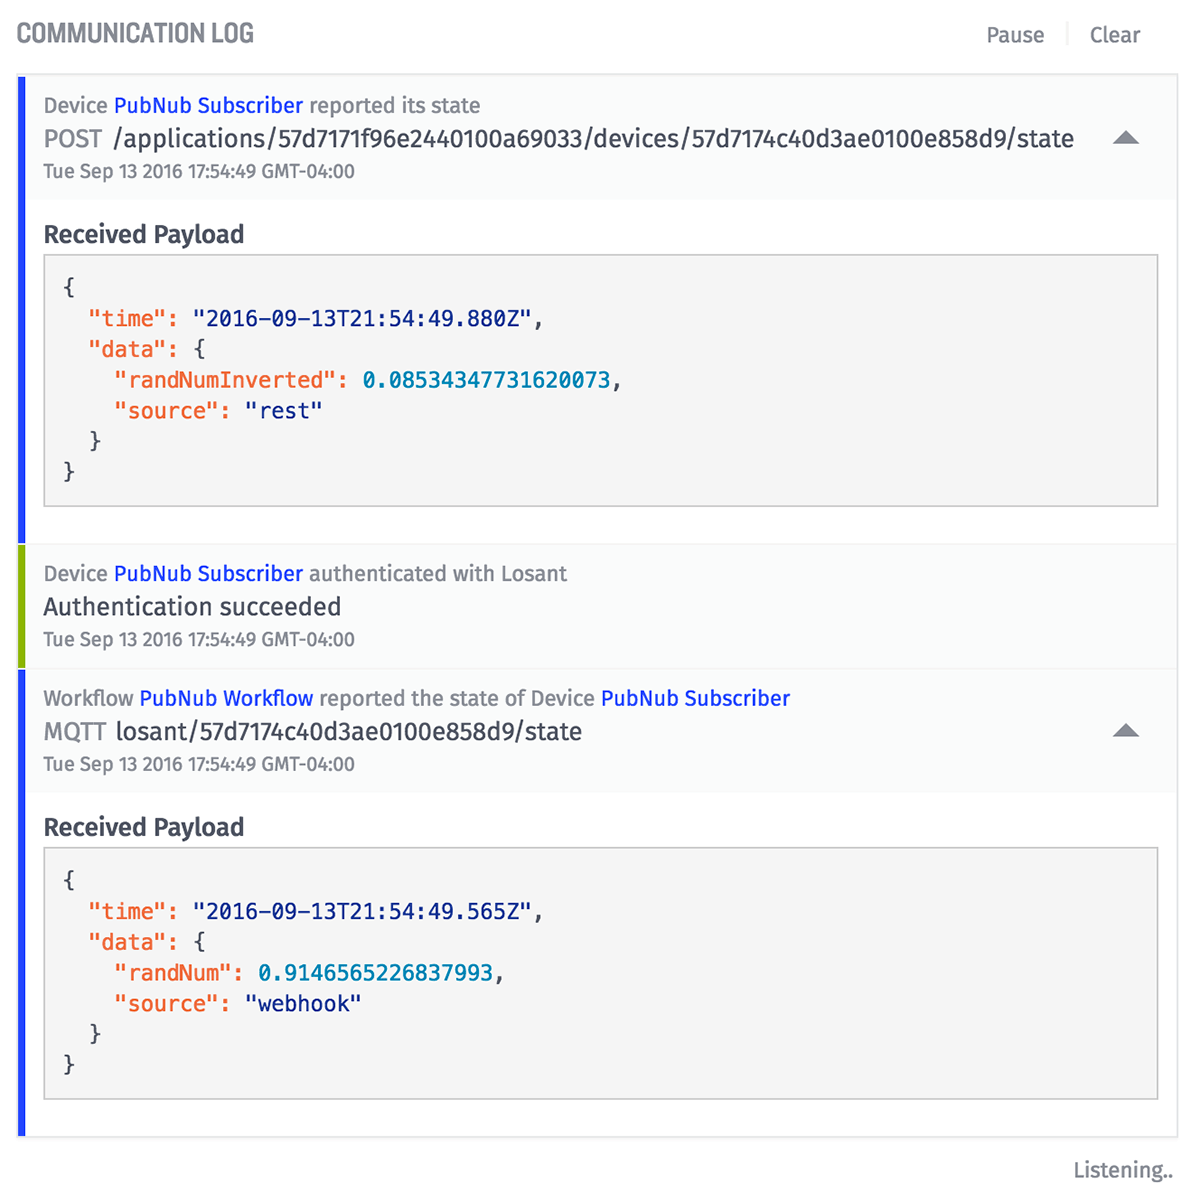
Back in the Losant platform, navigate to your application's main page and, if you click "Publish" in PubNub again, you'll see the device's state being set both by the webhook and by the API call in the application log.
We've demonstrated how using PubNub's new BLOCKS feature makes it easy to send your real-time messages to Losant, both using a webhook and also using our REST API. We encourage you to check out their growing BLOCKS catalog and find new ways to connect your Things yours PubNub and Losant.
Working on a PubNub-to-Losant project of your own? Let us know in the comments!