
In most IoT projects, the requirements are defined and devices and external systems are selected before developers start working on a dashboard or user experience. However, if you are working on an IoT project with undefined objectives, it can be beneficial to create the user interface first so you can identify what end users and management teams want to accomplish. To do this, you will need to simulate IoT data from devices without physical objects or sources. The purpose of this tutorial is to demonstrate how to simulate devices and incoming data for IoT applications using the Losant application enablement platform.
There are several advantages to simulating the data first:
- The user interface will be a live document. Users will see how data changes affect the visuals.
- Data changes can be displayed in minutes instead of hours.
- Data attributes and visual changes are made without impacting existing devices or connections.
- You can test advanced data processing (like Losant Notebooks) by using a known data set to verify the data is correct.
In short, creating a simulation can clarify several unknowns quickly before the actual project begins.
As an example, we’re going to look at a dashboard using simulated data from devices on a food truck and the truck itself. The dashboard will show stationary and mobile device data. Losant built this application as a way to show remote monitoring, but since we don’t own a food truck, we simulated the data. Figure 1 shows the dashboard of a truck, including its position, current status, and history of equipment on the truck.
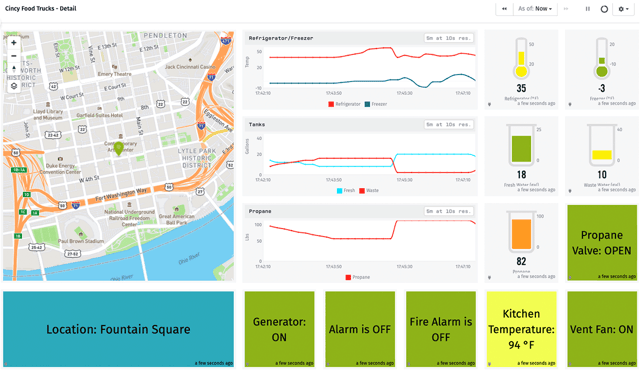
Figure 1
Simulating Stationary Devices
Even though there is equipment on our imaginary trucks, the equipment does not move; the truck does. To simulate a stationary device, like the temperature sensors in the refrigerator/freezer, do the following:
First, define your device(s) just as you would with real devices. Use the attributes and tags you need to support your dashboard.
Next, you’ll need to create a workflow that sends simulated data to those devices. There are two main ways of supplying this data: from a formula or a fixed-data set. We will explain using a data set later in this article, so let’s focus on using a formula.
You could provide a constant temperature setting in a simulation, but the graphics will be flat lines and will not look realistic. Instead, we will use a workflow that will vary the data randomly as shown in Figure 2.
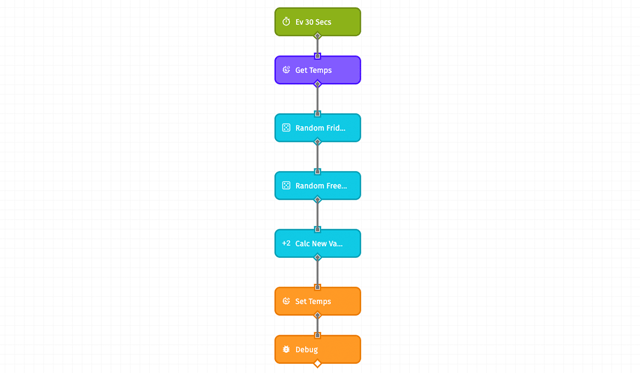
Figure 2
This workflow retrieves the last recorded values for the refrigerator and freezer using a Device: Get Node (Get Temps). It uses Random Number Nodes to create a number between -2 and 2 for each value (Random Fridge Temp and Random Freezer Temp). A Math Node (Calc New Values) is used to update each temperature and the new values are recorded for the device using a Device: State Node (Set Temps). The workflow executes every 30 seconds to simulate data from the sensors. Repeat these steps as necessary for each device.
Simulating Mobile Devices
Mobile devices require a more complicated simulation process than stationary devices due to calculating routes and the desired behavior of the vehicles. Figure 3 shows a sample workflow for such a vehicle:
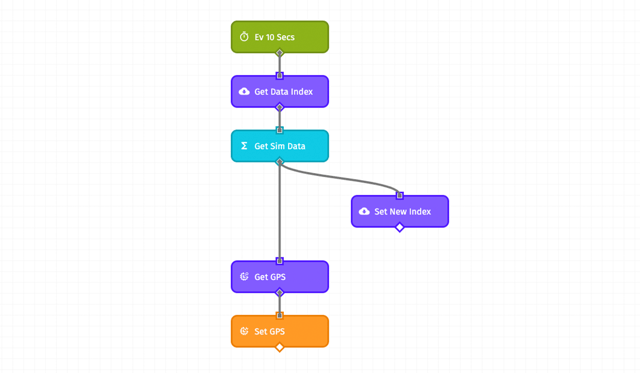
Figure 3
This workflow is executed every 10 seconds using a Timer Node. A Storage: Get Value Node (Get Data Index) retrieves a stored value called dataIndex. A Function Node (Get Sim Data) uses JavaScript to define a data set of all the vehicle’s locations and other attributes. Figure 4 shows the JavaScript code in this node.
Figure 4
The array of simulated data will be used one row at a time per workflow run. A row of the array, specified by the dataIndex variable retrieved in the previous node, is stored in the payload data. A temporary variable, newIndex, is set to the next array record to use either the next row or zero if you are at the last record.
The Storage: Set Value Node (Set New Index) stores the newIndex value in the dataIndex storage variable. Finally, the Device: Get Node (Get GPS) retrieves the identifiers for the vehicle’s GPS device and Device: State Node (Set GPS) sets the new state for the device using the attributes from the data array. Again, repeat the workflow for each vehicle in your application.
Warning
An important thing to keep in mind is that a simulated data payload will count against your payload threshold as a real data payload. If you have a dozen simulated devices reporting every few seconds, you could quickly deplete your allocation before you know it. You (or your administrator) can always check your application’s payload count from your Organization Overview dashboard.
Conclusion
The examples in this document show simple simulations. After you create a simple simulation, you may find that a more complex emulation is needed. Workflows can enhance a simulation to exhibit different behaviors based on time of day or events within the application. Simulations can be as simple or complex as you need.
Simulation applications can be built in an enterprise organization or in our Developer Sandbox. Contact us in the Losant Forums if you need any other information about simulating data in an application.