
This article was contributed by Kevin Sidwar. Kevin is an Internet of Things instructor and host of Daily IoT.
As part of my IoT sports memorabilia project, I'm trying to get NHL stats to display on a small e-paper display mounted inside a hockey puck.
 For the cloud backend, I needed a way to access NHL player stats quickly and easily. Instead of having my hardware interact with the NHL API directly, I was looking for a way to store current stats for multiple players in the cloud and grab them only when I want to update the display.
A project like this would normally require me to spin up a web backend, create APIs to access that backend and stand up a database to store the NHL stats. Even after setting it all up, I'd need to patch and maintain both the API code as well as the database. As an alternative, I decided to use the Losant IoT Platform instead, and couldn't be more happy with the result. The best part is that it didn't require me to write any code. Let me show you how I set it up.
If you prefer a video, here is a video tutorial of me explaining the process:
Create a Losant Data Table
The first thing we need is a place to store our player stats. For that Losant offers the concept of Data Tables, where you can define a table schema and start dumping data into it. It's pretty cool, but the platform goes a bit further with first-class integration of Data Tables in the Workflow editor which allows you to manipulate tables in a workflow and event trigger a workflow when a table is updated. To create a table, simply navigate to the Data Tables tab in your Losant application and click on the Add Table button.

Give your table a name, and then add the following minimum set of columns.
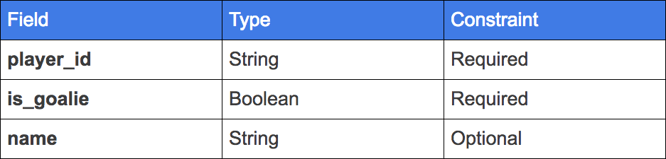
Any additional columns you want to add are for stats you wish to track. They should all be added as type Number and have the constraint set to Optional. I also set all of my stats to have a default value of 0. The stats I am currently tracking are:
- GAA*
- Save Percentage*
- Wins*
- Goals
- Assists
- Plus Minus
- Shot Percentage
- Blocked Shots
*Goalies only
Feel the Workflow
With the table created, we are ready to add a workflow to get data flowing into it (pun intended). Because we are using the Losant built-in data table, we get first-class workflow support for interacting with our new table. To get started, create a new workflow and drop in a Virtual Button Node, a ;Table: Get Rows Node, and a Loop Node connected as shown.
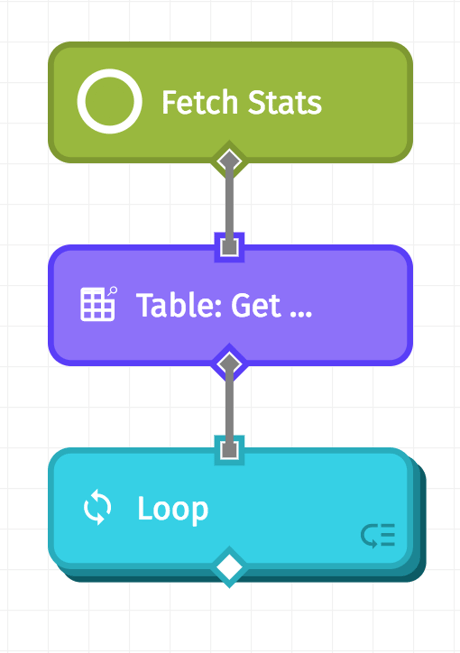
Table: Get Rows ;Node
For the Table: Get Rows Node, select your newly created table from the Table ID Template dropdown and set the Result Path at the very bottom to data.rows. You don't have to worry about any of the other settings like query, sort, limit, and offset; leave all of those blank. This causes the node to fetch every row in the table and store the result in data.rows to be used in future nodes.
Loop Node
Configure the Loop Node with the following settings:
- Loop Source Path = data.rows.items
- Current Item Path = data.row
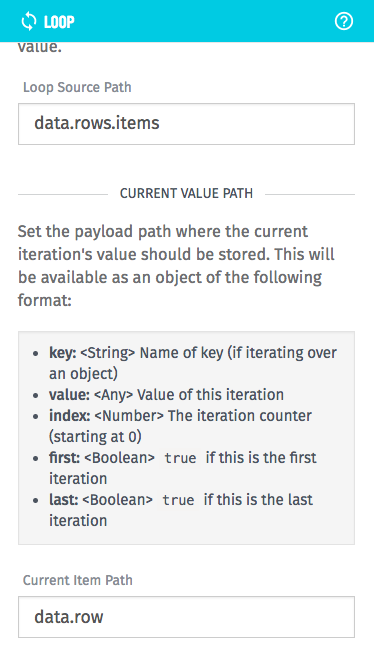
This tells the Loop Node to iterate over all of the actual rows from the table query, and that during each iteration of the loop the current row will be stored in data.row so you can access it from the nodes that make up the loop logic.
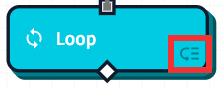
To access the contents of the Loop Node, click on the icon in the lower right-hand corner.
This will drill down into the loop logic. Create the following workflow inside the loop:

Notice that the Next Node has been removed. That is intentional. The Loop Next Node allows us to continually update the data payload and causes changes in each iteration of the loop to persist to the next iteration. In our case we don’t want to persist the changes across loop iterations because we are done with the data after storing it in our database table.
Each time through the loop we are querying the stats API and storing the result in data.raw_stats. We then mutate that data and store it as data.stats and data.fullName in the payload. We only need those values to feed into the Table: Update Row Node and then we can throw them away for the next iteration of the loop.
On the other hand, if we were looking to build up a list of all player stats into one big payload or perform some data aggregation (add all of the goals and assists together) we would need the Loop Next node in our loop workflow.
Start: Loop Trigger
The Start: Loop Trigger can be left untouched as it gets its settings from the Loop Node in the main workflow. Configure the HTTP Node, the Mutate Node and Table: Update Row Nodes as follows.
HTTP Node
The HTTP Node is responsible for querying the NHL API for the player stats.
- Request Method = Get
- URL Template
- https://statsapi.web.nhl.com/api/v1/people/?hydrate=stats(splits=statsSingleSeason)
- Payload Path to Store Response = data.raw_stats
Mutate Node
The Mutate Node will extract the actual stats from the gnarly, nested JSON returned from the NHL API. Its entire purpose is to make the data easier to deal with in the Table: Update Row Node that follows. In the Mutate Node create two rules for setting a new value with the following settings.
- Rule 1
- Value Template =
- Destination Path = data.stats
- Rule 2
- Value Template =
- Destination Path = data.fullName
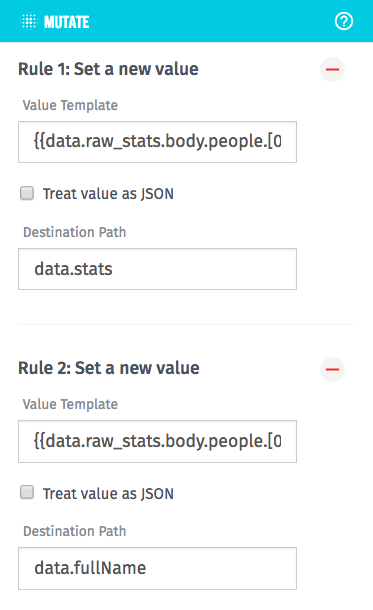
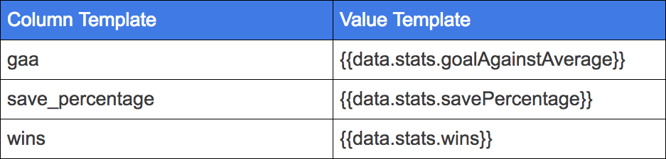
Table: Update Row Node
This node takes the stats gathered from the NHL API call and modifies the correct row in the table. Remember, the stats are located in data.stats because of the Mutate Node. The configuration of this node will depend on which stats you have decided to track and store in your table. For example, to set the name of the player you would use the following settings:

Here are the settings for a few of the stats I chose to track:
If you aren't sure how your stat is stored in the NHL JSON output, just stick a Debug Node onto the output of the Mutate Node and inspect the data.stats member in the debug window (accessed by clicking the small bug icon on the right side of the screen).
How to Add a Player
Since the workflow is player-agnostic, it is very easy to add more players to track. Simply create a new row in the stat table and populate the player_id and is_goalie fields. On the next run of the workflow the new player's stats will flow into the table. Their full name will be updated as well.

Summary
I'm excited about how this turned out. I have all the data I need and can return it to my end device when requested, which I will show in a future post (spoiler, Losant supports webhooks, too). My favorite part about this approach was how fast (about an hour) I was able to stand up a backend without writing any of the code normally required for a project like this. I now have a complete backend for my project without any code or database to maintain.
If you are interested, check out a deep dive into the hardware inside my hockey puck: