
With the Builder Kits beginning to ship to folks, we thought it would be cool to move beyond the basic workshops and show you some other things you can do with Losant and the simple hardware in the kit. Today we're going to look at connecting Losant to IFTTT, a well-known website for connecting various apps and services together. The possibilities are quite possibly endless when connecting platforms like IFTTT and Losant, but we're going to keep our focus pretty narrow and just show off one idea: taking data out of Losant and placing it into a Google Spreadsheet.
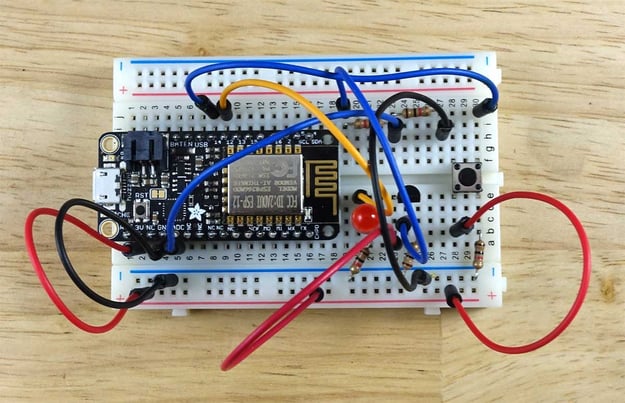
Before we move on, though, I would recommend that you read up on the Builder Kit Workshops, if you haven't already. I'm going to go ahead and assume that you've completed Workshop 3 and have a functional board with a button and temperature sensor reporting to Losant. Just plug it in and let it start reporting, because we aren't going to need to change anything about the breadboard layout or software on the Feather for the rest of this post. Everything that we need to do will be done in Losant (and IFTTT).
So we have the temperature sensor reporting to Losant every 15 seconds. Our goal for this post is to keep track of a moving average of that temperature date, and when we press the button on the kit, for that moving average to be added as a new row in a Google Spreadsheet. That means our first step needs to be to build a workflow for tracking a moving average. Below is a picture of the example workflow that I built – we'll go through each node step by step:

 |
The first node in the workflow is a Device Trigger node, configured, as you might guess, to trigger off of my Builder Kit Widget device. So this node will trigger the workflow whenever Losant receives new state from the device – meaning new temperature data every 15 seconds, or whenever the button on the device is pressed. |
|
After the triggering node, our next step is to pull out the previously stored moving average for temperature – the "Get Stored Avg" node above. This is done using a Get Value node, which allows a workflow run to retrieve a value stored by a previous workflow run. In this case, we are pulling out a previous value that I named |
 |
 |
Next is the "Has TempF" node, which is a reasonably simple Conditional node. Here, we are just checking to make sure that the current workflow payload has a |
|
Following that check is another simple check using another Conditional node. Remember how near the top of the workflow we pulled out the previously stored average and placed it in the current payload? Well, what happens if there was no previously stored value? That is what we are checking for here – if there is no value in |
 |
 |
So in the case where there was no value to pull out of |
|
Now the two branches of the workflow come back together, and we can actually calculate the moving average. To do this, we use a Math node, taking the previously stored moving average and the current temperature value and calculating a new average. In this case, we're doing a "10 point" moving average, which is why we're multiplying the previous average by 9 (i.e., 10 - 1) and dividing the whole result by 10. We store the new average in the payload at |
 |
 |
And finally, we store the newly calculated moving average for use in future workflow runs using a Store Value node. As you can see, we use the same identifier as we used in the Get Stored Avg node all the way at the top of the workflow – |
Ok, so now we have Losant calculating a moving average of temperature data! What's next? First we have to configure the IFTTT portion of this setup – so hop on over to https://ifttt.com and either log in or create an account. We're going to need to create a custom recipe that uses the "Maker" channel as the trigger and the "Google Drive" channel as the action.

First step to configuring a IFTTT recipe is choosing the "This" (or the "Trigger") and configuring it. The trigger in this case is the Maker Channel, which allows IFTTT to respond to arbitrary webhooks. This is going to be how Losant ends up talking to IFTTT.

The only configurable part of a "Maker" channel trigger is the event name, which in this case I named buttonPressed. That event name will be relevant when we have Losant talking to IFTTT – this is how IFTTT will know to trigger this particular recipe.
Next we have to configure the "That" (or the "Action") portion of the recipe,which in this case is the Google Drive channel. There are a number of possible actions that can be done with the Google Drive channel, but for this post we care about the "Add Row To Spreadsheet" action.

You can name your spreadsheet whatever you would like. I named mine TempRollingAvg. You can also place the spreadsheet wherever you would like – I left mine at the default path IFTTT suggested. The important bit, though, is the row formatting. This configuration has the action adding a row with two cells. The first cell (OccurredAt) will be filled in with a date: the date that the IFTTT trigger fired. The second cell (Value1) will be the the value for the moving average of the temperature. The IFTTT Maker trigger has very specific naming conventions, which is where these field names come from.
Ok, so our recipe is configured, and now we need Losant to actually trigger this recipe. How do we do that? Well, first you'll need to look at the details of your Maker Channel (click the "How To Trigger Events" link on that page):

You will see a page similar to the above screen shot, but where mine says YOUR_IFTTT_MAKER_KEY_HERE, yours will actually have a key. You care about the url – and make sure to fill in the event name with the name you gave your event (in my case buttonPressed). This is the url that we're going to have our Losant Workflow POST to with the moving average of the temperature.
Now it's time to go back to our workflow and add a few new nodes! Below is what our newly modified workflow looks like, and like I did above, I'll walk through the two new nodes.

|
We start out with a second path out of the Get Stored Avg node. This path is going to be for when the button on our device is pressed, so the first thing we want to do is make sure the button is actually pressed. To do that, we add a Conditional node, checking to make sure that |
 |
 |
Now for probably the most important node in the entire workflow – it's time to actually talk to IFTTT and trigger our recipe. This is an HTTP node, and you are going to want to grab the url that we talked about a bit ago from your IFTTT Maker channel. You want to configure your HTTP node to "POST" to that url with a specific JSON body. The JSON body needs to be an object where the key is |
And that's everything! We have a continuously running moving average, updating every time new temperature data is reported. Now when the button on the device is pressed, that moving average value is sent to an IFTTT trigger, which runs our custom IFTTT recipe, adding that moving average value as a row in a Google Spreadsheet:

Every time I press the button, a new row appears in the spreadsheet! It's just a shade warm around here today for my tastes, but since it's been pretty cold lately, I guess that's ok. Hope this sampling of more complex Losant workflows and interactions has been interesting, and if anyone takes these ideas and runs with them to make something, please let us know! We love to hear how people are using Losant to do their own things.