
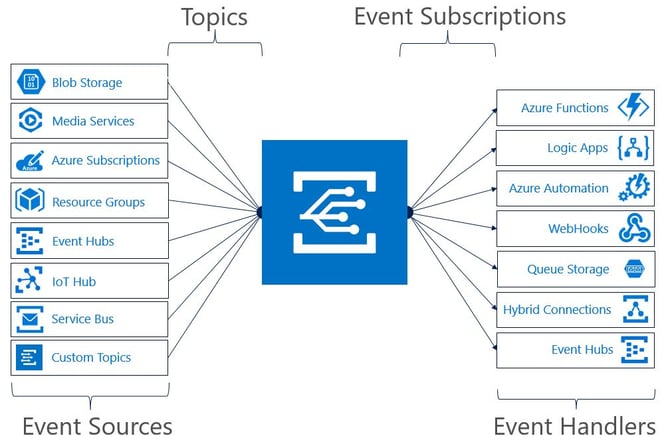
Why Azure and Losant
You may think that Azure and Losant are competitors but this is far from the case. We have customers using Azure IoT Hub and Losant to build really awesome and production-ready IoT applications. Azure provides the raw cloud infrastructure to build cloud-native applications. Losant is all about building End-User Experiences, and a lot of the time, those Experiences end up being products that our customer provides to their customers. In Losant’s world, the data for these Experiences can come from anywhere, including Azure.
So, in this case, one could use Azure IoT as a data ingest engine and Losant to build their IoT Experience (this fact is true for any cloud provider). This tutorial will walk you through just that; getting data from Azure IoT Hub into Losant to build your end-user application.
How To Send Data to Losant
There are two main methods of sending data to Losant: MQTT and HTTP (via Webhook, Losant API, or Experience Endpoints. At the time of writing, there were no Azure MQTT topics to subscribe to what Azure calls “device-to-cloud” messages. So, we are taking the HTTP route in this case. In Azure, you can “React to IoT Hub events by using Event Grid to trigger actions.”
Webhooks
This would by far be the most seamless and easiest integration. In Azure, you can easily set up an Event Handler to forward Device Telemetry data to a Losant Webhook Endpoint. However, at the time of writing, the “Device Telemetry” Event Type was still in preview.
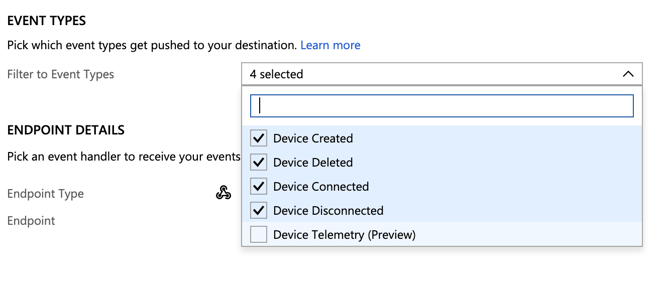
Overall, once this feature is supported by Azure it would be the recommended (and easiest) way to send data to Losant. For now, the best method is through Azure Functions.
Azure Functions
Azure Functions is an “event-driven serverless compute platform”. This means that you can build a small lightweight application that’s triggered every time a particular event occurs. In this case, we can create a small Node.js application that sends an HTTP POST with the Device Telemetry data to a Losant Webhook. Webhooks can trigger Losant Workflows, which from there you can easily integrate this data into your Losant Application.
If you’re new to Azure Functions, here is a great guide to get you started: Create serverless logic with Azure Functions.
Step-by-Step Instructions
Now, that we have all of the background information out of the way, let’s get started.
To begin, you’ll need to sign into Losant. If you don't already have a Losant account, sign up for a free Developer Sandbox, which has very generous limits for most applications. Once there, go to an application or create a new one.
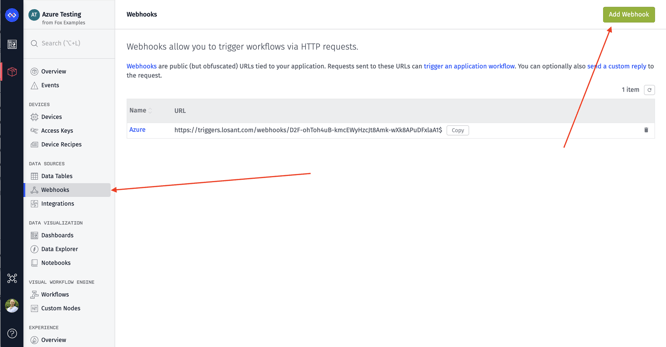
Create A Losant Webhook
Before we can write our Azure Function, we need to configure a Losant Webhook. Webhooks are found under the “Webhooks” link within the “Data Sources” section of your application’s navigation. Once there, you can create a new webhook.
When creating your webhook, you have the option to “Wait for reply from workflow”. This is helpful if you would like to send a response back to your Azure Function. This provides an easy way for you to communicate back and forth with your Azure Function. If not, Losant will always respond with {"success": true}.
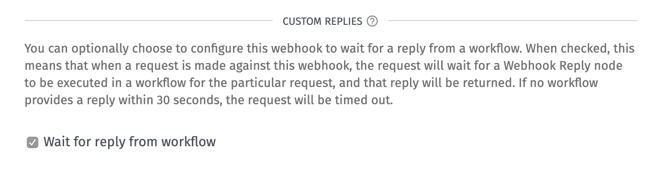
If you would like to follow the tutorial exactly, the rest of these instructions assume you have enabled the “Wait for reply from workflow” option.
Once you create your webhook, you should receive a URL that looks like this:
https://triggers.losant.com/webhooks/GaOJicZzGrsDKg4W6O6rg6iVHNacgr7JzMD5DAutaA1$
You should save this for later. We will need it when building our Azure Function.
Create a Losant Workflow
Now that we have a webhook, we can create a workflow to capture this data and save it into Losant. If you’re new to Losant, Workflows are the brains of your application. They are comprised of nodes; each of which has their own function you can leverage in your application.
In this case, we need a workflow that will start when the Losant Webhook is called from the Azure Function. Here is what that looks like:
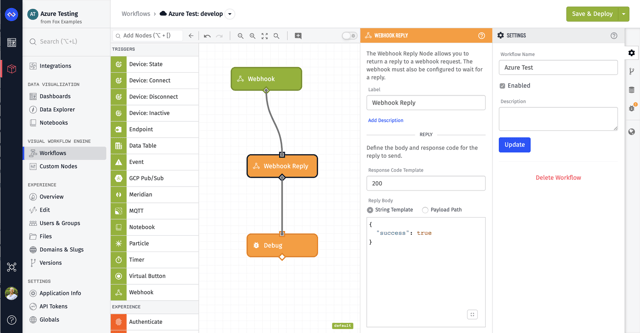
This workflow consists of three nodes:
- Webhook Trigger Node - This node tells us to start this workflow when a webhook is received.
- Webhook Reply Output Node - Since we configured “Wait for reply from workflow”, this node allows us to customize the response back to the Azure Function.
- Debug Node - Debug Nodes are super helpful to see the data — in Losant this is called a payload — that’s being passed from node to node.
This workflow isn’t saving the data in Losant yet, but now we have something to trigger from an Azure Function. Let’s set that up.
Create an Azure Function
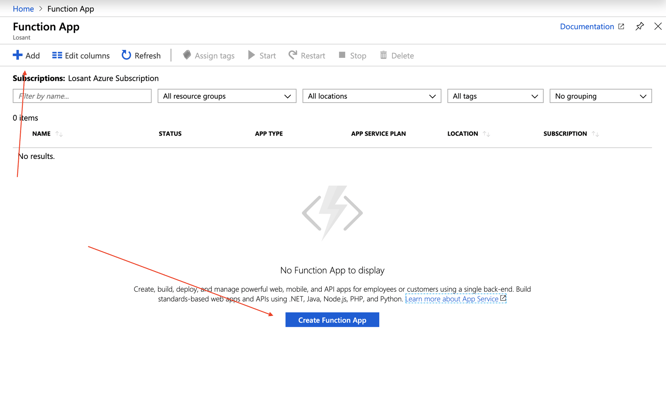
As mentioned above, this article assumes you already have data being sent to Azure IoT Hub. With that being the case, in your Azure Portal, go to the “Function App”. There you can create a new Function App.
Most of the settings you are presented with are dependent upon your application. However, a couple are important for the sake of this tutorial.
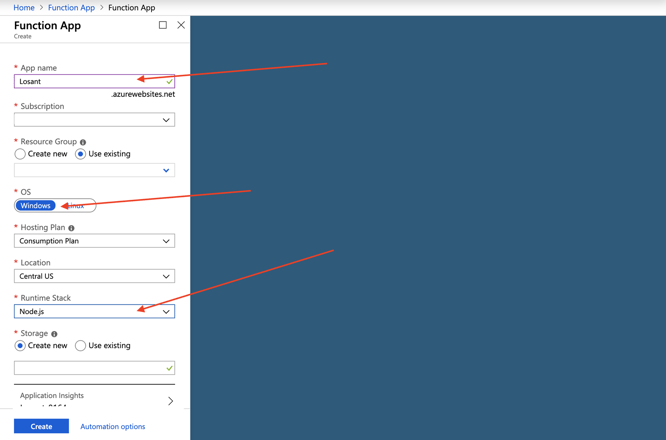
For the sake of this tutorial, you must configure the following options:
- OS - Windows
- Runtime Stack - Node.js
Every other setting is based on your personal Azure settings.
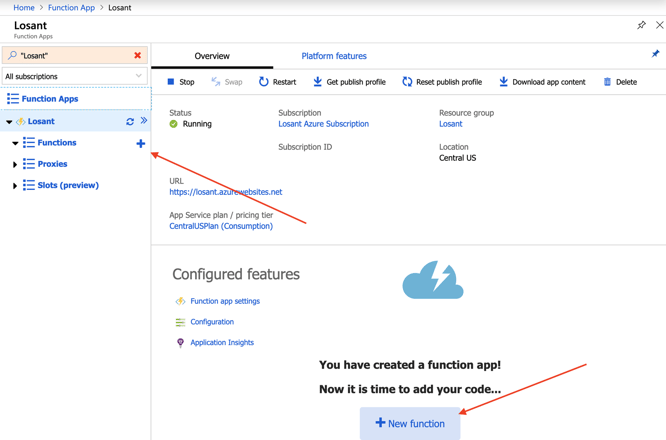
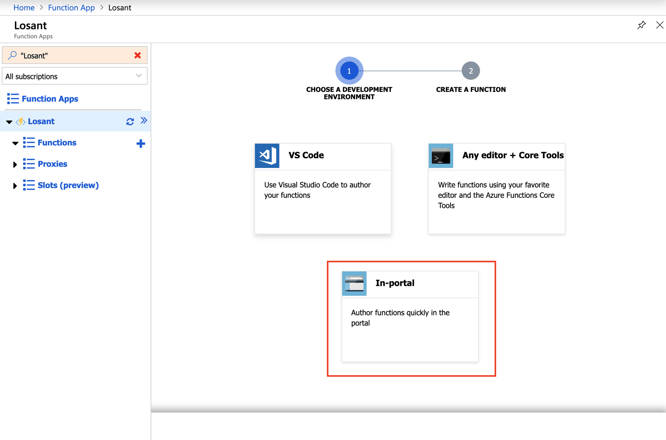
Once you select “Create” and your Function App is created, you may now create an Azure Function:
When authoring your function you have a lot of options, you can choose to build it locally or build it directly within the Azure portal. Ultimately, the route you choose is up to you, but for simplicity in this tutorial, I’m going to use the “In-portal” option.
Next, you’ll have the option to choose a template. Lucky for us, there is a template for “IoT Hub (Event Hub)”. You should pick that one:
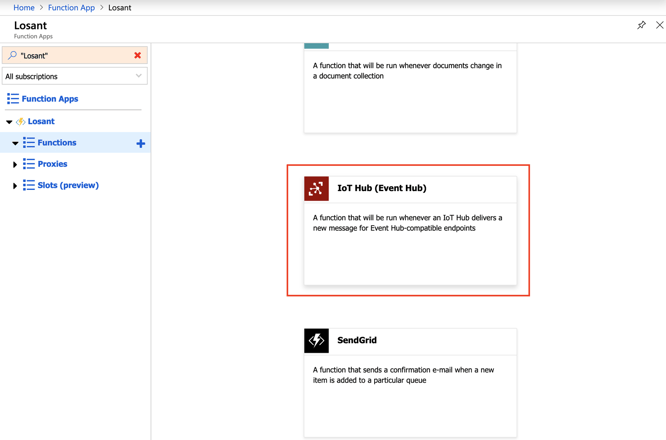
After selecting this template, Azure may ask you to install an extension, you will need to install that extension to use the template.
Next, create a new “Event Hub connection”:
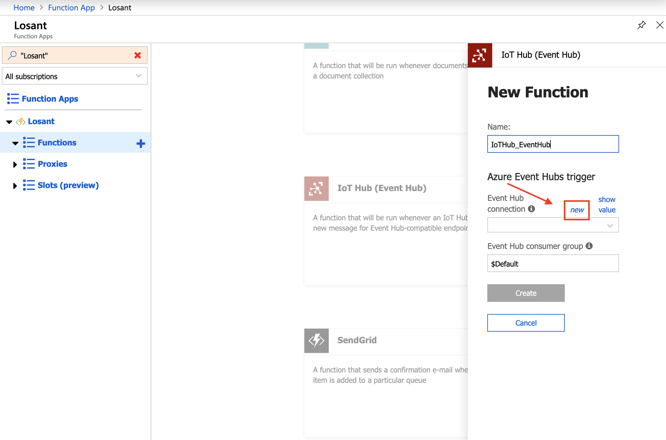
After you press “New”, you’ll be presented with a dialog:
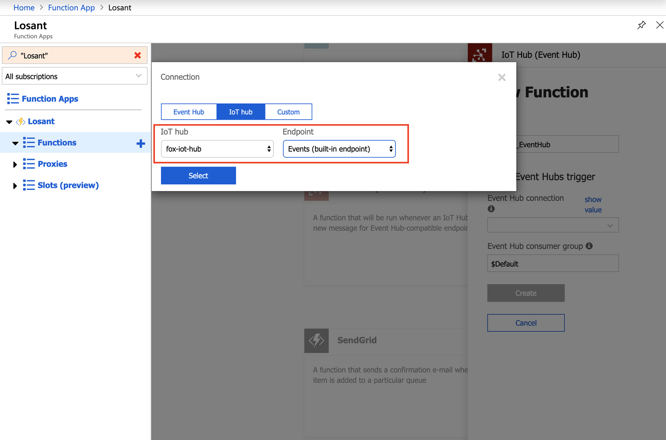
To configure your new “Event Hub connection”, you should select the IoT hub you would like to pull events from and select “Events (built-in endpoint)”. Once done, you can select “Create” and now we have a very basic Azure Function.
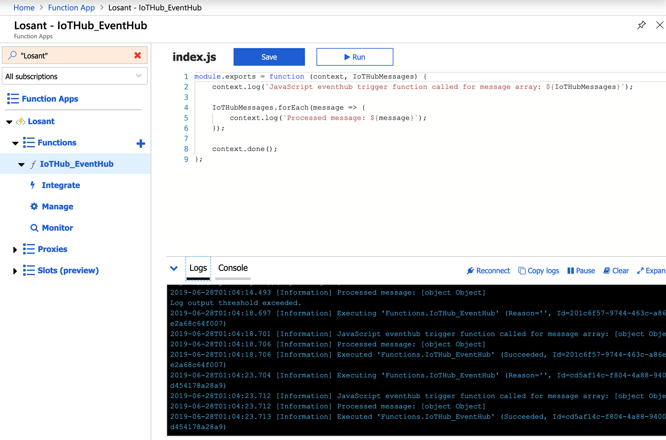
Writing your Azure Function
Now, it’s time to write our JavaScript. For the purpose of following along, you should have something that looks similar to this:
Since we need to make an HTTP request to Losant, we need to install an HTTP Library. I found that Axios is super simple to use and very easy to understand. Note: you can build this entire thing without dependencies using the built-in HTTPS library.
To install Axios, select the “Console” in the Azure Portal and run:
npm i axios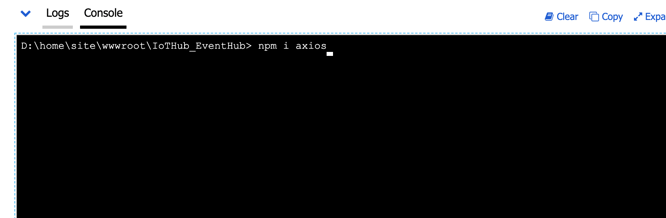
Now, we can write our Function. To save you some time, here is all the code you need to forward data to Losant:
In order for this to work, you need to replace PUT_YOUR_WEBHOOK_HERE with your Losant Webhook you created earlier.
Now, we are ready to run! To start, select “Save and run”:
If everything was successful, you’ll start to see the logs populate with messages. And, on the other hand, if you go back to Losant, you should begin to see Debug messages appear in the Workflow Engine.
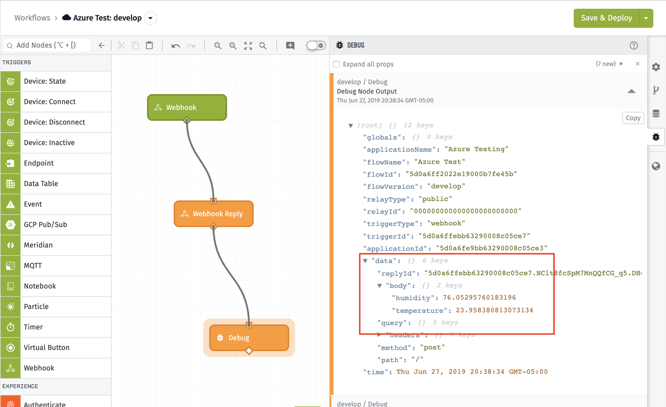
In this case, my device is sending temperature and humidity data to Azure IoT Hub. In the Debug Panel, you can see that data in the body of the webhook request.
Saving Data to Losant Device
At this point, we now have successfully sent data from IoT Hub to Losant. Now, we need to save that data into Losant so it can be used through the rest of the platform. To do this, we need to report state within Losant. To report state, we just need to create a device and use the workflow we created earlier to report state.
Devices are found under the "Devices" link within the “Devices” section of your application’s navigation. Then, add a new device.
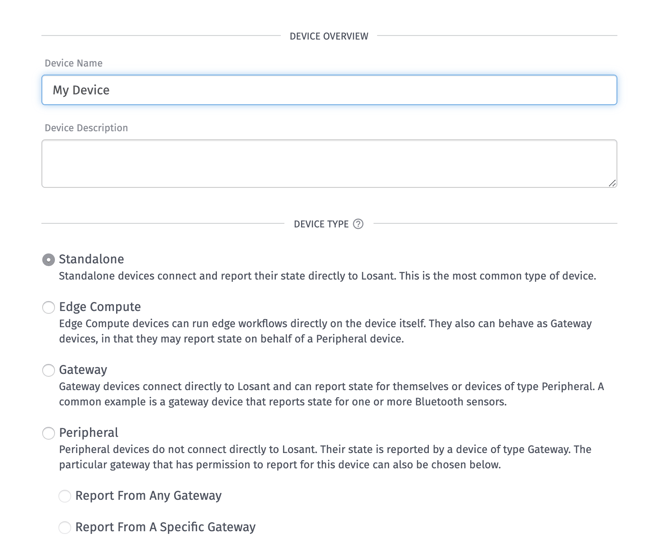
In this case, I just named my device “My Device” and made it a “Standalone” device within Losant.
Since my device is reporting temperature and humidity, the device that’s created has to reflect that. In this case, we can create two number attributes:
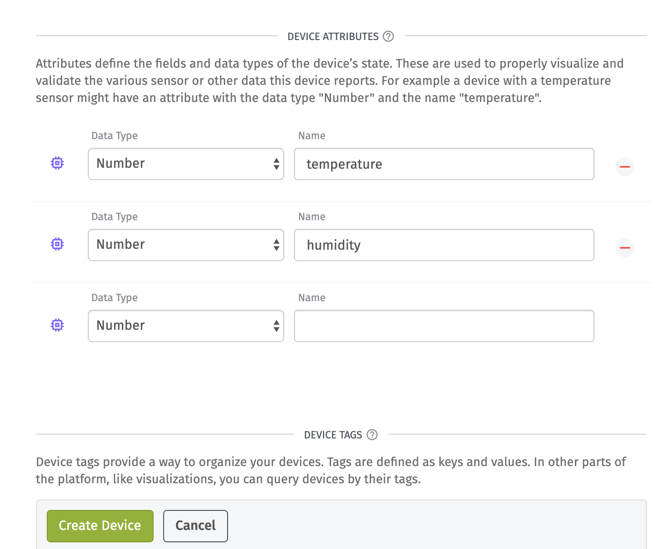
Once done you can create your device with the “Create Device” button.
Reporting State in the Workflow
Now, we are ready to finish things up in our workflow. We already have all the glue in place, now we just need to use the Device State Node to report state (or save data) within Losant.
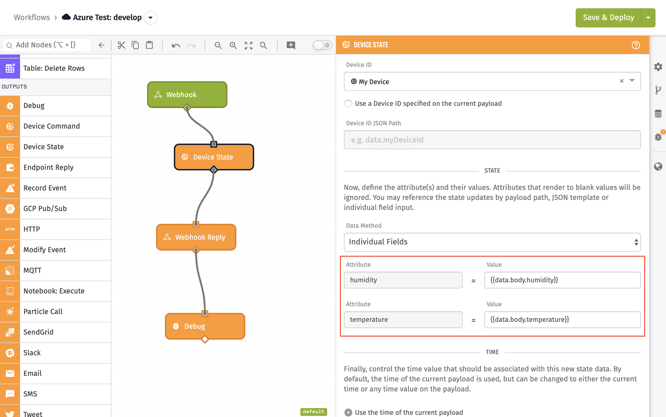
In the Device State Node, I can tell the Workflow Engine where to find my data on the payload and what attribute that belongs to. In this case for humidity, here is the value:
{{data.body.humdidity}}
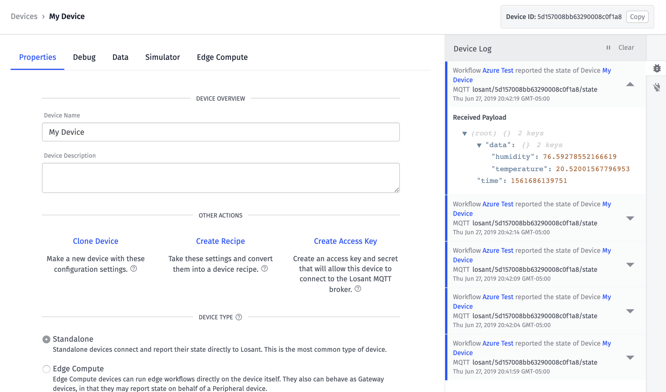
If we go back and look at our Device Log, we should be able to see the data flowing in and being saved as state:
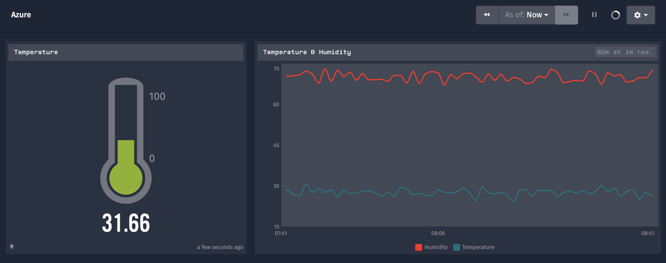
Well, look at that, we are all done! Now, it’s time to build out the rest of your Experience within Losant.
Next Steps
Now, that we have data within Losant, you can build more Workflows, build Dashboards, Experiences, integrate that data into other applications, etc.
If you use Losant and Azure in an interesting way we would love to hear from you. Please post your project to Losant Forums.