
Anybody who has ever worked with the Arduino Integrated Development Environment (IDE) can tell you that the tool is clunky at best and maddening at worst. PlatformIO's IDE takes the pain out of programming for microcontrollers at every step: initial setup, application developmentm, build, deployment and testing.
We previously wrote about getting started with PlatformIO, but now that Losant's Arduino MQTT Client is available in the PlatformIO Library Registry, we can dramatically simplify the steps required to begin working with the Losant platform. In this post, we'll outline the key benefits of working with PlatformIO's IDE and how we can utilize the tool in Losant's door sensor kit project.
Benefits of PlatformIO
In addition to all of the features found in the Arduino IDE – such as build / deployment tools and a serial monitor – PlatformIO includes a number of improvements on the development environment:
- Initial environment setup can be problematic for novice users, as certain boards require very specific settings that are not obvious from the get-go. Similarly, new boards require manual installation in the Arduino IDE, a problem that compounds as the microcontroller market expands. PlatformIO has configuration baked in for countless microcontrollers, and the list automatically updates regularly.
- Project configuration exists at the IDE level for Arduino, meaning that as you switch between projects and microcontrollers, the environment needs to be re-configured. PlatformIO's IDE saves these settings at the project level, so as you switch projects, your environment configuration stays in sync with your application.
- Modern editor conveniences come with PlatformIO's IDE, as it is built on top of Atom, GitHub's popular "hackable text editor." Arduino IDE lacks inline linting, autocomplete and any other features essential to your personal setup.
- Dependency management is a major problem in Arduino, as only a handful of libraries ship with the IDE and there is no sub-dependency management. For example, as detailed in our documentation, the Losant MQTT client requires two additional dependencies, meaning that three libraries must be manually installed to work with our platform. With PlatformIO, dependency management is more akin to Node.js's npm or Python's pip, where libraries are installed from a community-managed registry and sub-dependencies are automatically installed with your chosen library, and updating all libraries takes just a single command.
Example: Losant Door Sensor Kit
By using PlatformIO, we can replace our existing environment setup instructions with these simple steps below.
- The only step we still need complete from Losant's environment setup instructions is the installation of the USB driver. The rest of those instructions are covered by the steps listed below.
- Install PlatformIO IDE on your computer. Note that these instructions vary by operating system.
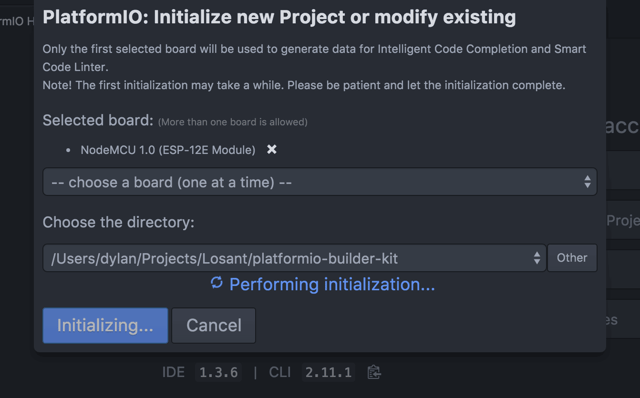
- Launch the IDE and, from the home screen, start a new project. When selecting a board, choose either
Adafruit > Adafruit HUZZAH ESP8266orNodeMCU > NodeMCU 1.0 (ESP-12E Module), depending on which microcontroller you received with your kit. Also, choose a directory on your computer where you would like to save your files. - Download the door sensor kit source code and copy the file at
losant-kit-door-sensor/losant-kit-door-sensor.inointo thesrc/directory of your PlatformIO project. - Install the Losant library by opening the Library Manager in the IDE. This can be reached by clicking the "</>" icon in the left toolbar or selecting
PlatformIO > Library Manager CLIin the top menu.- Libraries are installed by numerical ID, and a library's ID can be found by searching for it by name in the CLI with the command
pio lib search [string]. - Since Losant's library ID is "277", we install the dependency using the command
pio lib install 277.
- Libraries are installed by numerical ID, and a library's ID can be found by searching for it by name in the CLI with the command
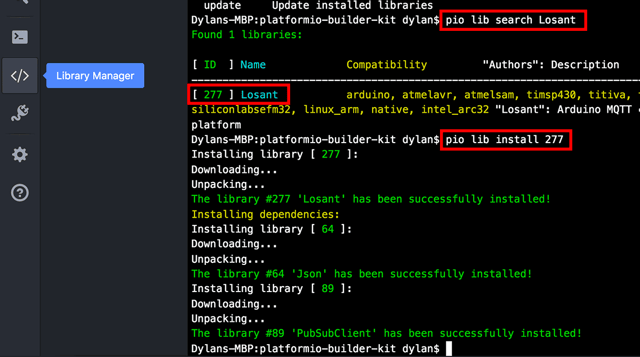
The search command (first red box) helps us find our package by ID (second red box) which can then be installed in our environment (third red box). Note how Losant's two dependencies automatically install as well.
Now you're ready to set up your Losant account, edit the application code to include your personal settings and wire up your kit.
After those steps are complete, it's time to build and upload your project from the IDE. Follow the instructions provided in the PlatformIO instructions to get your code onto the microcontroller.
Next Steps
Now that we've dramatically simplified environment setup using the PlatformIO IDE, we can easily maintain a number of different IoT projects for a whole array of devices. And as the IoT development community grows and PlatformIO's popularity increases, we can expect dependency management to become even easier as popular libraries make their way into the PlatformIO Library Registry. Expect future Losant tutorials and documentation to adopt PlatformIO's IDE as the editor of record.