
Welcome to the second part of our two-part guide on building an interactive Google Assistant with no code. In part one of this guide, you learned how to use Google's Actions Console and Dialogflow to configure your action and the questions you intend your users to ask. In this part, you'll learn how to use Losant to answer those questions without writing a single line of code.
Create the Losant Webhook
If you don't already have a Losant account, create one now. If you already have a Losant application with data you'd like to voice enable, then feel free to use that one, otherwise create a new application.
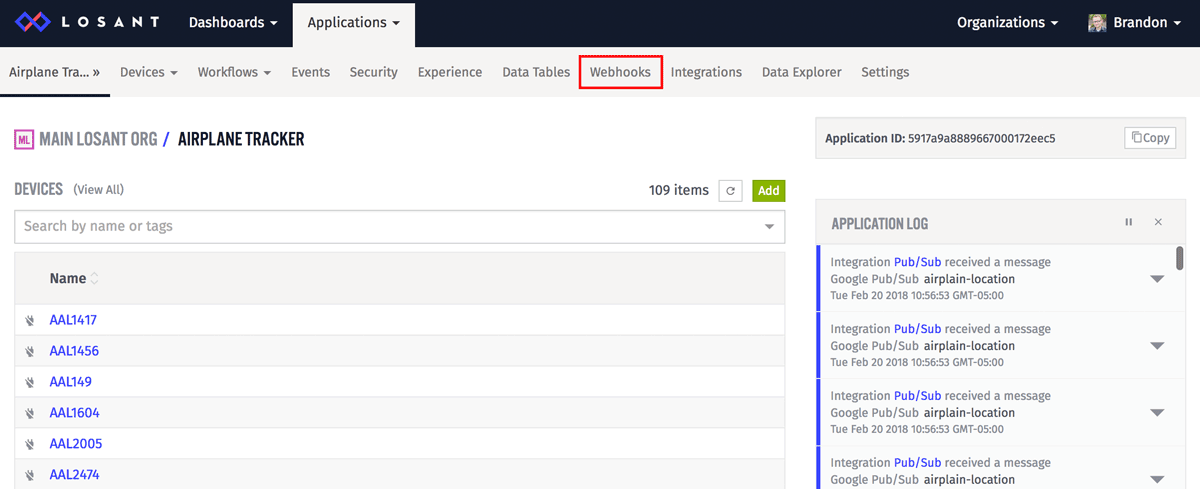
Google Assistant can fulfill questions asked by users by invoking a webhook on another service. Fortunately, Losant makes creating and using webhooks simple. On the application's main menu, click "Webhooks".
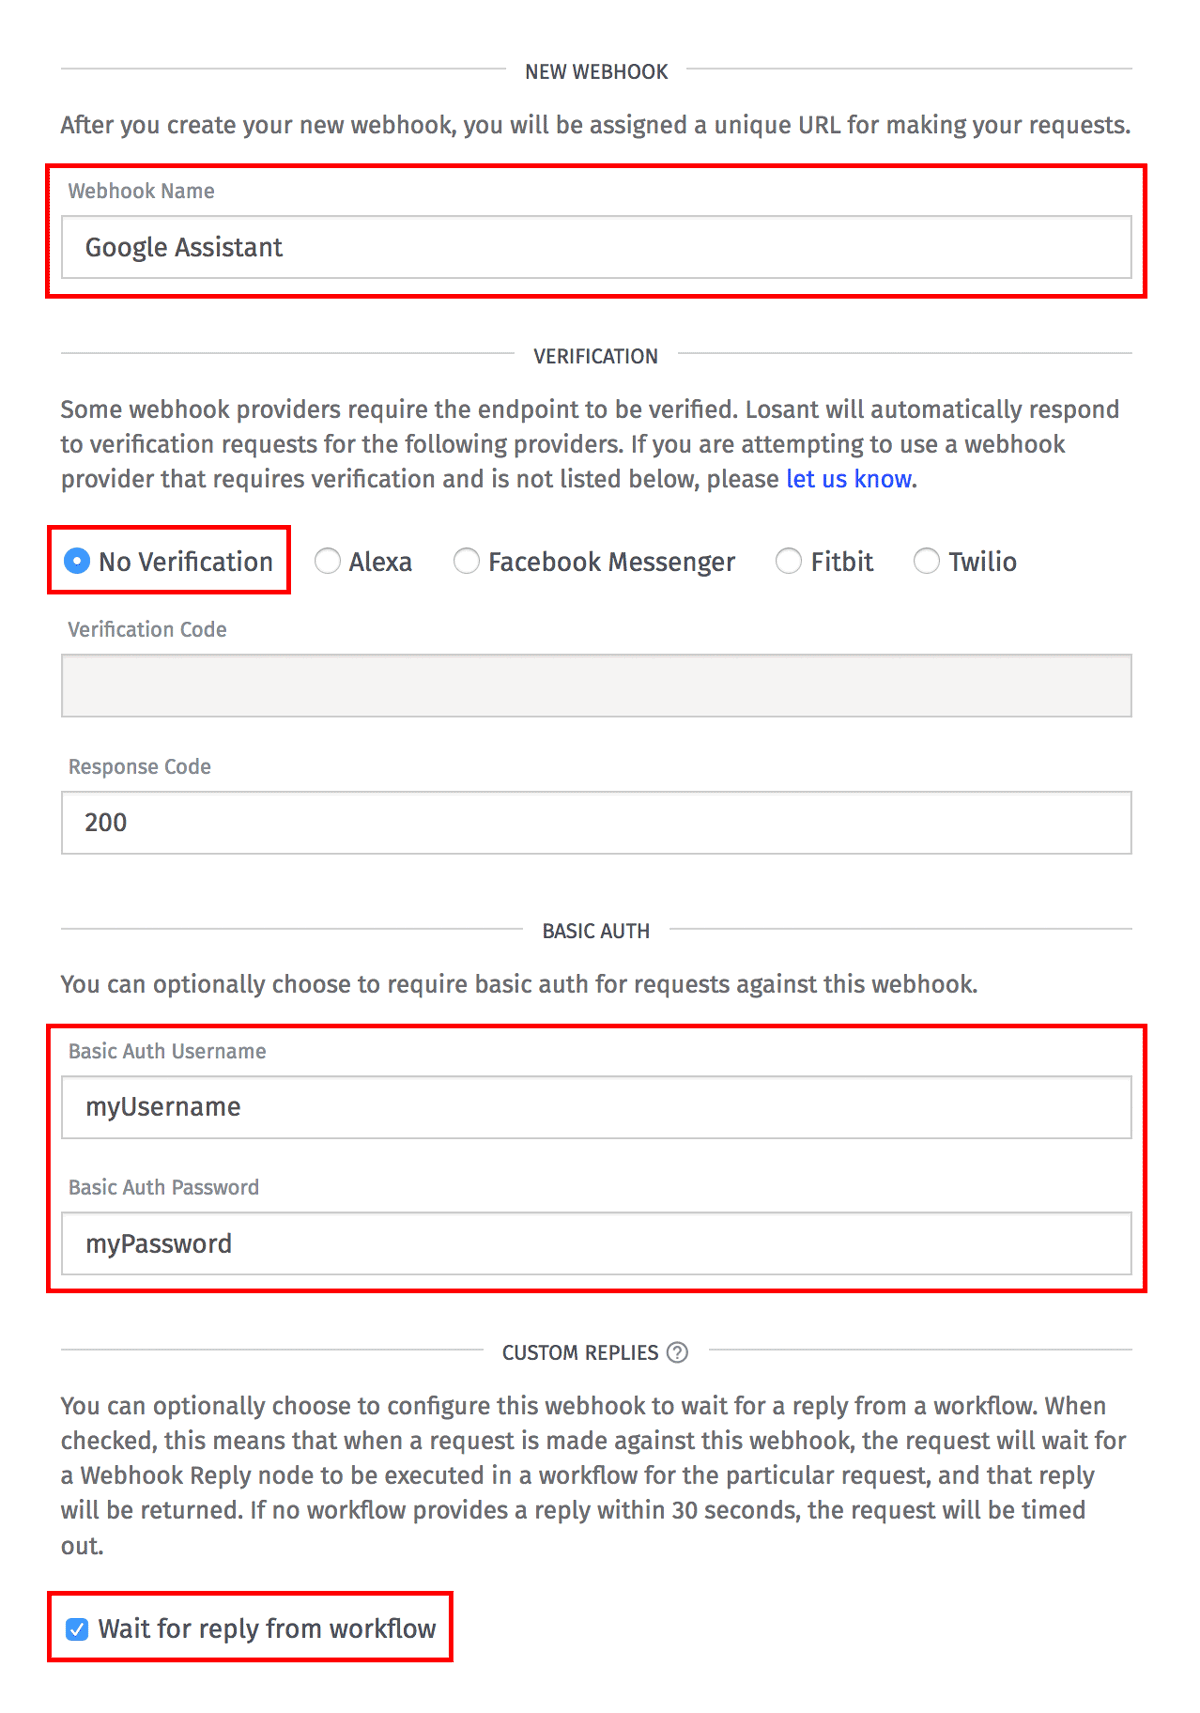
Name the webhook anything you'd like. I named this one "Google Assistant". There's no special verification required for Google Assistant webhooks, so leave "No Verification" checked. Google Assistant does support basic authentication when invoking webhooks, so put in your designed username and password in the "Basic Auth" section. Lastly, check the "Wait for reply from workflow" checkbox. This means the Losant Workflow that's triggered by this webhook can reply with the answer to the user's question.
Once everything is entered, click the "Create Webhook" button at the bottom. At this point, we need a Losant Workflow to trigger on requests to this webhook and provide the answer.
Create the Losant Workflows
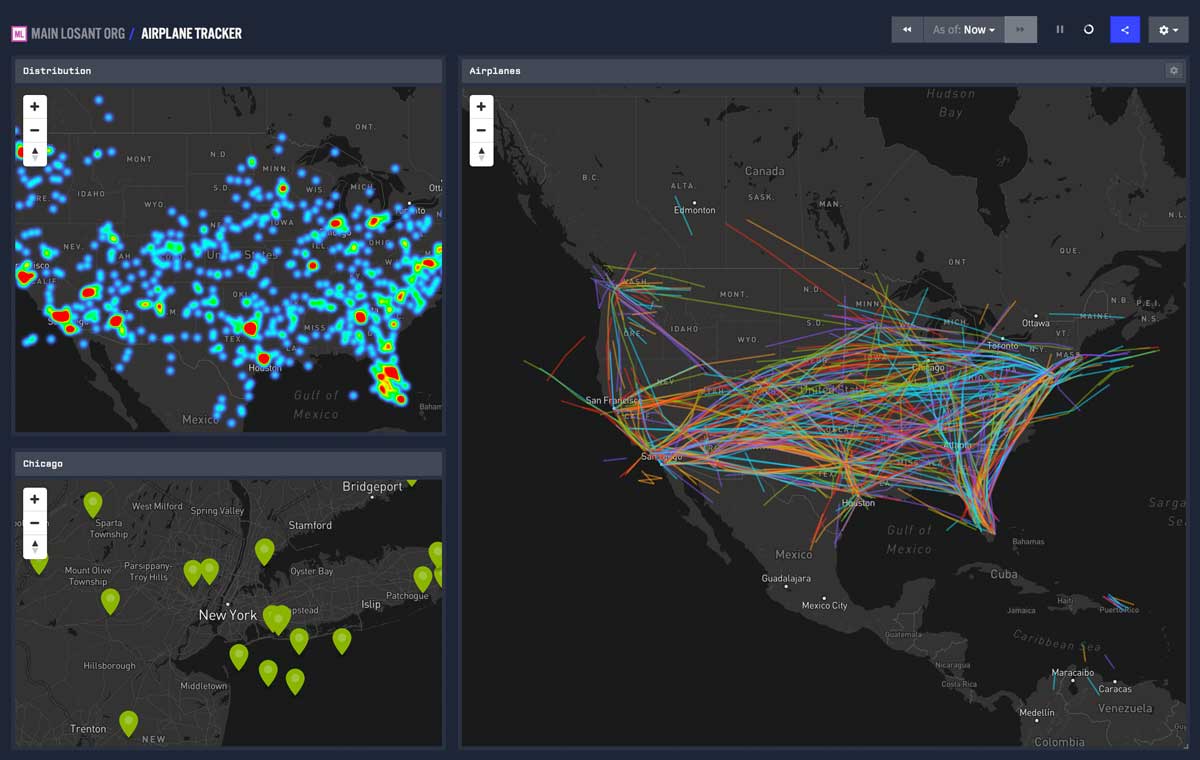
As we stated in part one of this guide, the data we're using is the real-time location information for every flight over the United States. This data is coming from the OpenSky Network, but the same principles apply to any location data you may have.
In order to answer our user's question, which was "How many airplanes are near <city>?", we'll have to build two workflows. The first workflow will use a series of Geofence Nodes to track airplanes as they enter and exit a city. The second workflow will be responsible for responding to the Google Assistant webhook with the number of airplanes near the specified city.
Create City Tracking Workflow
Let's start by building the workflow that tracks airplanes as they enter and exit a city.

This workflow triggers whenever one of the airplanes reports its location data. It then checks four Geofence Nodes to see if the location that was reported was near one of the cities we're tracking. The Geofence Node configuration requires three configuration parameters:
- The point to check, which is for this example is available on the payload at
{{ data.location }}. - The GPS coordinates of the center of the Geofence, which is the center of Chicago in the above screenshot.
- The radius of the Geofence in meters, which is set to 50000 for this example.
Geofence nodes have two outputs depending on whether or not the location is inside or outside the configured boundaries. The workflow will take the left path if the location was outside of the Geofence and it will take the right path if it was inside.
If the location was inside the Geofence, the next thing we need to do is update the device with a Device Tag to indicate which city it's near. This will allow us to easily query all devices near a specific city when the user asks. Devices can be easily updated using a Device Update Node.

In the Device ID field (not pictured), enter the ID of the device to update. The Device State Trigger, which is being used above, automatically places the device's ID on the payload, so in this example, the value is set to {{ triggerId }}.
Scroll down to the "Device Tags" section and set a new "city" tag with the value of "chicago". Now whenever an airplane is near one of our target cities, a tag will be added with whatever city it's near.
As you can see from the screenshot, this process is then repeated for the three other cities we care about: Cincinnati, New York, and San Francisco.
If all four Geofences are checked and the airplane is not near any city, we need to remove the "city" tag. This can be done with a final Device Update Node.
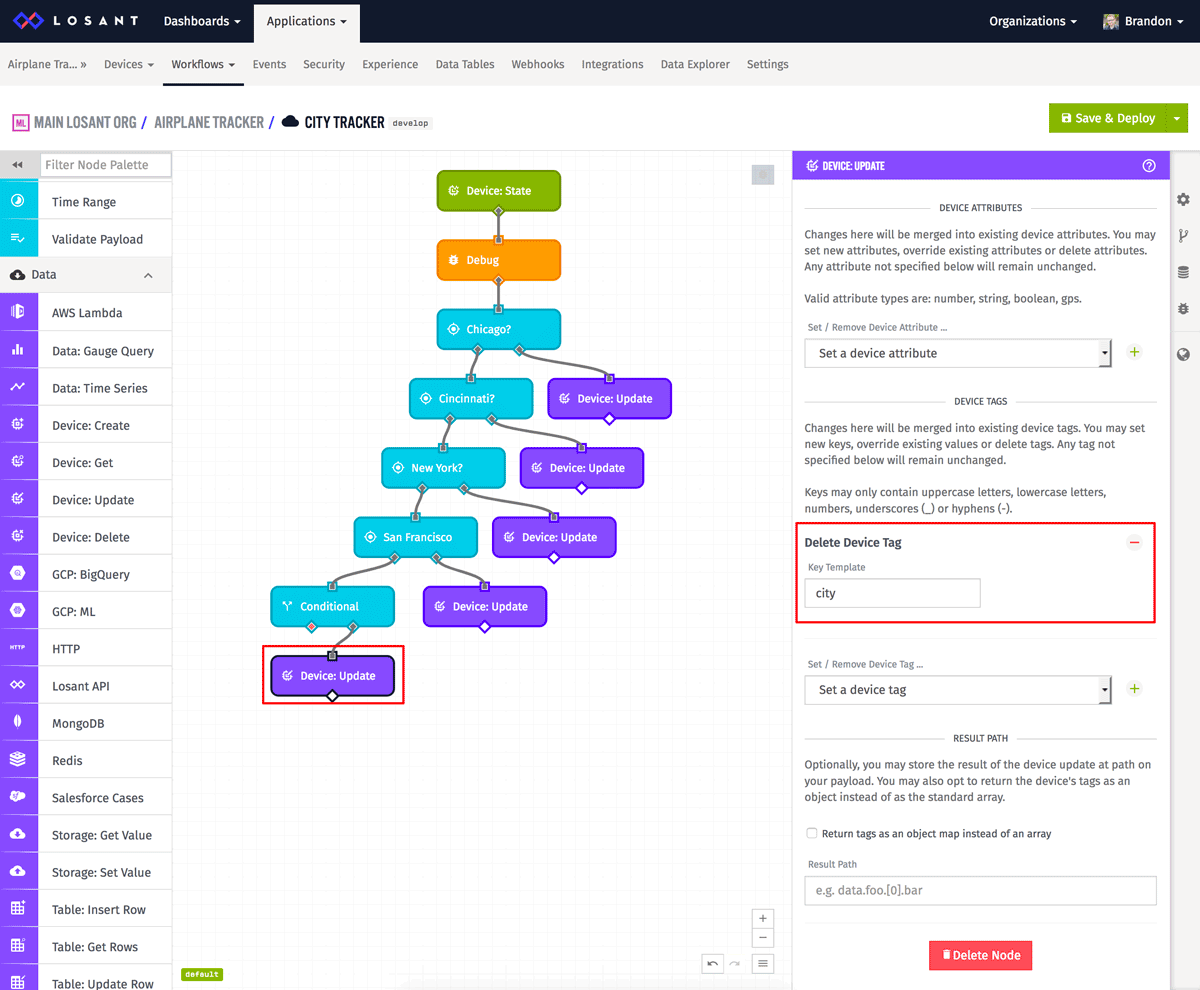
Just like the Device Update Node above, set the Device ID to {{ triggerId }}. Instead of setting a new tag, this time configure the node to delete the "city" tag.
This completes our city tracking workflow. As the airplanes are reporting location data, the workflow is updating the "city" tag on each one in real-time and setting it to the city, if any, that it's near. We can now build the workflow that responds to Google Assistant by querying devices by these tags.
Create Google Assistant Workflow
The workflow we created above holds most of the hard work for this custom Google Action. The next workflow is simply triggering from the webhook we created earlier, querying the number of devices near the city specified, and sending the answer back to Google.
Start by adding a Webhook Trigger to the workflow canvas.
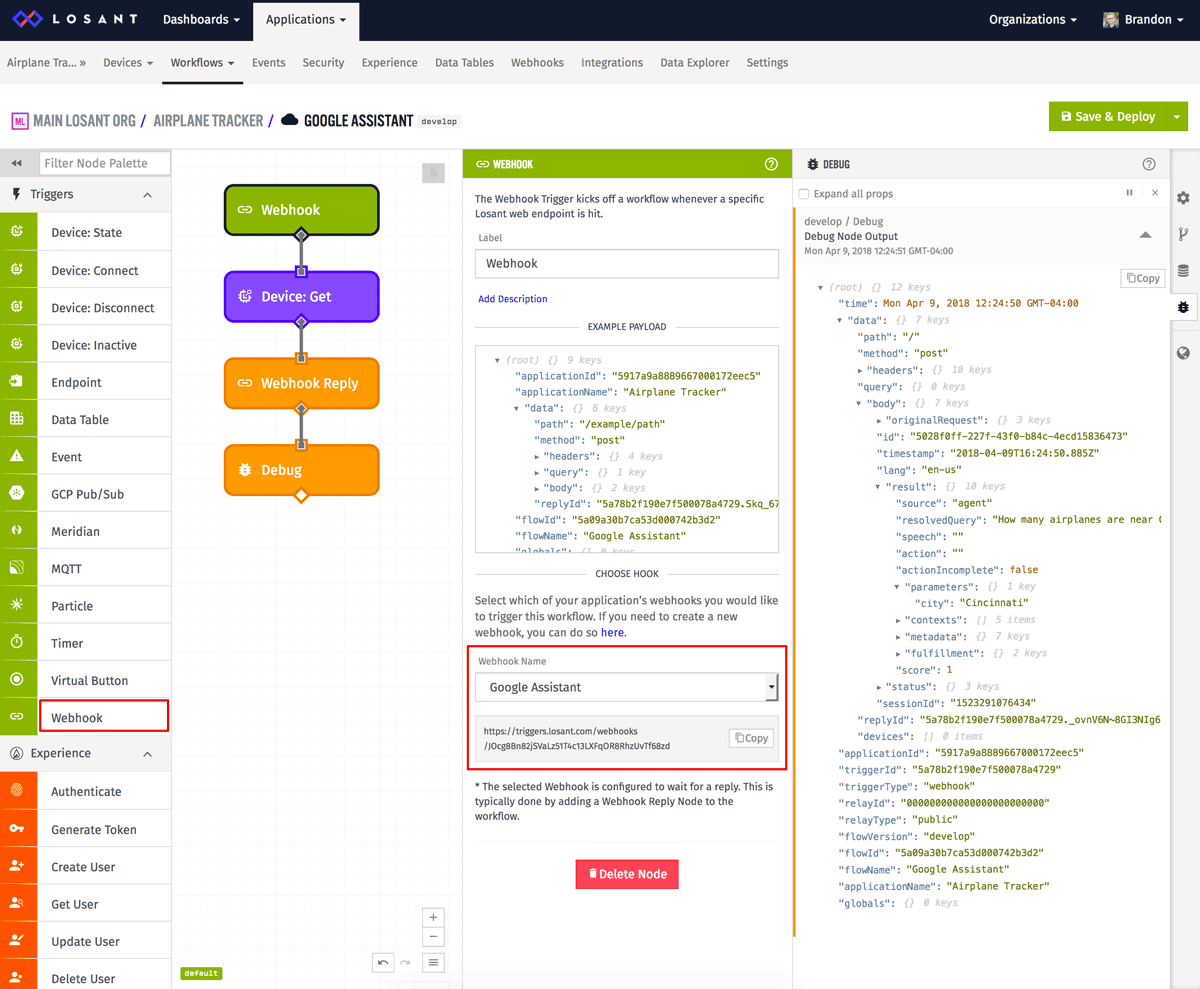
Configure the Webhook Trigger with the webhook you created earlier. If your application only has one webhook, it will be selected by default.
Next, add a Device Get Node to the canvas to query the devices near the city that was specified by the user.
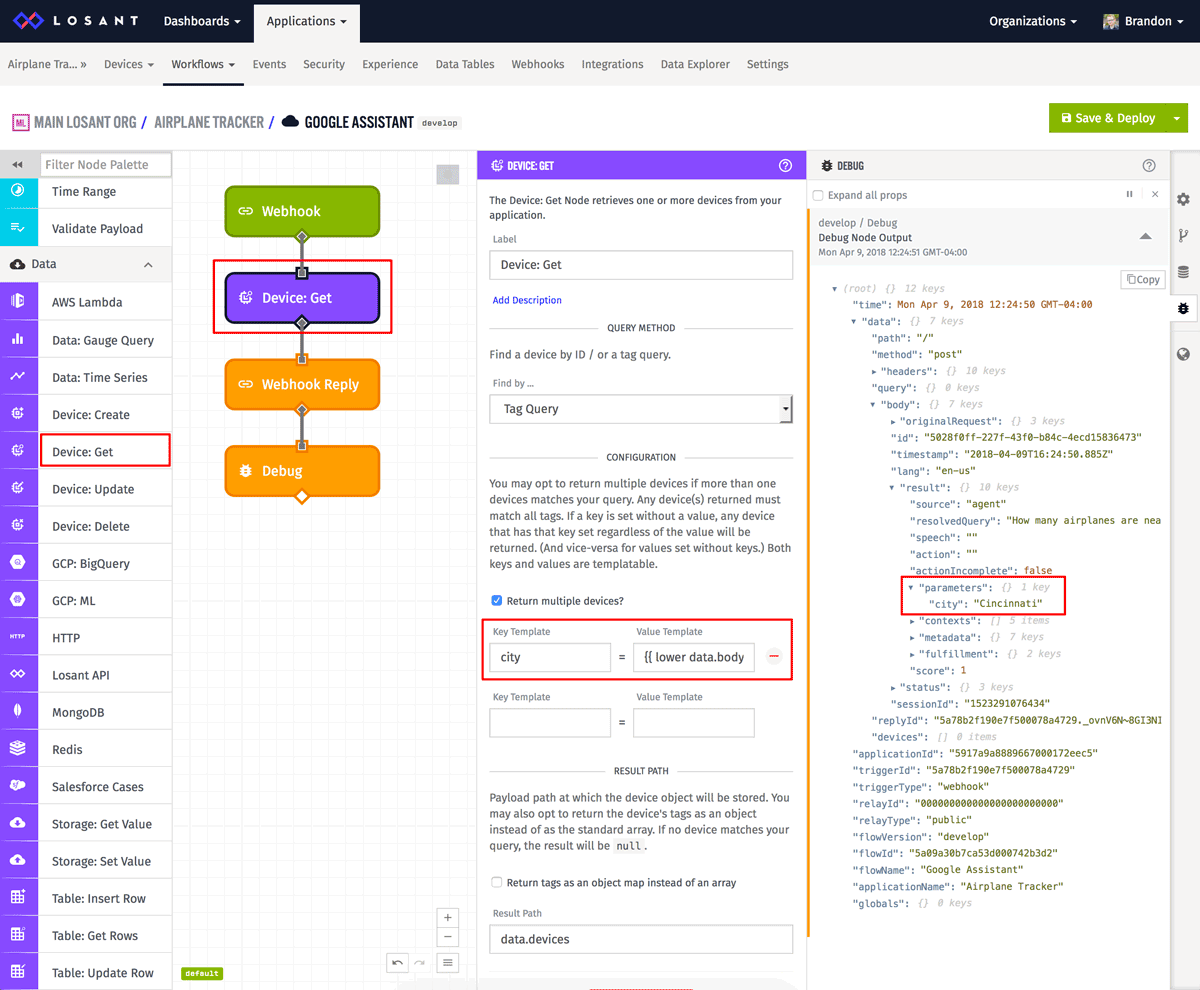
The Device Get Node lets you query all devices by their tags. In this example, we're going to query by the "city" tag that's being added by the workflow we created previously. For this example, the query value is set to the following template:
{{ lower data.body.result.parameters.city }}
In the above template, "lower" is a helper that converts the value to all lowercase. Google will send the city parameter with whatever capitalization the user provided, so we need to convert it to lowercase before using it. The rest of the template is the path in the body provided by Google where the city parameter is located.
The result of this Device Get Node will be an array of all devices that have a "city" tag that matches whatever was provided by the user. In the above example, this array is placed back on the payload at "data.devices". We can now use this to determine how many airplanes are near that city.
The next node to add is a Webhook Reply Node, which is what actually responds to this incoming webhook request.
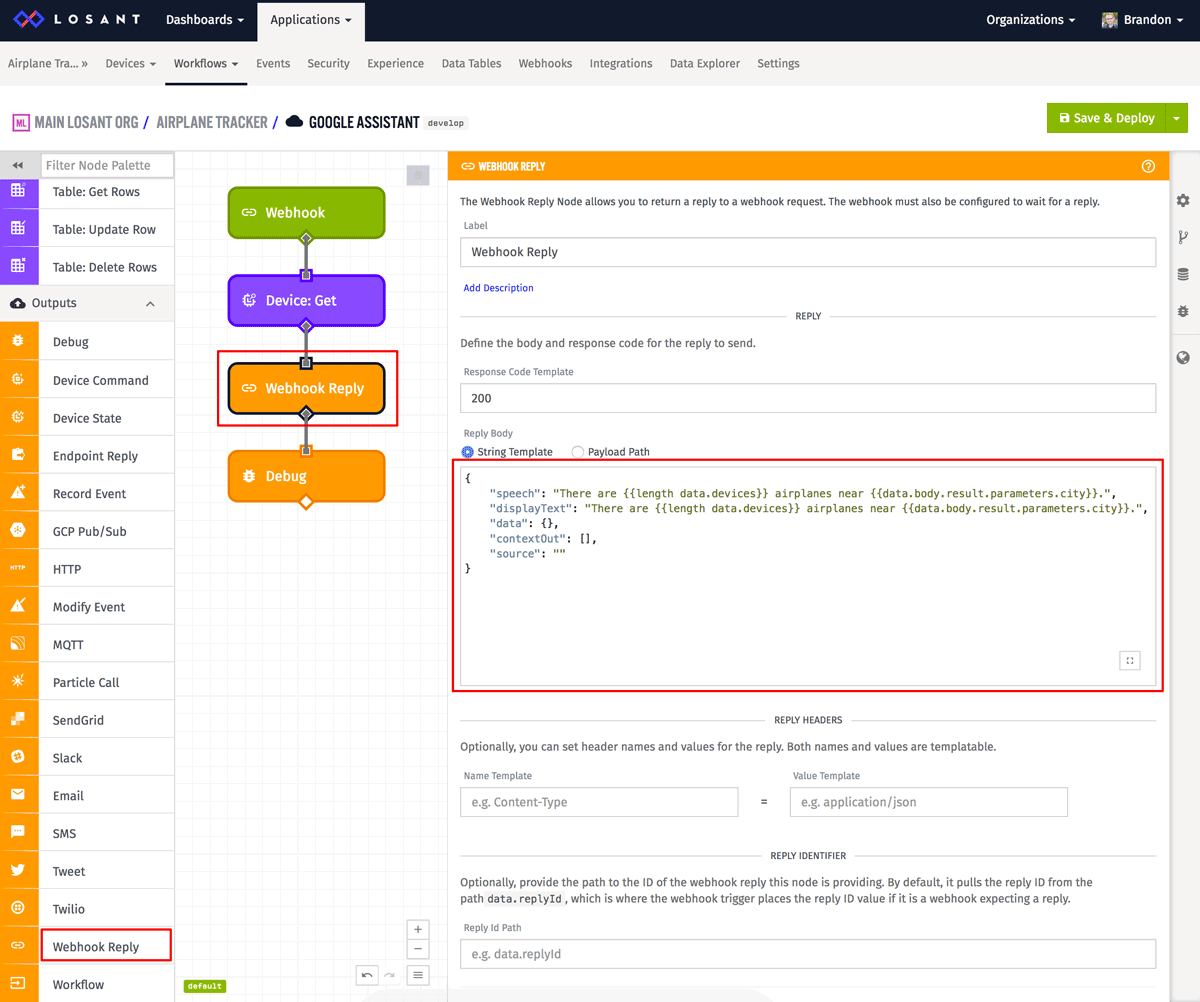
Set the "Response Code" to "200", which is the HTTP code for "OK". Next, set the "Reply Body" to the following:
{
  "speech": "There are {{length data.devices}} airplanes near {{data.body.result.parameters.city}}.",
  "displayText": "There are {{length data.devices}} airplanes near {{data.body.result.parameters.city}}.",
  "data": {},
  "contextOut": [],
  "source": ""
}
The above format comes from Google's Simple Response API documentation. The most important fields are "speech" and "displayText" which controls what the device will say and display back to the user. Both of these are set to the same value:
"There are airplanes near ."
As you can see, this value contains two templates to pull the actual result from the payload. The first, {{length data.devices}}, returns the length of the array of devices obtained by the Device Get Node. The second, {{data.body.result.parameters.city}}, grabs the name of the city supplied by the user. So, if the user asked about Cincinnati, and there are ten airplanes near Cincinnati, this template would convert to:
"There are 10 airplanes near Cincinnati."
The last node in this workflow is simply a Debug Node, which will display the current payload to make building and debugging your workflows easier.
At this point, we're now properly responding to the Google Action webhook whenever it's invoked. The last step is to configure the Google Action's fulfillment to tell it to invoke your webhook whenever the user asks a question.
Configure Google Action Fulfillment
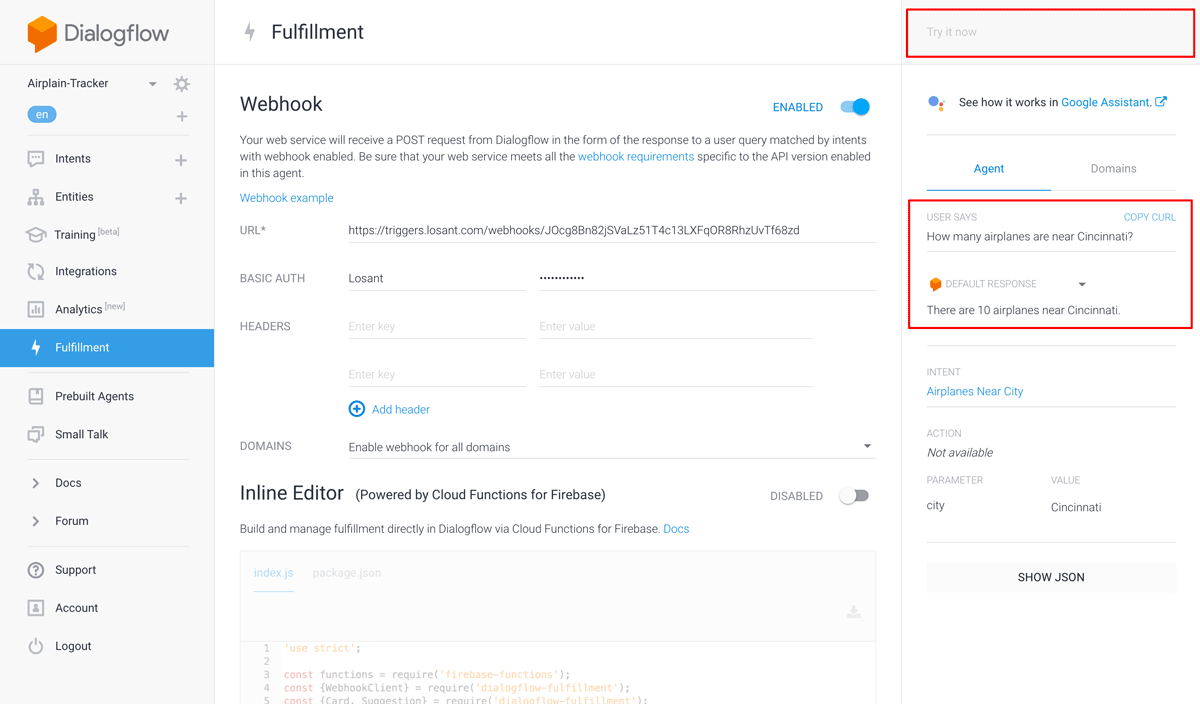
Return to Dialogflow and select the "Fulfillment" tab. Once in that tab, add your webhook URL and basic authentication details you created earlier in this tutorial.

Once you click "Save", your custom Google Action will now invoke your webhook and respond with the answer generated by your workflows.
You can now test your custom Google Action using the panel on the right. For example, if I type "How many airplanes are near Cincinnati?" in the input field, I can verify that I receive a proper result.
You can also test the default response you configured in part one for the case where a user does not provide a city. If you enter "How many airplanes are there?", you'll receive the answer, "Which city would you like to know about? Available options are Chicago, Cincinnati, New York, and San Francisco."
Build Something Awesome
This concludes part two of how to build a custom Google Action with no code using Losant. Even if you aren't building an airplane tracker, the lessons learned in this tutorial can be applied to a wide variety of use cases. If you do build something awesome, please let us know in the forums!