
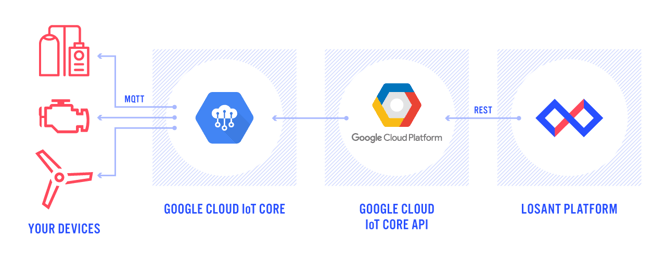
Bi-directional communication is an important aspect in most IoT solutions. In my previous article, How to Send Device Telemetry Data From Google Cloud IoT Core to Losant, I covered how to receive messages from the device to the cloud. That's only half the equation, though. We also need the ability to send commands from the cloud to the device. This article provides step-by-step instructions for how to send commands to your Google Cloud IoT Core devices.
Sending Commands to IoT Core Devices From a Dashboard
Let's start by looking at the finished product that we'll be building in this article. What I've replicated here is a remote engine controller. This dashboard allows an operator or service person to remotely control the visual and physical state of an engine controller that is connected to Google Cloud IoT Core.
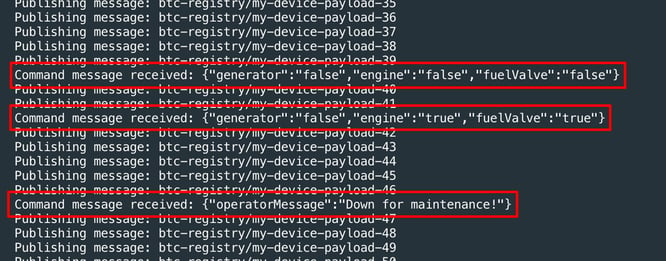
The top half of the above animation is a Losant Dashboard with an Input Controls Block. The window on the bottom right is a terminal running the Google Cloud IoT Core NodeJS MQTT Example application. This terminal application is connecting to Google Cloud IoT Core exactly like a real device does. By default, it's reporting telemetry data once per second. Whenever a command is invoked by the dashboard, you can see that the terminal application is receiving and printing the details about the command.
If this were an engine controller, these commands could then be used to control the state of the engine itself. A remote operator could turn it off, put it in maintenance mode, and in the above example, display a custom message to any local operator that may want to use the equipment.
Sending Commands to IoT Core Devices Using the IoT Core API
The Input Controls Block can do one of two things when you click a button. It can send a Losant Device Command or it can trigger a Losant Workflow. Since your devices are connected to Google Cloud IoT Core, and not directly to Losant, we won't be able to use Losant's built-in commands. Instead, we need to trigger a Workflow which can then send the command to IoT Core's API.
Here's the configuration of an Input Control Block Button Trigger so you can see how this Dashboard works.
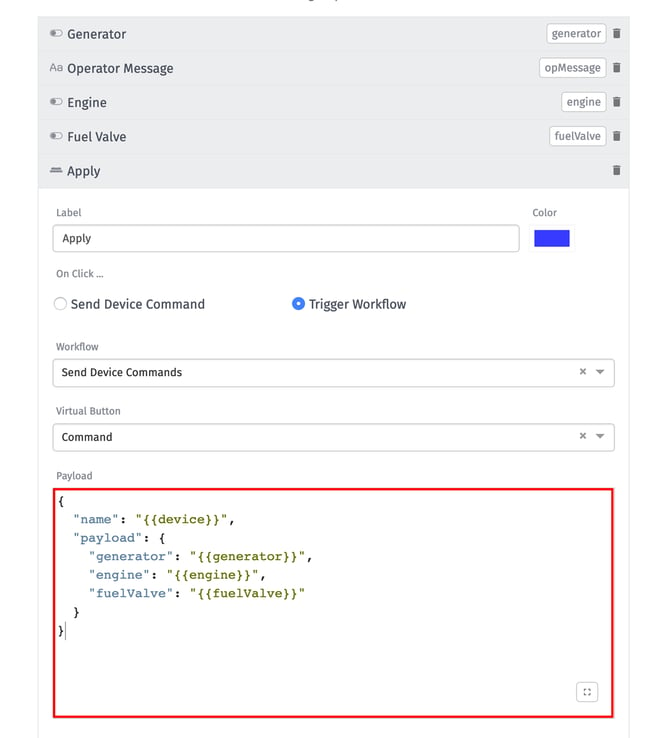
Every non-button control that's added to an Input Control Block exposes its value on a customizable variable. When a button is clicked, you can then use those variables to craft any JSON payload you'd like. This payload is then sent to the workflow where you can do something useful with it. In this example, we're going to send the inner payload field to our Google Cloud IoT Core devices.
Let's now look at the Workflow that's triggered whenever one of these buttons is clicked.
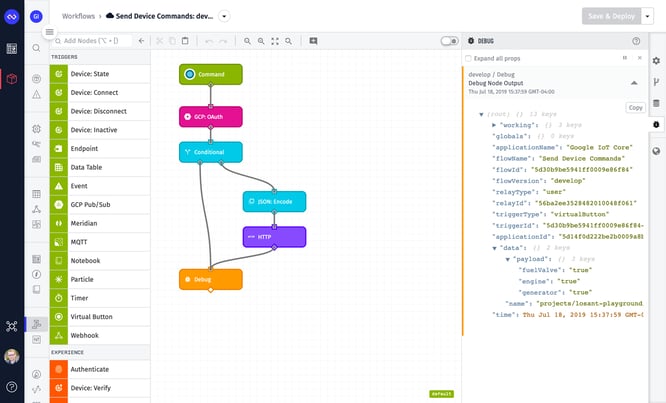
This Workflow starts with a Virtual Button. This is the button that's connected to the buttons on the Input Controls Block, which means whenever a remote operator clicks a button on the Dashboard, this Workflow will be triggered. Whatever payload was configured in the Input Controls Block is automatically added to the data field on the Workflow's starting payload.
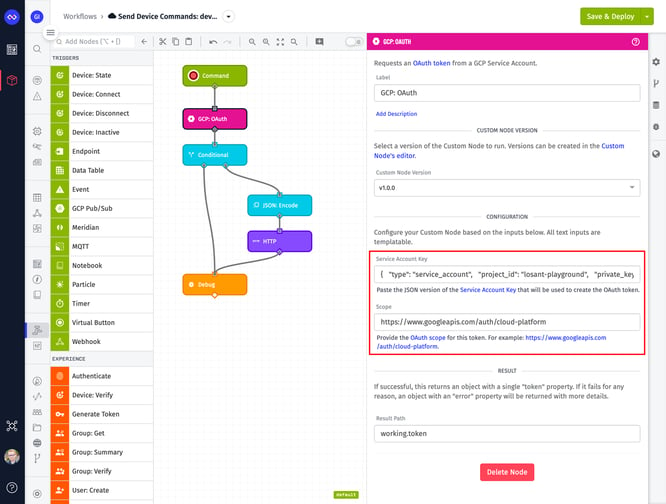
To make server-to-server requests against Google Cloud's API, you must obtain an OAuth token from a Service Account. This process involves crafting specifically formatted JSON Web Tokens, and can be quite challenging to do manually. Fortunately we've created a Contributed GCP: OAuth Node that wraps up that complexity for you. The GCP: OAuth Node takes a Service Account Key, in JSON format, and the desired OAuth scope for the resulting token. According to Google Cloud's documentation on the sendCommandToDevice API method, you'll need one of the following two OAuth scopes:
- https://www.googleapis.com/auth/cloudiot
- https://www.googleapis.com/auth/cloud-platform
For my application, I went with the second one in the list: https://www.googleapis.com/auth/cloud-platform. You will also need to make sure the Service Account you create does have the required privileges to create a token with the specified scope.
The Conditional Node is checking the output of the GCP: OAuth Node to make sure it successfully created a token. I then use a JSON: Encode Node to convert the incoming configuration object on my payload into a string that I can send to my Google IoT Core device. We have to convert the data to a string because IoT Core only accepts commands as Base64 encoded data, which I'll cover a little later.
We now have everything required to invoke the Google Cloud IoT Core API to send the command.
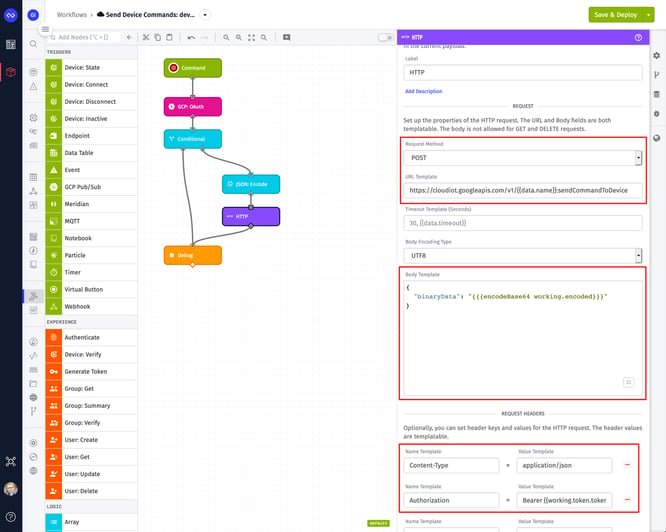
The URL to request includes the full unique name of the Google Cloud IoT Core device. For the simple application in this example, I added my available devices and their unique IDs to a Dropdown Selector on the Input Controls Block. This way I could choose any device from the list and send commands to it. When the user clicks a button, the value that's selected in the dropdown is added to the name field on the payload, which is then available in the workflow at data.name. I can then use this field to construct the full URL.
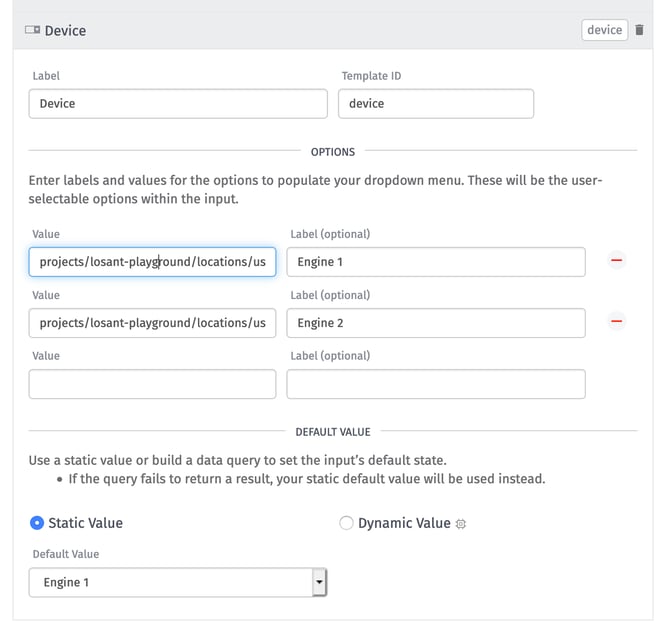
So if I wanted to send a command to "Engine 1", the full URL would be:
https://cloudiot.googleapis.com/v1/projects/losant-playground/locations/us-central1/registries/btc-registry/devices/my-device:sendCommandToDevice
Google Cloud IoT Core accepts commands as Base64 encoded strings added to the binaryData field. Losant has an encodeBase64 format helper that makes this encoding easy. This makes the body that we're sending to the IoT Core API looks like this:
{
  "binaryData": "{{{encodeBase64 working.encoded}}}"
}
The value at working.encoding is the result of the JSON: Encode Node, which means we're sending a Base64 encoded version of a JSON string. Also notice the triple-curly-braces. This ensures the template won't attempt to do any HTML encoding on the resulting string. You can see these JSON strings printed in the MQTT example application.
Lastly, we need to set the Content-Type and Authorization Headers. The Content-Type is simply application/json. The Authorization Header should be set to Bearer <your-oauth-token>. This is the token you received as the result of the GCP: OAuth Node.
At this point, you're successfully invoking Google Cloud IoT Core's API to send device commands. There's a lot of additional functionality in Losant, including Experiences, that can be used to wrap a powerful solution around IoT Core's device management, telemetry, and commands. If you've built something interesting with the combination of Google Cloud IoT Core and Losant, we'd love to hear about it. Please let us know in the Losant Forums.