
Thought-controlling government spy satellites are real. How else has Donald Trump made it this far? It's time to protect yourself, your children, and democracy by using the power of IoT to prevent incursion before it can occur.
The International Space Station (ISS), supposedly built for "scientific reasons", is actually the most advanced thought-injecting piece of equipment to be invented since television advertising. This guide will walk you through how to detect when the ISS is overhead and how to properly block its signals.
What we'll be building today is a Detection Unit for Malicious Ballistic Astronomical Spy Satellites or D.U.M.B.A.S.S. for short. Using a DUMBASS system, you and your family can sleep soundly at night knowing you won't vote for Trump against your will.

Tracking ISS Location
Every once and a while the government screws up to our advantage. In order to maintain the scientific charade for the ISS, they made the real-time location publicly available. I'm guessing they never thought someone would figure out what they're actually up to. We're going to use this information to track and visualize its location.
If you haven't already, create a Losant account and then create a new application. Once created, we'll use a virtual device to track the current and historical location of the ISS. Use the Devices -> Add Device menu to create a new device.


Name the device anything you'd like - I named mine ISS. Make sure the "Virtual Device" checkbox is checked. Lastly, give the device one attribute, "location", which has the type set to "GPS String".
Virtual devices are useful if their state isn't coming directly from a physical "thing". Since the ISS is not reporting its location directly to Losant, we'll use a virtual device and populate its state from an external API.
Now let's use a Losant workflow to periodically get the GPS coordinates of the ISS and save them to our virtual device. Create a new workflow using the Workflows -> Create Workflow menu item. You can name it anything you want - I named mine "ISS Tracker".


All workflows start with a trigger. In this case, the trigger is simply a timer that will periodically grab the coordinates of the ISS. Drag a Timer Trigger onto the canvas and set the interval to every 30 seconds.

Now that the workflow is being triggered every 30 seconds, let's add an HTTP node to actually get the location and a Debug node so we can inspect the API's response.

First, enter the URL to get. Open Notify, until the government shuts them down, provides an easy-to-use public API for gaining access to the real-time location of the ISS.
http://api.open-notify.org/iss-now.json
Next, enter the location on the payload to store the HTTP response. Workflows work by passing a payload through each node. The nodes can then add, remove, or modify the payload as it passes through them.
data.location
You can now deploy the workflow and watch the debug output to see the response from the API call.


The HTTP node places the response body, headers, and status code on the payload. We only care about the body, which should look something like this:
{
  "time": "2016-03-30T19:50:46.000Z",
  "data": {
    "location": {
      "body": {
        "iss_position": {
          "latitude": -45.74776011728832,
          "longitude": -91.84437897662421
        },
        "message": "success",
        "timestamp": 1459367446
      }
      ...
    }
  }
}
Now that we have the location, we can push it as a state into our virtual device. Add a Virtual Device node to the canvas and connect it to the HTTP node.

Since you likely only have the one device, it should already be selected, but if not, select the ISS device from the dropdown. Next, set the value of the device's location state attribute to the latitude and longitude of the ISS.
,
This is called a "template field", which means we can pull values from the payload by surrounding them in double curly braces. If you remember from the debug output, the latitude and longitude are stored on the data.location.body.iss_position object. When this gets evaluated, the variables in the curly braces will be replaced and it will result in something that looks like:
50.98733483338851, 53.999021370541
You can deploy this workflow again and the virtual device will be updated with the location of the ISS every 30 seconds.
Visualize ISS Location
Now that we are storing the location of the government's flagship thought violator, we can visualize it using a Losant dashboard. Create a new dashboard using the Dashboards->Create Dashboard menu. Name it whatever you want - I named mine DUMBASS. Once created, add a "GPS History" block.


Name the block anything you'd like and select your DUMBASS application from the dropdown. Next set the time range to 24 hours. Lastly, select the ISS device from the dropdown and choose the location attribute. The preview graph should update in real-time. Click "Add Block" to add the GPS history block to your dashboard.

The ISS may not have moved very far since you started watching it, but over 24 hours, its pattern of chaos starts to become clear.

Get Alerted
The last step for our DUMBASS system is to alert us when the ISS thought rays are in range of your vulnerable brain. For this we're going to use a Wemo smart outlet, a spinning red light, and Losant's geofence features.

The Wemo does not provide a remote API, which means it can only be controlled over your local network. This means we need to use some kind of gateway between your local network and the Losant platform. Fortunately, a Raspberry Pi is a perfect and inexpensive solution. As an added bonus, you can connect a TV to the Pi to display the current location of the ISS.

First, follow Wemo's instructions for getting the smart outlet connected to your Wifi network.
Next, add a new device to the Losant platform for the Raspberry Pi.

The only thing required for the Raspberry Pi device is the name. The Pi simply responds to commands sent from the Losant platform. It will, in turn, control the Wemo based on those commands.
Now we need an access key and secret so this device can authenticate and connect to Losant. Select "Security" from the application menu bar, choose "Device Access Keys" in the left navigation, and then click the "Add Access Key" button on the top-right.
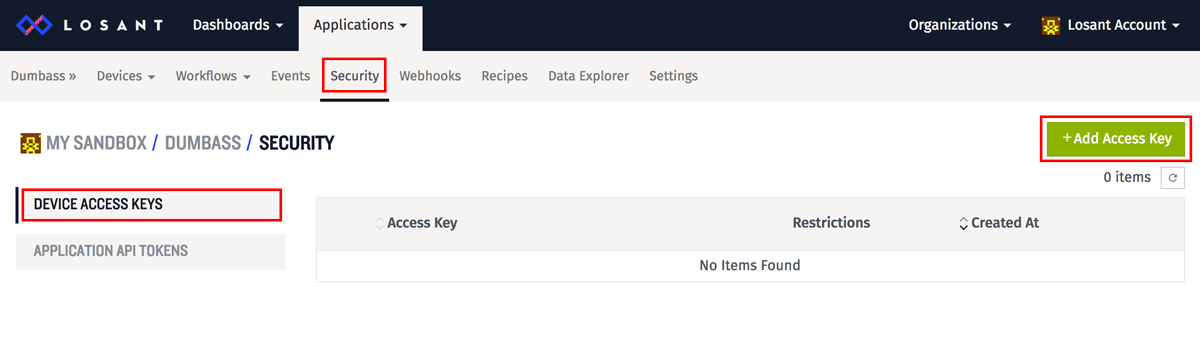
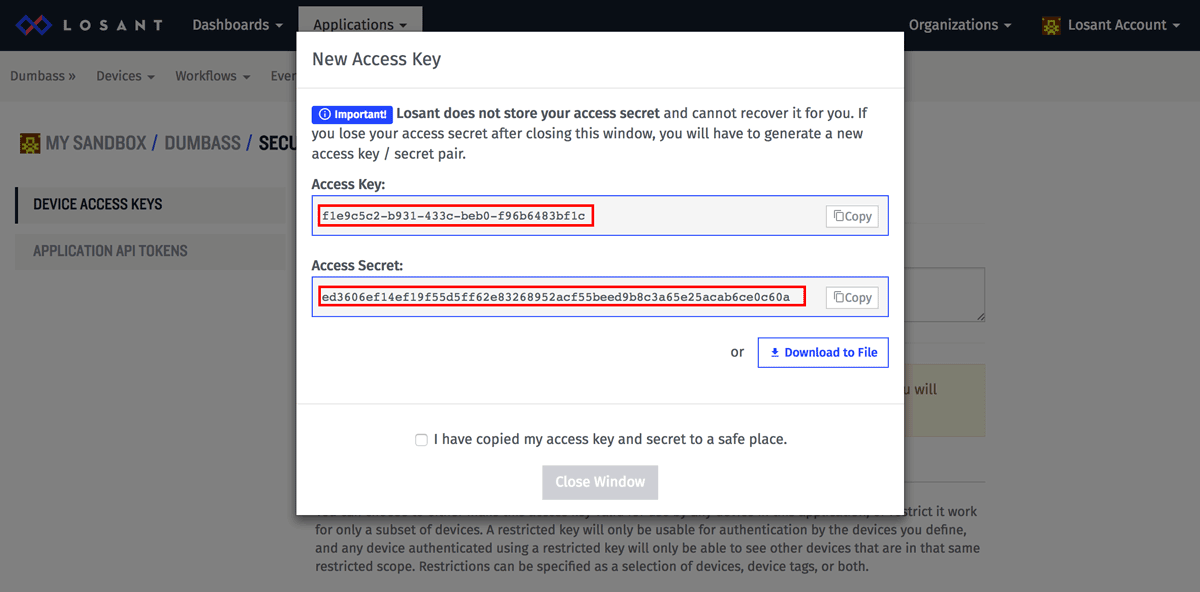
Click the "Generate Key" button and select "All Devices". This will display a popup with your access keys. Losant DOES NOT store the access secret, so make sure you copy-paste it somewhere secure.
Now that we have a device id and an access key, we can program the Raspberry Pi. We'll have to write some Node.js code to get the Pi connected and controlling the Wemo. You can find a getting started guide in our docs and an article on how to install Node.js on the Raspberry Pi on our blog.
Below is all the code required. It's also available on Github.
Most of this code is self-explanatory. It first connects the Raspberry Pi to Losant and listens for the "on" and "off" commands, which turn the smart outlet on and off respectively. It then attempts to find the Wemo on your network.
That's it for the Wemo and Raspberry Pi. All that's left is to send the Pi the "on" and "off" commands based on the location of the ISS. We can do this by simply adding a few nodes to the workflow.
Start by adding a Geofence node and connecting it to the virtual device node.

The geofence node requires the input coordinate to check, the center of the geofence, and the radius. If the input coordinate is ever inside the circle, the true path (right side) will be taken. Otherwise the false path (left side) is taken.
The input coordinate is also a template field, which means we can use the exact same string we used earlier when saving the coordinate on the virtual device.
,
You can right-click on the map to set the center of the geofence, or enter it manually. The ISS's brain waves can reach pretty far, so make the radius something big, like 2000000 meters (2000 kilometers).
Next, add two Device Command nodes and attach them to the outputs on the geofence.

The Raspberry Pi expects the "on" and "off" commands. On the true path of the geofence, send it the "on" command. On the false path, send it the "off" command.
Your DUMBASS system is now complete! Whenever the ISS gets in range, the Losant workflow will send the Raspberry Pi a command. The Raspberry Pi then tells the Wemo to turn on or off. The flashing red light is plugged into the Wemo and will alert you. All you have to do it place the aluminum hat on your head and the government will no longer be able to control your behavior.
Lastly, you can rest assured that Losant, unlike the government, will not read or store any of your thoughts. We take the privacy of your personal feelings towards old high school crushes very seriously and would never tell them how many times you look at their Facebook profile.
But since you're probably on Facebook right now, looking at that profile, all creepy like, why not take a moment and share this post.