
The CHIP is a tiny $9 computer created by Next Thing Co. Because of its cost, flexibility, and power, it's a perfect device for projects. The Next Thing Co. even sells an entire console that allows you to play games on the CHIP, like Minecraft. The CHIP is even flexible enough to embed in your own production hardware project. To show this off, Next Thing Co. created a product named Dashbot, which is an AI for your car.
For most connected hardware projects, you’ll likely want to do two things:
- Control GPIO - With GPIO, we can do things like control lights or servomotors. In this example, we are going to control an LED.
- React to Input - We might also want to listen for input. This input could be from things such as a button or motion sensor. In this example, we are going to react to a button press.
We can easily do this with Losant. Losant is an excellent tool to control and collect data from internet-connected hardware.
This tutorial will explain how to set up the CHIP with Losant.
CHIP Setup
Internet
For the rest of the tutorial, we'll need access to the CHIP's terminal. The recommended way to get started with the CHIP is with a keyboard and monitor. I found that the easiest way to do this is to boot your CHIP in headless mode.
For SSH access, you'll want to connect the CHIP to WiFi.
As an alternative, you can use serial. Using a program called screen, you can connect to the CHIP's terminal over serial. Just as SSH gives you access to a terminal over TCP. screen gives you access to a terminal over serial.
Python
Once you are able to use the terminal we'll need to install Python. To control the GPIO, we are going use the CHIP-IO python library. CHIP uses a Debian-based OS, so we have the power of apt-get.
Here are the commands you need to run:
sudo apt-get update
sudo apt-get install git build-essential python3-dev python3-pip flex bison chip-dt-overlays -y
sudo pip3 install CHIP-IO
sudo pip3 install losant-mqtt
Wiring
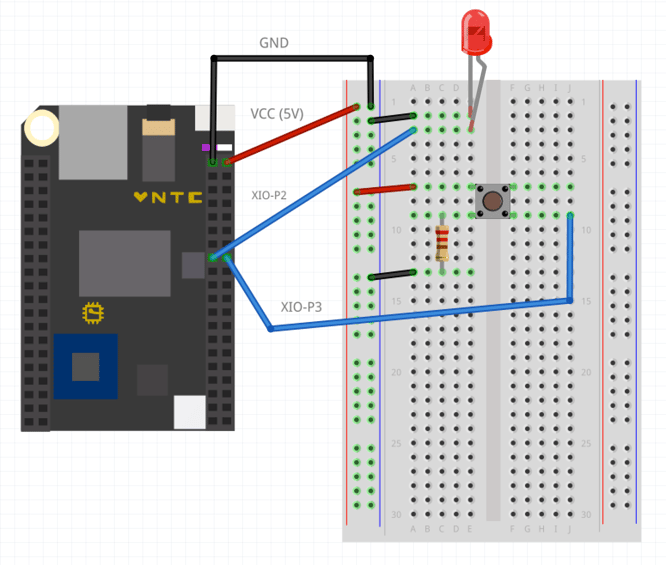
For this tutorial, you'll need an LED and a button. However, the ideas are the same for other hardware, like a servomotor.
Here is how you wire everything up:
Download Example Project
Using a terminal, SSH into the CHIP and download the example project. This project is available for you on GitHub:
git clone git@github.com:Losant/example-chip-python.git
Here is the code in index.py:
Now, you may see that three things are missing from the code: my-device-id, my-access-key, and my-access-secret. We get this information from Losant.
To run the code:
cd example-chip-python
python3 index.py
Set Up Losant
If you haven't already, create an account and an application in Losant. Next, add a device to your Losant application for the CHIP.
Once we create a device, we can get the Device ID (my-device-id) from the dashboard.
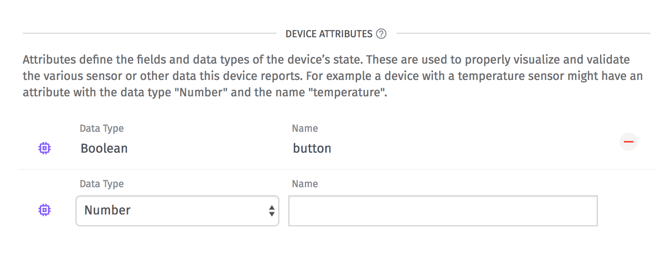
We also need to give our device an attribute. This tells Losant what data to expect from the device. The attribute should be called button and be of type Boolean.
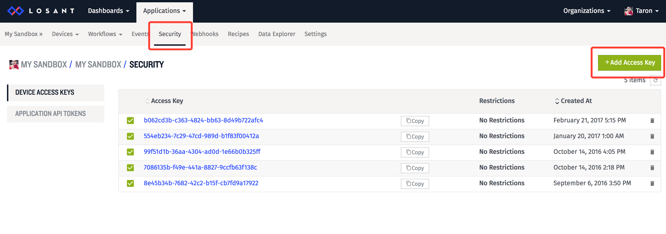
Now, we just need an access key/secret (my-access-key & my-access-secret). Go to the Security tab in Losant to create a pair:
Workflow
Finally, we'll use a Workflow to control the LED and respond to the button press.
Control GPIO
In the Workflow Editor, we can use a Virtual Button and Device Command to control the LED remotely.
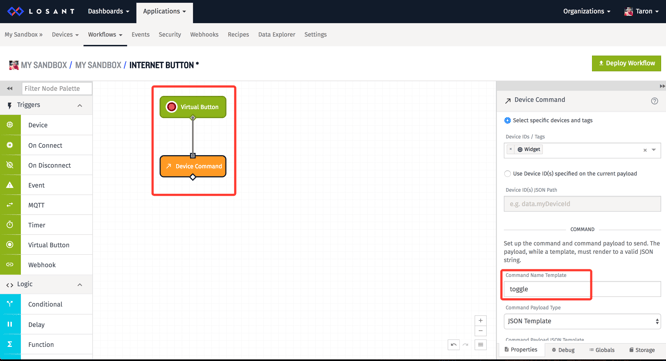
In the example firmware, it is listening for a command called toggle. When the Virtual Button is clicked, it will send the toggle command to the Raspberry Pi, toggling the LED on and off.
React to Input
To react to the button press, we need to listen for a device payload by using the Device Trigger node. In the firmware, we are sending state when the button is pressed. When Losant gets this state, it can trigger a workflow.
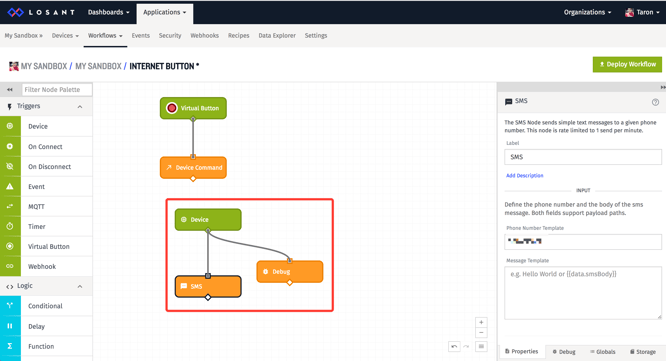
In this Workflow, we are sending an SMS message every time the button is pressed. However, the output doesn't have to be a SMS message, it could be an email, Tweet, etc. or even many things at once.
What's Next?
Now that you can control your GPIO over the internet, the power is yours! You can even start to visualize data that you're collecting.
This tutorial is in a series about controlling different kinds of compute modules and microcontrollers form the internet using Losant. Check out the others:
If you have any ideas/request, let us know! Follow us on Twitter if you want to keep up with the series.