
The ESP8266 microcontroller has been widely successful in the maker community. With its WiFi capabilities, low price, Arduino support and the NodeMCU dev board, it became a natural choice for small projects. Espressif, the people behind the ESP8266, released an even better microcontroller: the ESP32. The ESP32 comes with improvements all around. The ESP32 is WiFi capable, like the ESP8266, but also supports Bluetooth LTE, more GPIO, dual cores and more.
Since the ESP32 is so new, it has little or no documentation and a lot is still being created for the community. If you follow these steps, you'll be able to get up and running pretty quickly with an ESP32.
Get an ESP32 Dev Board
Here are great boards to get started:
For this example, I am using the SparkFun ESP32 Thing. In general, boards with the ESP32 have been selling out quickly and are in limited stock. So, if you can find one, buy it!
Install PlatformIO
Currently, PlatformIO is the easiest way to start working with an ESP32 board. It automatically installs all the libraries needed, and it is filled with other goodies like linting. Installing PlatformIO is pretty simple because it is built on top of the Atom text editor. You can also see their full ESP32 support here: PlatformIO espressif32.
If You Don’t Have Atom Installed
There is an IDE bundle that will install everything for you. You can find that here: PlatformIO IDE Bundle.
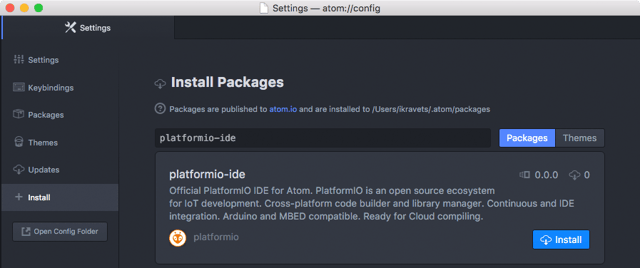
If You Have Atom
All you need to do is install the package:
apm install platformio-ide
or in the IDE's GUI:
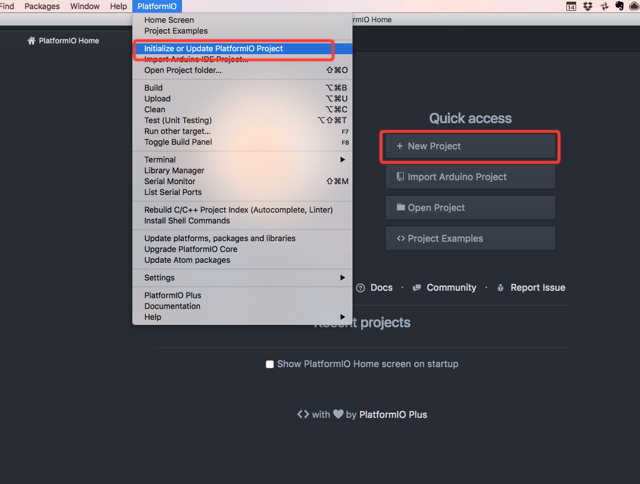
Create a New Project
Once you've successfully installed PlatformIO, Select "New Project" from the home screen or "Initialize or Update PlatformIO Project" from the menu.
Then, choose your board and project location. In this case, since I have the SparkFun board, I will choose that one.
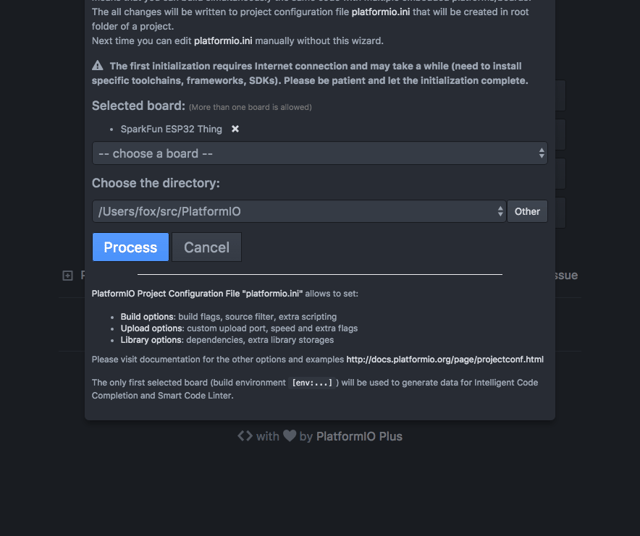
After you hit "Process," PlatformIO will install all the necessary libraries needed to start flashing the device.
 Hello World
Create a file in the src directory of your project and name it main.cpp. It is very important that you call your file src/main.cpp. The Arduino libraries like the main.cpp naming convention. Then, insert this code:
If you're not familiar, all Arduino code has two functions: setup and loop. Setup runs once and loop runs in a loop. So, this program will print "Hello World!" every second.
Build and Upload
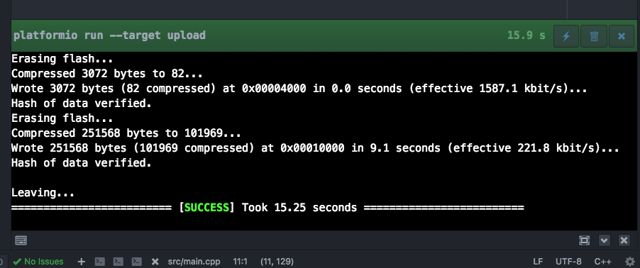
Now, it's time to flash your device.
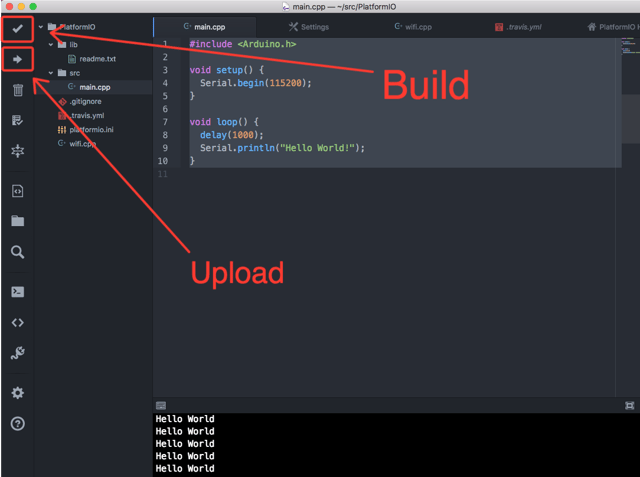
First, we need to build our code. The build process will compile your code to run on the microcontroller. The upload process will flash (deploy) your compiled code to the device. As shown in the screenshot above, select the "Build" icon to build and wait for a success message. Then, do the same for "Upload". If all goes well, you should receive a success message that looks like this:
Open Serial Monitor
To see our message, we need to open up the Serial Monitor.
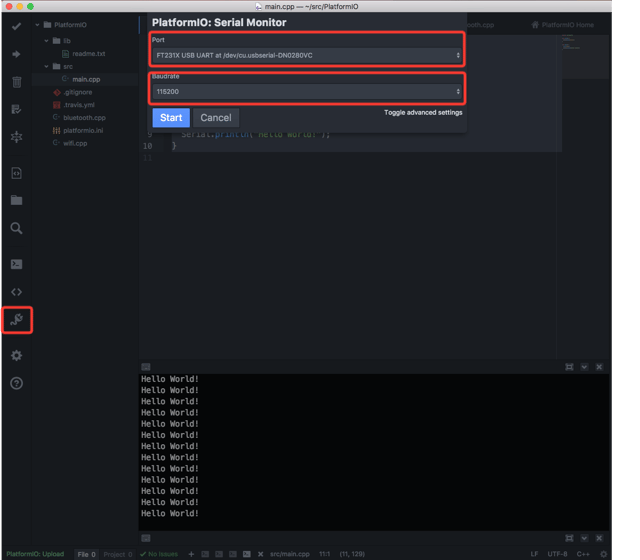
Once you press the serial monitor icon, a dialog will pop up asking you to choose a port and a baudrate. On Mac and Linux, the port will be something like: /dev/tty.usbserial-XXXXXX. For Windows users, it will be: COMX.
Your baudrate is defined in the main.cpp file as 9600. So, we will need to use that.
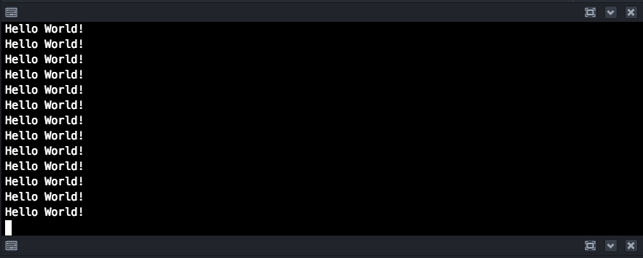
Once started, we should see our message, "Hello World!", being printed in the serial moniter every second:
Connecting to WiFi
The best part of this microcontroller is its ability to connect to the internet, so, lets do that. Create a new project or update main.cpp with this code:
Here we are setting up two configuration variables: WIFI_SSID and WIFI_PASSWORD. You should update these with proper values. Then, using some standard connection code, we connect to the WiFi that's configured.
Make sure you verify the WiFi credentials. Then, as we did before, build and upload your code.
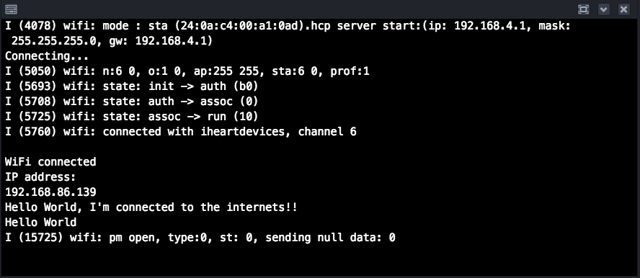
Ignoring some of the funky output coming from the device, you should now see a successful connection message:
What's Next?
With the ESP32 libraries installed, you should be able to start using this board for your connected projects. If you can, contribute back to the community; all help is needed.
Connecting to Bluetooth
The Arduino ESP32 library is still in active development. Currently, there is no interface for Bluetooth yet. Once it's available, I will add an example to this tutorial.
Update: There isn't complete Bluetooth support yet. However, some simple functions are available.
This tutorial is in a series about controlling different kinds of compute modules and microcontrollers form the internet using Losant. Check out the others:
Did I miss anything? Feedback? If so, let me know in the comments. I would love to hear your thoughts.