
The Raspberry Pi Camera provides an easy and cost-effective solution during early development and proof-of-concept work. The Losant Enterprise IoT Platform, which has built-in support for image data, provides the orchestration and visualizations that are required to turn raw image data into meaningful IoT applications.
To make it easy to utilize the Raspberry Pi in edge computing use cases, Losant provides a Gateway Edge Agent. This agent extends Losant's workflow capability to nearly any Linux gateway, including the Raspberry Pi. The Edge Agent handles reading local peripherals, like the Raspberry Pi Camera, and then securely transmits that data to the cloud for further processing and visualization. Accessing the camera from within the edge agent's environment, however, does require some up-front configuration.
This tutorial provides step-by-step instructions for how to access the Raspberry Pi Camera from the Losant Gateway Edge Agent.
Prerequisites: Raspbian & Docker
The steps outlined in this tutorial assume the latest version of Raspbian is installed on the Raspberry Pi. Many of the concepts will apply to other Linux-based operating systems, but this tutorial utilizes the built-in camera support provided by Raspbian.
The Losant Gateway Edge Agent is distributed as a Docker container, so the Docker runtime is required. Raspbian has excellent support for Docker, which can be installed by following these instructions.
Accessing the Raspberry Pi Camera in Docker
Accessing the Raspberry Pi camera from within a Docker container can be challenging due to permissions and dependency issues. Fortunately, we have another tutorial that provides step-by-step instruction for how to solve these issues.
From the tutorial, How to Access the Raspberry Pi Camera in Docker, perform the following instructions:
- How to Let Non-Root Users Access the Raspberry Pi Camera
- How to Mount the Raspberry Pi Camera Dependencies Into a Docker Container
That tutorial does have further instructions beyond the two sections mentioned above, however they are not required when using the Losant Gateway Edge Agent.
How to Install ImageMagick on a Raspberry Pi
The images that come directly from the Raspberry Pi camera are several megabytes in size. Before sending those to the cloud, they need to be resized and compressed. ImageMagick is a command line tool that makes resizing and compressing images easy.
To install ImageMagick on the Raspberry Pi, run the following command:
sudo apt-get install imagemagick
This will install a standalone executable named convert in the Raspberry Pi's /usr/bin folder. We can then pass this executable into the Docker container so that it can be accessed by the Losant Gateway Edge Agent. In order for the Edge Agent to access this file, the permissions need to be changed. Run the following command to give all users execute permissions on this file:
sudo chmod a+rwx /usr/bin/convert
Run the Losant Gateway Edge Agent
Execute the following command to run the Losant Gateway Edge Agent and pass it all required dependencies and files:
docker run -d --restart always \
--env LD_LIBRARY_PATH=/opt/vc/lib \
-v /opt/vc/:/opt/vc \
-v /usr/bin/convert:/usr/bin/convert \
-v /path/to/config.toml:/etc/losant/losant-edge-agent-config.toml \
--device=/dev/vchiq \
losant/edge-agent
Below is a breakdown of each line:
--env LD_LIBRARY_PATH=/opt/vc/lib: This tells Linux where to look for the shared libraries that are required when accessing the Raspberry Pi camera.-v /opt/vc/:/opt/vc: This mounts in the shared libraries and binaries associated with the Raspberry Pi camera.-v /usr/bin/convert:/usr/bin/convert: This mounts in ImageMagick so it can be accessed from within the Docker container.-v /path/to/config.toml:/etc/losant/losant-edge-agent-config.toml: This mounts in the Losant configuration file for this specific edge compute device.--device=/dev/vchiq: This passes in the actual camera device.
How to Capture an Image with a Losant Edge Workflow
We now have everything required to create an Edge Workflow to capture, compress, and send image data to the Losant platform.
This workflow captures and compresses images by using two different executables. The first is raspistill, which handles capturing the raw image data. The second is convert (ImageMagick), which will resize and compress the result. Let's first look at how to execute raspistill.
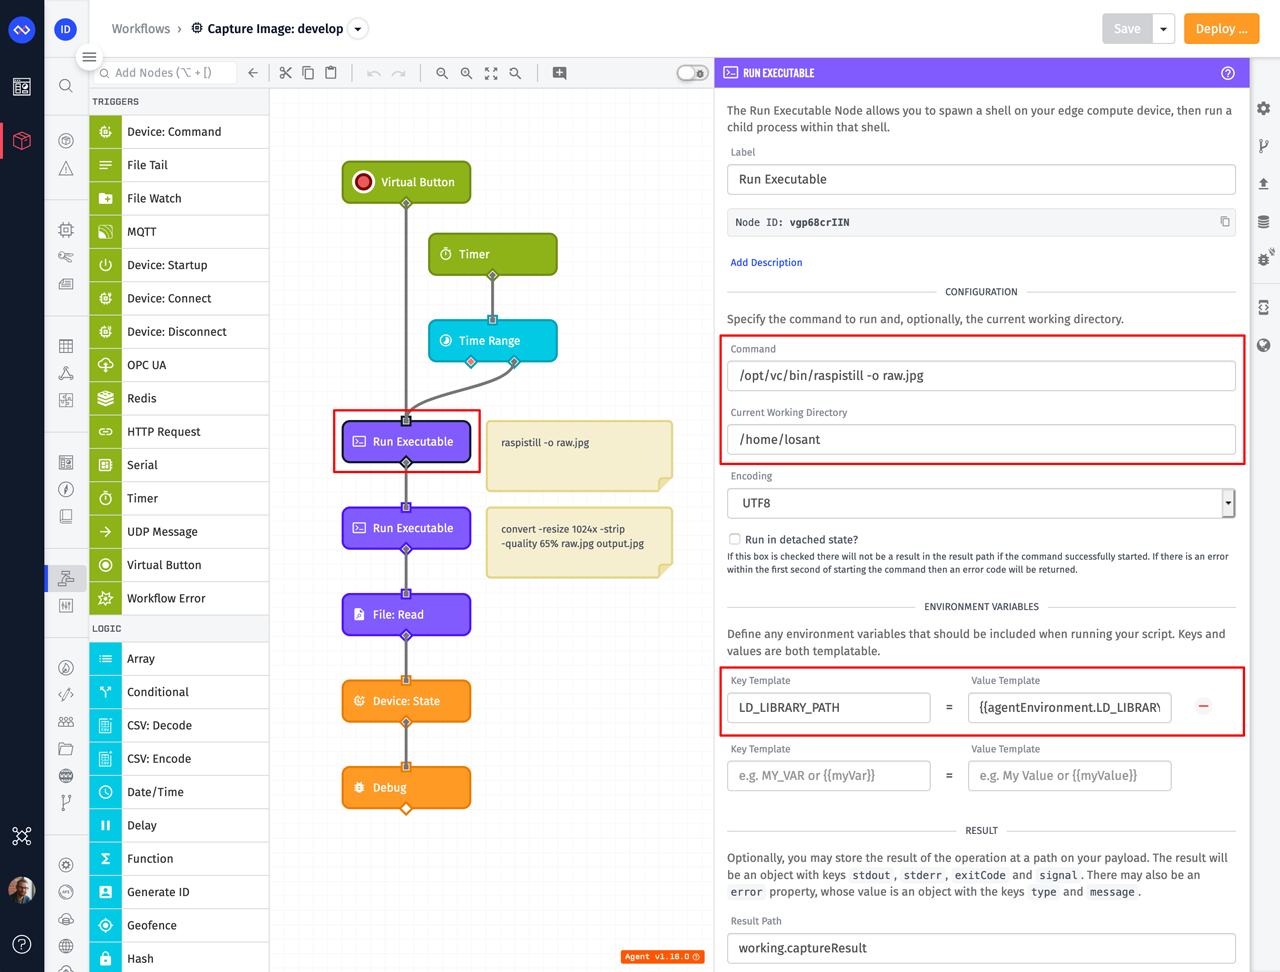
To execute raspistill, add a Run Executable Node with the following configuration:
- Set the Current Working Directory to
/home/losant. The Losant Gateway Edge Agent runs under thelosantuser. This is the path to that user's home directory and a safe place to read and write files. - Set the Command to
/opt/vc/bin/raspistill -o raw.jpg. This will execute raspistill and put the output in the current working directory atraw.jpg. - Add a
LD_LIBRARY_PATHenvironment variable and set it to{{agentEnvironment.LD_LIBRARY_PATH}}. This environment variable tells Linux where to look for the shared libraries that are required when accessing the camera. Since we passed this location into the container as part of the run command, this template is just forwarding that value to the raspistill command. TheagentEnvironmentobject is automatically provided as part of every Edge Workflow payload. - (Optional) Set the Result Path to
working.captureResult. This is not required, but very helpful during debugging to see if the command failed and what errors were produced.
Next, let's look at the Run Executable Node for the convert command.
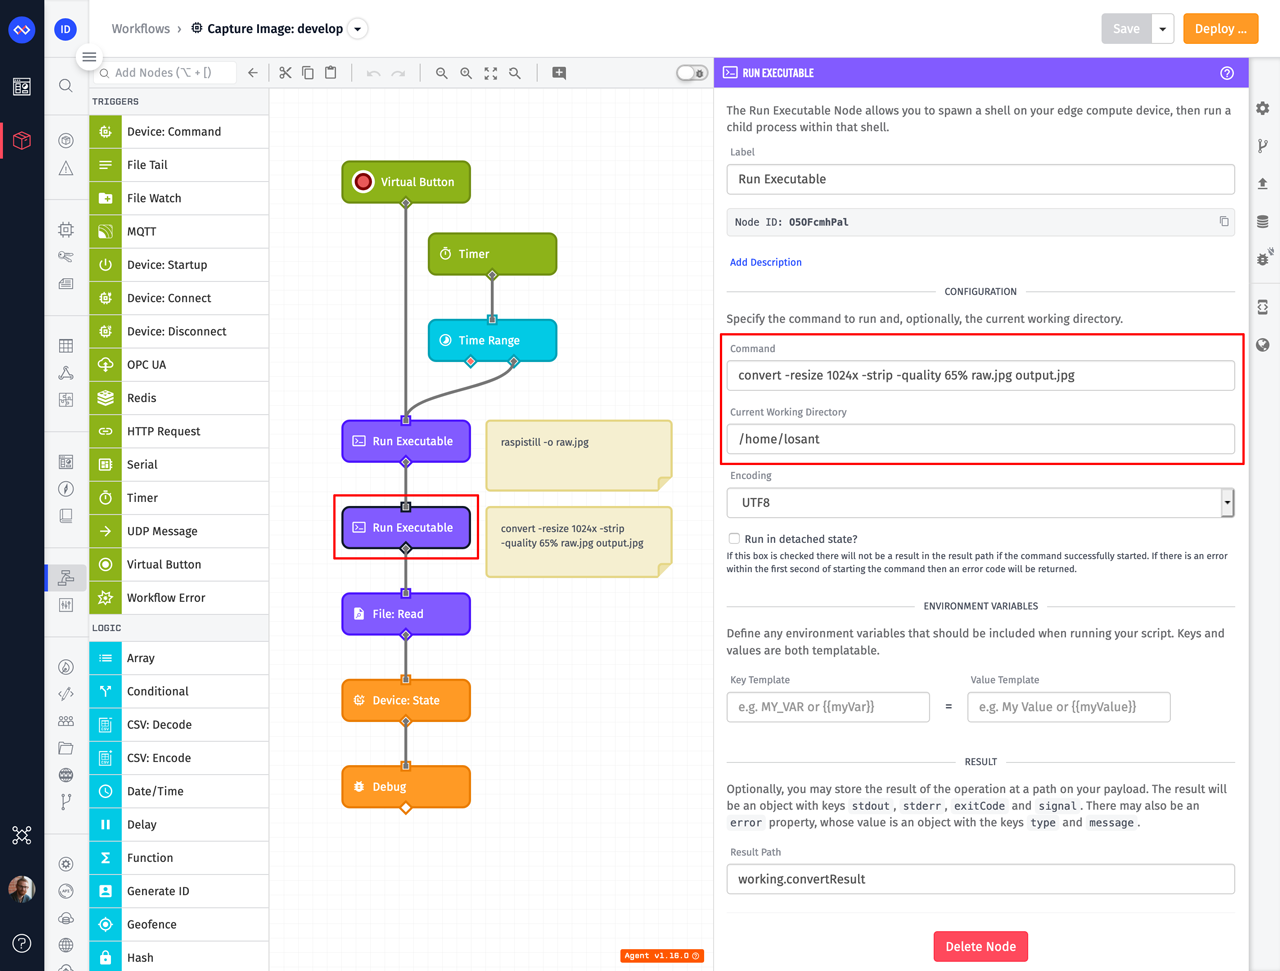
- Set the Current Working Directory to
/home/losant. There is where raspistill placed the raw image that was captured. - Set the Command to
convert -resize 1024x -strip -quality 65% raw.jpg output.jpg. This executes ImageMagick and does three things:
- Resizes the image to a width of 1024px while maintaining its aspect ratio.
- Removes all exif data from the image to reduce size.
- Compresses the image to a jpg at 65% quality.
- (Optional) Set the Result Path to
working.convertResult.
The Edge Agent reports data to Losant using MQTT. Since a single MQTT payload has a maximum size of 256KB, the image data must fit in this limit. The configuration listed above results in images that are roughly 150KB. The size and quality may have to be changed based on the actual images being captured. The image data is also Base64 encoded before being reported to Losant, which increases the size by 20-30 percent. It's important to ensure the final image is small enough for the encoding overhead.
Now that image data has been captured and compressed, the final result can be read from disk and reported to Losant. This is done using a File: Read Node.
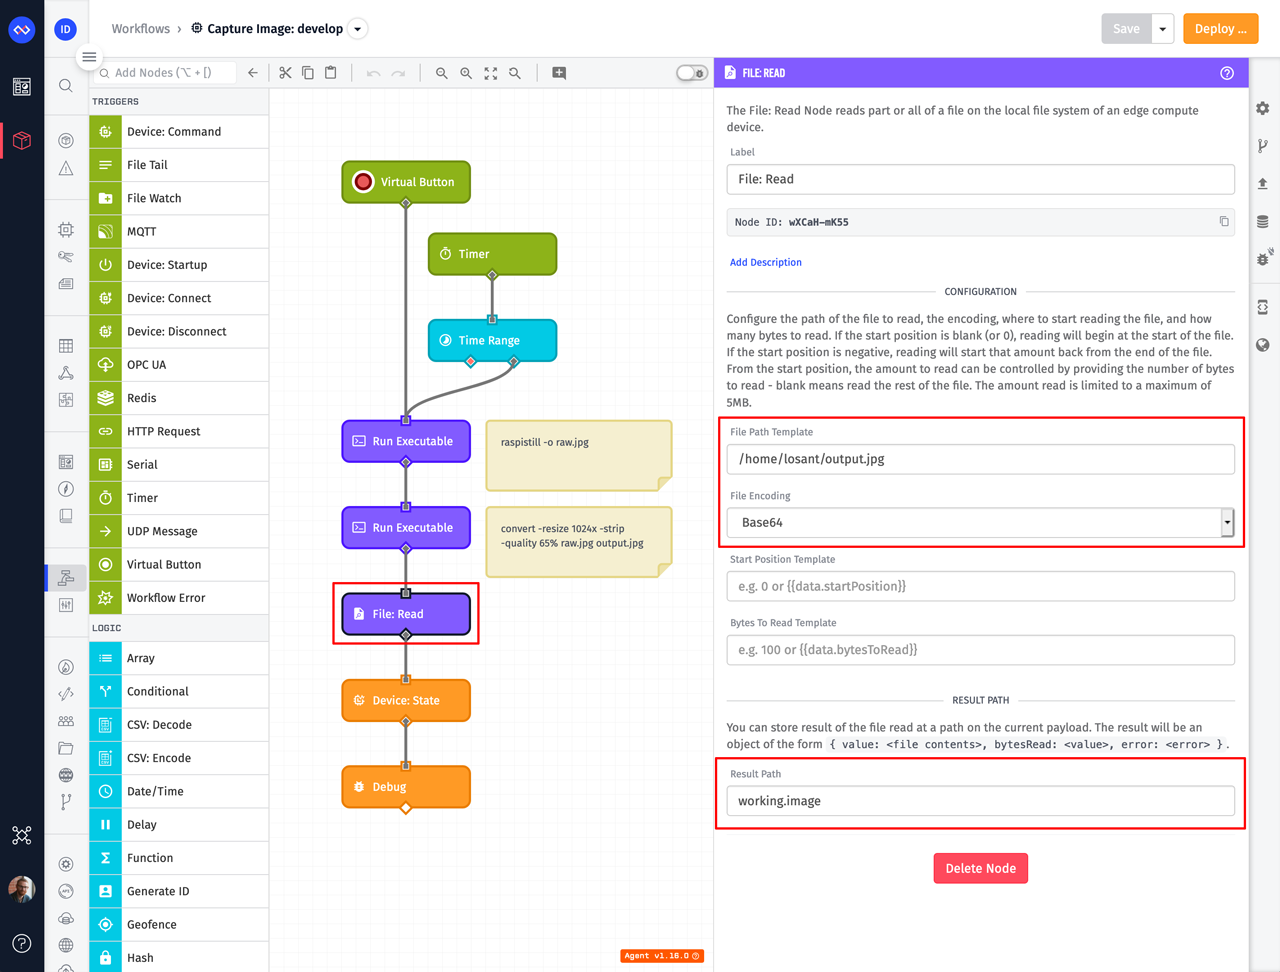
- Set the File Path Template to
/home/losant/output.jpg. This is the location of the resized and compressed image created by ImageMagick. - Set the File Encoding to
Base64. All data reported to a blob attribute must be encoded as Base64. - Set the Result Path to
working.image.
Lastly, report the image data to Losant using the Device: State Node.
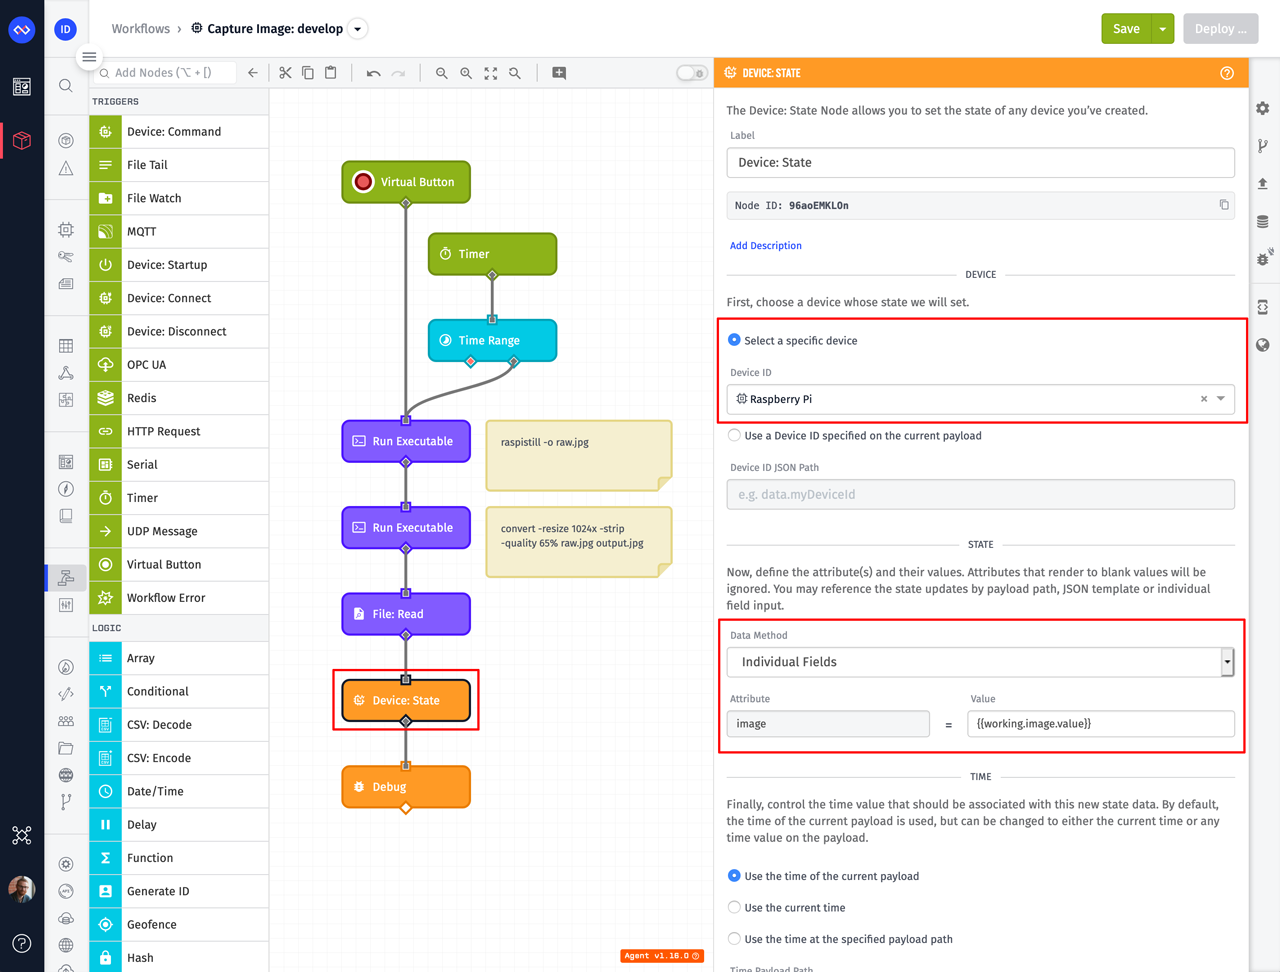
- Select the device on which to report state. Edge Compute devices can report state for themselves or on behalf of any associated peripheral device.
- Report the raw image data, which can be found at
{{working.image.value}}. In the screenshot above, the attribute is namedimage.
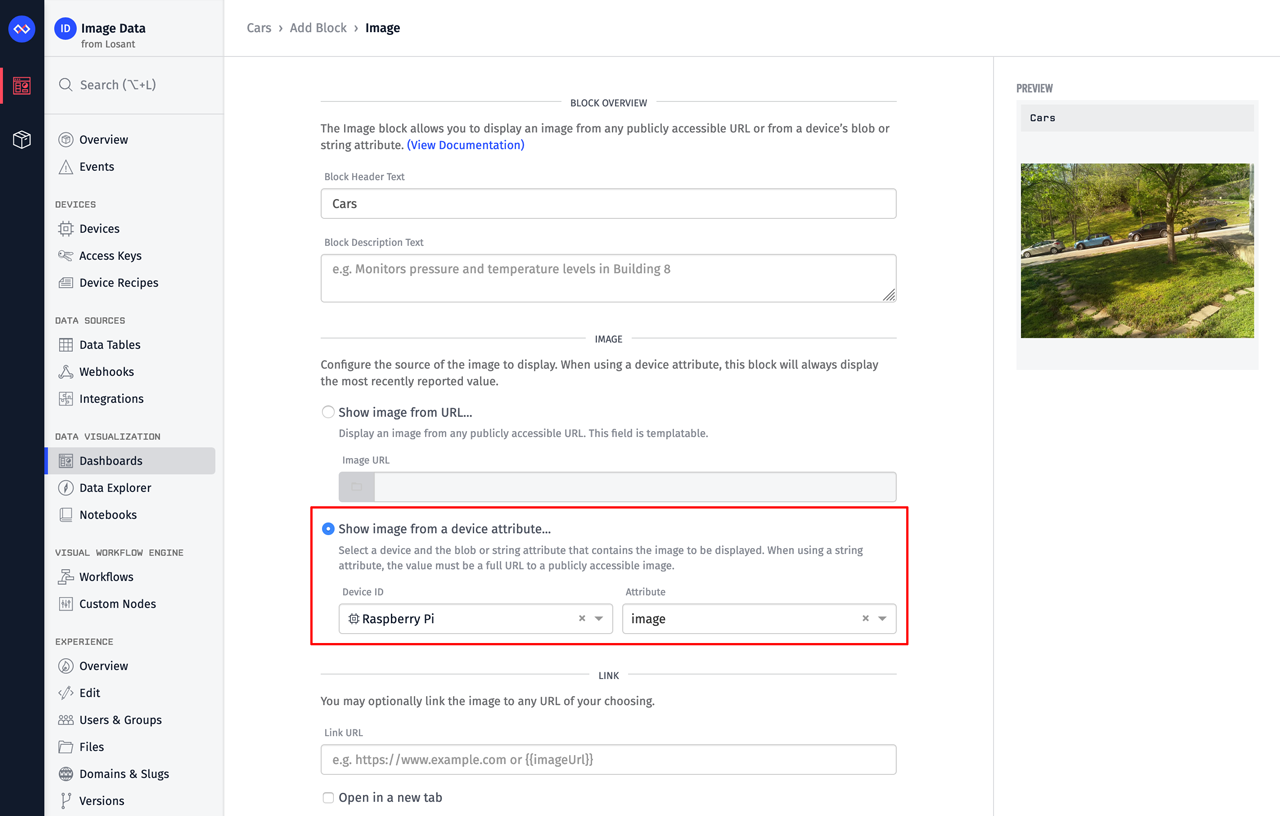
Use the Raspberry Pi Camera as an IoT Data Source
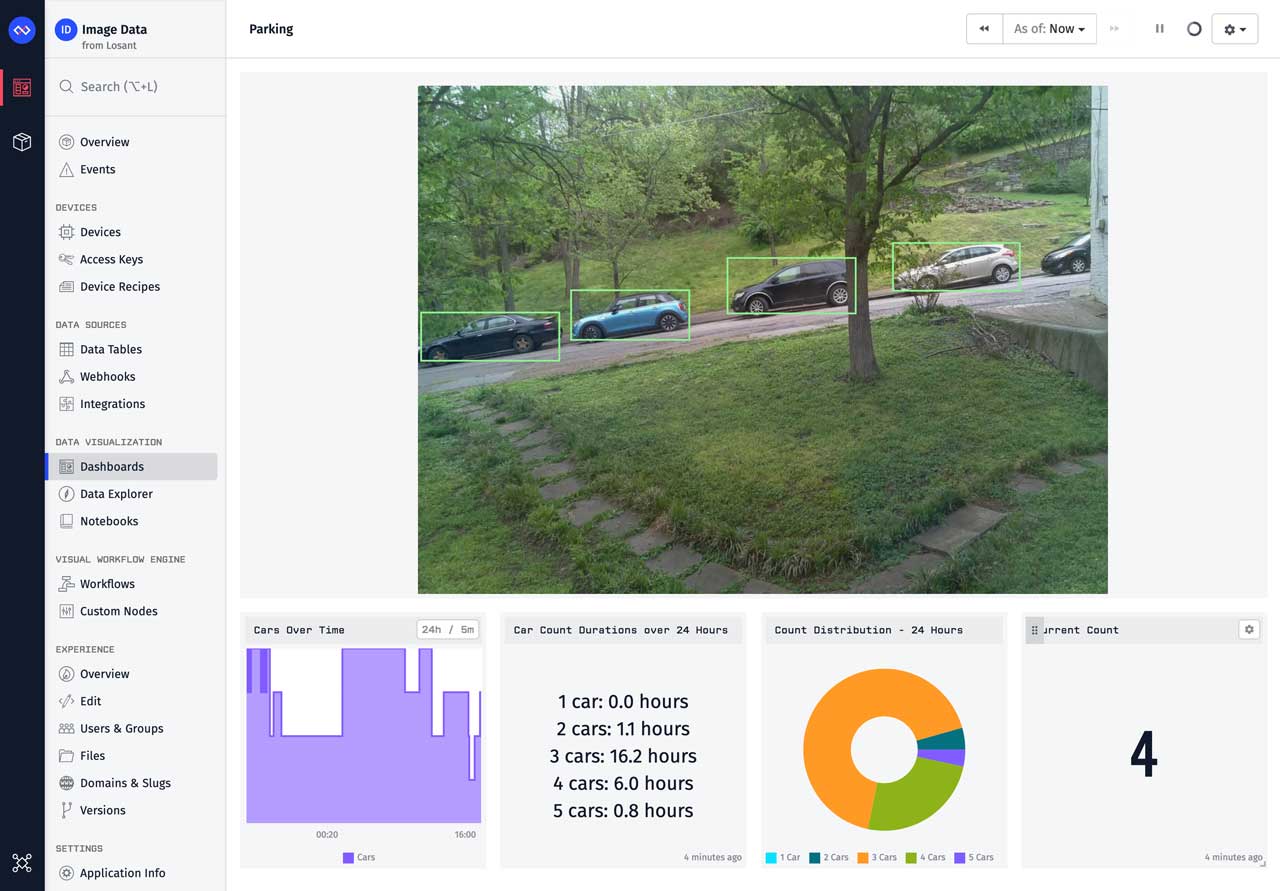
Now that image data is successfully being reported to Losant, the next step is to display that data on a Losant dashboard using the built-in Image Block.
Using Losant's Application Workflows and Google's Vision API, this application can be extended to detect objects and understand trends.
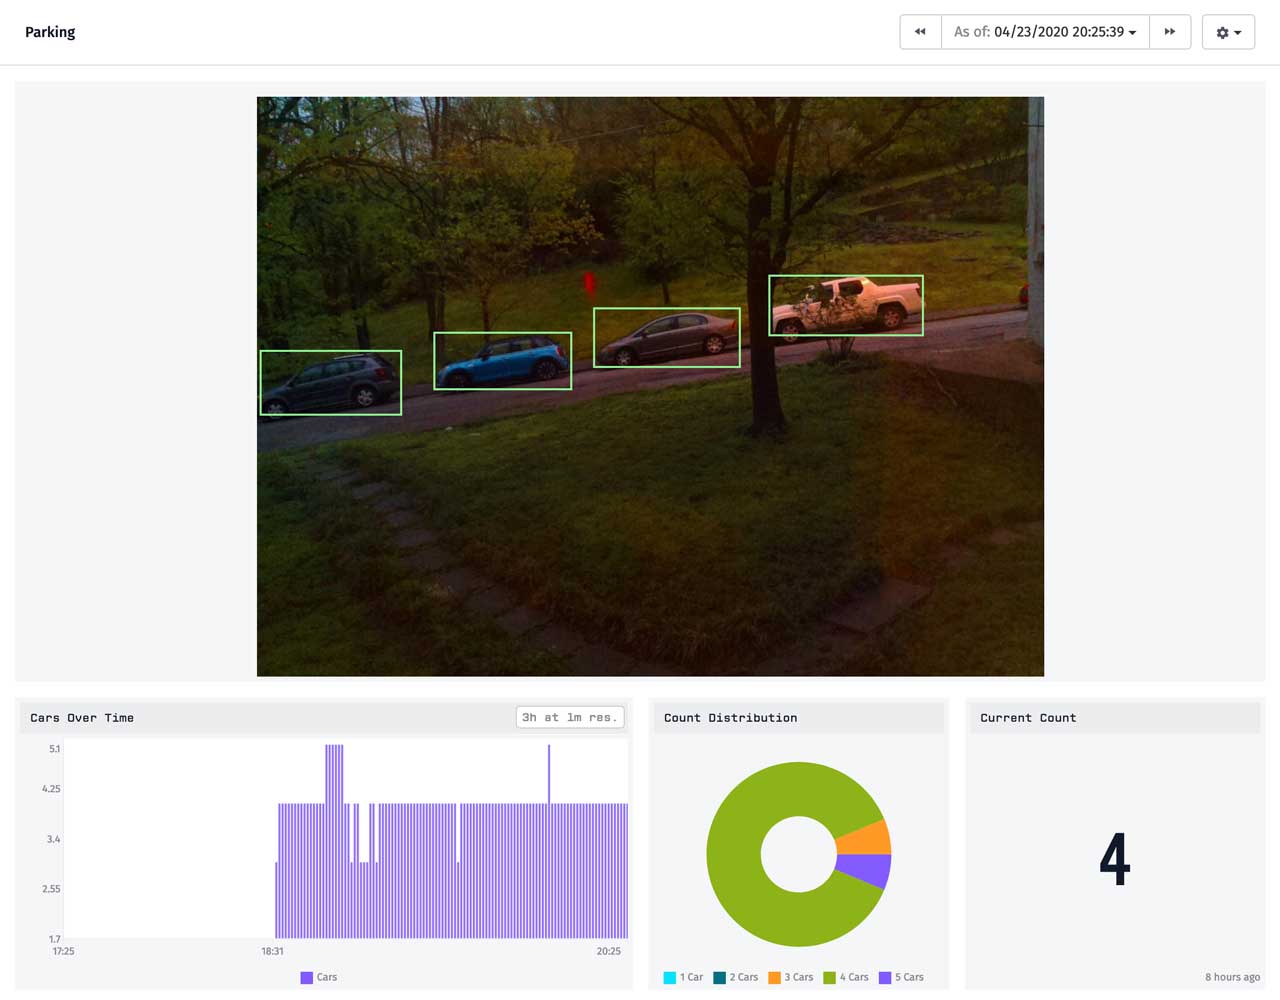
To learn how to build the application in the screenshot above, see the tutorial Analyzing IoT Image Data using Losant and the Google Vision API.
Losant provides a full-featured and no-cost Developer Sandbox where you can explore the platform yourself. If you've used this tutorial to build something cool, or have any questions, please let us know on the Losant Forums.